Repository navigation
Your First Mod

Time to make something you can hold. On this page we give the empty mod from the setup pages a sword: a class that describes it, a picture, a name in the game and a recipe to craft it. It is the same sword whether you write it on the phone or on a PC, and the steps that differ between the two have their own blocks below. By the end you will be swinging it in your world.
Note
Before you start, follow Setup on your phone or Setup on PC. This page continues from the empty mod you created there; we call it First Mod.
Every new item in a mod is a class that extends ModItem, in a file of its
own. By tModLoader's habit, items live in a Content/Items folder, and the
file is named after the class: ours will be FirstSword.cs.
On your phone (BL Editor)
Open your mod in BL Editor. Select the Content folder in the file list and
tap the New folder button above it to create Items. Then select the new
Items folder and tap New file. BL Editor asks for a name and what the
file should start from:

Type FirstSword at (1), choose ModItem: sword at (2) and tap
Create at (3). The template writes the whole class you will read
below, a placeholder picture and the sword's name in Localization:

The two new files are at (1). The check mark at (2) means BL Editor already saved the mod and installed it in Bunny Loader.
On PC (Visual Studio)
In Solution Explorer, right-click the project and choose Add → New
Folder to create Content, then do the same on Content to create Items.
Right-click Items, choose Add → Class, name it FirstSword.cs, and
replace what Visual Studio wrote with the code below. There is nothing else to
add to the project: every .cs file in the project folder is part of the mod.
This is the whole sword. If you used BL Editor's template, it is already in
your FirstSword.cs, with one difference: BL Editor's IDs are lowercase, so
your namespace reads firstmod.Content.Items.
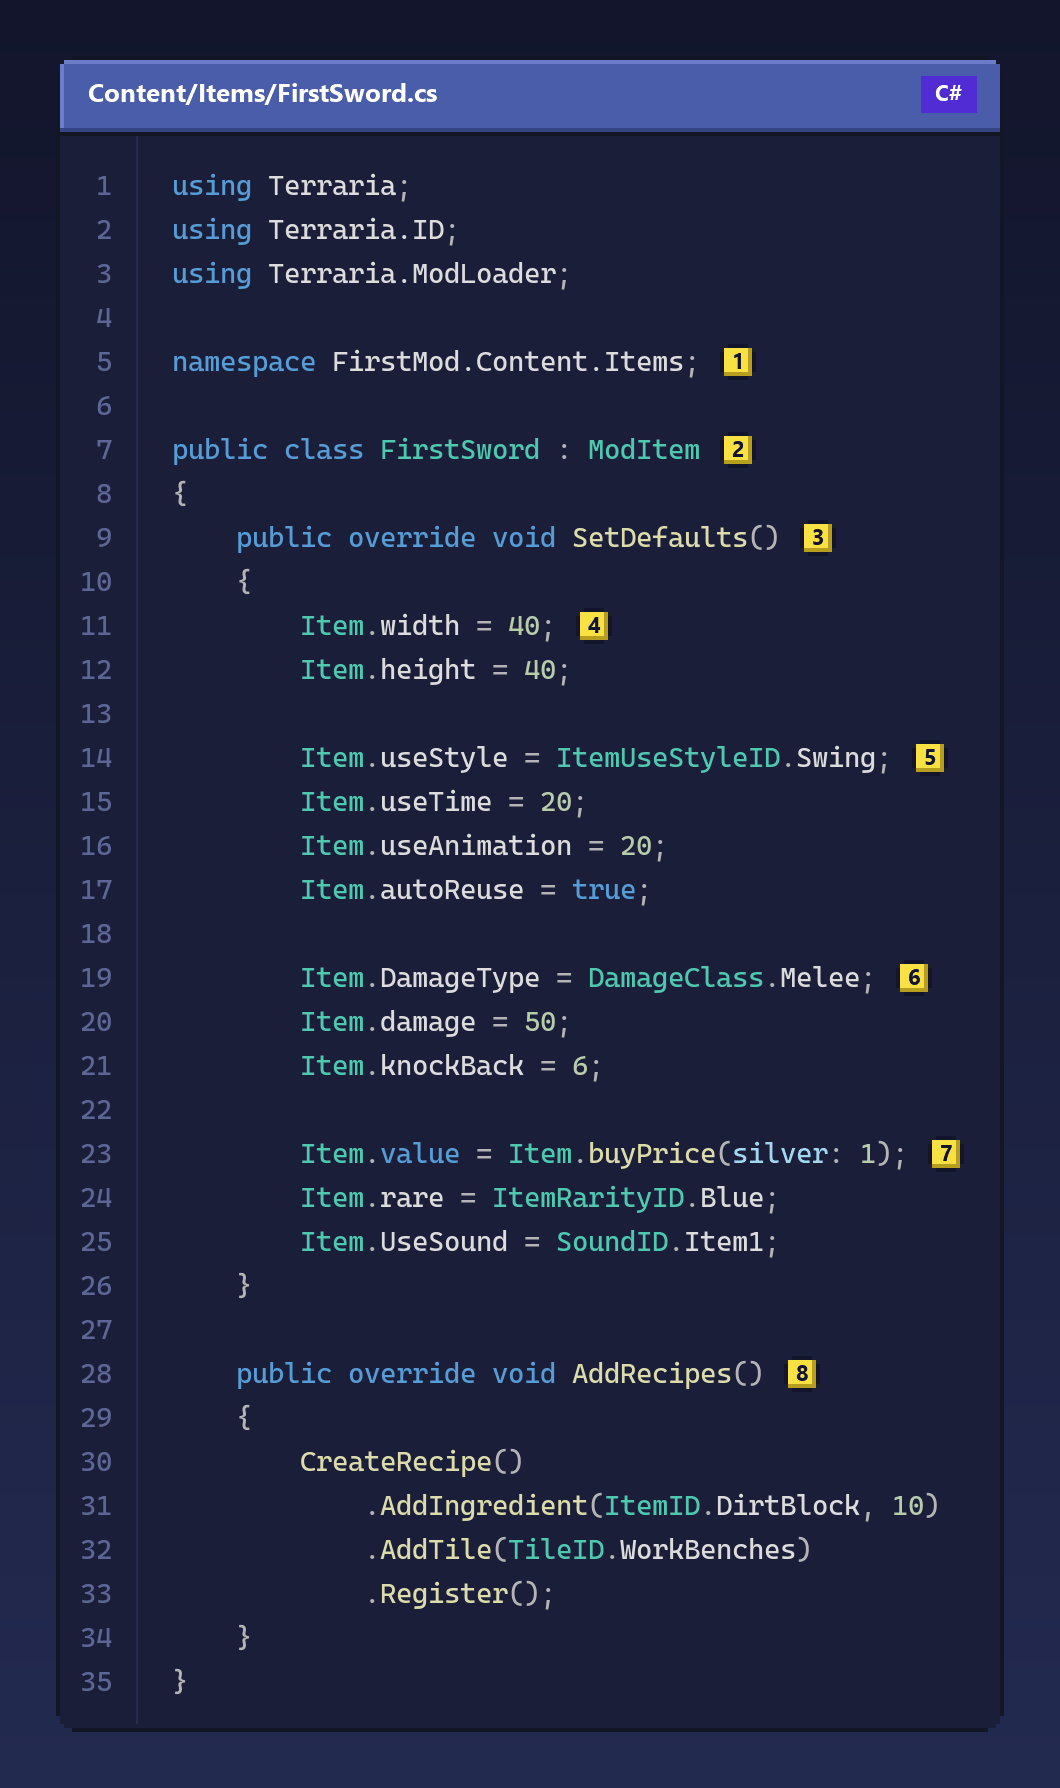
Copy this code
using Terraria;
using Terraria.ID;
using Terraria.ModLoader;

namespace FirstMod.Content.Items; // (1)

public class FirstSword : ModItem // (2)
{
    public override void SetDefaults() // (3)
    {
        Item.width = 40; // (4)
        Item.height = 40;

        Item.useStyle = ItemUseStyleID.Swing; // (5)
        Item.useTime = 20;
        Item.useAnimation = 20;
        Item.autoReuse = true;

        Item.DamageType = DamageClass.Melee; // (6)
        Item.damage = 50;
        Item.knockBack = 6;

        Item.value = Item.buyPrice(silver: 1); // (7)
        Item.rare = ItemRarityID.Blue;
        Item.UseSound = SoundID.Item1;
    }

    public override void AddRecipes() // (8)
    {
        CreateRecipe()
            .AddIngredient(ItemID.DirtBlock, 10)
            .AddTile(TileID.WorkBenches)
            .Register();
    }
}
The three using lines bring in the names the file needs: the game's classes
from Terraria, its lists of IDs (every item, tile and sound has a number,
and Terraria.ID gives those numbers names) from Terraria.ID, and
ModItem from Terraria.ModLoader.
The namespace at (1) is the mod's ID followed by the folders the file is
in. It is more than a label: Bunny Loader uses it to find the item's picture,
as you will see in a moment. The class at (2) extends ModItem, and that
is all it takes for Bunny Loader to turn it into a new item when the game
starts. You never register it anywhere.
SetDefaults, at (3), is where an item gets its numbers, and everything
in it sets a field of Item, the item being created. The size at (4) is
the item's hitbox in pixels, usually the size of its picture. At (5) we
make it swing like a broadsword. useTime and useAnimation are counted in
ticks, sixtieths of a second, so 20 means three swings a second, and
autoReuse keeps it swinging while you hold the attack button.
The block at (6) makes it a weapon: it deals melee damage, 50 of it,
and pushes enemies back with a knockback of 6. At (7) come the details
that make it feel like a real item: it costs one silver coin at a shop, its
name shows in blue, the color of its rarity, and it plays the game's standard
swing sound.
Finally, AddRecipes at (8) tells the game how to craft it: ten dirt
blocks at a work bench. Cheap on purpose, so you can try it right away.
Tip
You do not have to remember these names. Type Item. inside
SetDefaults and both BL Editor and Visual Studio list every field an item
has. Items and Weapons explain the ones that matter
most.
The sword's picture is a PNG file with the same name as the class, in the
same folder: Content/Items/FirstSword.png. Bunny Loader finds it through the
namespace at (1), which is why the folders and the namespace must match.
Item pictures are pixel art drawn at the size the item has in the game, so a
40 by 40 pixel image for our 40 by 40 sword.
You can draw your own or use this one, the same sword Bunny Loader's templates
use: FirstSword.png. Open the link and save the
image as FirstSword.png.

On your phone (BL Editor)
The template created a placeholder FirstSword.png, a plain colored square.
To use a real picture, first delete the placeholder: long press it in the file
list and choose Delete. Then select the Items folder, tap Import
file and pick the FirstSword.png you saved. If you import it without
deleting the placeholder, BL Editor keeps both and names the new one
FirstSword (2).png, which the game ignores.
If you would rather draw, tap the PNG in the file list to open it, and from the image viewer open it in BL Editor's pixel editor.
On PC (Visual Studio)
Save FirstSword.png in the Content/Items folder, next to FirstSword.cs.
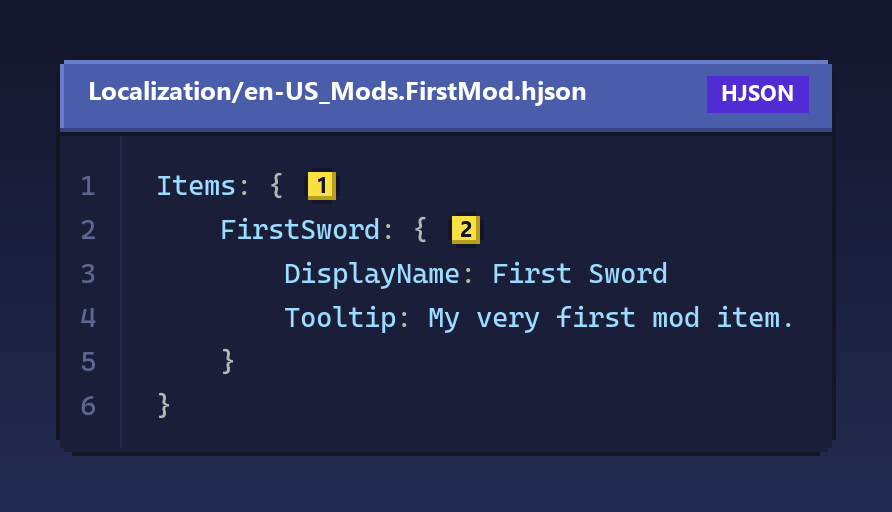
Without a name, the game would only know the sword by its class name. Names
and tooltips live in translation files, in the Localization folder, one
file per language. The English one is called
en-US_Mods.FirstMod.hjson:
Copy this code
Items: { # (1)
	FirstSword: { # (2)
		DisplayName: First Sword
		Tooltip: My very first mod item.
	}
}
The file name says two things: en-US is the language, and
Mods.FirstMod is where the keys inside it start, so this file is about the
texts of our mod. Inside, Items at (1) groups the items, and
FirstSword at (2) is our class. DisplayName is the name the player
sees, and Tooltip is the line under it when the player looks at the item.
Localization explains the format and how to add other
languages.
On the phone, the template already created this file, with the name split
into words and an empty tooltip: open it from Localization and write a
tooltip if you like. On a PC, create it.
On your phone (BL Editor)
Tap Test. BL Editor saves everything, Bunny Loader builds the mod, installs it and opens the game, or restarts it if it was already open.
On PC (Visual Studio)
Build (Ctrl+Shift+B), then make a new FirstMod.zip as in Setup on
PC. This time the zip also needs the
Content and Localization folders. Import it in Bunny Loader's
Packages tab and confirm that it should replace the installed First Mod,
then press Play.
In your world, open the Mod Menu with the bunny button at the top of the screen and go to its mods section. First Mod is there with its one item:
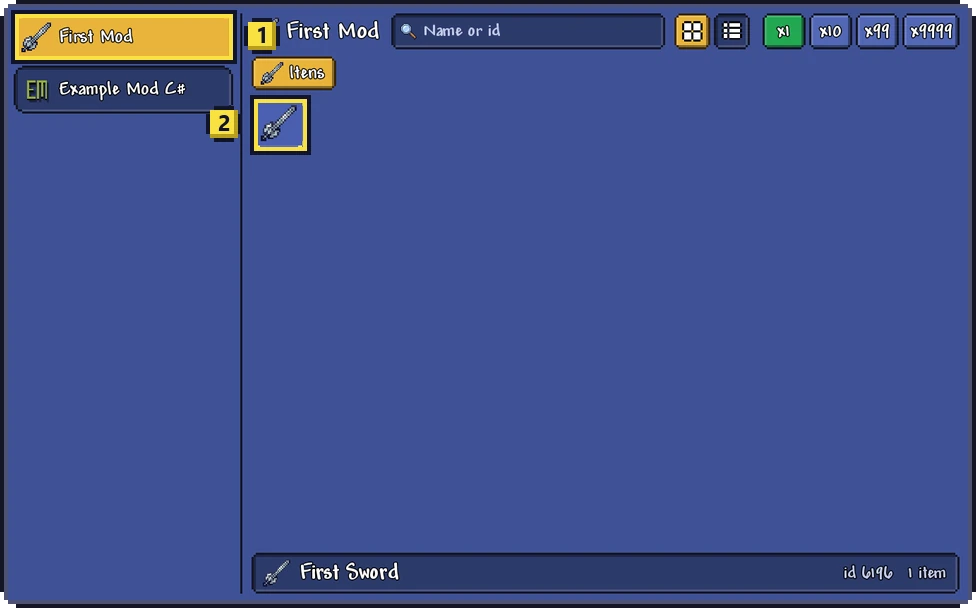
Tap the sword at (2) to put it in your inventory. Its name at the bottom, First Sword, comes from the translation file. Or play it straight: stand next to a work bench with ten dirt blocks and craft it.
If Bunny Loader cannot find the picture, it cannot load the item, and it says
so in the log and in the error panel:
FirstMod/FirstSword: texture 'FirstMod/Content/Items/FirstSword' not found.
The path in quotes is where it looked, built from the namespace and the class
name. Check that FirstSword.png is in Content/Items, next to the class, and
that the namespace ends in .Content.Items. If the sword shows up without its
name, check the translation file's name and the spelling of Items and
FirstSword inside it.
If the mod does not load at all, the code did not compile or the mod is off. On the phone, Test opens the list of errors under the code; on a PC, the Error List shows them before you even zip. In both cases Testing and errors shows where the log is and what the common messages mean.
This class is exactly what you would write for tModLoader, line by line. The
differences are around it, not in it: the package has a manifest.json
instead of build.txt, and the mod is installed from a package on the phone
instead of being built by tModLoader. Bunny Loader vs
tModLoader lists the rest.
You made an item. From here, Mod structure explains every file of a mod and how Bunny Loader loads it, and Testing and errors shows how to read the log when something does not work. When you want more, Items and Weapons take the sword further, Recipes covers crafting in depth, and the rest of the Basics section adds projectiles, NPCs, buffs and tiles.
