Slicer Settings Reference
The Prepare settings panel groups slicer controls into BASIC, ADVANCED, and EXPERT levels. Use search when you know a setting name, and switch levels when deeper controls are needed.
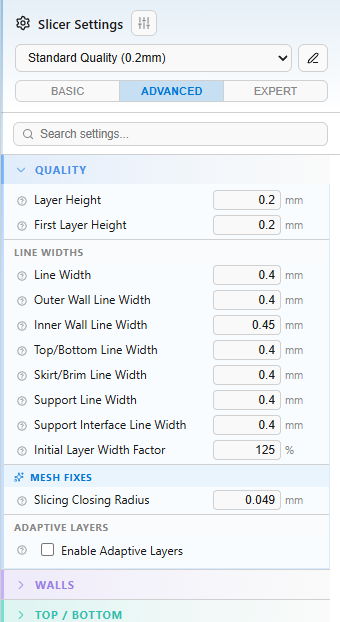
Layer height is the vertical distance between printed layers. Smaller layers improve visible curves and fine detail; larger layers reduce print time.
Common values:
-
0.12 mm: fine detail. -
0.20 mm: general PLA/PETG printing. -
0.28 mm: fast draft with a 0.4 mm nozzle.
Related settings: first layer height, line width, adaptive layers.
Walls often matter more than infill for practical strength.
Use more walls for:
- Screw retention.
- Load-bearing brackets.
- Parts that will be sanded or post-processed.
- Thin shells that need stiffness.
Wall flow changes extrusion amount for perimeter lines. Tune it after filament diameter and basic extrusion multiplier are close. Lower it for swollen walls or oversized parts; raise it when wall lines show visible gaps.
Infill density controls internal material. Walls and top/bottom layers often contribute more to strength than simply raising infill.
Common values:
-
0-8%: display models and large shells. -
15-25%: general functional parts. -
35-60%: brackets, fixtures, and parts that see compression.
Related settings: infill pattern, wall count, top layers, bottom layers.
Print speed is the default extrusion movement speed. Raise it only after temperature, flow, cooling, acceleration, and pressure advance are stable.
Lower speed when:
- Corners ring.
- Walls under-extrude.
- Small details look melted.
- Overhangs curl.
Retraction pulls filament back before travel moves to reduce stringing.
Typical ranges:
- Direct drive:
0.4-1.2 mm. - Bowden:
3-6 mm. - Flexible materials: lower values, sometimes near zero.
Increase in small steps for wisps. Decrease when gaps appear after travel moves, filament grinds, or heat creep starts.
Support angle decides which overhangs receive support. Lower angles generate more support; higher angles trust the printer to bridge or cool steeper geometry.
Typical values:
-
35-40 deg: conservative, soft materials, weaker cooling. -
45 deg: general starting point. -
55-60 deg: tuned PLA with strong cooling.
Related settings: support type, support Z distance, support interface, minimum support area.
Adhesion adds skirt, brim, or raft geometry around the first layer.
- None: tuned bed and material.
- Skirt: nozzle priming and bed-level sanity check.
- Brim: tall, narrow, sharp-cornered, or warp-prone parts.
- Raft: difficult bed/material combinations where normal first layers are unreliable.
Rafts and brims add material and cleanup time, but can save long jobs.
Horizontal expansion offsets XY dimensions to compensate for consistent dimensional error.
Use it after measuring calibrated parts. Adjust in small steps. Do not use horizontal expansion to fix first-layer squish; solve bed/nozzle first-layer issues separately.
Adaptive layers vary layer height based on model geometry. Steep slopes use thinner layers for smoother surfaces, while flatter areas use thicker layers for speed.
Use adaptive layers when the part has curved cosmetic surfaces but does not need the whole print at a fine layer height.
Z seam controls where each layer starts and ends.
Common choices:
- Sharpest Corner: hides seam in corners.
- Aligned: consistent seam line, useful when the line can face away.
- Shortest: minimizes travel.
- Random: distributes seam marks but may make small artifacts appear everywhere.