New Developers' Guide
If you are a new developer, welcome to SimMobility! This page will help you get started with acquiring the source code, compiling it, and learning where to go for information on the various files and classes in the project.
SimMobility is being developed, compiled and tested in Debian based operating systems. Most developers in the team have Ubuntu running on their computers. If you are new to Linux, we recommend Ubuntu. SimMobility has been tested successfully on Debian and Linux Mint as well. If you have your own preference for the OS, feel free to work with it and let us know if you have managed to compile and run SimMobility on it. The instructions below will be easy to follow if you have Ubuntu.
You will need the following libraries to compile Sim Mobility:
- Tiny XML
- SOCI (database access)
- SOCI PostgreSQL plugin
- Boost::Thread
- Boost::Random
- Boost::System
- Boost::program_options
- Boost::MPI (optional)
- The Xerces-C XML parser (>2.6, or >3.0)
- CodeSynthesis: XSD (>= V3.3.0)
- Json Cpp
- Lua
- g++
- git
- cmake
- libcppunit-dev
- libglpk
- libsoci
Note: To build the unit tests you need cppunit lib.
On Ubuntu, most of these can simply be installed via apt-get. Open a console, and type:
sudo apt-get install libboost-all-dev \
     libtinyxml-dev \
     libpq-dev \
     libxerces-c-dev \
     libjsoncpp-dev \
     xsdcxx \
     liblua5.2-dev \
     g++ \
     git \
     qgit \
     cmake \
     libcppunit-dev \
     doxygen \
     libglpk-dev \
     libssl-dev \
     libsoci-dev \
     postgresql \
     binutils \
     libproj-dev \
     gdal-bin \
     python \
     python-pip \
     libssl-dev
Note: The version of boost must be 1.54 or higher. Install the libboost-all-dev metapackage only if you have a fairly recent version of Ubuntu. Please double check before installing.
Boost version should be 1.54 or higher. Version 1.56 or higher is preferred if you require good runtime performance for short-term. If your package tool (apt-get) lists a lower version or if you need a specific (possibly higher than listed) version of boost, follow the instructions below:
- Go to https://www.boost.org/users/history/version_1_58_0.html
- Download
boost_1_58_0.tar.bz2 cd /path/to/boost_1_58_0.tar.bz2tar --bzip2 -xf boost_1_58_0.tar.bz2cd boost_1_58_0/bash bootstrap.shsudo ./b2 install
SimMobility is built by CMake 2.8.8 or newer. Please carefully check CMake version before you process through next step.
check CMake version:
cmake --versionif it is not installed or the version is not 2.8.8 or newer, you have to go to CMake download to download and install CMake 2.8.8
sudo apt-get install python-pandas
sudo apt-get install python-matplotlib
sudo apt-get install python-numpy
sudo apt-get install python-crypto
sudo apt-get install python-psycopg2
or
sudo pip install pandas
sudo pip install matplotlib
sudo pip install numpy
sudo pip install crypto
sudo pip install psycopg2
You do not need to do this. If you know what you're doing or what I'm talking about: click here
You will need git installed to retrieve the source and push your own updates to it.
In order to retrieve the source code, you will need a Github user account. Register for one here: https://github.com/
After activating your account, you will need to mail one of the SimMobility maintainers to be added to the "simmobility" Github project.
From a terminal, perform the following:
git clone https://github.com/smart-fm/simmobility-prod.gitYou will see something like the following if the git repository has been successfully cloned, but with your Github username instead of USERNAME:
Cloning into 'simmobility'...
Username for 'https://github.com': USERNAME
Password for 'https://USERNAME@github.com':
remote: Counting objects: 52946, done.
remote: Compressing objects: 100% (16934/16934), done.
remote: Total 52946 (delta 35357), reused 52485 (delta 34907)
Receiving objects: 100% (52946/52946), 19.19 MiB | 2.32 MiB/s, done.
Resolving deltas: 100% (35357/35357), done.
Checking connectivity... done
The repository contains several folders. Most of the code we are interested in is located in the "dev" folder, and the "Basic" sub-folder contains the main Sim-Mobility project. This folder will be referred to as "the source folder" or "the main folder" for the remainder of this article.
You can build SimMobility from either Linux terminal or Eclipse. For completeness, we explain both procedures, but we warmly suggest to build from Linux.
If you have problems following these instructions, you may find useful to have a look to the Troubleshooting page.
We need at first to create the Makefile, which is the sequence of commands to compile the code. We will let the application cmake create it for us:
cd <simmobility>/dev/Basic
mkdir Release
cd Release
cmake ../ -DCMAKE_BUILD_TYPE:STRING=Release -DBUILD_SHORT:BOOL=ON -DBUILD_MEDIUM:BOOL=ON -DBUILD_LONG:BOOL=ON -DBUILD_TESTS:BOOL=OFF -DBUILD_TESTS_LONG:BOOL=OFF
where is the folder where you have SimMobility installed.
NOTE: If you want to have a "Debug" version, in case you want to use some debug tool like gdb, run cmake -DCMAKE_BUILD_TYPE=Debug .. instead of simply cmake ... You find more info about how to debug SimMobility here.
If everything is properly set, you should see a message like Build files have been written to: <simmobility>/dev/Basic. But some libraries may not be found. In this case, you will see a message like Could NOT find <missing_package>, instead. It may happen, for example, with PostgreSQL and GLPK. Installing them from their respective source code should solve the problem. The PostgreSQL version we suggest is 9.4. Whenever you want to re-try to create the make file, you should first run
cd <simmobility>/dev/Basic
rm -r Debug
and then repeat the cmake procedure written above.
If you manage to obtain the message Build files have been written to: <simmobility>/dev/Basic, you are done with cmake and you should see a Makefile file has been created.
Otherwise, if what explained above does not work with jsoncpp, restore the original CMakeLists.txt file and change JSONCPP_LIBRARY to JSONCPP_LIBRARIES. Try to run cmake again.
If you finally managed to successfully run cmake and you see a Makefile created, you can simply run make. An error may occur at this point, like
/usr/bin/ld: <erroneous_library>(<an_object_file>):
relocation R_X86_64_32S against <some_id> can not be used when making a shared object
We will now explain how to solve this kinds of problems. Let us suppose that the erroneous library is libjsoncpp. Donwload the source code of libjsoncpp and install it as a shared library:
cd <source_code_folder_of_libjsoncpp>
make SHARED=1
sudo make install SHARED=1
mv <path_of_libjsoncpp>/libjsoncpp.a <path_of_libjsoncpp>/libjsoncpp.a.bak
Of course, <path_of_libjsoncpp> changes from machine to machine, but it should look like /usr/lib/x86_64-linux-gnu/.
Check that the file <path_of_libjsoncpp>/libjsoncpp.so, which is the shared library of libjsoncpp, has been correctly created. The steps above serve to force our compilation to use this shared library instead of the static version libjsoncpp.a. Launch again cmake. If the library libjsoncpp is still not found, modify CMakeList.txt, adding the line set(JSONCPP_LIBRARY "<path_of_libjsoncpp>/libjsoncpp.so") right before LIST(APPEND LibraryList ${JSONCPP_LIBRARY}). After you successfully run cmake, repeat all the passages explained in this section.
Sim Mobility has been tested on GCC 4.7 and 4.8 and has been shown to build with no errors. The project currently uses new features of C++11, so it would noy build in earlier versions of GCC.
There are some flags in CMakeLists.txt, like "SIMMOB_DISABLE_OUTPUT", which you may want to change. It is important that you do not edit CMakeLists.txt to change these. Instead, browse to dev/Basic/Debug or dev/Basic/Release and change CMakeCache.txt. Then, re-run CMake. This way, no-one else will be affected by your changes (since the cache is not part of the repository). The only time that CMakeLists.txt should be changed is if a feature becomes stable, and that flag should now be permanently on.
As a side note, do not edit GenConfig.h; either edit GenConfig.h.in or re-run CMake to re-generate the header file.
- Open CMakeLists.txt found in simmobility/dev/basic
- Change the BUILD_STATIC option to ON as shown below:
option(BUILD_STATIC "If true, SimMobility is built in static mode." ON)-
Go to the Debug (or Release) folder found in simmobility/dev/basic/Debug (or Release)
-
Regenerate the cmake files with the following command:
cmake ../ -DCMAKE_BUILD_TYPE:STRING=Release -DBUILD_SHORT:BOOL=OFF -DBUILD_MEDIUM:BOOL=ON -DBUILD_LONG:BOOL=OFF -DBUILD_TESTS:BOOL=OFF -DBUILD_TESTS_LONG:BOOL=OFFNote that the above cmake command will compute the short-term, mid-term and long-term binaries. If you only need one of these binaries, set the appropriate flags to true or false as needed. Also note that you can toggle between Debug and Release modes from the cmake line above.
- Compile the binaries with this command below:
make -j6You can build SimMobility in Eclipse --specifically the Eclipse CDT. Other instructions on Eclipse are here.
Once you have that installed (along with gcc, g++ and the java sdk), open Eclipse and click on "File" then "Import...", then choose "Existing Projects into Workspace" from the "General" tab.
In this new dialog, select "Browse" from the line "Select root directory" and browse to the folder "dev" in the main source folder. You should see several projects, including "Basic", which contains the main SimMobility code.
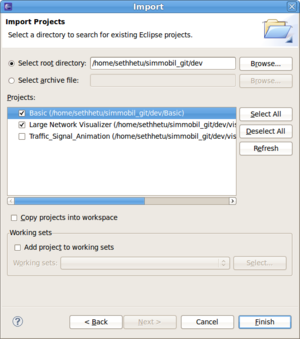
Click "Finish" when you have selected the projects you want to import.
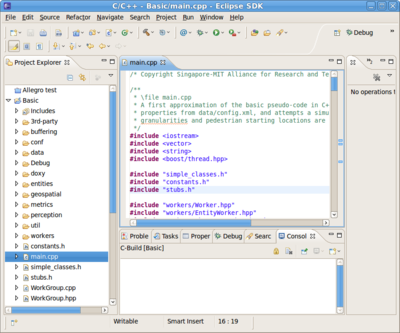
Once the project(s) has loaded, you should see "Basic" on the left in the Project Explorer. Double-click on this, and the various folders and files in the project will be visible. Double-click on "main.cpp" to open the primary source file for Sim Mobility.
If you are not familiar with Eclipse, you should take some time to read up on it --there are some excellent Eclipse guides on the web. There are a few things you may consider in addition:
- Eclipse tries to constantly build your project as you are coding. You may find this restrictive; in that case click "Project" and then un-tick "Build automatically". Now, you will have to choose "Project->Build Project" every time you want to compile your new code.
- Eclipse uses "make", which tries to only rebuild the files that need rebuilding. Obviously, C++ is a very complicated language, and things such as macros and templates occasionally trip make up. In that case, right-click on your project in the Project Explorer and choose "Clean Project". This will remove all object files and will force a full rebuild.
If you are unable to perform any of the following steps, please check that Eclipse CDT features are correctly installed. Try to follow these instructions, if needed.
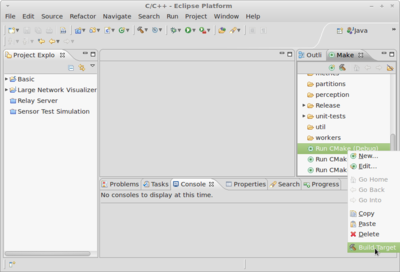
SimMobility uses the "CMake" build system internally. Most of the details of this are hidden by Eclipse. Still, you should be aware of a few things. First, CMake is used to generate the Makefiles which Eclipse then uses to build the project. Any file named CMakeLists.txt is a CMake file. To force CMake to run, click on "Windown -> Show View -> Make Targets" in Eclipse. Then, expand the "Basic" project, right-click on CMake [D.1] Short for short-term simulation or CMake [D.2] Medium for mid-term simulation and choose "Build Target".
If Eclipse complains, manually creating a new folder Basic/Debug may solve the problem.
The first time you run this, you should see something like the following for output:
**** Build of configuration Debug_M for project Basic ****
cmake -E chdir Debug/ cmake -G Unix Makefiles ../ -DCMAKE_BUILD_TYPE:STRING=Debug
-- The C compiler identification is GNU
-- The CXX compiler identification is GNU
-- Check for working C compiler: /usr/bin/gcc
-- Check for working C compiler: /usr/bin/gcc -- works
-- Detecting C compiler ABI info
-- Detecting C compiler ABI info - done
-- Check for working CXX compiler: /usr/bin/c++
-- Check for working CXX compiler: /usr/bin/c++ -- works
-- Detecting CXX compiler ABI info
-- Detecting CXX compiler ABI info - done
-- Configuring done
-- Generating done
-- Build files have been written to: /home/me/simmobility/dev/Basic/Debug
Normally, the Makefiles generated by CMake will link back to CMakeLists.txt, so if the latter changes, the former will force a full re-compile. There are a few cases where you have to force a rebuild:
- The first time you download the source, CMake must be run.
- If you add a new *.cpp file to the project, CMake must be run manually. It will then auto-detect the file.
- If you are making lots of changes to CMakeLists.txt, or if you want to be sure that you are running a clean build.
After Makefiles are generated, you can start to compile the source code to get binary executable file in the Debug folder.
The latest visualizer is written in Qt, and is stored in a separate repository. After installing QT usgin:
sudo apt-get install libqt4-dev qtcreator
Please follow the instructions here: https://github.com/smart-fm/simmobility-prod/wiki/Simulation-output-visualization
NOTE: This functionality is broken at the moment
Who needs this: If you are developing something that uses Sim Mobility's Road Network data structures, and you need access to our XML parser, you need to install the Sim Mobility library. This includes the Qt visualizer team, and perhaps others, but does not include normal Sim Mobility developers.
** What this does:** This will "install" Sim Mobility, putting the header files and shared object (library) files in a place where your compiler can find them. After installation, you can treat Sim Mobility like any other shared library (TinyXML, Xerces, etc.)
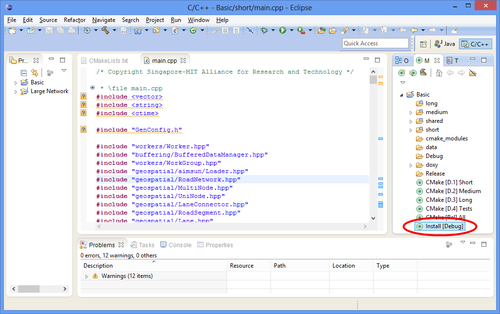
First, run either a Debug or Release build, and make sure it completes successfully. The library component of Sim Mobility is built automatically, and located in Debug/libsimmob_geoxml.so (or Release/libsimmob_geoxml.so). At this point, you can simply open a terminal and type the following to install the library:
cd Debug
sudo make install
Optionally, if you have [http://maestric.com/doc/unix/ubuntu_sudo_without_password auto-sudo] set up, you can click on the Install [Debug] target in the "Make Targets" window in Eclipse. (In general, though, you should prefer the command line for administrative work.)
NOTE: This functionality is broken at the moment
At this point, Sim Mobility's header files have been copied to /usr/local/include, and the library file has been copied to /usr/local/lib. In order to find the header files, you'll have to add /usr/local/include to your include paths (how you do this differs between CMake and QMake).
To get the library to load, edit /etc/ld.so.conf, and add the following line at the end of the file
/usr/local/libThe default data input supply for SimMobility is a database called simmobility. Since the database content currently do not follow the open source guidelines, the access to the database is subject to Terms and Conditions.
Note: If you have not signed an NDA, we cannot provide you with our private network data. However, we have several generated road networks that you can use to demo SimMobility or test its performance. Please contact us for details; we can provide these to you.
If you open the Sim Mobility config file (e.g., "data/test_road_network.xml" or "data/simulation.xml"), you will see a section called . This is used to define various XML and database configurations. Note that declaring a construct does not cause it to load; you will also have to select it (later).
Currently, XML constructs are disabled, so you only need to be concerned with database ones. These look something like this:
<database id="fm_remote" dbtype="postgres">
    <host value="172.25.184.48"/>
    <port value="5432"/>
    <dbname value="simmobility"/>
</database>
Note that the database construct does not list login details (because this is insecure!) or stored-procedure mappings. The and <db_proc_groups> constructs provide these. Finally, the following tags determine which constructs are actually used to load the data:
<network_database database="fm_remote" credentials="fm_remote" proc_map="bugis_small"/>Please read through the documentation on constructs (in the sample config file). The following sections will describe each usage in detail.
To connect to the database, make sure the following properties are set accordingly in your simrun_MidTerm.xml file:
<network_source value="database"/>
<network_database database="fm_remote" credentials="fm_remote" proc_map="bugis_small"/>
Note that in the simulation.xml you assigned an id to the database xml construct and an id to the credentials construct. You have to replace the argument of database= and credentials= with those ids.
Assuming the three constructs you referenced exist (fm_remote, fm_remote, and bugis_small), this will tell SimMobility to load from the master database. Note that you will have to put the credentials file into the private directory. Just ask for it to one of the developers in the team.
For performance and reliability purposes, it is often desirable to mirror the remote database on your machine and then connect to this. First, change your config file:
<network_source value="database"/>
<network_database database="fm_local" credentials="NAME_cred" proc_map="bugis_small"/>
Change "NAME_cred" to your own name; e.g., "seth_cred". Then, add a corresponding credentials element in the section:
<credentials>
    <!-- there will be some existing credentials; don't change them. -->

    <!-- At the end, add your own: -->
    <plaintext-credential id="seth_cred">
        <username value="seth"/>
        <password value="some_password"/>
    </plaintext-credential>
</credentials>
The username and password can be anything you choose. Be aware that everyone will see this password if you commit it to the repository, so choose something you don't use anywhere else.
At this point, your config file is all set up. Now you need to clone the database. Follow the following instructions on your Ubuntu box to obtain a copy of the above database:
From the command line:
sudo apt-get install postgresql
pg_dump -h 172.25.184.48  -U postgres simmobility > my_SimMobility_DB_bkp.sql
At this point you will have to supply the remote database password (just ask for it). Or put SimMobility in Debug mode and grab the unencrypted password from the credentials file. Then:
chmod 777  my_SimMobility_DB_bkp.sql
su postgres
psql
In the postgres console, run:
create database "SimMobility_DB";
\c  SimMobility_DB
\i  my_SimMobility_DB_bkp.sql
This will take some time to complete. Then:
\password postgresIt will ask for the password twice. At this point, enter YOUR OWN password (the one you put in the section. WARNING: do NOT use the remote password here, since you will then have to add it to the constructs file in plain text.
At this point, you can run SimMobility and it should connect to the local database without issue.
You are ready to go now! Please refer to this page for running SimMobility.