Admin Configure Constituents
Taranis uses the concept of Constituents. Constituents can be seen as customers of the security team. Constituent individuals are grouped into Constituent groups. Constituent groups are usually organizations within the constituency, whereas Constituent individuals are the employees of these organizations.
Each Constituent group is of a specific Constituent type. The type of Constituent dictates what kind of products this Constituent group is allowed to receive.
Users can define different Constituent types through the ‘Constituent Types’ option in the Configuration menu. Enter a name for a Constituent type and assign publication types to it. As described in further down in this chapter, linking publication types to a Constituent type will have a great impact on the publication types that Constituent individuals will be able to receive.
NOTE: Taranis will warn you when you unlink a publication type from a Constituent type because this will break all links between Constituent individuals and publication types for all Constituent groups that are assigned to this specific Constituent type.
Each Constituent individual has a role. This role describes the type of contact person this individual is to your organization. Examples of this role are: “operational contact” or “contract owner”. You can configure the Constituent role in the Constituent Roles configuration item. Each entry in this configuration item contains only one value. The possible values are given as the Role options in the Constituent individual information screen.
You can manage the Constituent groups by choosing ‘Constituent groups’ from the Configuration menu. The figure below shows the information displayed for Constituent groups.
Figure: Management of Constituent groups

If you have a lot of Constituent groups configured, you can search through them based on Constituent type, keyword or status. For every Constituent group, the name of this group is shown. To the right of the Constituent group, a maximum of four action icons is displayed. The user can edit the Constituent group by clicking on the first icon. The second icon will give you an overview of this specific Constituent group, including Constituent individuals that are linked to this Constituent group. Clicking the third icon will delete the specific Constituent group.
The phone icon does not have any action configured with it, but is simply an indicator that this Constituent group will have to be called in case of a high/high advisory.
When you edit a Constituent group or add a new Constituent group (by clicking on the Add new button), the details window for Constituent groups is opened. This window has four tabs to manage the different properties of a Constituent group.
General settings
The ‘General settings’ tab allows you to administer general properties of the Constituent group. An example of these properties:
Figure: Constituent group properties
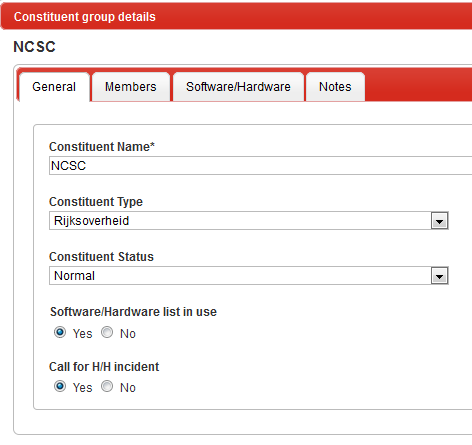
Many of the properties are pretty straight forward: you can edit the name, the type, and the current status of the Constituent group. The list of Constituent types available is based on the list of types you configured. The configured Constituent type defines what kind of publications the members of this group will be allowed to receive.
You must also indicate whether or not to use the software/hardware list (‘Software/Hardware list in use’) of this Constituent group. If you choose ‘Yes’, this Constituent group will only receive those advisories that are linked to hardware and software that are on the software/hardware list of this Constituent group. If you choose ‘No’, the software/hardware list will be ignored, which results in the Constituent group receiving all advisories.
The ‘Call for H/H incident’ property indicates whether or not the Constituent group wishes to be called in case of an advisory that has high chance and high impact. If you choose ‘Yes’, the Constituent group will automatically be added to the calling list of such an advisory.
Configuring Constituent group members
The ‘Members’ tab allows users to link Constituent individuals to Constituent groups. On the right side of this tab, a list of all configured Constituent individuals is displayed. By selecting one or more Constituent individuals and then clicking the < button, Taranis will link the individuals to the group. You can select more Constituent individuals at once by holding down the [Ctrl]-key while selecting or double clicking on a specific Constituent individual to only select that individual. Please note that it is possible to add a Constituent individual to multiple groups.
Populating the software/hardware list
Taranis supports the use of CPE to populate a list of possible hard- and software in use by Constituent groups. The ‘Software/Hardware’ tab enables users to link hard- and software from this list to a Constituent group. By linking hard- and software to Constituent groups it is possible to only send relevant advisories to this Constituent group.
You can link hard- and software by searching through the soft-/hardware list and then selecting all relevant items. Again, clicking the button (or double clicking on an item) will link the selected hard- and software to the group.
Figure: Populating the hard-/software list of a Constituent group

Notes
You can add notes to a Constituent group. These notes enable users to record unstructured information about the Constituent. The notes show in a high/high caller list so that any particulars about the Constituent group is automatically presented to the person responsible for informing this group.
As described in the previous paragraph, Constituent individuals are part of a Constituent group. Constituent individuals can be managed by selecting the ‘Constituent individuals’ option from the Configuration menu.
Figure: Management of Constituent individuals

The action icons for each Constituent individual works basically the same as for the Constituent groups described in the previous paragraph: the user can edit the Constituent individual by clicking on the icon and delete the Constituent individual by clicking on the icon. The icon is again an indicator that this Constituent individual will have to be called in case of a high/high advisory. Hovering your mouse pointer over the icon allows you to quickly see the main information about this individual.
When you edit a Constituent individual or create a new one, Taranis will open the Constituent individual details window. Split across three tabs, this window allows the user to specify individual properties, link the individual to Constituent groups, and specify the publication types the individual wishes to receive.
Individual details
The ‘Individual details’ tab enables the user to record contact information for this individual (e-mail, phone) and the role of the user. Regarding the preferences for contact over the phone in case of high/high advisories, the user cannot only specify whether the individual wants to be called, but also if he wants to be called outside office hours. Taranis will use these settings when it creates a calling list for a specific high/high advisory.
Constituent role
Each individual has a role. This role describes the type of contact this individual is to your organization. Examples of this role are: “operational contact” or “contract owner”. You can configure the Constituent role in the Constituent Roles configuration. Each entry in this configuration contains only one value. The possible values are given as the Role options in the Constituent individual information screen.
Specifying publication types
You can define which publication types a user wishes to receive. The publication types available depend on the Constituent group(s) the individual is a member of, the type of these Constituent group(s) and the publication types linked to these Constituent types.
Figure: Publication types for an individual

Taranis currently supports the following publication types:
- Advisory (email)
- an email with the advisory text, without an XML-based version of the advisory attached to it.
- Advisory (XML)
- an email with the advisory text, with an XML-based version of the advisory attached to it. Based on the “advisory (email)”.
- Advisory (forward)
- a separate advisory product, which consists of a “raw” original (vendor) advisory along with added metadata.
- End-of-Shift (email)
- an email with the end-of-shift.
- End-of-Week (email)
- an email with the end-of-week.
The list of hard- and software in use by constituents is called the ‘photo’. This is a historic term used by NCSC-NL that might lead to some confusion. It refers to the ‘snapshot’ of used hard- and software by a constituent.
You can import and export these lists through the Taranis web interface.
Import photo
Change a list of software and hardware used by a constituent via the Taranis GUI based by uploading a CSV file. Taranis will link all the soft- and hardware in that file to the constituent you specify.
The CSV file you specify must contain all the soft- and hardware you want to import, one component per line. Each component must be defined as producer, soft-/hardware name, soft-/hardware type and CPE-ID, divided by colons, for example:
"3Com","Router 5231","cpe:/h:3com:3c13750","Hardware"You start the import-process by clicking the button in the Photo management-section. Next, the ‘Import photo’ screen will open. This screen allows you to import a photo and get an overview of all the previous imports.
Figure: Import photo
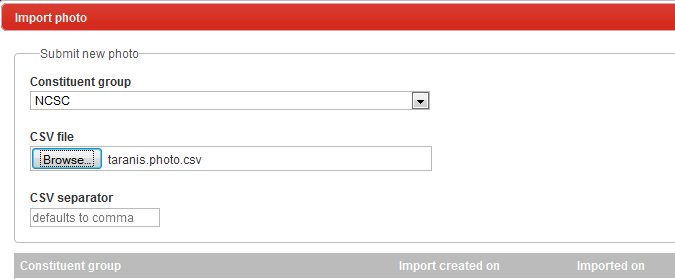
The list of imports shows the Constituent group for which a photo was imported, the time the import was created and the time the import was finalized (‘imported on’). For all pending imports (imports that still have issues), the ‘imported on’ property is empty. You can open such an import by clicking on the Constituent group name.
You start an import by selecting a Constituent group from the dropdown list and browsing for a CSV file. All Constituent groups, for which an import is pending, will not show up in the dropdown list. This is to prevent concurrency issues.
Once you have selected a Constituent group and a CSV file, click on the button to start the import. If the CSV is properly structured, you get an overview of the items to be imported as follows:
Figure: Items to be imported

Different colors indicate whether attention is needed before the import of the item can be executed. Items are colored white, green, light orange or dark orange.
White indicates that the item is already on the Constituents photo. Green indicates that the item can be linked to the Constituent group with no extra attention. Orange indicates that the user must consider creating an issue for this item and red indicates that the item cannot be linked to the Constituent group because the hard-/software could not be found.
Depending on the status (color) of the item, you can perform different actions:
- Accept the import of the item. The item will be linked to the Constituent group.
- Create an issue for this item. An issue means that further action needs to be taken before this item can be linked to the Constituent group. Possible actions include: finding a source to be able to monitor vulnerabilities in this product, or creating a new soft- or hardware item in case the item is not part of the current soft-/hardware list.
- Remove the item from the import-list. The item will not be linked to the Constituent group and an issue will be created.
| CPE-match | Exact match | In use | |
|---|---|---|---|
| Yes | Yes | Yes | Taranis found a match on both CPE-ID and name. This product is already in use by another Constituent so it is safe to link this item |
| Yes | Yes | No | Although Taranis found a match on both CPE-ID and name, attention is required because this product isn’t used by any of the other Constituents. |
| Yes | No | Yes | Taranis found a match based on CPE-ID and the product is already in use. We can link it without intervention. |
| Yes | No | No | Taranis found a match based on CPE-ID but the product is not in use by any of the other Constituents. |
| No | Yes | Yes | Taranis found a match (based on name) and this product is in use by at least one of the other Constituents. It is safe to link without intervention. |
| No | Yes | No | Taranis found a match (based on name) but this product is not yet in use by any of the other Constituents. |
| No | No | Yes | This situation cannot occur: a product that is in use but is not listed in the soft-/hardware list. |
| No | No | No | The product is not known by Taranis. You must first add a new item to the soft-/hardware list before you can import this item. |
Every import will most probably result in issues that need to be resolved before the list can be linked to the Constituent group. The list of all open issues can be seen by just opening Photo management again. All open issues are indicated with a red background:
Figure: Open issues
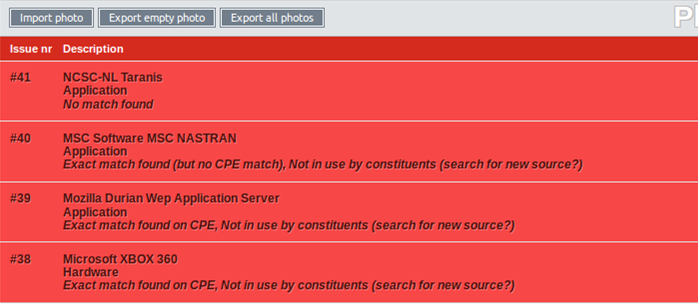
You must resolve all open issues before you can actually import the photo of the Constituent. If no match was found for a particular software item you must first add a new item to the hard-/software list, and then reopen the issue. You can then link the issue to the new soft-/hardware item just created and then resolve the issue as illustrated in
Figure: Resolve issue
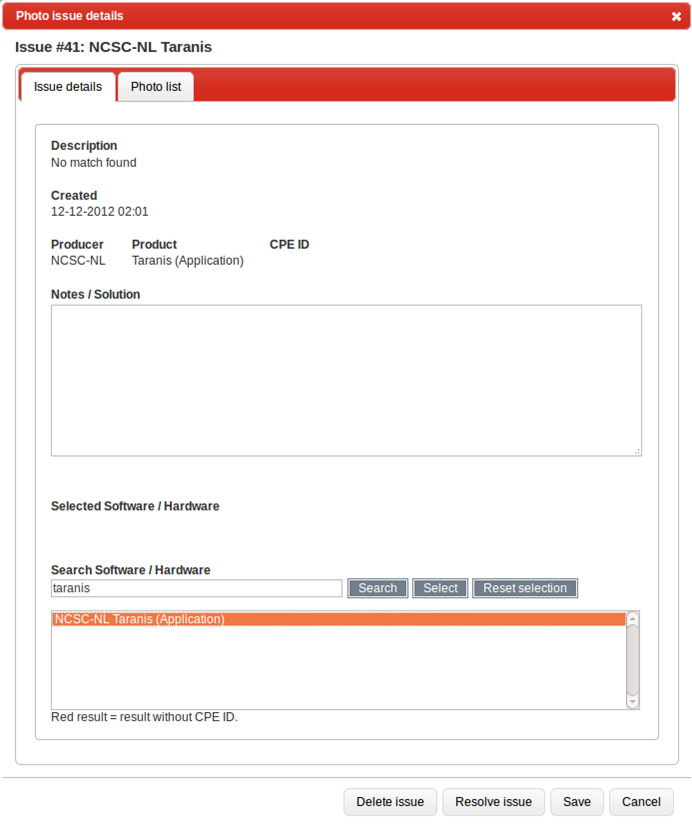
Taranis remembers the choices you make. This means that an item you resolve will automatically be resolved in future imports when the same item shows up in this import.
Special attention is required if you add an item to a photo that is not yet in use by any of the other Constituents. In this case you must make sure that you have proper sources in Taranis to monitor for new vulnerabilities in that product. You must resolve these issues by following a workflow that mostly resembles the workflow of publications: add your comments, set the issue to Ready for review, and Accept & resolve the issue.
Figure: Accept and resolve issue

Export empty photo
You can export the list of soft- and hardware by clicking from within Photo management. This will present you with a comma separated file that lists the following information of all soft- and hardware:
- Producer (vendor), e.g. ‘Oracle’.
- Product, e.g. ‘PeopleSoft Enterprise’.
- CPE-ID (if applicable), e.g. ‘cpe:/a:oracle:peoplesoft_enterprise’.
- Soft-/hardware type, e.g. ‘Application.
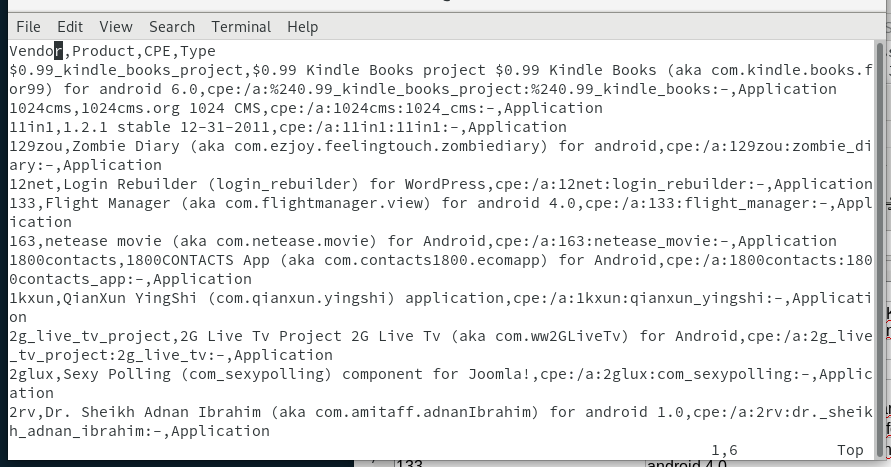
You can send the soft-/hardware list to your constituents so that they can specify which products they use. The Constituent must then create a new CSV file in which only the products they use are listed. This file can then be imported through the ‘Photo import’ functionality (see previous section).
Export all products in use
The button results in a CSV file, just like the CSV file described in the previous section. The only difference is that only soft- and hardware items that are in use by any of your Constituents will be placed in this file.
Export all photos
You can all the photos of your constituents. You can use this list e.g. as a backup in case Taranis is not available. The output is again a CSV-file just as with the empty photo. The only difference is that an extra column (“Constituent”) is added to the list.
