Admin Configure Sources
“Sources” is probably the most important configuration pane as sources are the primary input for Taranis. The Collectors of Taranis scan all sources for news items. New items are inserted into the database.
Taranis supports the following types of sources:
- HTTP- and HTTPS-based sources.
- IMAP- and IMAPS-based sources.
- POP3- and POP3S-based sources.
Figure: Sources example
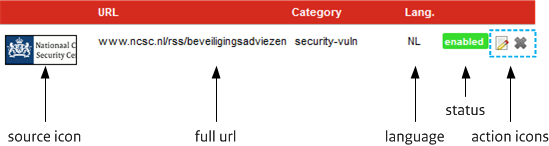
Taranis shows all configured sources on one page. For each source, Taranis shows the icon used for displaying messages of this source, the full URL, the category, language and status of the source, and the action icons. The first action icon will open the source details screen and the second will delete the source. When you click on the status, the status will change into disabled. Clicking again will re-enable the source.
Add a new source by clicking on the button. The source details window will open in which you enter the details of the new source. The first thing you’ll have to configure is the type of source you want to add: http, https, imap, imaps, pop3 or pop3s. Depending on the type of protocol you choose, different configuration options will be shown. This paragraph describes the way in which you can add the different types of sources.
A HTTP-source can be any source that is visited over HTTP and is properly structured so that it can be parsed in a standardized way.
Figure: A HTTP-based source configuration
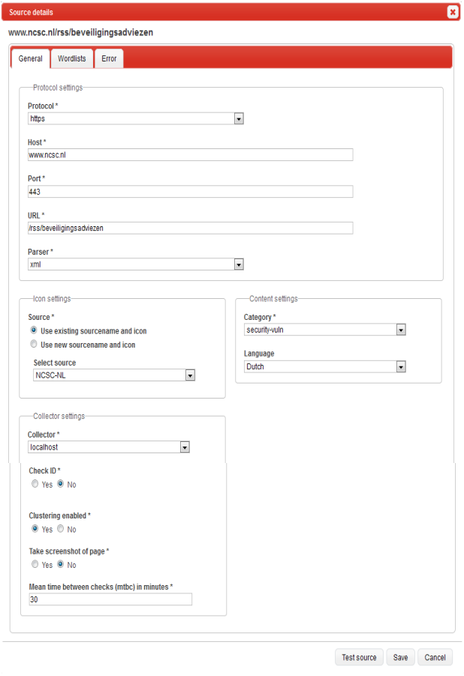
With every HTTP(S)-based source, you’ll have to specify the hostname, port number and URL of the source.
For instance to monitor the webpage http://edition.cnn.com/WORLD/ use the host edition.cnn.com, URL /WORLD/, and port number 80. Sometimes, a website does not run on the default HTTP-port (80/tcp) in which case you can specify an alternative port number.
Other available options:
- Parser
- Defines how you want to parse the webpage. If you’re adding an XML-based source (RSS, Atom, RDF), you can pick the default parser ‘xml’. In other cases you may have to write you own parser to be able to extract news items from a certain source.
- Source
- Defines the icon that is displayed next to all the news items that are fetched from the source. Choose an existing source icon or add a new source. When you want to add a new source, check the checkbox ‘add new source’, after which additional input fields will appear.
- Category
- Specifies in which category new items from this source will be placed The dropdown list shows all the categories currently defined. Use Configuration ‘Source categories’ to add new categories.
- Language
- Make sure you select the Language of the source if you want items of this source to be clustered.
- Collector
- Every source is bound to a specific Collector. Here you can specify which Collector instance should be used to monitor this source.
- Check ID
- If you set this value to ‘Yes’, Taranis will open the link of each new item collected and scan for CERT ID patterns in the contents of the revered page. Taranis then connect all the found IDs to the item.
- Clustering enabled
- Should new items of this source to be clustered with other items (from other sources).
- Take screenshot
- Additionally make screenshots of the pages revered to by the collected items. Users will see a screenshot and not visit this website. Use this functionality if you don’t want your users to open this website. Screenshots each take up around 1 to 3 MB of space in your database, which may add-up.
- Rating
- The rating of a source is an optional visual aid for the handler to determine how credible/important the source is. There is no difference in how the Taranis collector processes low-rated sources versus high-rated. The rating of a source is only displayed in the Assess tab under each individual item. It is for an organisation to determine what this rating represents.
- MTBC
- MTBC stands for ‘Minimum Time Between Checks’. It defines how often the source should be checked for new items, specified in minutes. When you set the ‘mtbc’ to ‘60’, the Collector will wait for a minimum of 60 minutes (1 hour) before checking the source again.
Adding an IMAP(S)-source works almost the same as a HTTP(S)-based source. Instead of a URL you must specify a path to the mailbox on the IMAP(S)-server where Taranis should read the e-mails from. You can also specify an archive mailbox so that every e-mail processed by Taranis is automatically moved to another folder.
The figure below shows an example where Taranis is configured to read the contents of a Gmail-account over IMAPS and move read messages to the ‘Done’ folder.
Figure: Gmail as an IMAPS-source

The way you specify the mailbox, depends on the specific IMAP(S)-implementation your organization is using. To read a public or subfolder on an IMAPS-installation you might need to configure something like ‘inbox.subfolder1.subfolder2’ where all the folders in the path are separated by a dot. Click on to see whether the options you specified work with Taranis.
When you use IMAPS, you may need to use the STARTTLS command. Some IMAPS servers require this before they allow a TLS secured session.
This type of source is mostly the same as the other types of sources already discussed. Specific to the POP3(S)-sources is that you cannot specify a path, mailbox, or URL. Taranis will connect to the POP3-server you specify with the credentials you entered and then just read out your mailbox. Specify whether or not Taranis should keep a copy of the message on the server or just delete it.
Figure: Add a new source (icon)
.png)
When you add new source you are required to specify a name and a path to an icon image. Icon images must meet the following criteria:
- The size of the image must be exactly 72x30 pixels (width x height).
- The size of the image must not exceed 5 kb.
Taranis supports the use of XML-advisories written by other CERT’s as a source as long as those advisories were also created with Taranis. Using the XML advisories of related CERTs as a source will enable Taranis to transfer the newly collected advisory straight to the advisory write menu.
Figure: XML advisories as source

Note that this option is only available for email based sources and not for HTTP(S)-sources. Every advisory is linked to a specific author, so you must assign an author responsible for the automatically collected advisories.
With every source you use, you can make use of word lists. Word lists allow you to reduce the number of items you collect from a specific source, based on a list of keywords. Usually, every item that is published by a source will show up as an unread item in Taranis. By using a wordlist, all items will still be inserted into the Taranis database, but only when the item contains a keyword in your wordlist, this item will be marked as unread. In other cases, the item will automatically be marked as read so that you don’t have to assess it.
To enable a wordlist for your source, first click on the “Wordlists” tab. On this tab, you have the option to turn keyword filtering on or off use one or two wordlists. When you select one wordlist, Taranis will check whether a keyword on this list is found in the each item. If so, Taranis will mark the item as unread, otherwise as read.
Figure: Wordlists
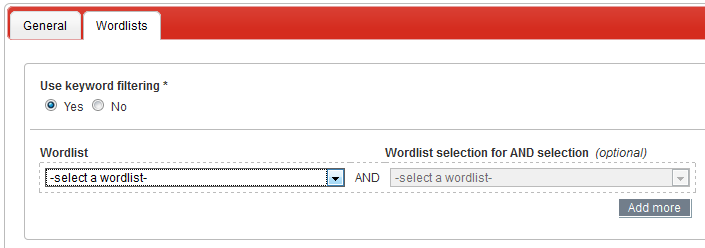
You can also specify two wordlists. In that case, keywords from both wordlists will be combined. A new item needs a keyword match in either lists to become ‘unread’.
A possible use of this functionality is to filter on threats specific to your constituency. In this case, one wordlist lists names of your Constituents, and the other list is filled with threats. For example, the first wordlist contains the organization name ‘NCSC’ and the other list contain threats like ‘powned’, ‘attacked’, ‘XSS’, etc. In this case, only when an item describes a XSS vulnerability in the NCSC website, it will show up in your assess view.
The ‘Source Categories’ option under the main ‘Configuration’ menu allows you to administer the categories for your sources. By default, five categories are configured. Feel free to add new categories or remove default categories.
Default source categories:
- Ict-news
- ICT-related news, not necessarily security-related.
- News
- General news, e.g. websites of newspapers.
- Security-news
- Background information on developments in the ict-security area. Examples are blogs from security specialists security companies.
- Security-tweets
- Security-related tweets, e.g. twitterfeeds of security specialists and Twitter searches for security-related terms.
- Security-vuln
- Websites and feeds describing actual vulnerabilities in software, from vendors (e.g. Microsoft) and 3rd parties (e.g. SecurityFocus).
Clusters are defined per category and per language. Taranis supports clustering of items collected from sources indicated as Dutch or English. Should you require clustering of news items in different languages, add Clustering runs after each collector run.
Figure: Cluster details
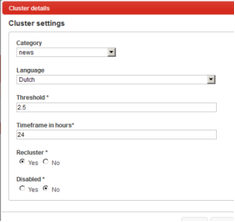
The different configuration options:
- Category
- Determines the category that the clustering settings are applied to.
- Threshold
- The threshold determines the measure of reliability with which clustering is applied. A higher value increases the reliability that clustered items are actually related. This consequently results in more and smaller clusters. Should you decide to experiment with these values, do so by beginning with value changes of 0.1 at a time.
- Timeframe
- Defines the timeframe that a cluster is kept alive. Any news items that are older than the defined timeframe will be exluded from the cluster.
- Recluster
- Reclustering is used to re-evaluate the currently formed clusters. Should specific news items belong to a different cluster or should a previously unclustered news item be deemed to be part of an existing cluster, the clusters will be re-shuffeled accordingly.
- Disabled
- Indicates wether a category/language combination is clustered or whether clustering is disabled for the the particular category/language combination.
All data collected from HTTP(S)-based sources in Taranis is parsed based on parser-definitions. Initially Taranis supports two parsers:
- the ‘xml’-parser that is valid for XML-based feeds like RSS and Atom.
- the ‘Twitter’-parser which is valid for sources that use the Twitter v1.1-API, e.g. Twitter feeds.
We found that many security teams make use of Twitter feeds and Twitter searches to get the latest developments. Before you can add Twitter sources, first configure your Twitter credentials in the main Taranis configuration file (taranis.conf.xml).
All these settings are used to access Twitter information based on Oauth. You can generate the consumer and access information from https://dev.twitter.com
- twitter_consumer_key
- twitter_consumer_secret
- twitter_access_token
- twitter_access_token_secret
NOTE: For Twitter sources to function, it is important that the time on your server is set correctly. If the time is not set correctly, this can lead to authentication problems.
In this example, monitor the mentioning of the keyword ‘mykeyword’ on Twitter. First, you add a new source, linked it to the ‘twitter’-parser and fill in the other settings.
Figure: Example Twitter source
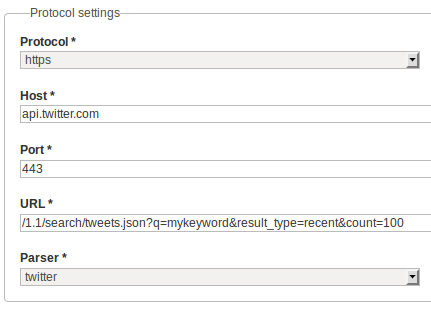
The source is configured to connect to api.twitter.com over port 443 (https) It queries for ‘mykeyword’ with a maximum of 100 results. In the same way you can add Twitter users you want to follow.
Let’s have a look at a simplified example to explain the working of parsers. Imagine you want to monitor new messages on a website.
Figure: Example website
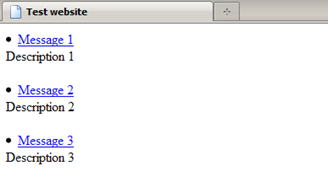
To write a parser for this page, you must first take a look at its HTML-code behind the website:
<html>
  <head>
    <title>Test website</title>
  </head>
  <body>
    <li>
      <a href="/1.html">Message 1</a><br />
      Description1<br /><br />
    </li>
    <li>
      <a href="/2.html">Message 2</a><br />
      Description2<br /><br />
    </li>
    <li>
      <a href="/3.html">Message 3</a><br />
      Description3<br /><br />
    </li>
  </body>
</html>
Try to find out how the website is structured and especially look for strings defining the news items. In the previous example, we can see that every news item starts with <li> and is closed with </li>. We use these start- and end-tags as the basis of our parser. If we tell Taranis that it should parse this page based on these tags, Taranis will find three items on this page:
<li>
  <a href="/1.html">Message 1</a><br />
  Description1<br /><br />
</li>

<li>
  <a href="/2.html">Message 2</a><br />
  Description2<br /><br />
</li>

<li>
  <a href="/3.html">Message 3</a><br />
  Description3<br /><br />
</li>
Now that we isolated the different news items, we must further parse these items into titles, descriptions and links. Again, we will look for strings that help us split the different items into these components. Looking at the items, we can conclude the following:
- The message title starts at
">and ends at</a>. - The message description starts at
<br />and ends at<br. - The link starts at
href="and ends at">.
Item 1
Title       : Message 1
Description : Description 1
Link        : /1.html

Item 2
Title       : Message 2
Description : Description 2
Link        : /2.html

Item 3
Title       : Message 3
Description : Description 3
Link        : /3.html
This seems to be good, except for the fact that the links are not absolute. If Taranis stores the items with these links, Taranis will not be able to redirect the user to the right page. That is why Taranis allows you to define a link prefix that will be prepended to the link that is extracted from the item. By specifying a prefix like http://www.website.com the resulting links will point to http://wwww.website.com/1.html, http://www.website.com/2.html and so on.
The example described here is simplified. However, most websites that have a news page or the like, have a structured design. It can be a little bit tricky to figure out what the best way is to parse a website, but most of the time you will succeed. If, after parsing, you end up with both valid items and invalid items, you could consider to first strip the page from unwanted content.
Let’s assume the page we are parsing is the same as the one before, but starts with the following HTML-code:
<html>
  <head>
    <title>Test website</title>
  </head>
  <body>
    <ul><li><a href="#unwanted">Unwanted content</a></li></ul>
    <li>
      ...
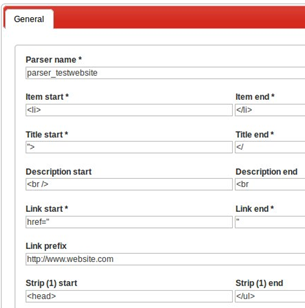
If we were to parse the webpage with the parser we just defined, not only would we see the messages we need, but also the ‘Unwanted content’ message at the top of the page. To prevent this, we configure to first strip of all the contents starting at <head> and ending at </ul>. This way, the unwanted content is removed before parsing. The resulting parser configuration in Taranis is:
Figure: Parser example
By using ID patterns in combination with the ‘Check ID’ feature with sources, Taranis will automatically parse all IDs with a given item. Sometimes, you will receive ‘false positives’ because a webpage shows IDs that are related to some other message. An example of such a webpage:
Figure: False positives on IDs
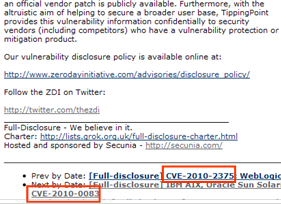
Above example shows a web interface for a mailing list, in this case the former ‘Full Disclosure’ list. The web interface not only shows the current message, but also references to other messages posted on the list (‘Prev by Date’ and ‘Next by Date’). If these references contain an ID, these IDs will be added to an item. If you want to prevent this, you can configure strips. By using a strip you make sure that unwanted content is stripped from an item before Taranis will search for IDs.
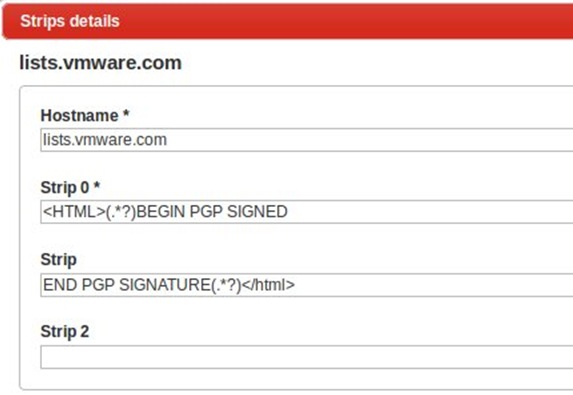
The figure below shows an example of a strip. You can specify a maximum of three strips per host (strip 0, strip 1 and strip 2). Each strip is a regular expression describing the contents that should be stripped off. The strip definition of figure 5-17 specifies that all content from <HTML>… to END PGP… should be stripped off in case the hostname is equal to lists.vmware.com.
Figure: Strip example
When checking items for IDs, Taranis will automatically apply all relevant strips to the page.
One of the prime goals of Taranis is to link different items, analyses, and publications with each other, based on common identifiers. When different news sources report about a vulnerability and include the same identifier in their report, it is simple to link these reports and to find-out whether or not you already created a publication for it. In order to extract identifiers from news items, you must define patterns for these identifiers first. By default, Taranis already has patterns for some of the most used identifier types like CVE-ID.
An identifier pattern is a Perl5 regular expression. Every identifier pattern has three properties: the name, the pattern, and an optional substitution. The substitution also is a regular expression that serves to substitute parts of the item in order to be able to extract identifier patterns. An example identifier pattern for Adobe security advisories:
Figure: Example ID-pattern
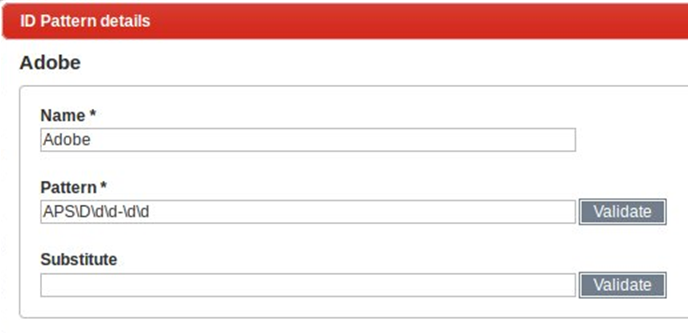
Click on the button to verify the regular expression(s) you enter. Every source that is visited by the Collector and has the option ‘Check ID’ set to ‘Yes’ will automatically be scanned against all identifier patterns defined.
Taranis allows you to export and import the sources in bulk. By clicking on the Import/Export sources button, you open the main screen through which you can import sources from a file or export sources to a CSV file.
Import
Start an import by selecting an import file and then clicking on the button.
Figure: Import sources
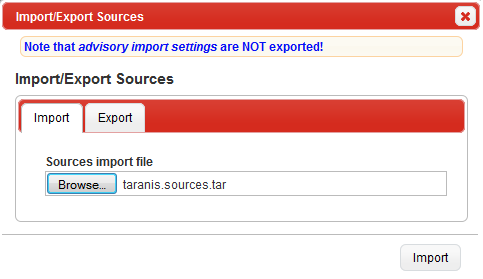
Taranis will automatically create sources, parsers, and icons for the sources to be imported. Once completed, Taranis gives you an overview of the sources and parsers imported. It will also report problems encountered during the import.
Export
When you click on the export tab, you will see the different selection options available for exporting. You can select sources based on protocol, category, language, and parser.
Figure: Export sources
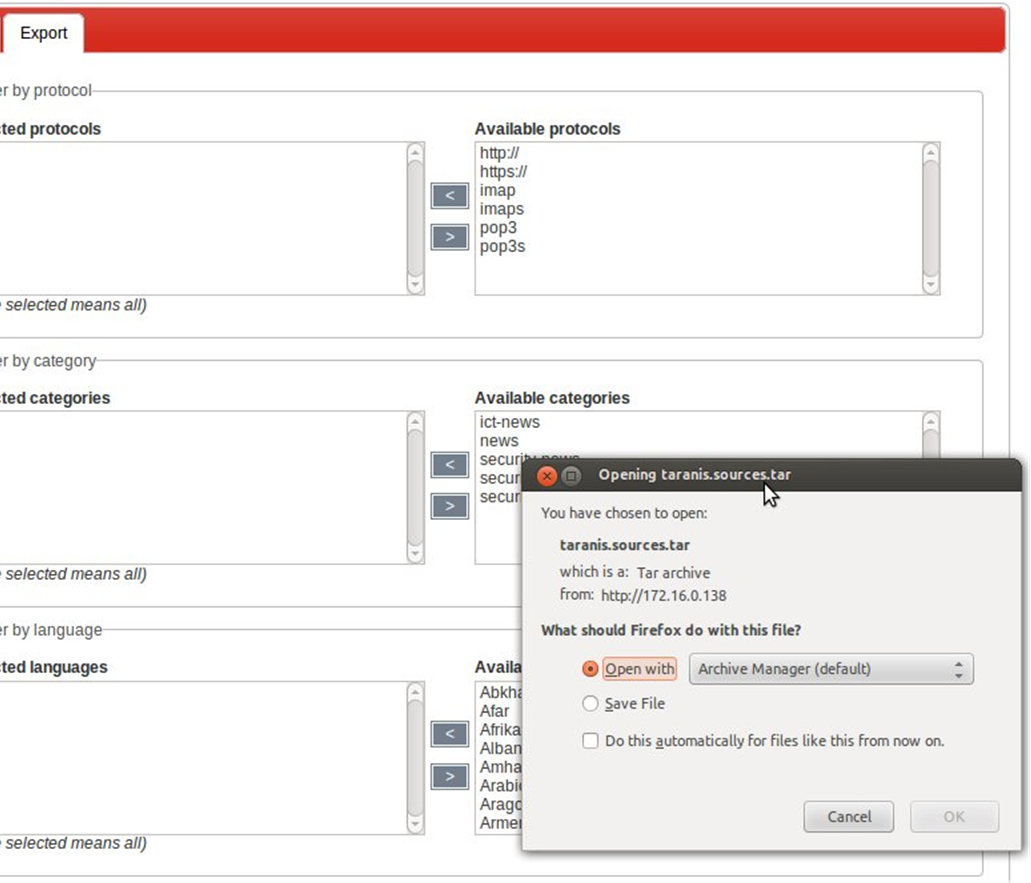
The result of the export is a tarball with icons (GIF files), parser definitions (taranis.parsers.xml), and source definitions (taranis.sources.xml).
Taranis supports multiple collectors all reporting to the same Taranis database. The Collectors configuration option allows you to administer those collectors. When you want to add a new Collector to your installation, you click “Add new collector” on the top of the screen. A popup will then enable you to register this Collector based on a description.
Figure: Add a new collector

After saving the configuration Taranis will create a secret that you’ll need on the Collector side to successfully establish a connection to the Taranis server. As you will see, next to the Description the Secret will show up in the screen.
Figure: Looking up the Collector secret

