Admin Configure Tools
The tools configuration pane enables you to administer the tools visible under de “Tools” menu on the frontpage.
Plugging in existing tools
You can plug different tools into Taranis. By default, Taranis comes with four different tools: ‘WHOIS’, ‘Phishing Checker’, ‘Big Screen’ and ‘Feed Digest’. Every tool you define has three properties:
- Name;
- Webscript; and
- Back-end script.
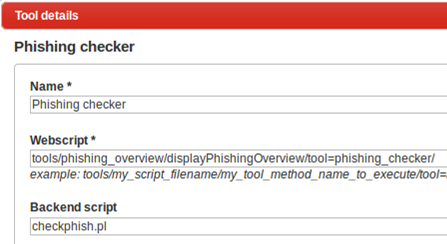
The figure below shows the configuration of the phishing checker that has both a front-end and back-end: the front-end shows the status of all phishing websites, the back-end checks the current status of those websites.
Figure: tool configuration
Create your own tool
You can easily add your own tools to Taranis. All you need is some creativity, some Perl knowledge, and the information provided in this paragraph. As an example we create a tool called the “Hello World” tool which will only display the message “Hello World”. In order to create this tool, you first create this very simplistic helloworld.pl script:
#!/usr/bin/perl

my @EXPORT_OK = qw(displayHelloWorld);

sub helloworld_export {
  return @EXPOERT_OK;
}

sub displayHelloWorld {
  my $htmlContent = "<h1>Hello world!</h1>";
  return { content => $htmlContent };
}

1;
The following things are important in creating this script:
- It must contain an
@EXPORT_OKarray defining the subs that you want to be accessible through the web interface. - It must contain an
_export-sub that returns this@EXPORT_OKarray. The name of this sub corresponds with your tool name followed by the_exportstring (e.g.helloworld_export). - The subs specified in the
@EXPORT_OKarray must be part of the same file.
<entitlement id="helloworld">
  <menuitem>1</menuitem>
  <use_entitlement>tools</use_entitlement>
</entitlement>
Make sure that the ID of your entitlement matches the name of your script (without the .pl extension).
Place your helloworld.pl in a subdirectory of the mod_tools-directory of Taranis. The directory name and the script name should correspond. In this case you create the directory scripts/mod_tools/helloworld/ and copy the script helloworld.pl to this newly created directory.
Your tool is now almost ready to use. Make sure that the permissions and ownership of your new tool are set correctly. On Ubuntu you should e.g. issue the following commands:
cd /opt/Taranis/mod_tools/
chown -R apache: ./helloworld/
chmod -R 755 ./helloworld/
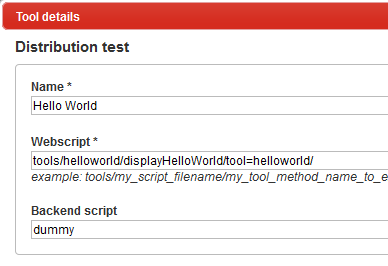
Now add your tool definition by following the steps outlined in the previous paragraph. Use the settings as shown below:
Figure: Tool details
The last step is to restart or reload your Apache daemon and login to Taranis for all changes to take effect. If all went well, you should now see your tool listed in the Tools menu.
Of course, the example shown is very simple but it should help you get up and running with the tools functionality. You could check the other tools scripts included with Taranis to see what other functionalities are offered by this functionality. You can make use of all core Taranis components which should enable you to easily integrate your extension into Taranis!
