Admin Configure
The settings of Taranis can be configured through the Taranis web interface or via the configuration files on the Taranis server. This chapter describes the different web-based configuration options Taranis offers.
The configuration of Taranis is opened through the “Configuration” link on top of every page. This chapter will focus on these configuration items only. It depends on the user's rights which configuration options are displayed.
Figure: Configuration options
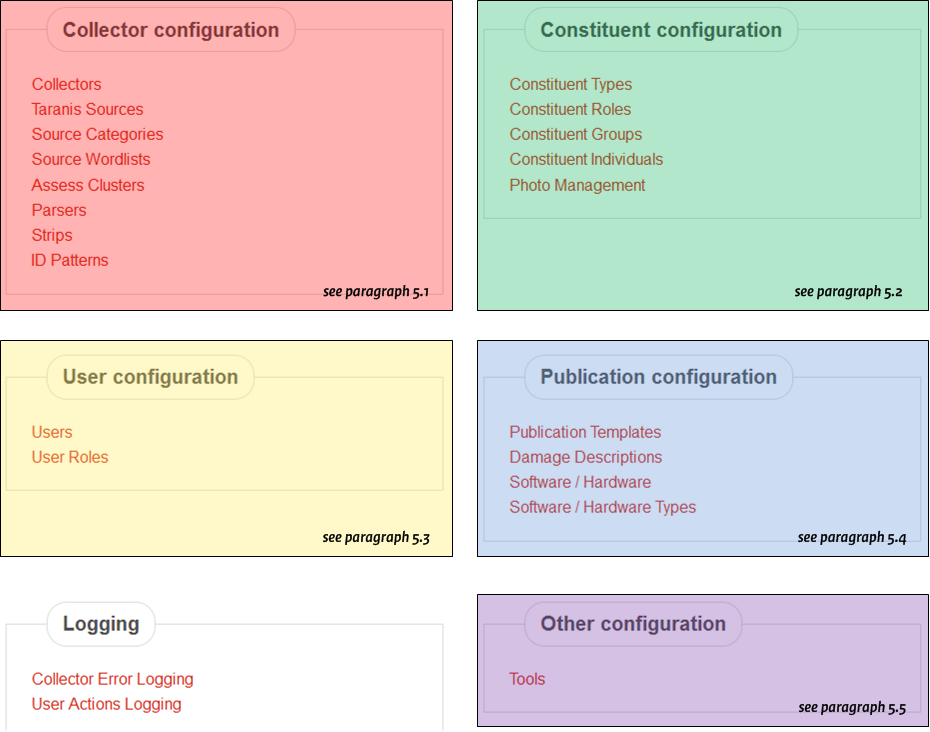
Option blocks:
After installation of Taranis only the ‘admin’ user is defined. To add a new user or edit the properties of an existing user, open the users’ details window. It will show some basic properties of the user (figure 5-30). You can specify the full name, email address. and email name of this user.
The “Role” tab allows the administrator to specify which roles the users will have.
Figure: User configuration
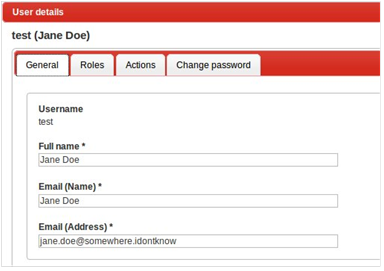
By default only the role ‘Taranis Administrator’ is available, which allows full access to the configuration. You may link multiple roles to a single user; to do this, the access rights the user will receive are cumulative (the rights of all the roles combined).
The “Change password” tab allows the administrator to change the current password of the users. The “Actions” tab gives you an overview of the last actions by this user.
Taranis supports a granular authorization framework in which users can get access to the different features of Taranis. This authorization framework makes use of “roles”, “entitlements”, and “particularizations”. An entitlement defines the authorization a user can have on a very specific component of Taranis, e.g. authorizations to access the “Assess”-part of Taranis.
A role is used to group a list of entitlements and to specify the exact rights on this entitlement. Possible rights on an entitlement are “Read” (R), “Write” (W) and “Execute (X). When a user has for example only Read-access to items he or she can read the items collected but cannot change the status of these items.
| admin_generic | Defines access to generic administration features |
| analysis | Analyses |
| configuration_generic | Item categories, collector logs, ID patterns |
| configuration_parser | Parser definitions |
| configuration_strips | <currently not in use> |
| Constituent_groups | Constituent groups, soft-/hardware linked to Constituent groups |
| Constituent_individuals | Constituent individuals, Constituent roles |
| cve | CVE Descriptions |
| damage_description | Damage descriptions |
| entitlements | <currently not in use> |
| dossiers | The dossier functionality |
| generic | Basic access (required for every user) |
| item_analysis | Items from assessment to analyze, bulk analysis, multiple analyses |
| items | Items |
| membership | <currently not in use> |
| photo_import | Photo management features under Configuration |
| publication | Publications, soft-/hardware list, publishing, calling lists |
| publication_template | Publication templates |
| publication_type | <currently not in use> |
| report | Report functionality |
| rest_level_1-4 | Access to the REST API |
| role_right | Roles, role rights |
| roles | Roles, role rights |
| soft_hard_usage | <currently not in use> |
| software_hardware | Soft-/hardware types, soft-/hardware list |
| sources_errors | <currently not in use> |
| sources_items | Sources, strips |
| sources_stats | Statistics |
| tools | Tools |
| user_action | User actions |
| user_role | User roles, users |
| users | Users |
The ‘Rights’ tab for a role shows all the entitlements along with three checkboxes (R, W, X) and sometimes a particularization.
Figure: Role rights
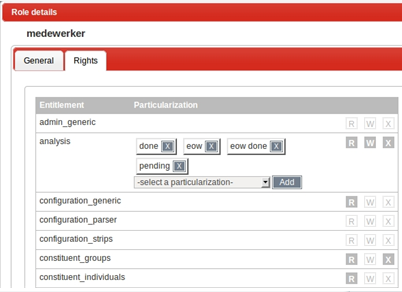
Some entitlements support a particularization. These particularizations enable the administrator to further limit the access of the user to certain subsets of the entitlement. The example shows that the role has read-, write- and execute-access to analyses, but only for analyses with the statuses ‘Done’, ‘Eow’, ‘Eow Done’ and ‘Pending’. This means that the user does not have access to analyses with another status than those.
Publication templates ease the process of advisory creation. You can create templates for texts that you often use in your publications. Taranis comes with several publication templates: ‘Advisory (email)’, ‘Advisory (update)’, ‘Advisory (forward), ‘Advisory (forward update)’, ‘End-of-Shift (email)’, and ‘End-of-Week (email)’. You can change these templates to adapt the standard NCSC-NL products for your own use.
The strength of templates lies in the fact that you can easily create publications thereby avoiding errors and using uniform texts. To enable flexibility in your templates, you can use variables in your texts.
When describing vulnerabilities and solutions, for example, you will regularly see updates from the same vendor. The texts you use to describe these solutions are often the same. To ease this process you decide to create a template to describe an update from Ubuntu. The text you use for Ubuntu-updates is something like this:
Ubuntu released updates for Ubuntu 12.04 LTS to resolve this issue. You can install
these updates by using 'apt-get update' and 'apt-get upgrade'. More information about
the vulnerability can be found here: http://www.ubuntu.com/usn/USN-1439-1
You can create a template for the text shown above by choosing “Publication Templates” from the main configuration screen and then clicking ???. The window that will open, allows you to specify some general properties of the template you’re about to create.
Figure: New publication template

Make sure the title properly describes the contents of your template, as this is the name you will see when loading templates into your advisory or other publications. Also, specify in which product you want to normally use your template.
The ‘Template’-tab contains the actual template, formatted as XML. Taranis fills in the following XML in this tab:
<publication>
  <template>
  </template>
  <fields>
  </fields>
</publication>
The template-text must be placed in the <template> container. Variables to be used in the text must be placed in the <fields> container.
If we use the example text for Ubuntu and replace the dynamic parts with variables, the text could look something like this:
Ubuntu released updates for Ubuntu _fld_ubuntuversion_ to resolve this issue.
You can install these updates by using 'apt-get update'
and 'apt-get upgrade'. More information about the vulnerability
can be found here: http://www.ubuntu.com/usn/USN-_fld_ID_
Variables in the text must be enclosed by underscores ('_'). The first variable in the text is the Ubuntu versions that are updated which we will call variable _fld_ubuntuversion_. The second variable is the ID of the Ubuntu advisory-ID which we will call variable _fld_ID_.
Now that we defined these two variables, we will have to tell Taranis what kind of variables these are. Taranis supports the following input types for variables:
- Text area;
- Textbox;
- Dropdown list;
- Radio buttons;
- Checkboxes.
<fields> container. For the Ubuntu version we want to show a list of supported versions that can be checked by the user:
<fld_ubuntuversion desc="Ubuntu version(s)">
  multiple:10.04 LTS:11.10:12.04 LTS
</fld_ubuntuversion>
Each variable must be represented as an XML-tag. The description for the variable is stored in the desc-attribute. Between the variable tags, the user can specify the type of input field (textarea, text, dropdown, radio or multiple). Properties for the input field are placed behind the type-indicator, divided by colons.
Example Result:
-
textarea:10:20Shows a text area with 10 columns and 20 rows. -
text:10Shows a textbox with size 10. -
dropdown:a:b:cShows a dropdown list with values ‘a’, ‘b’ and ‘c’. -
radio:a:b:cShows three radio buttons with values ‘a’, ‘b’ and ‘c’. -
multiple:a:b:cShows three checkboxes with values ‘a’, ‘b’ and ‘c’.
<publication>
<template>
Ubuntu released updates for Ubuntu _fld_ubuntuversion_ to resolve this issue. You can install these updates by using 'apt-get update' and 'apt-get upgrade'. More information about the vulnerability can be found here:
http://www.ubuntu.com/usn/USN-_fld_ID_
</template>

<fields>
<fld_ubuntuversion desc="Ubuntu version(s)">
  multiple:8.04 LTS:10.04 LTS:11.10:12.04 LTS:12.10
</fld_ubuntuversion>
<fld_ID desc="Ubuntu-ID (USN-XXX-X):">text:170</fld_id>
</fields>
</publication>
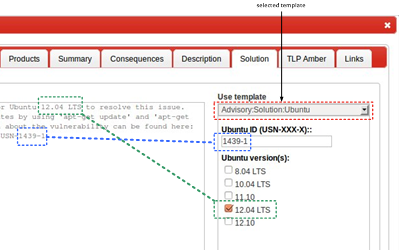
After you’ve entered the template, press the button to find out if your XML is syntactically correct. If validation of the template was successful, you can save it and use it in your publications. The figure below shows how the Ubuntu-template can be used in an advisory.
Figure: Using templates
To standardize the damage descriptions for advisories, Taranis enables you to administer a standard list of damage descriptions to include in your advisory. Open the list of damage descriptions through “Damage description” on the “Publication configuration” pane.
Examples of damage description that NCSC-NL uses in its advisories are ‘Remote code execution’ and ‘Denial of Service’. All the damage descriptions you add to this list, will automatically be loaded into the advisory.
Figure: a list of possible damage descriptions loaded in an advisory

Taranis keeps a list of all soft- and hardware. This list is used to indicate vulnerable software in an advisory. By linking Constituent groups to soft- and hardware, it is possible to automatically send an advisory only to Constituent groups that use that vulnerable soft- or hardware. You can manually add new items to the list or use the CPE list maintained by MITRE.
Below an example of the soft-/hardware list. For each piece of soft-/hardware, Taranis shows an icon that indicates the use of the soft-/hardware within the constituency. This can help in deciding to write an advisory or skip it because the soft-/hardware is not in use.
Figure: The soft-/hardware list
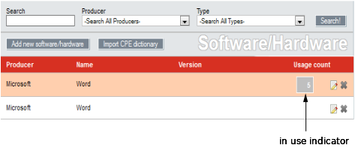
When a particular piece of soft-/hardware is in use (see the ‘in use indicator’), you can move your mouse pointer over the indicator to see which organizations use this soft-/hardware. An administrator can open the details of the soft-/hardware by clicking on the ???-icon next to it.
You can add new hard- or software to the list by clicking on the button at the top of the page. This will open up a pop-up like:
Figure: Add new hard- or software
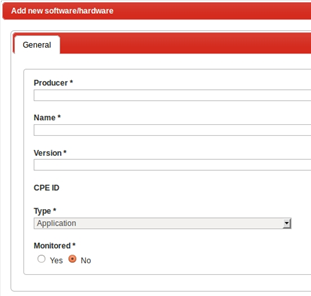
Specify the name of the producer (vendor), the name of the product, and optionally a version number of the soft- or hardware. CPE ID is only used with soft- and hardware imported from the CPE-list. The type indicates what you want to add to the list:
- Hardware;
- Operating System; or
- Software.
Keeping the list of soft- and hardware up-to-date can be a daunting task. To ease the maintenance of this list, Taranis supports the use of the Common Platform Enumeration (CPE) list maintained by MITRE. According to MITRE:
“CPE is a structured naming scheme for information technology systems, platforms, and packages. Based upon the generic syntax for Uniform Resource Identifiers (URI), CPE includes a formal name format, a language for describing complex platforms, a method for checking names against a system, and a description format for binding text and tests to a name.”
You can import the latest CPE-dictionary by clicking on the button on top of the screen. Clicking on this button will open up this screen:
Figure: Import CPE dictionary
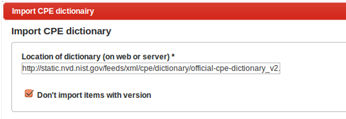
MITRE offers the CPE dictionary in the form of an XML file that is regularly updated. You can import this file directly by specifying the URL or you can enter a full path to the file on the server.
The CPE dictionary contains a lot of items. You can limit the number of items imported in Taranis by selecting the ‘Don’t import items with version’ option. Whether this is suitable for your situation mainly depends on the way your constituents specify the hard- and software they use. If they just specify the products without version numbers, you can use this filter without problems.
Click on ‘load file’ to start the import. This process is RAM intensive, so make sure you comply with the minimum system requirements.
Figure: Download and processing
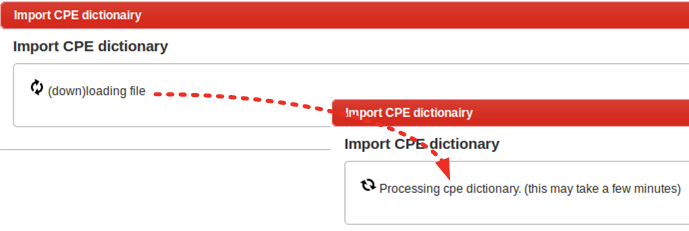
After Taranis successfully processed the dictionary, it will show:
Figure: CPE-import
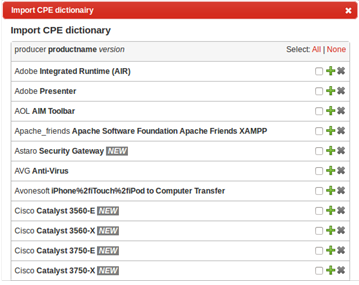
Taranis presents you a list of all new and changed items from the CPE-list. All new items are flagged with ???.
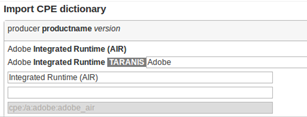
The figure below shows an example of a CPE-item where the product name name in Taranis (‘Integrated Runtime’) is different from the product name in the CPE (‘Integrated Runtime (AIR)’).
Figure: Changed CPE-item
It is up to you to decide how you want to process the information from the CPE. The easiest way to make your choice is by clicking on the words on the bottom of the page:
Figure: Actions on CPE-items

By clicking on the words you can define the actions to be taken on which pieces of information:
- What you want to do: import or discard.
- Which items it concerns: all new, all changed or all selected.
After you finished the complete list, Taranis may ask you if you want to import items that are only listed with a version number. This will happen if you selected the ‘Don’t import items with version’ option at the start of the import. The reason Taranis asks you this question, is because there are apparently products listed in the CPE that are only listed with a version number and not without. If you would ignore these items, you would end up with an incomplete list of hard- and software. What Taranis can do in this situation is to create a new soft- or hardware item based on the information in the CPE but without a version-number. Because this item is not listed in the CPE, it will not receive a CPE-ID. If you want to do this, click on the ???-button. If not, choose the ???-button.
Figure: Remaining CPE-items after the import

All the records in the soft-/hardware list are linked to a soft-/hardware type. Taranis needs to know what type a specific piece of hard- or software is, in order to be able to distinguish operating systems from applications running on top of that. This is especially important for advisories as these publications have different sections for the selection of vulnerable operating systems and vulnerable applications.
Based on the CPE-list, Taranis distinguishes the following software and hardware types by default:
- Application;
- Hardware; or
- Operating System.
Figure: Creating a custom soft-/hardware type

The “Other configuration” pane is used to configure settings that do not fit under one of the other categories. Currently, the tools configuration, access tokens, CVE Descriptions and CVE Templates are part of this pane.
The tools configuration pane enables you to administer the tools visible under de “Tools” menu on the frontpage.
Plugging in existing tools
You can plug different tools into Taranis. By default, Taranis comes with four different tools: ‘WHOIS’, ‘Phishing Checker’, ‘Big Screen’ and ‘Feed Digest’. Every tool you define has three properties:
- Name;
- Webscript; and
- Back-end script.
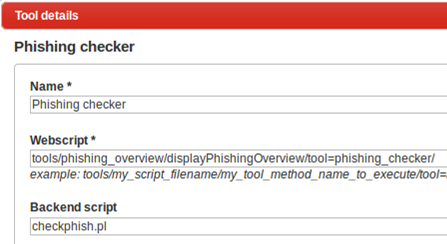
The figure below shows the configuration of the phishing checker that has both a front-end and back-end: the front-end shows the status of all phishing websites, the back-end checks the current status of those websites.
Figure: tool configuration
Create your own tool
You can easily add your own tools to Taranis. All you need is some creativity, some Perl knowledge, and the information provided in this paragraph. As an example we create a tool called the “Hello World” tool which will only display the message “Hello World”. In order to create this tool, you first create this very simplistic helloworld.pl script:
#!/usr/bin/perl

my @EXPORT_OK = qw(displayHelloWorld);

sub helloworld_export {
  return @EXPOERT_OK;
}

sub displayHelloWorld {
  my $htmlContent = "<h1>Hello world!</h1>";
  return { content => $htmlContent };
}

1;
The following things are important in creating this script:
- It must contain an
@EXPORT_OKarray defining the subs that you want to be accessible through the web interface. - It must contain an
_export-sub that returns this@EXPORT_OKarray. The name of this sub corresponds with your tool name followed by the_exportstring (e.g.helloworld_export). - The subs specified in the
@EXPORT_OKarray must be part of the same file.
<entitlement id="helloworld">
  <menuitem>1</menuitem>
  <use_entitlement>tools</use_entitlement>
</entitlement>
Make sure that the ID of your entitlement matches the name of your script (without the .pl extension).
Place your helloworld.pl in a subdirectory of the mod_tools-directory of Taranis. The directory name and the script name should correspond. In this case you create the directory scripts/mod_tools/helloworld/ and copy the script helloworld.pl to this newly created directory.
Your tool is now almost ready to use. Make sure that the permissions and ownership of your new tool are set correctly. On Ubuntu you should e.g. issue the following commands:
cd /opt/Taranis/mod_tools/
chown -R apache: ./helloworld/
chmod -R 755 ./helloworld/
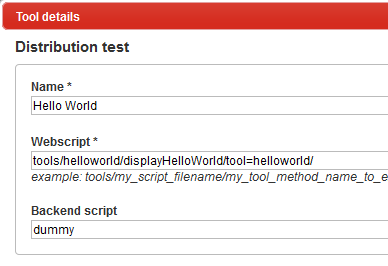
Now add your tool definition by following the steps outlined in the previous paragraph. Use the settings as shown below:
Figure: Tool details
The last step is to restart or reload your Apache daemon and login to Taranis for all changes to take effect. If all went well, you should now see your tool listed in the Tools menu. Of course, the example shown is very simple but it should help you get up and running with the tools functionality. You could check the other tools scripts included with Taranis to see what other functionalities are offered by this functionality. You can make use of all core Taranis components which should enable you to easily integrate your extension into Taranis!
Access Tokens are used to grant users access to the REST API of Taranis. Use the ‘Add new tokens’ to add them. Select a user and an expire time.
CVE descriptions can be used to translate or describe a CVE once and then use it in multiple advisories. The original descriptions are provided by MITRE. The URL from which these descriptions are downloaded can be managed with the ???-button. This will show the page shown here:
Figure: Manage CVE download files

Use the add URL link to add additional URL’s. The descriptions are downloaded and processed with taranis cve descriptions.
CVE descriptions can be very similar for vulnerabilities that are related to each other. In such a case you can use a CVE Template. A new template can be added with the ???-button.
