Admin Maintenance
Once you’ve installed and configured Taranis to your needs, it is important to maintain the installation to make sure that everything keeps on running smoothly. This chapter introduces some aspects that are relevant for the day-to-day administration of Taranis.
Daily maintenance of your installation is pre-configured during the installation, but you may want to improve on that. To perform daily maintenance, you do not need to have root privileges: you need to be able to login as user 'taranis' (or the username you picked during installation).
Give yourself ssh access to that username for easy and safe access. The (new in 3.4.0) taranis command has many sub-commands (and there will be more in the future). Try taranis --help to list all sub-commands. Each of them also has a short help, for instance taranis db --help which shows the exact use and options.
Sub-commands which have to be run often, are grouped into three scripts which are triggered via cron. You may change their frequency in the crontab (crontab -e).
The three default groups of commands are:
~/var/cron.often Run (very) often, by default every five minutes.
For example to update the dashboard information.
~/var/cron.cycle Run at each collector cycle, by default every twenty minutes. This controls the collecting itself, running some back-end scripts, statistics collector, and so on.
~/var/cron.daily Daily maintenance, to update cve and cpe information, and more.
You may alter these scripts to your own likes: add, move, or disable steps, redirect output, etc. Do not forget to document the reason for your changes. Commands can be started by hand, for instance to debug them. When needed, the sub-commands will lock themselves to avoid accidents with critical activities. It is not required to block them in cron.
When there are many extensions to your installation, it may be clearer to create your own separate cron scripts.
Your Taranis instance is defined by the files in ~/var/ and the content of the database. When you move your instance to a new machine, they have to be moved as they are.
The (new) wrapper command psql will let you login to the database without the need to remember how access is configured.
When you change files in ~/etc/ you have to rerun taranis install: they define your installation. When your instance moves to a different machine, those files will change.
The files in ~/lib/ are produced during the installation process. They should not be modified by hand.
Beside the default OS and application logging, Taranis supports both system logging and Taranis specific application logging.
- Apache logging
- PostgreSQL logging
journalctl -t TARANIS- Logfiles under
/var/log/taranis/
You need to backup
- the database table
taranis, where most data is stored -
~taranis/where the code is stored
- restore the directory of user
taranis - as root:
cd ~taranis/sources/taranis-$version; bin/taranis install
Depending on the number of sources you add to Taranis and the number of items these sources generate, the list of items can grow pretty fast. All the items are stored in the items-table of the Taranis-database. Most items are not relevant anymore after a certain amount of time. To make sure Taranis performs well, we advise you to archive older items. The only disadvantage is that the information that is archived will not show up in e.g. the Assess-part of Taranis. However, you can still query the archived items through ‘Advanced Search’ - select ‘Yes’ for the option ‘Search in archive’.
Archiving of items is done based on a date. All items that were collected before this date are moved to the archive-tables. Only items that are linked to an analysis or dossier will not be archived because this would hinder your analysis or dossier. The following is an example of how to archive all data older than 14 days (from the 10th of Juli 2017):
tar$ taranis db archive --before +14d
Archiving records before 20170627
(+   0s) 12:57:26 record count before archiving: [...]
(+   0s) 12:57:26 Collecting tagged items, to be excluded
excluding 0 tagged items
(+   0s) 12:57:26 Archiving email records (table email_item)
(+   0s) 12:57:26 Delete archived email items
(+   0s) 12:57:26 Archiving feed records (table item)
(+   0s) 12:57:26 Deleting archived feed records
(+   0s) 12:57:26 Archiving identifiers (table identifier)
(+   0s) 12:57:26 Delete archived identifiers
(+   0s) 12:57:26 Completing transaction
(+   0s) 12:57:26 Re-analyze modified tables
(+   0s) 12:57:26 Archiving successfully completed!
Record count after archiving: [...]
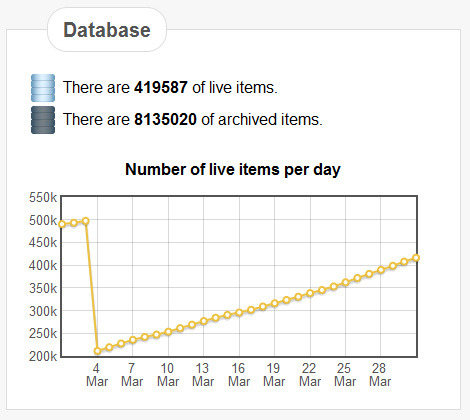
Once you archived items they will become visible in the Dashboard screen of Taranis. In the example of figure 6-1 you can see that an archiving action took place at the beginning of March which resulted in a decrease from 500k live items to around 200k items.
Figure: Database characteristics
PostgreSQL offers a function called vacuuming to, amongst others, allow for recovery and reuse of disk space occupied by updated or deleted rows. You should either run the VACUUM command on the database regularly or turn on autovacuuming.
To manually vacuum the database, execute VACUUM from the psql command line. To enable autovacuuming, consult the PostgreSQL manual with regard to the different autovacuuming options available in the postgresql.conf configuration file.
As a security team, you should practice what you preach: keep your system up-to-date and install security and bug fixes as soon as they become available.
