Repository navigation
Plugins
A plugin adds a feature to Sonorium without changing Sonorium itself, in the way an app adds a feature to a phone. Plugins handle sign-in, keys for other programs, announcements, importing themes from another website, and merging themes.
Plugins are managed on Settings › Plugins. Only an Admin sees Settings (see Roles). To write a plugin, see Plugin Development.
Five plugins are installed with Sonorium and marked Built-in:
| Plugin | What it does | Starts | Where it shows |
|---|---|---|---|
| Users | Accounts, sign-in and roles; Zones. See Sign-in and Users and Zones. | On | The sign-in screens, Settings › Users & devices, the signed-in user at the bottom of the menu, the Zones row on Settings › Advanced, and the Zones fields in a channel's window when Zones is on |
| Integration | Keys that let devices and programs use Sonorium, each with only the access you tick. See Keys. | On | Settings › Keys |
| Announcements | Home Assistant and MQTT can announce on channels: each channel gets a notify entity in Home Assistant, and the text is spoken with Home Assistant's text to speech. See Announcements. | On | Its settings on the Plugins page; the Announcements switch in a channel's window |
| Theme Merge | Merges two themes, into a new theme or into either of the two. See How to merge two themes. | Off | Its form on the Plugins page |
| Ambient Mixer Importer | Imports a mix from Ambient-Mixer.com as a new theme, or as a preset of a theme you have. See How to import from Ambient Mixer. | Off | Its form on the Plugins page |
A built-in plugin is updated with Sonorium: when an update brings a newer version of it, Sonorium replaces the installed copy when it starts.
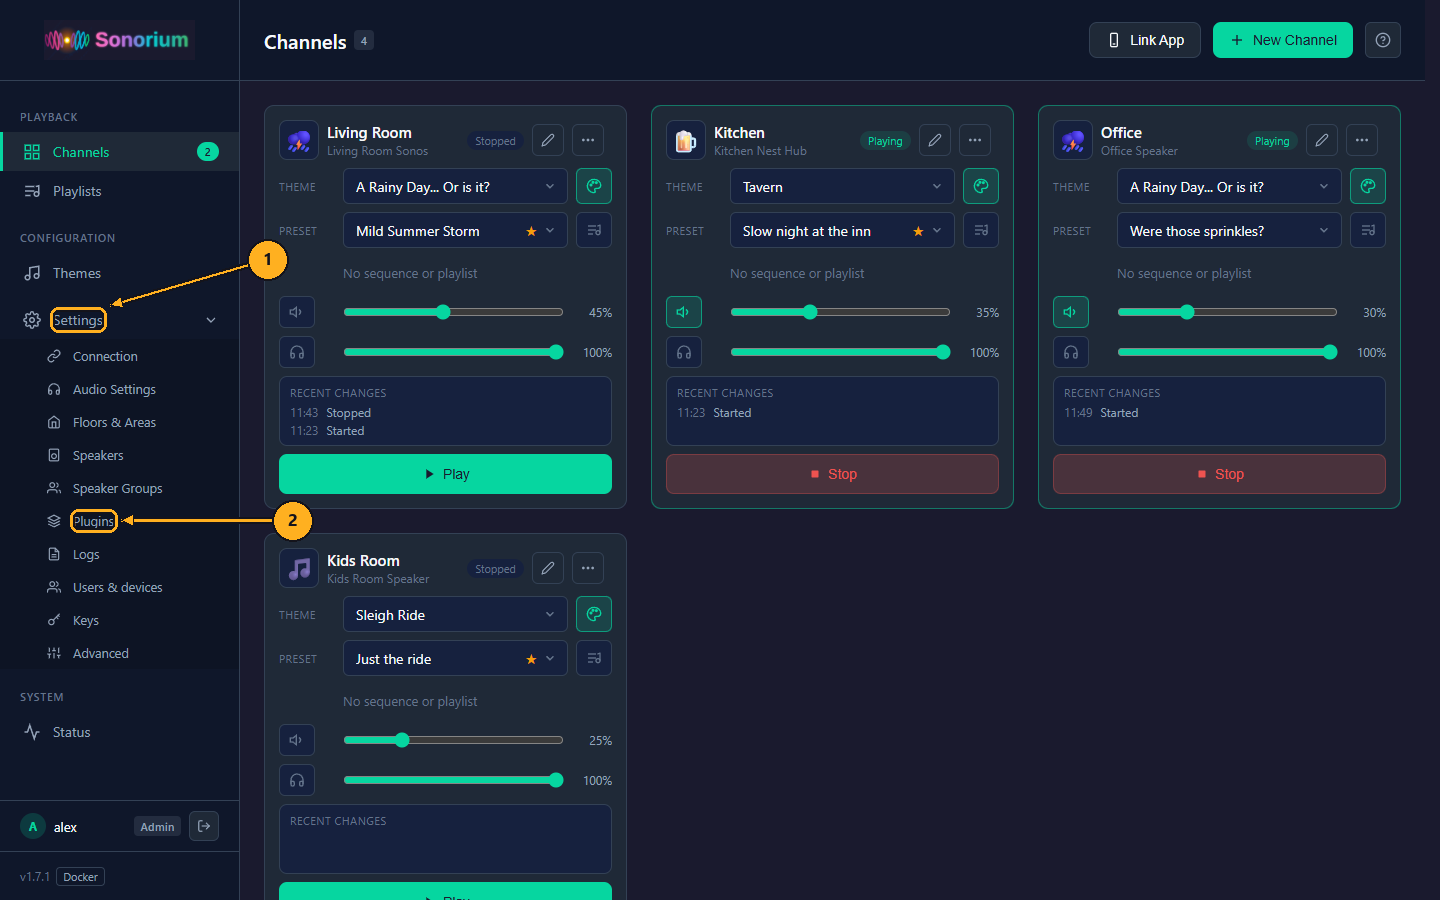
1: On the Channels page, click Settings in the menu on the left. The menu opens to show the settings pages.
2: Click Plugins.
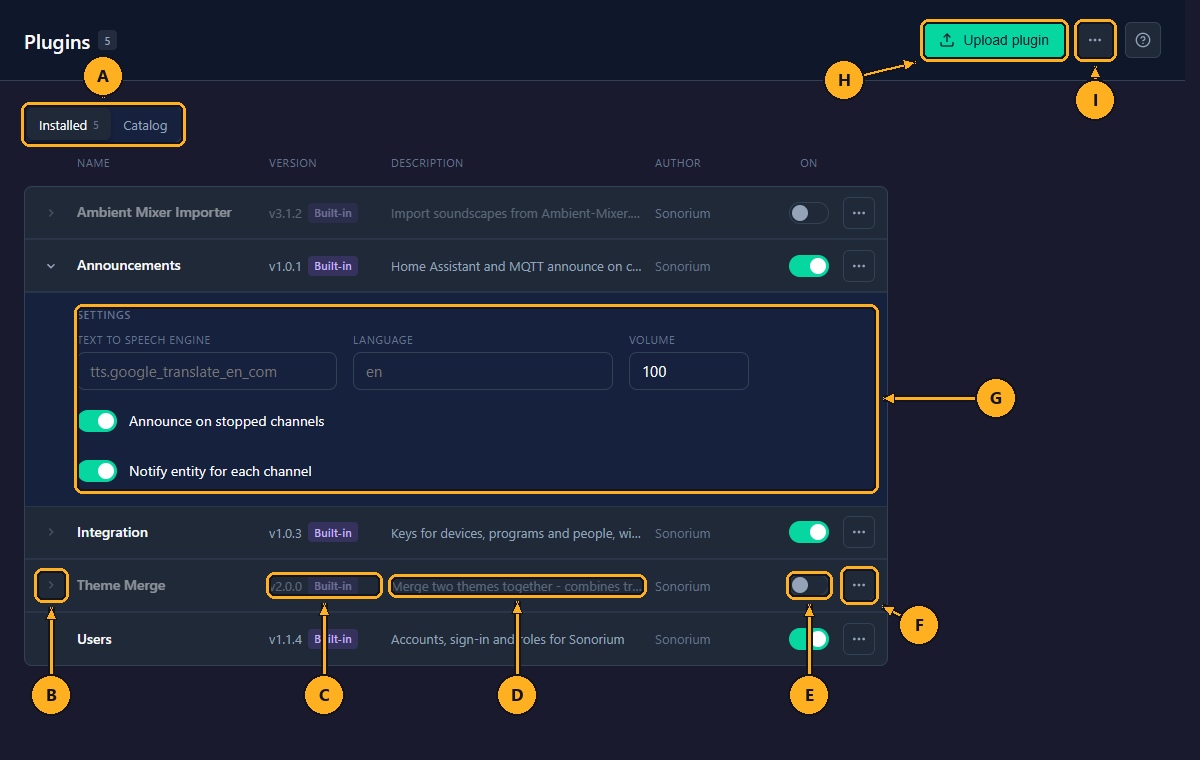
- A: Installed, Catalog: Installed lists the plugins you have, with how many. Catalog lists the plugins you can download (see How to install a plugin from the Catalog).
- B: Arrow: shows or hides the plugin's form and settings. It can't be clicked for a plugin that is off (Enable to use) or has nothing to show (No options). A plugin's form is open when the page opens.
- C: Version and Built-in: the installed version. Built-in marks a plugin that comes with Sonorium.
- D: Description: hover over a shortened description to read all of it.
- E: On: takes effect at once, without a restart (see How to switch a plugin on or off).
- F: ⋯: Uninstall… (see How to uninstall a plugin).
- G: Settings: the plugin's settings, here those of Announcements (below).
-
H: Upload plugin: installs a plugin from a
.zipfile. -
I: ⋯: Plugin requirements…: what a plugin
.ziphas to contain.
The Author column says who made the plugin. The number next to the page title counts the installed plugins.
A plugin that is on, and has something to show, opens under its row. It can have three parts:
- Fields: what the plugin needs for its next job, for example the address of a mix to import. Some fields show only for certain choices in another field.
- Buttons: start a job with the fields above. The result shows as a message at the bottom of the screen.
- Settings: values the plugin keeps between jobs. A setting is saved as soon as you change it (a switch at once, a text box when you press the Enter key or click elsewhere). A value the plugin can't use is refused, with a message under the settings, for example Volume must be 0 to 200.
What was typed in the fields stays there while the page is open.
| Setting | What it does | Default |
|---|---|---|
| Text to speech engine | The Home Assistant tts.* entity that speaks the text, for example tts.google_translate_en_com. |
Empty: Home Assistant's first one |
| Language | The language code given to the text to speech engine, for example en. |
Empty: the engine's default |
| Volume | The announcement's volume, 0 to 200 (%). | 100 |
| Announce on stopped channels | On, a stopped channel is started for an announcement and stopped after it. Off, stopped channels are skipped. | On |
| Notify entity for each channel | On, each channel gets a notify entity in Home Assistant (for example Kitchen Announce). | On |
How announcements work, with examples, is on Announcements.
1: On the Channels page, click Settings in the menu on the left.
2: Click Plugins.
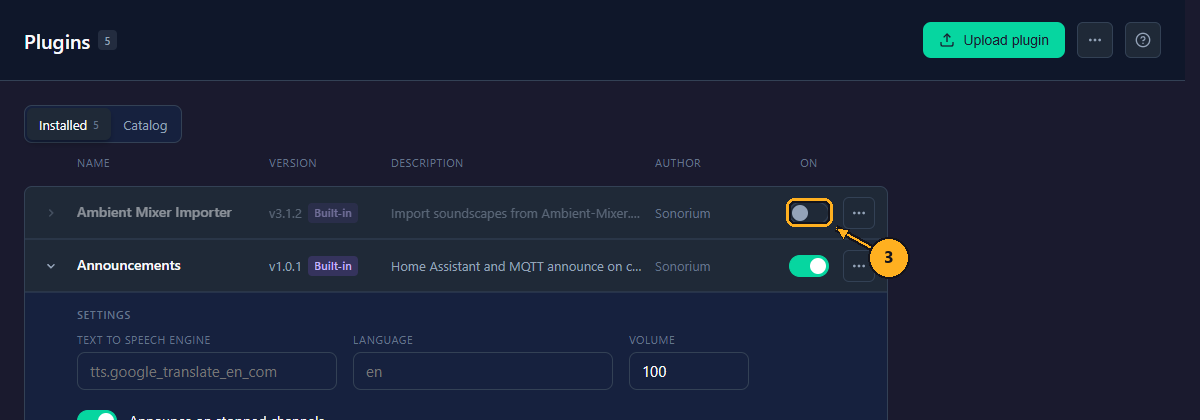
3: Click the plugin's On switch (E on the Plugins page). The screenshot shows Ambient Mixer Importer.
A message says Plugin enabled or Plugin disabled. Switching a plugin on opens its form. No restart is needed.
A plugin that is off does nothing, and its pages and menu items are hidden. For example, with Integration off, Keys is no longer in the Settings menu. Switching it back on brings them back.
Switching off Users asks first, because Sonorium is then open to anyone on your network: no sign-in, and everyone can change everything.
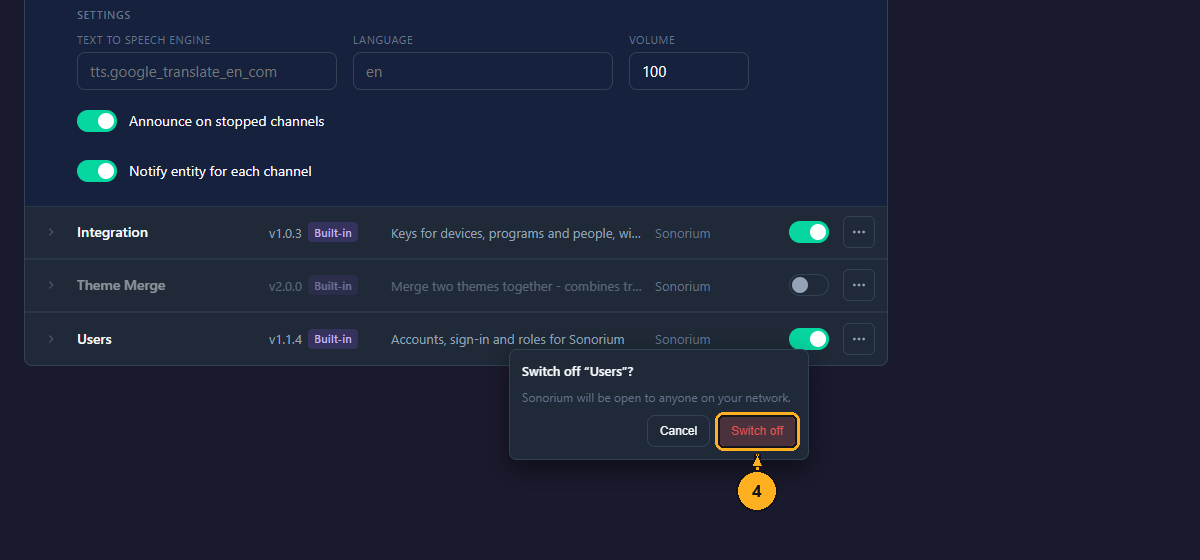
4: Click Switch off to confirm, or Cancel to keep it on.
Ambient-Mixer.com is a website of ambient mixes, each made of several sound files with volume and timing settings. The importer downloads the files of one mix and turns the mix into a Sonorium theme, or into a preset of a theme you have. Sonorium needs internet access for this.
1: On the Channels page, click Settings in the menu on the left.
2: Click Plugins.
3: Click the On switch of Ambient Mixer Importer. Its form opens.
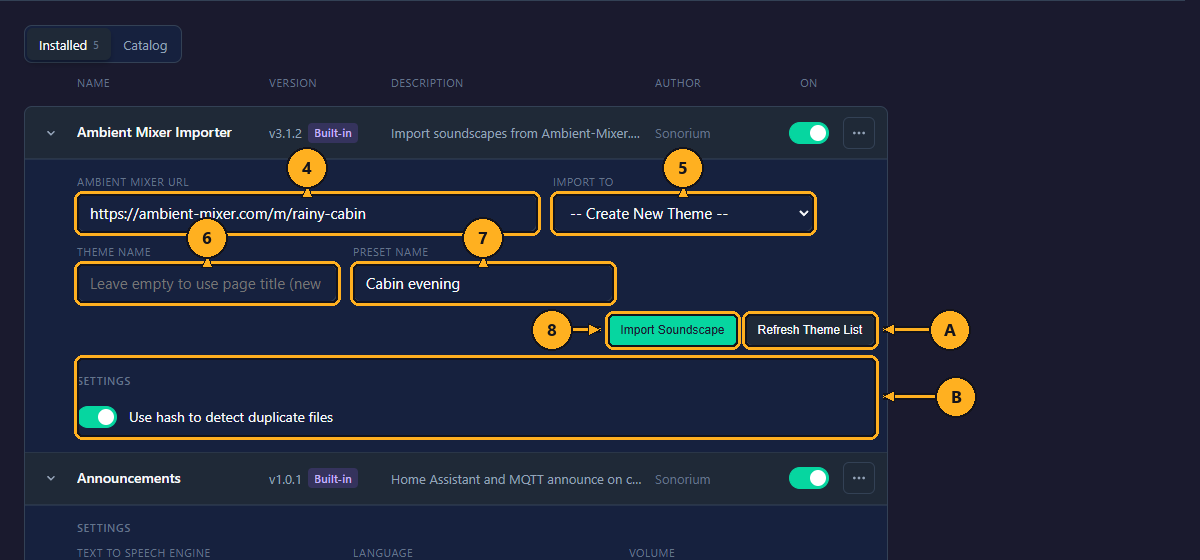
4: Paste the mix's address from Ambient-Mixer.com into Ambient Mixer URL.
5: Click Import To and pick -- Create New Theme --, or a theme you have to add the mix to as a preset.
6: For a new theme, type a name in Theme Name, or leave it empty to use the mix's name. This field is hidden when Import To is a theme you have.
7: Type a name in Preset Name, or leave it empty to use the mix's name.
8: Click Import Soundscape.
A message says Executing action... while the files download, which takes from a few seconds to a few minutes depending on the mix and your connection. Then:
- For a new theme: Created theme 'Rainy Cabin' with preset 'Cabin evening' (8 tracks). The theme is on the Themes page, with the preset as its default.
- For a theme you have: Added preset 'Cabin evening' to 'A Rainy Day' (8 tracks). The theme's other tracks are muted in the new preset, so the preset sounds like the mix.
- (3 existing files reused) is added when files the theme already has were used instead of downloading copies.
| Field or button | What it does |
|---|---|
| Ambient Mixer URL | The address of the mix, for example https://ambient-mixer.com/m/example. It must be an ambient-mixer.com address: anything else gives URL must be from ambient-mixer.com. Required. |
| Import To | -- Create New Theme -- (default) or one of your themes. |
| Theme Name | The new theme's name. Empty: the mix's name. |
| Preset Name | The preset's name. Empty: the mix's name. A name the theme already uses gets a number added, such as Cabin evening (2). |
| Import Soundscape | Downloads the mix's files and makes the theme or preset. |
| Refresh Theme List (A) | Reads your themes again for Import To, for example after you made a theme in another tab. |
| Setting | What it does | Default |
|---|---|---|
| Use hash to detect duplicate files (B) | When adding to a theme you have, a downloaded file is compared byte for byte with the theme's files, and a match is used instead of a new copy. More thorough, but slower. Off, only the file name and Ambient Mixer's file number are compared. | On |
- Each sound of the mix becomes a track. A sound that plays now and then on Ambient Mixer (its "random" setting) becomes Intermittent, with an Interval that plays it about as often as it played there; every other sound becomes Background.
- Each sound's volume and mute carry over. A sound without crossfade on Ambient Mixer becomes a gapless loop.
- A new theme gets the description "Imported from" and the mix's address, plus an
ATTRIBUTION.mdfile with the mix's address, the sounds' license (Creative Commons Sampling Plus 1.0, which asks you to credit ambient-mixer.com) and each file's original name, and aMANIFEST.jsonfile with the mix's settings. - Nothing is saved if the import fails partway: Import failed, nothing was saved: and the reason.
Other messages: Could not find template ID in page. The URL may be invalid. (the page isn't a mix), No audio channels found in the template. (the mix is empty), Failed to download any audio files.
Theme Merge puts the tracks and presets of two themes together, like pouring two drawers of sound files into one. The result can be a new theme, leaving both themes as they are, or one of the two themes, which then gains the other's tracks.
1: On the Channels page, click Settings in the menu on the left.
2: Click Plugins.
3: Click the On switch of Theme Merge. Its form opens.
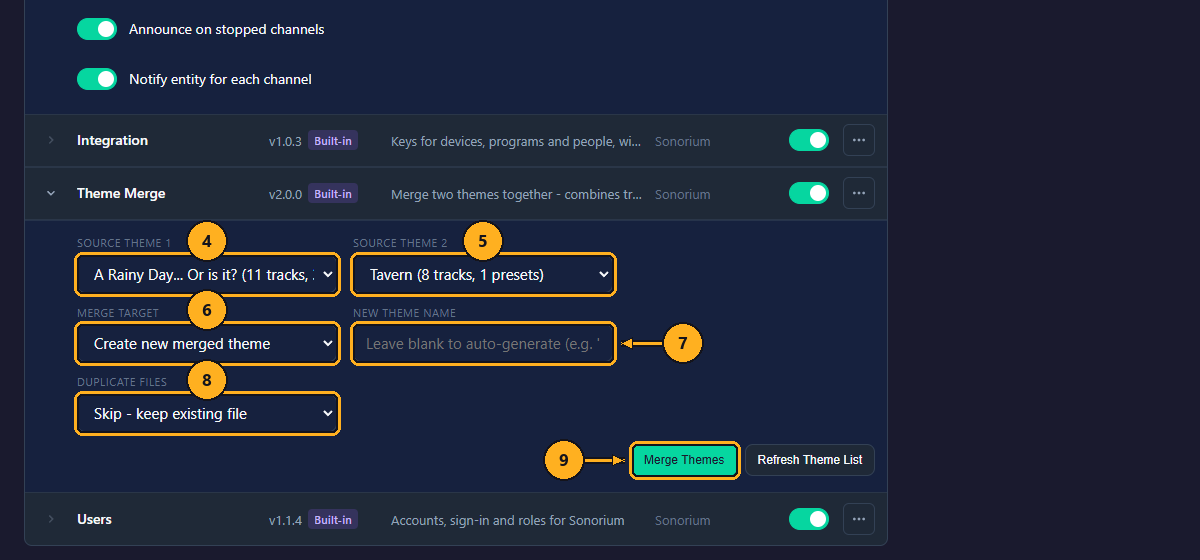
4: Click Source Theme 1 and pick the first theme.
5: Click Source Theme 2 and pick the second theme.
6: Click Merge Target and pick where the result goes.
7: For a new theme, type a name in New Theme Name, or leave it empty.
8: Click Duplicate Files and pick what happens to a file both themes have.
9: Click Merge Themes.
The message says what was done, for example Created merged theme 'A Rainy Day... Or is it? + Tavern': 19 tracks copied, 3 presets merged, or Merged into 'Tavern': 11 tracks copied, 2 presets merged. The theme is on the Themes page.
| Field or button | Choices | Default |
|---|---|---|
| Source Theme 1, Source Theme 2 | Your themes, each with its number of tracks and presets, for example Tavern (8 tracks, 1 presets). Pick two different themes. | -- Select a theme -- |
| Merge Target | Create new merged theme: a new theme; both source themes stay as they are. Merge into Source Theme 1: the first theme gains the second theme's tracks and presets; the second stays as it is. Merge into Source Theme 2: the other way round. | Create new merged theme |
| New Theme Name | The new theme's name. Empty: both names joined with +, such as Rain + Tavern. Used only for a new theme. | Empty |
| Duplicate Files | Skip - keep existing file: a track with the same name (and group) as one already in the target is left out, and the target's track is used. Rename - add suffix to new file: the file is copied anyway as "Name (2)". | Skip - keep existing file |
| Merge Themes | Checks both themes, then writes the result (see What comes along). | |
| Refresh Theme List | Reads your themes again for the two source lists. |
- Tracks: every sound file, in its group, with its track settings (mode, volume, Interval and so on).
- Groups: a group's settings, when the target has no group of that name. When it has one, the target's settings stay and the new tracks play as that group does.
- Linked files: a link to a file of one of the two themes becomes that track; a link to any other theme stays a link.
- Presets: every preset. A name the target already uses becomes "Name (Theme)". Tracks a preset didn't have are muted in it, and the target's presets get the new tracks muted, so every preset sounds as it did before.
- Sequences are not merged. The message then says Sequences of … were not merged. See Sequences and Playlists.
Everything is read and checked before anything is written: a merge either completes, or leaves both themes as they were with Nothing was merged: and the reason. A theme with problems must be fixed first (open it in Sonorium and check it first).
The Catalog lists the plugins published with Sonorium, plus Sonorium's built-in plugins. Opening it reads the list from GitHub, so Sonorium needs internet access; Sonorium keeps the list for an hour.
1: On the Channels page, click Settings in the menu on the left.
2: Click Plugins.
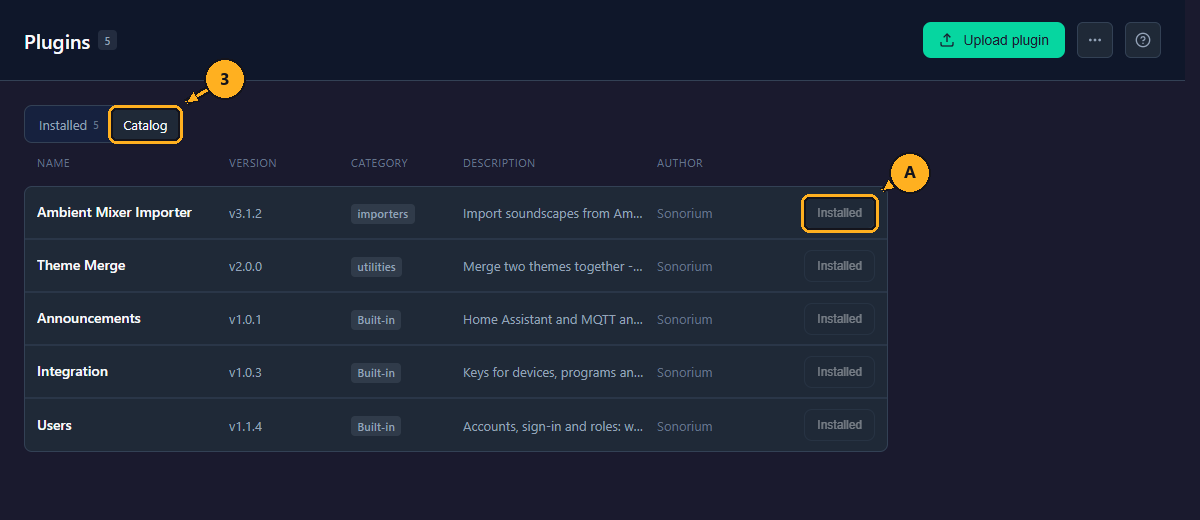
3: Click Catalog. Loading catalog… shows, then the list.
4: Click Install on the plugin's row (A).
The button shows Installing…, then a message says the plugin installed successfully, and it is added to Installed, switched off. Switch it on to use it.
The Catalog has the columns Name, Version, Category, Description and Author. The button on each row reads:
- Install: you don't have the plugin.
- Installed (can't be clicked): you have this version.
- Update: the Catalog has a newer version than yours. The version shows an Update badge; hover over it to see your version. Click Update to install the newer version; the plugin's settings are kept.
When the list can't be read, the Catalog shows Couldn’t load the catalog with a Retry button: check Sonorium's internet access.
A plugin you got elsewhere comes as a .zip file.
1: On the Channels page, click Settings in the menu on the left.
2: Click Plugins.
3: Click Upload plugin in the top right (H on the Plugins page). Your computer's file window opens.
4: Pick the .zip file and click Open.
Uploading… shows next to the button, then a message says the plugin installed successfully!, and it is listed under Installed, switched off.
- A plugin with the same id as one you have replaces it. Its settings are kept, and it stays on if it was on.
- A file that isn't a
.zipgives Please select a ZIP file. A.zipwithoutplugin.pygives No plugin.py found in archive. A plugin without a version, or with a version not written as three numbers (1.0.0), is refused with a message that says so.
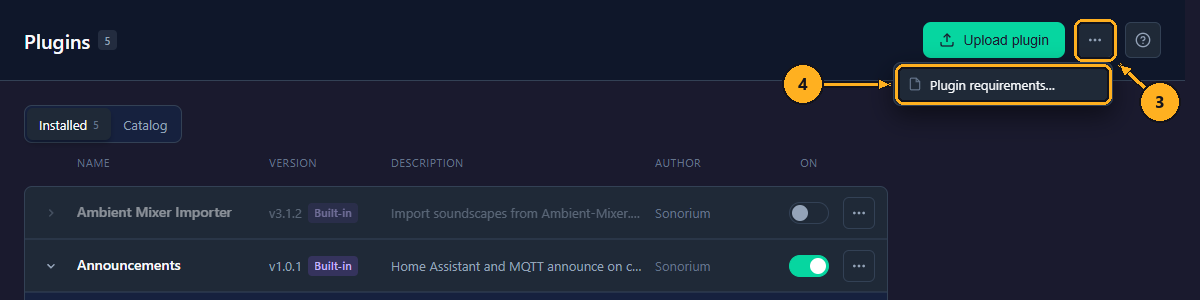
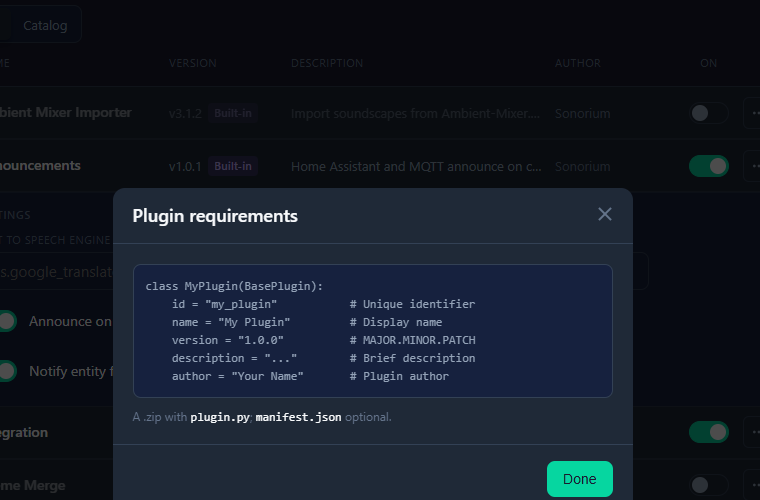
Plugin requirements… in the page's ⋯ menu shows what the .zip needs: a plugin.py with a plugin class that has an id, name, version, description and author; manifest.json is optional. Click Done to close it.
A plugin runs inside Sonorium, with the same access to your themes, settings, speakers and network as Sonorium itself, in the same way as a Home Assistant add-on. Install plugins only from people you trust.
A plugin can also ask to install Python packages from the internet. Sonorium refuses this until Plugin packages is switched on under Settings › Advanced; see Advanced Settings.
1: On the Channels page, click Settings in the menu on the left.
2: Click Plugins.
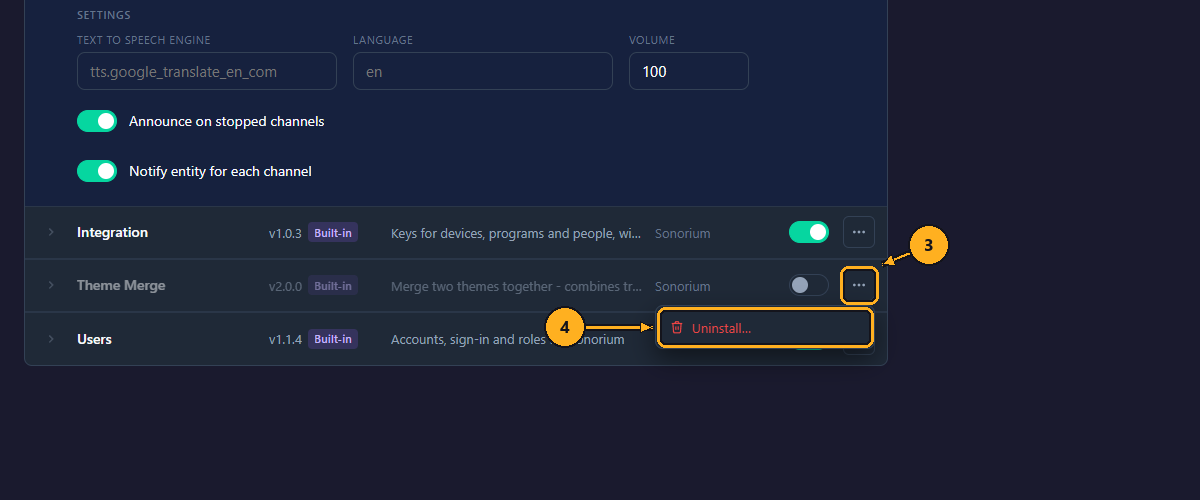
3: Click ⋯ on the plugin's row.
4: Click Uninstall….
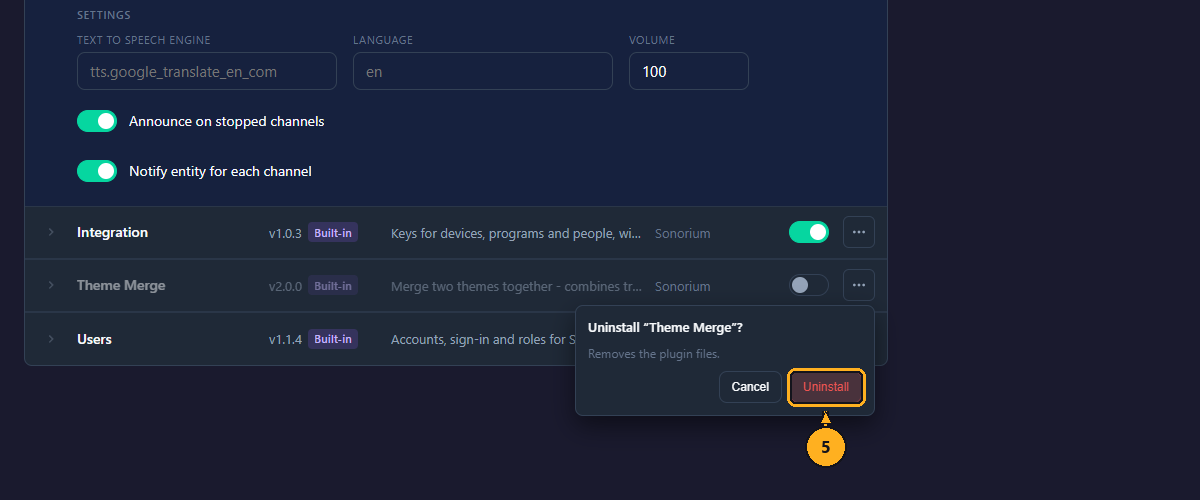
5: Click Uninstall to confirm, or Cancel to keep it.
A message says the plugin was uninstalled successfully. Its files are removed, with its settings, scheduled jobs, trigger tokens and saved connection details.
- Built-in plugins can be uninstalled too. An uninstalled built-in plugin stays uninstalled when Sonorium restarts or updates. To get it back, open the Catalog and click Install on its row: Sonorium installs it from the copy it ships with, switched off.
- Uninstalling Users asks with Sonorium will be open to anyone on your network. The accounts stay in Sonorium's config folder.