Repository navigation
Theme Editor
The Theme Editor is where a theme is built: its name and categories, its sound files, how each file plays, its groups, its presets and its sequences. This page walks through the editor from top to bottom and shows how to add files, make groups, move tracks and use files from another theme.
What each playback mode and setting does is explained in Track Settings. Presets are on Presets, sequences on Sequences and Playlists. To build a theme folder by hand instead, see Theme Format.
Only an Admin can open the Theme Editor (see Sign-in and Users).
1: On the Channels page, click Themes in the menu on the left (see Themes).
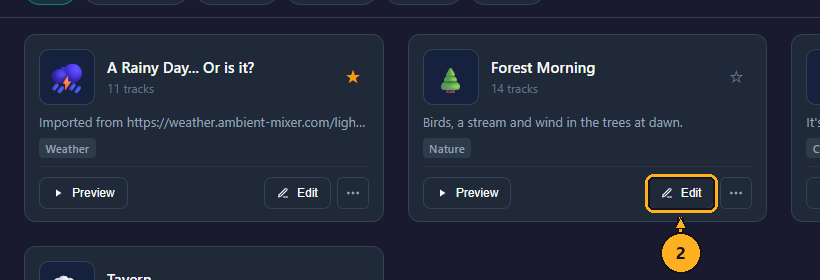
2: On the theme's card, click Edit. The Edit theme window opens over the page, with the theme's name next to its title.
A theme you've just created opens in the editor (see How to create a theme).
The editor saves two kinds of change in two ways:
- The mix (every slider, Mode, mute, fade, Gap, Crossfade, Rise, pause and switch on a track or group) is saved the moment you change it. It is heard at once with Preview mix, and on every channel playing this theme with no preset (Default settings on the channel). A channel playing a preset keeps that preset's values until you click Save preset; it then glides to the new ones over 3 seconds.
- The theme's details (name, icon, categories and description) are saved with Save theme. Until then a dot on Save theme shows there are unsaved details.
Some changes are saved at once and stay even if you click Cancel: uploads, moving tracks between groups and sections, making, renaming and deleting groups, adding and removing linked files, and saved presets and sequences.
Cancel (or the × in the top right, or a click outside the window) puts the mix back as it was when the editor opened, or when Save theme was last clicked, and closes the editor. Save theme saves the details and closes the editor; from then on, Cancel no longer puts back the changes made before it.
The buttons, as the editor's help puts them:
- Save Preset: Saves loaded preset
- Save Theme: Saves theme with all changes (presets, name, etc) Required after saving a preset.
- Cancel: Reverts unsaved changes.
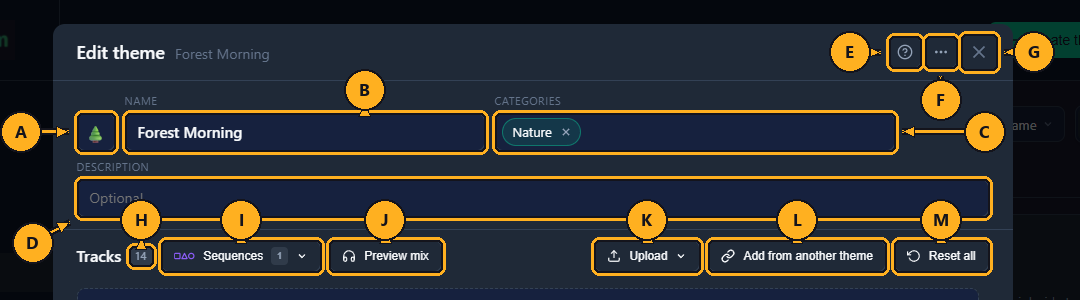
- A: Icon: the picture shown for the theme on its card and on channels. Click it to open a grid of icons and pick one. Auto (marked "from theme") lets Sonorium choose one from the theme's name.
- B: Name: the theme's name as Sonorium shows it. A theme must have a name: Save theme with an empty name shows "Please enter a theme name".
- C: Categories: type a category's name and press the Enter key (or the Tab key) to add it. Existing categories are suggested as you type; the Up and Down arrow keys move through the suggestions. A name that doesn't exist yet is offered as Create "…" and creates the category. Click × on a category to take the theme out of it; with the field empty, the Backspace key removes the last one. Categories are managed on the Themes page (see Categories).
- D: Description: a short line about the theme, shown on its card. It is optional; the Themes page search also looks in it.
- E: ?: the editor's help, How a theme plays. It follows the editor from top to bottom. It closes when you click outside it, two seconds after the pointer leaves it, or with the Esc key.
- F: ⋯: Export theme (see How to export a theme).
- G: ×: closes the editor, as Cancel does.
- H: Tracks: how many tracks the theme has.
- I: Sequences: the theme's sequences (the number is how many), Add sequence…, and the Theme defaults for new sequences. See Sequences and Playlists.
- J: Preview mix: plays the whole theme in this browser, with the editor's current settings, without touching the speakers. The button reads Stop preview while it plays. Volume, Interval, Duration, mute and group changes are heard a few seconds later; changing a Mode or Gapless, moving tracks, uploading and Reset all restart the preview.
- K: Upload: .mp3, .wav, .flac or .ogg files, into Unassigned or a group (see How to add sound files).
- L: Add from another theme: uses files from another theme without copying them (see Files from another theme).
- M: Reset all: asks Reset all tracks and groups to defaults?; Reset puts every track back to default settings and every group's Volume, Interval or Duration and mute back to 100% and on. Group Gaps are left as they are.
The track list is split into four sections, one for each playback mode: Unassigned, Background, Intermittent and Ebb & Flow. Every section is always shown, even when it's empty. A track sits in the section of the mode it plays in; changing a track's Mode, or dragging it into another section, moves it there.
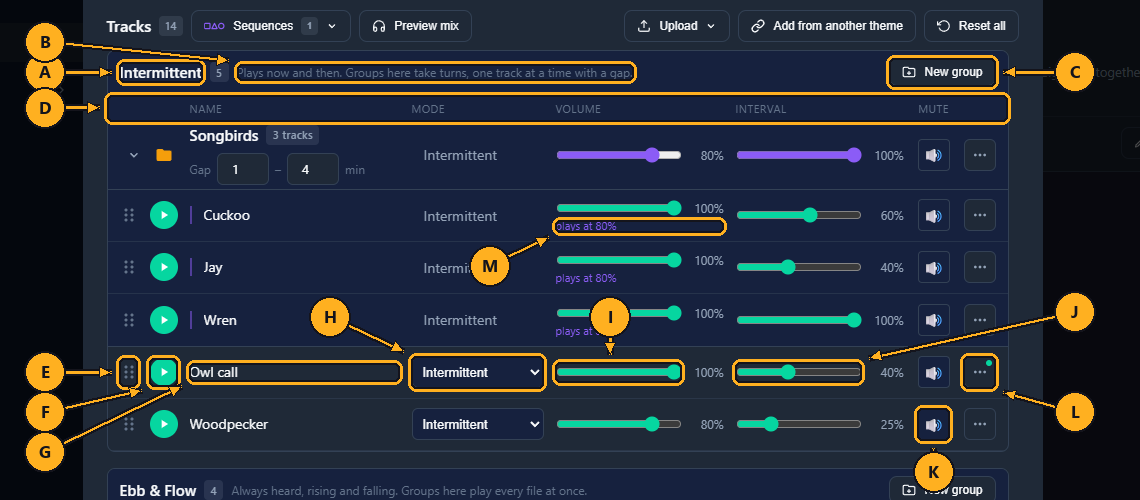
- A: Section name and count: how many tracks are in the section, grouped or not.
- B: Description: one line on how the section plays.
- C: New group: makes a group in this section (see How to make a group). Unassigned has none.
- D: Column headings: Name, Mode, Volume, the section's second slider (Interval in Intermittent, Duration in Ebb & Flow, none in Background) and Mute.
- E: Drag handle: drag a track by it onto a group or another section (see How to move a track).
- F: ▶: plays this one file in this browser. Click it again to stop. Moving its Volume slider changes the preview's volume as you drag.
- G: Name: the file's name without its extension. A name too long for the column scrolls slowly.
- H: Mode: Unassigned, Background, Intermittent or Ebb & Flow. Picking another mode moves the track to that section. A track in a group shows its group's mode as text instead (Merry-go-round, Intermittent or Ebb & Flow): to change it, move the track out of the group.
- I: Volume: 0 to 100%. In Ebb & Flow it has two knobs (lowest and highest level).
- J: Interval (Intermittent) or Duration (Ebb & Flow): 0 to 100%. See Track Settings.
- K: Mute: silences the track without losing its settings. It fades out and in over 3 seconds.
- L: ⋯: the track's menu (see A track's ⋯ menu). A dot on it means one of its menu settings is on, for example a fade.
- M: plays at: in a group, the level the track really plays at once the group's slider is applied, for example "plays at 80%".
Tracks in Unassigned show the file's length instead of the sliders and mute: nothing in Unassigned plays.
A group is a set of tracks inside a section that plays that section's way: Background groups are Merry-go-round, Intermittent groups take turns, Ebb & Flow groups play every file at once. What each kind does is in Track Settings. On disk, a group is a subfolder of the theme's folder.
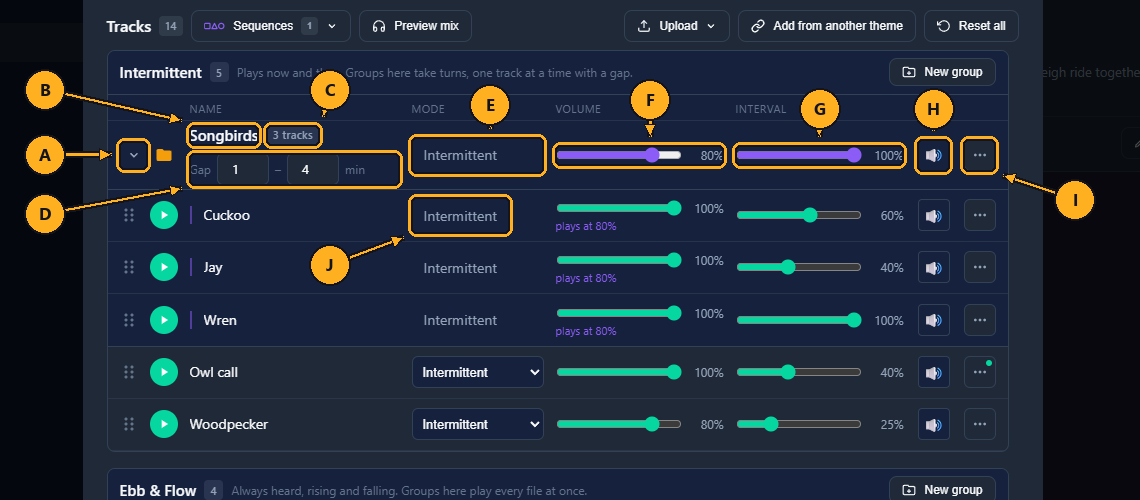
- A: Arrow: folds the group's tracks away, or shows them.
- B: Group name: double-click it to rename the group (see A group's ⋯ menu).
- C: Track count: how many tracks are in the group.
- D: Group setting: under the name: Gap (minutes) in an Intermittent group, Crossfade (seconds) in a Merry-go-round group, the Pause between plays switch in an Ebb & Flow group. See Track Settings.
- E: Mode: the group's mode, set by its section.
- F: Group Volume: applies to every track in the group: it multiplies each track's Volume (a track at 100% in a group at 80% plays at 80%).
- G: Group Interval (Intermittent) or Duration (Ebb & Flow): multiplies each track's value the same way. Background groups have none.
- H: Group Mute: mutes every track in the group.
- I: ⋯: the group's menu.
- J: a track in a group shows the group's mode as text.
A group with no tracks shows Drag files here. While you drag a track over a group, the group lights up and shows Drop to add.
Click ⋯ at the right of a track's row. What the menu holds depends on the track's section. An Ebb & Flow track's menu:
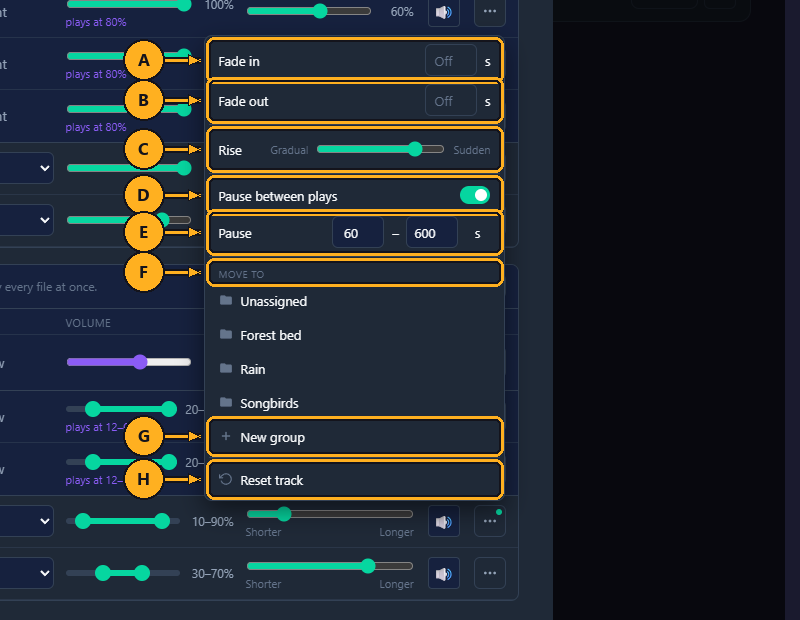
- A: Fade in: seconds the file fades in each time it starts (0 to 30, in steps of 0.5). Empty (Off) is off.
- B: Fade out: seconds the file fades out each time it ends, including each loop.
- C: Rise: Ebb & Flow only, from Gradual to Sudden. It shows "set by group" when the track's group sets one Rise for every file.
- D: Pause between plays: Ebb & Flow only. It shows "set by group" when the group's switch is on.
- E: Pause: Ebb & Flow only: the shortest and longest pause, in seconds.
- F: Move to: Unassigned, or one of the theme's groups. The track's present place can't be picked and is marked "here".
- G: New group: makes a group in this track's section, with the track in it (not in Unassigned).
- H: Reset track: puts the track back to default settings: Volume and Interval or Duration 100%, unmuted, fades and Gapless off, Ebb & Flow settings back to their defaults.
A Background track outside a group also has Gapless:
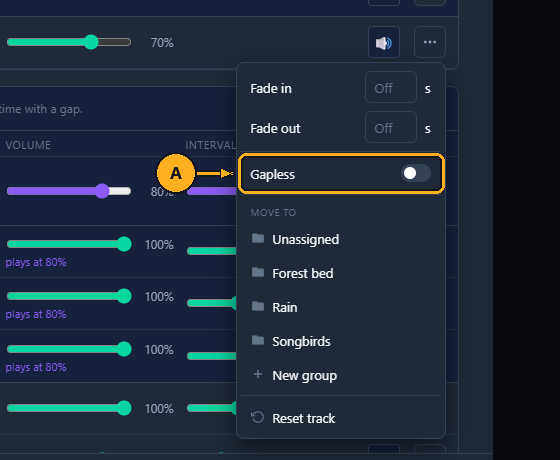
- A: Gapless: loops the file with no crossfade.
What these settings do, with their ranges and defaults, is in Track Settings.
A track of a theme made with an older version can also show One at a time (legacy), switched on. It makes the track take turns with the other tracks that have it. Switching it off removes it from the menu; a group does the same job.
A file linked from another theme has Remove link… at the bottom instead of New group (see Files from another theme).
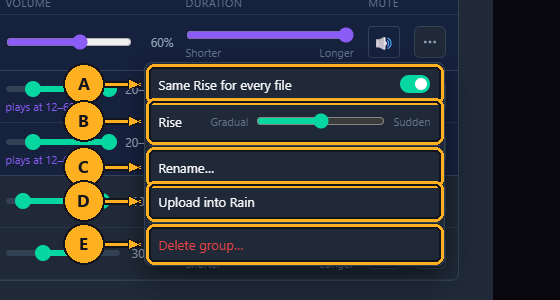
- A: Same Rise for every file: Ebb & Flow groups only. On, one Rise for every file in the group instead of each file's own; it starts halfway between Gradual and Sudden. Off, each file uses its own Rise again.
- B: Rise: the group's Rise, shown while the switch is on.
- C: Rename…: puts a name box in place of the group's name. Type the new name and press the Enter key; the Esc key cancels. Two groups can't have the same name ("A group with that name exists").
- D: Upload into …: uploads files straight into this group (see How to add sound files).
- E: Delete group…: the group's row asks Delete Rain? Tracks move to the theme.; Delete removes the group. Its files are not deleted: they move back into the section, outside any group.
The bottom of the editor holds the theme's presets and the save buttons. Presets are explained on Presets.

- A: Preset: the loaded preset. — Current settings — is the theme without one. Click it to open the list: the theme's presets (★ marks the default, ☆ makes one the default), then its sequences. Picking a preset loads its values into the mix; picking a sequence selects it.
- B: ⋯: Rename…, Set as default, Import…, Export and Delete… (see Presets).
- C: Reload / Edit: shown when needed. Reload puts the loaded preset's values back after you changed the mix. Edit opens the selected sequence.
- D: New: makes a new preset from the current mix (see How to create a preset).
- E: Mix changed: the mix differs from the loaded preset. A dot on the Preset field says the same.
- F: Save preset: saves the current mix into the loaded preset. Can't be clicked when no preset is loaded.
- G: Save theme: saves the name, icon, description and categories, and closes the editor.
- H: Cancel: puts back unsaved changes and closes the editor.
Loading a preset in the editor copies its values into the theme's settings, so channels playing the theme with no preset hear it too. Cancel puts the theme's settings back.
Sonorium accepts .mp3, .wav, .flac and .ogg files.
1: On the Channels page, click Themes in the menu on the left.
2: On the theme's card, click Edit (see How to open the Theme Editor).
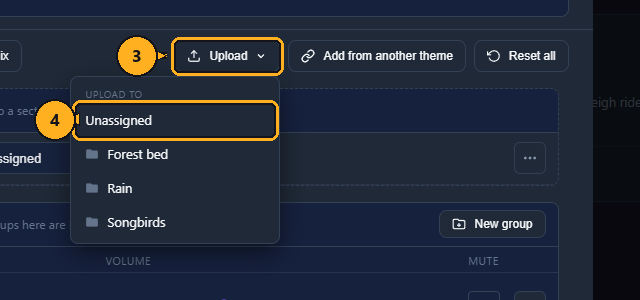
3: Click Upload, above the list of tracks. The Upload to menu opens.
4: Click Unassigned, or the group the files should go into. Your computer's file window opens.
5: Select one or more sound files and confirm (usually Open).
The message "Uploading 3 files…" appears, then "Uploaded 3 files", and the list reloads after about 3 seconds. New files land in Unassigned (or the group you picked) and don't play until you give them a Mode or drag them into a section or group. A file with the same name as one already in the theme replaces it and keeps its settings.
After step 4, an upload area stays open under the toolbar:
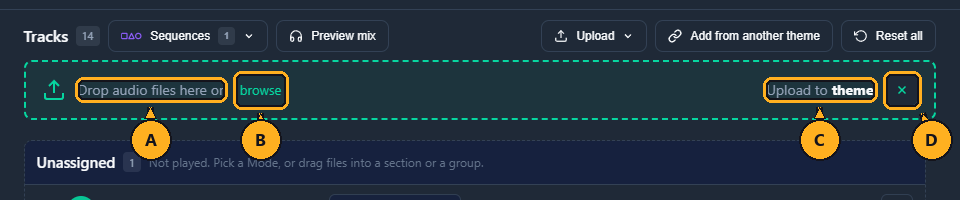
- A: Drop audio files here: drag files from your computer's file window and drop them on this area to upload them.
- B: browse: opens the file window again.
- C: Upload to: where the files go: theme means Unassigned, otherwise the group's name. To change it, pick another place from Upload or from a group's ⋯ › Upload into ….
- D: ×: closes the upload area.
A file of another type is refused with "Invalid file type. Supported: .mp3, .wav, .flac, .ogg"; the other files still upload.
1: On the Channels page, click Themes in the menu on the left.
2: On the theme's card, click Edit.
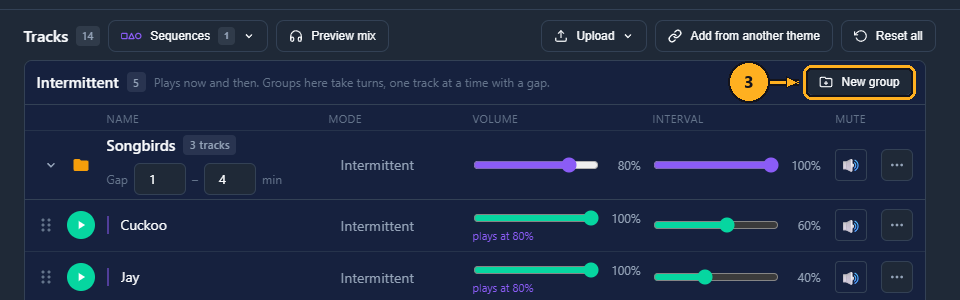
3: Click New group at the right of the section the group belongs in. The group appears in the section, named "New group", with its name ready to change.
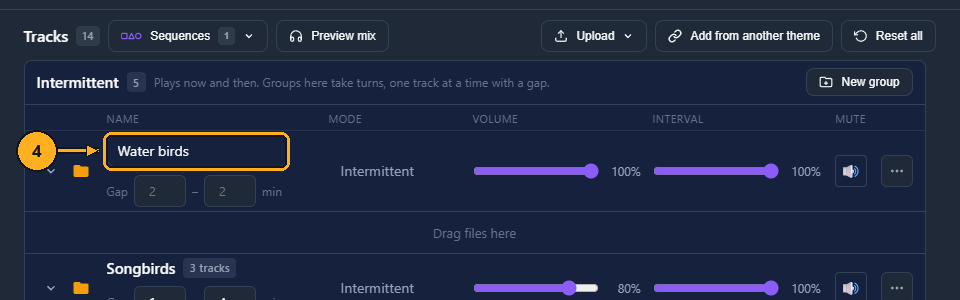
4: Type the group's name, for example "Water birds".
5: Press the Enter key.
The group starts empty, with Volume and Interval or Duration at 100%. Drag tracks into it, or use Move to in a track's menu (see How to move a track).
New group in a track's ⋯ menu does the same with that track already in it.
A track can move between sections and in or out of groups. A track dragged into a group plays its group's way; dragged out again, it stays in that group's section.
1: On the Channels page, click Themes in the menu on the left.
2: On the theme's card, click Edit.
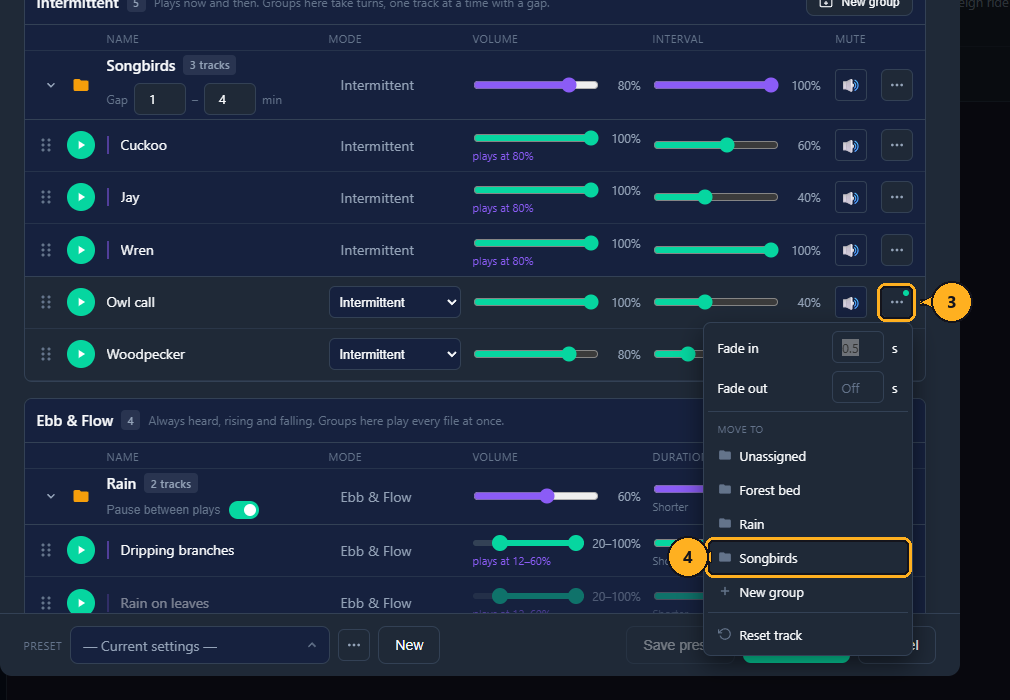
3: Click ⋯ on the track's row.
4: Under Move to, click the group, or Unassigned.
The message "Moved Owl call to Songbirds" appears. The list reloads a moment later.
Point at the six-dot handle at the left of the track's row (E in Sections), hold the mouse button down, and drag the track:
- onto a group, which lights up and shows Drop to add, to put it in that group;
- onto another section, outside its groups, to give it that section's mode outside any group.
Release the mouse button to drop it. Dragging works with a mouse; on a touch screen, use the menu.
To change only a track's mode, pick another Mode on its row.
A theme can use a sound file from another theme without copying it, like rain over a campsite or a storm over a tavern. The file stays in the other theme; this theme plays it from there.
1: On the Channels page, click Themes in the menu on the left.
2: On the theme's card, click Edit.
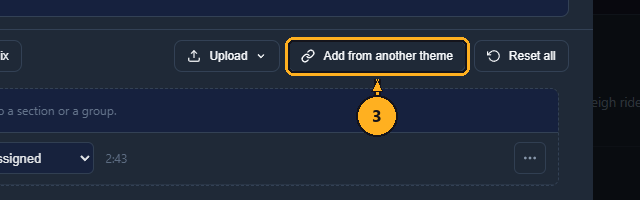
3: Click Add from another theme. The Add from another theme window lists your other themes, with their categories and number of tracks. Search themes finds them by name or category.
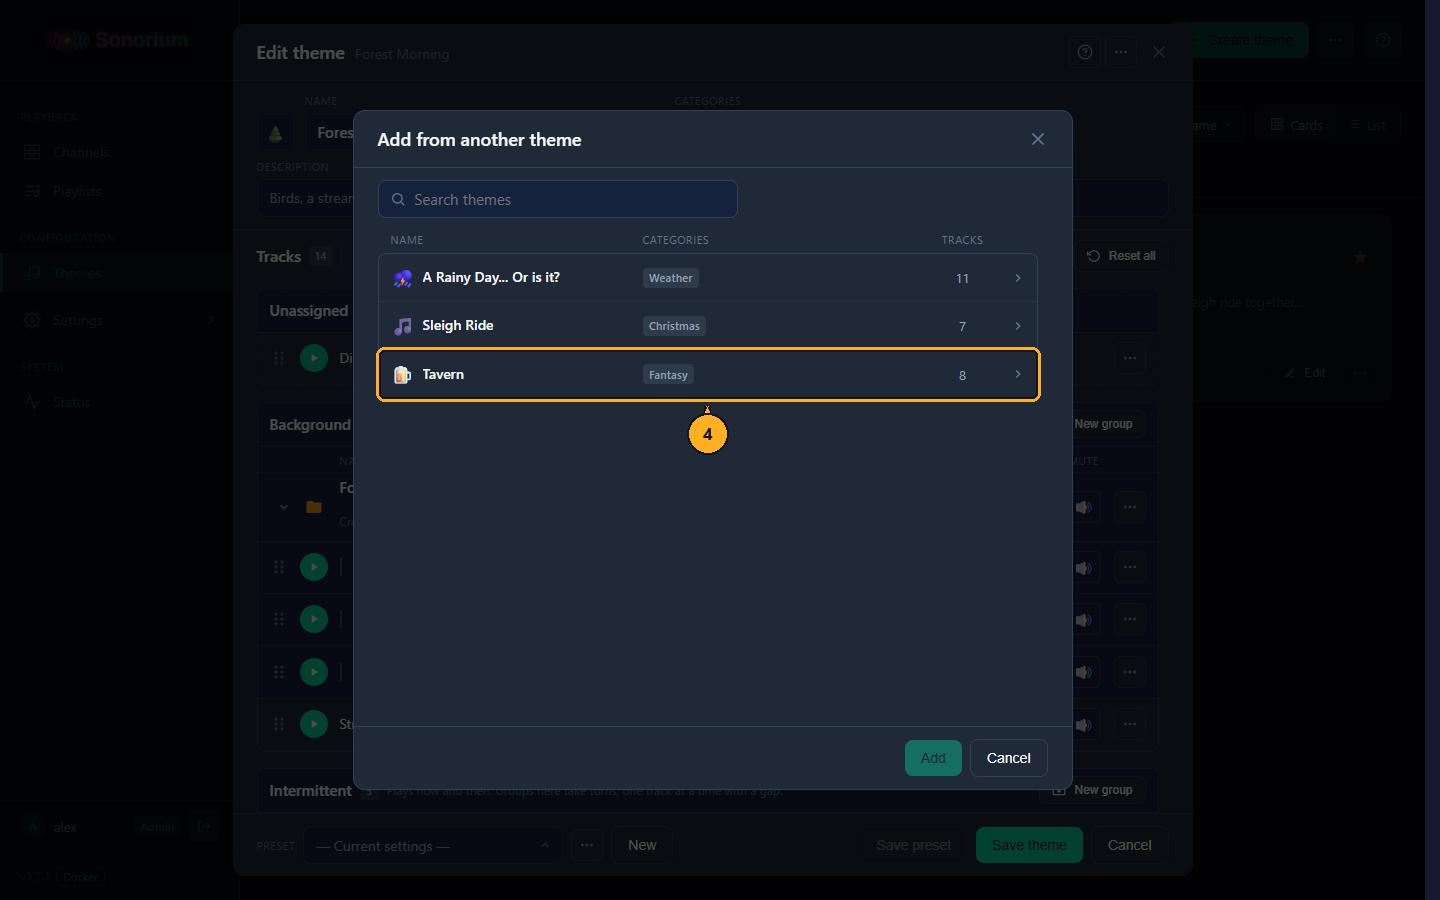
4: Click the theme that holds the file. Its files are listed, with their group and length.
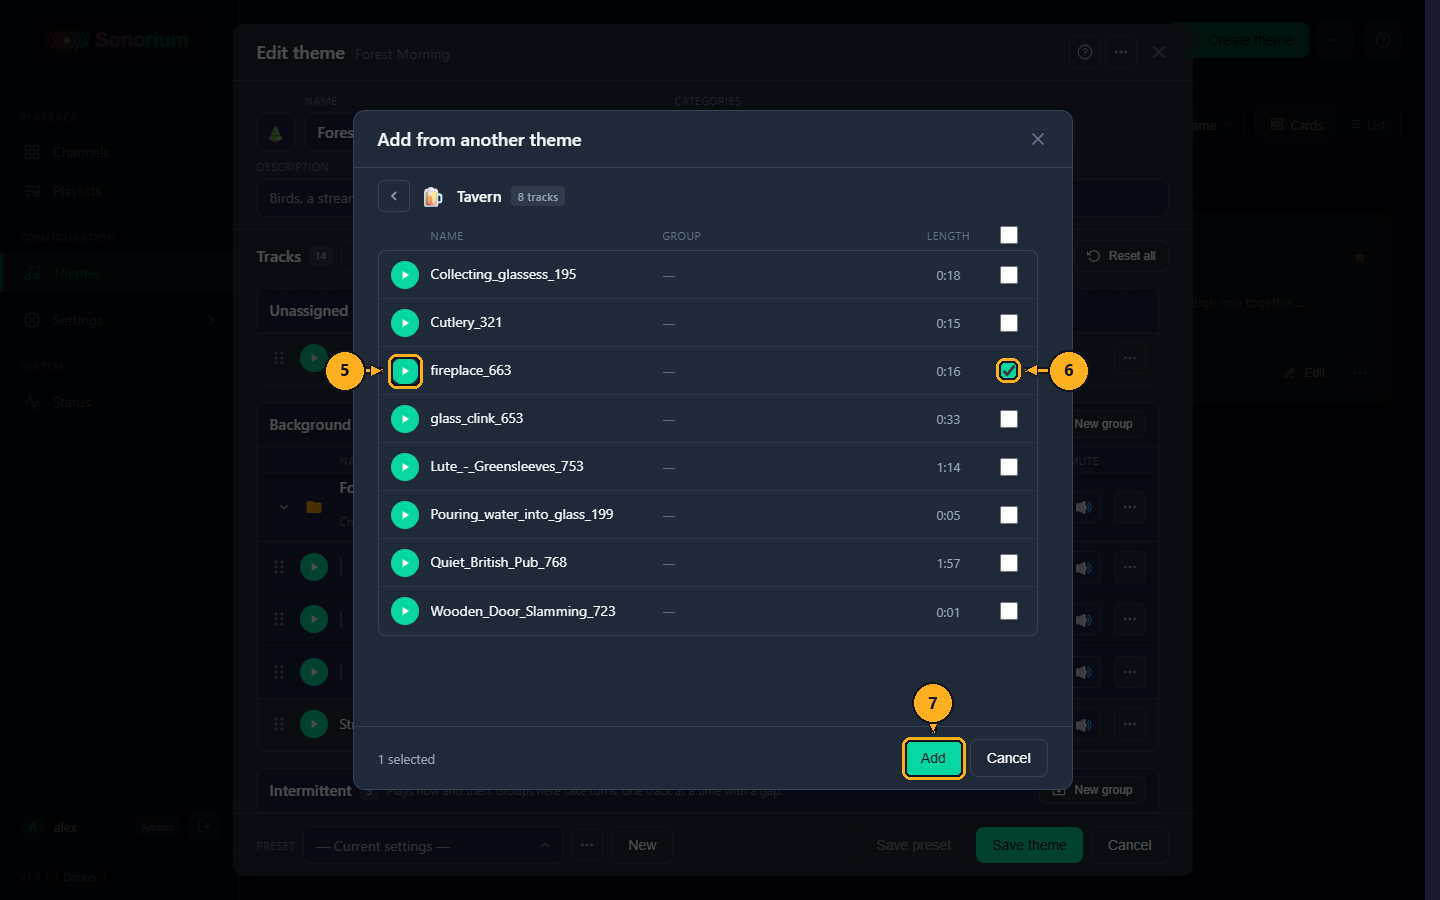
5: Click ▶ to listen to a file in this browser (optional).
6: Tick the box of each file you want. The box in the heading ticks them all. Files already added are ticked and can't be unticked.
7: Click Add. The bottom of the window counts the files selected, for example "1 selected".
The message "Added 1 linked file" appears. The arrow at the top left of the window goes back to the list of themes; Cancel or the Esc key closes it.
- The file is added to Unassigned, muted, with a copy of its settings from the other theme, so the theme sounds the same as before. Give it a Mode, or move it into a section or group; it can go anywhere the theme's files can.
- Its row shows a link icon and "from" the other theme's name.
- Presets turn linked files on and other tracks off, like rain that mutes the crickets. A preset that turns a linked file on is marked ⚭ (see Presets).
- Nothing is copied, and the other theme is never changed.
- If the other theme or the file is deleted, the row shows Missing; only its ⋯ menu works. Its settings are kept.
- Remove link… in its ⋯ menu asks Remove link to …?; Remove takes the file out of this theme. The file stays in the other theme.
- Exporting the theme copies linked files into the zip (see How to export a theme).
Example: your "Campsite" theme has crickets, a fire and an owl. Add the rain from "A Rainy Day... Or is it?" and put it in Background. Load your Night preset, unmute the rain and mute the crickets, and click New to save it as "Rain". Switch a channel to "Rain": the rain fades in while the crickets fade out.
- Esc: closes an open menu, the help, or a rename. With nothing open, it closes the editor; unlike Cancel, it leaves the mix as it is.
- Enter: in the Categories field, adds the category; in a group's name box, saves the name; in the New preset and Rename preset boxes, clicks OK.