Module Media and Capture
WinForge bundles a full media workbench into one app: an ffmpeg/ffprobe front-end for converting, trimming, GIF-making and inspection; a desktop screen recorder; a Capture Studio for region recording, instant snips and OCR; a screen colour picker; a SAPI read-aloud / voice tool; and an imaging & game corner that flashes Raspberry Pi SD cards and runs a Minecraft world downloader. Everything runs in-app, no redirects — the toggles and buttons really drive ffmpeg, the Windows OCR engine, the SAPI synthesizer and raw disk I/O.
呢一頁將 WinForge 入面幾個媒體相關模組擺埋一齊講:用 ffmpeg 做轉檔/剪裁/GIF、螢幕錄影、擷取工作室(區域錄影+截圖+OCR)、螢幕取色、文字轉語音,同埋燒 SD 卡 / Minecraft 工具。全部喺 app 內做,唔會跳走。
Safety · 安全 — Some tools here touch real hardware and overwrite files. ffmpeg always runs with
-y(it overwrites the output without prompting). The Raspberry Pi imager performs raw disk writes that erase an entire drive and requires administrator rights plus a typed confirmation. Read each section's callout before using.
| Module · 模組 | What it does · 功能 | Engine · 引擎 |
|---|---|---|
| Media · 媒體 | Convert / trim / GIF / frame / probe + ~60 catalog ops |
ffmpeg + ffprobe
|
| Screen Recorder · 螢幕錄影 | Record the whole desktop to MP4 (H.264) |
ffmpeg gdigrab
|
| Capture Studio · 擷取工作室 | Region record → MP4/GIF · snip → clipboard · OCR |
ffmpeg + Windows.Media.Ocr + GDI |
| Color Picker · 螢幕取色 | Grab any on-screen pixel, copy HEX/RGB/HSL | GDI GetPixel + low-level mouse hook |
| Voice & Read-Aloud · 語音朗讀 | TTS playback + export to WAV |
System.Speech (SAPI) |
| Imaging & game tools · 燒錄與遊戲工具 | SD-card / Raspberry Pi imager + Minecraft world downloader | Raw \\.\PhysicalDriveN I/O · java / Maven |
All six share the same bilingual chrome — every label resolves through Loc.I.Pick(en, zh), so the whole surface flips between English and 粵語 live with the language toggle.
The Media module (MediaModule) is a thin, friendly wrapper over ffmpeg and ffprobe for the file you select. It works whether or not WinForge is elevated, and Browse uses the Win32 file dialogs (FileDialogs.OpenFileAsync / SaveFileAsync).
If ffmpeg is not on PATH, the page shows a warning InfoBar:
-
ffmpeg not found · 搵唔到 ffmpeg — with a one-click action button that runs
winget install Gyan.FFmpeg(EngineBars.AutoInstallButton("Gyan.FFmpeg", …)), then re-scans (MediaService.Rescan) so the just-installed binary is found without restarting.
MediaService resolves ffmpeg.exe by walking each PATH entry, and finds ffprobe.exe as a sibling of ffmpeg before falling back to PATH.
-
Open… · 開啟… — chooses the Input file. Accepted extensions:
.mp4 .mkv .mov .avi .webm .m4v .wmv .flv .mp3 .wav .flac .aac .m4a .ogg .opus. As soon as you pick an input, the page auto-runs anffprobeprobe and shows the media info. -
Save as… · 另存… — chooses the Output file (
.mp4 .mp3 .gif .wav .webm .mkv .png). Most quick actions auto-derive an output beside the input instead, so you rarely need this.
The selected paths live in AppState.CurrentMediaInput / CurrentMediaOutput, shared across the media-related pages.
One-tap buttons, each a real ffmpeg command. The output is written next to the input with a derived suffix:
| Button · 按鈕 | Output suffix | ffmpeg arguments |
|---|---|---|
| To MP4 · 轉 MP4 | .converted.mp4 |
-c:v libx264 -c:a aac -movflags +faststart |
| To WebM · 轉 WebM | .webm |
-c:v libvpx-vp9 -b:v 0 -crf 32 -c:a libopus |
| To MKV · 轉 MKV | .mkv |
-c copy (remux, no re-encode) |
| Extract MP3 · 抽 MP3 | .mp3 |
-vn -c:a libmp3lame -q:a 2 |
| Extract WAV · 抽 WAV | .wav |
-vn -c:a pcm_s16le |
| GIF | .gif |
-vf "fps=12,scale=480:-1:flags=lanczos" |
| Compress · 壓細 | .compressed.mp4 |
-c:v libx264 -crf 28 -c:a aac |
| Mute · 靜音 | .muted.mp4 |
-c:v copy -an |
| Normalize audio · 正規化音量 | .norm.mp4 |
-af loudnorm -c:v copy |
| Info · 資訊 | — | ffprobe -hide_banner -i {in} |
Each run shows a live Running ffmpeg… spinner and then the trimmed tail of ffmpeg's output (last ~4000 chars) with a ✓ Done / ✗ Failed header.
Two text boxes take start and length in HH:MM:SS (defaults 00:00:00 start, 00:00:10 length):
-
Trim (no re-encode) · 剪裁(唔重編碼) —
-ss {start} -i {in} -t {dur} -c copy …→.trimmed<ext>. Stream-copy, near-instant. -
Trim (re-encode) · 剪裁(重編碼) —
-ss {start} -i {in} -t {dur} -c:v libx264 -c:a aac -movflags +faststart …→.trimmed.mp4. Frame-accurate.
-
Make GIF · 整 GIF — uses the fps and width number boxes (defaults 12 fps · 480 px):
-vf "fps={fps},scale={w}:-1:flags=lanczos"→.gif. -
Grab frame · 擷取畫格 —
-ss {start} -i {in} -frames:v 1→.frame.png(a single still at the trim-start time).
Below the quick tools is a searchable list (filter box: Filter operations… · 篩選操作…) of 60 catalog operations from MediaOperations, each rendered as a TweakCard. They are grouped into six families of 12:
| Family · 類別 | Examples · 例子 |
|---|---|
| Video · 影片 | To MP4 (H.264 / H.265), WebM VP9, MKV, MOV, AVI, remux-copy, faststart, CRF 23, bitrate 2 Mbps, constant 30 fps, downscale 720p |
| Audio · 聲音 | Extract MP3 / AAC / WAV / FLAC / Opus / OGG, bitrate 192k, to mono, 44.1 kHz, loudnorm, +50 % volume, mute |
| Edit · 編輯 | Trim first 30 s, start at 10 s, cut 5–15 s, scale 1080/720/480p, centre-crop square, rotate 90° CW/CCW, hflip, 2× speed, 30 fps |
| Image/GIF · 圖/GIF | Make GIF, HQ palette GIF, frame at 5 s/10 s, thumbnail, frames every 1 s, WebP, animated WebP, contact sheet, first frame, poster, small GIF |
| Filters · 濾鏡 | Denoise (hqdn3d), sharpen (unsharp), fade in/out, brightness & contrast (eq), grayscale, deshake |
| Probe · 檢視 |
-show_format, -show_streams, duration, resolution, video codec, audio codec (all via ffprobe, output only) |
The probe operations set useProbe: true and don't need an output file; everything else writes to the chosen output. Operations carry bilingual names, descriptions and keywords so the filter box matches either language.
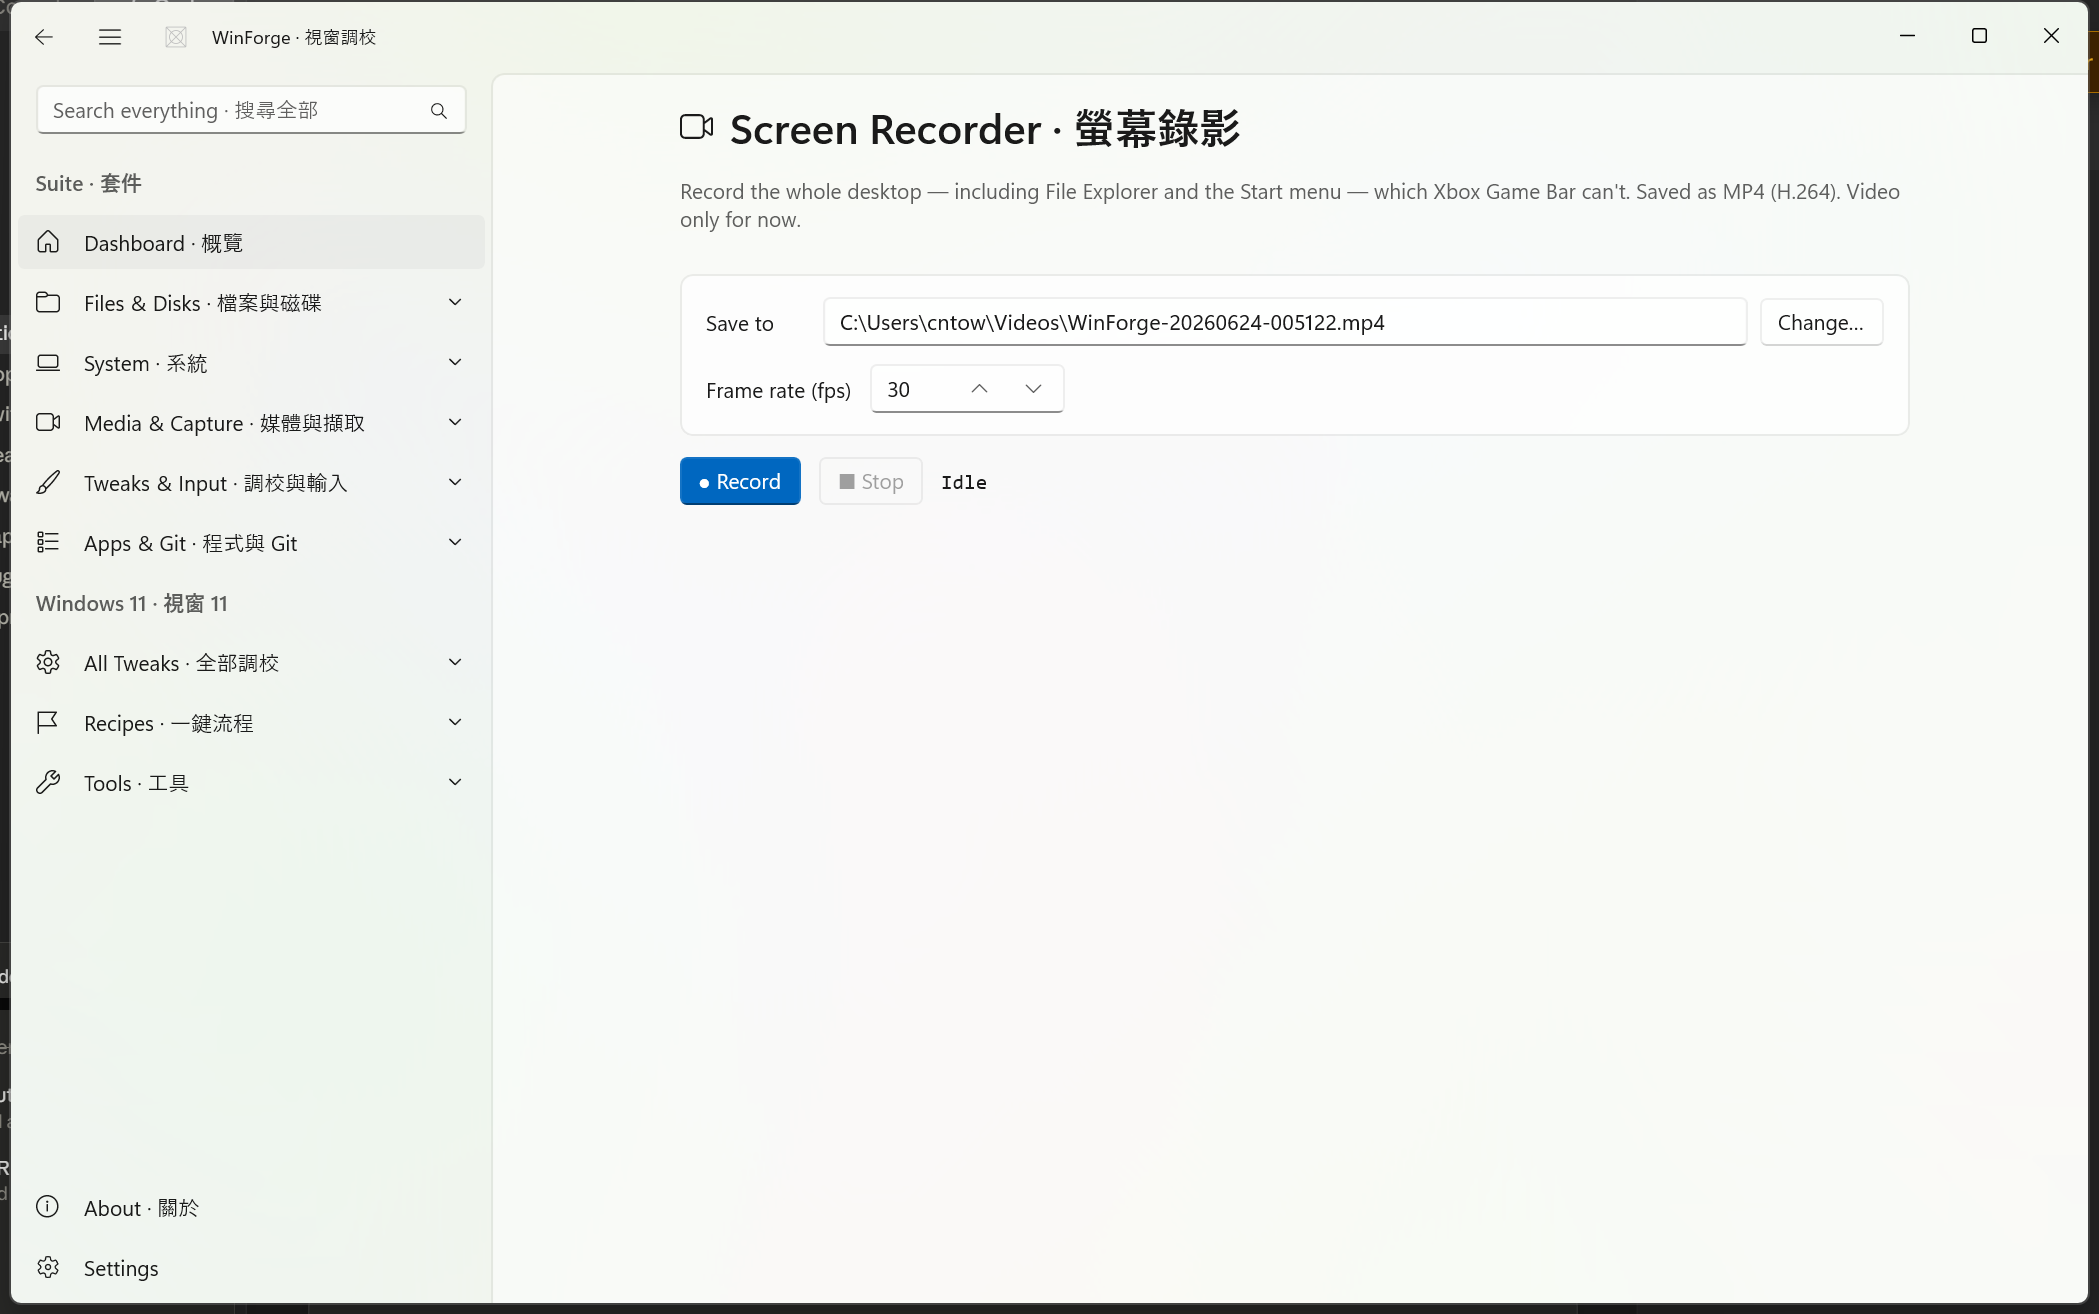
ScreenRecorderModule records the whole desktop — including File Explorer and the Start menu, which Xbox Game Bar can't capture — to an MP4 (H.264). Video only for now.
How it works · 點做: the recorder wraps ffmpeg's gdigrab:
-y -f gdigrab -framerate {fps} -i desktop -c:v libx264 -preset ultrafast -pix_fmt yuv420p "<out>"
- Frame rate (fps) · 幀率 — clamped to 5–60.
-
Save to · 存去 — defaults to a timestamped file in My Videos (
WinForge-yyyyMMdd-HHmmss.mp4); Change… · 更改… opens a save dialog. - ● Record · 開始錄影 starts; a red REC mm:ss dot + timer ticks live.
-
■ Stop · 停止 sends
qon ffmpeg's stdin so the file finalises cleanly (not a kill), then surfaces Saved with the path. A fresh filename is prepared for the next take.
It shares the same ffmpeg not found auto-install bar as the Media module.
Safety · 安全 — The recorder captures everything visible on your desktop, including notifications and private windows. ffmpeg writes with
-y, so an existing file at the target path is overwritten.
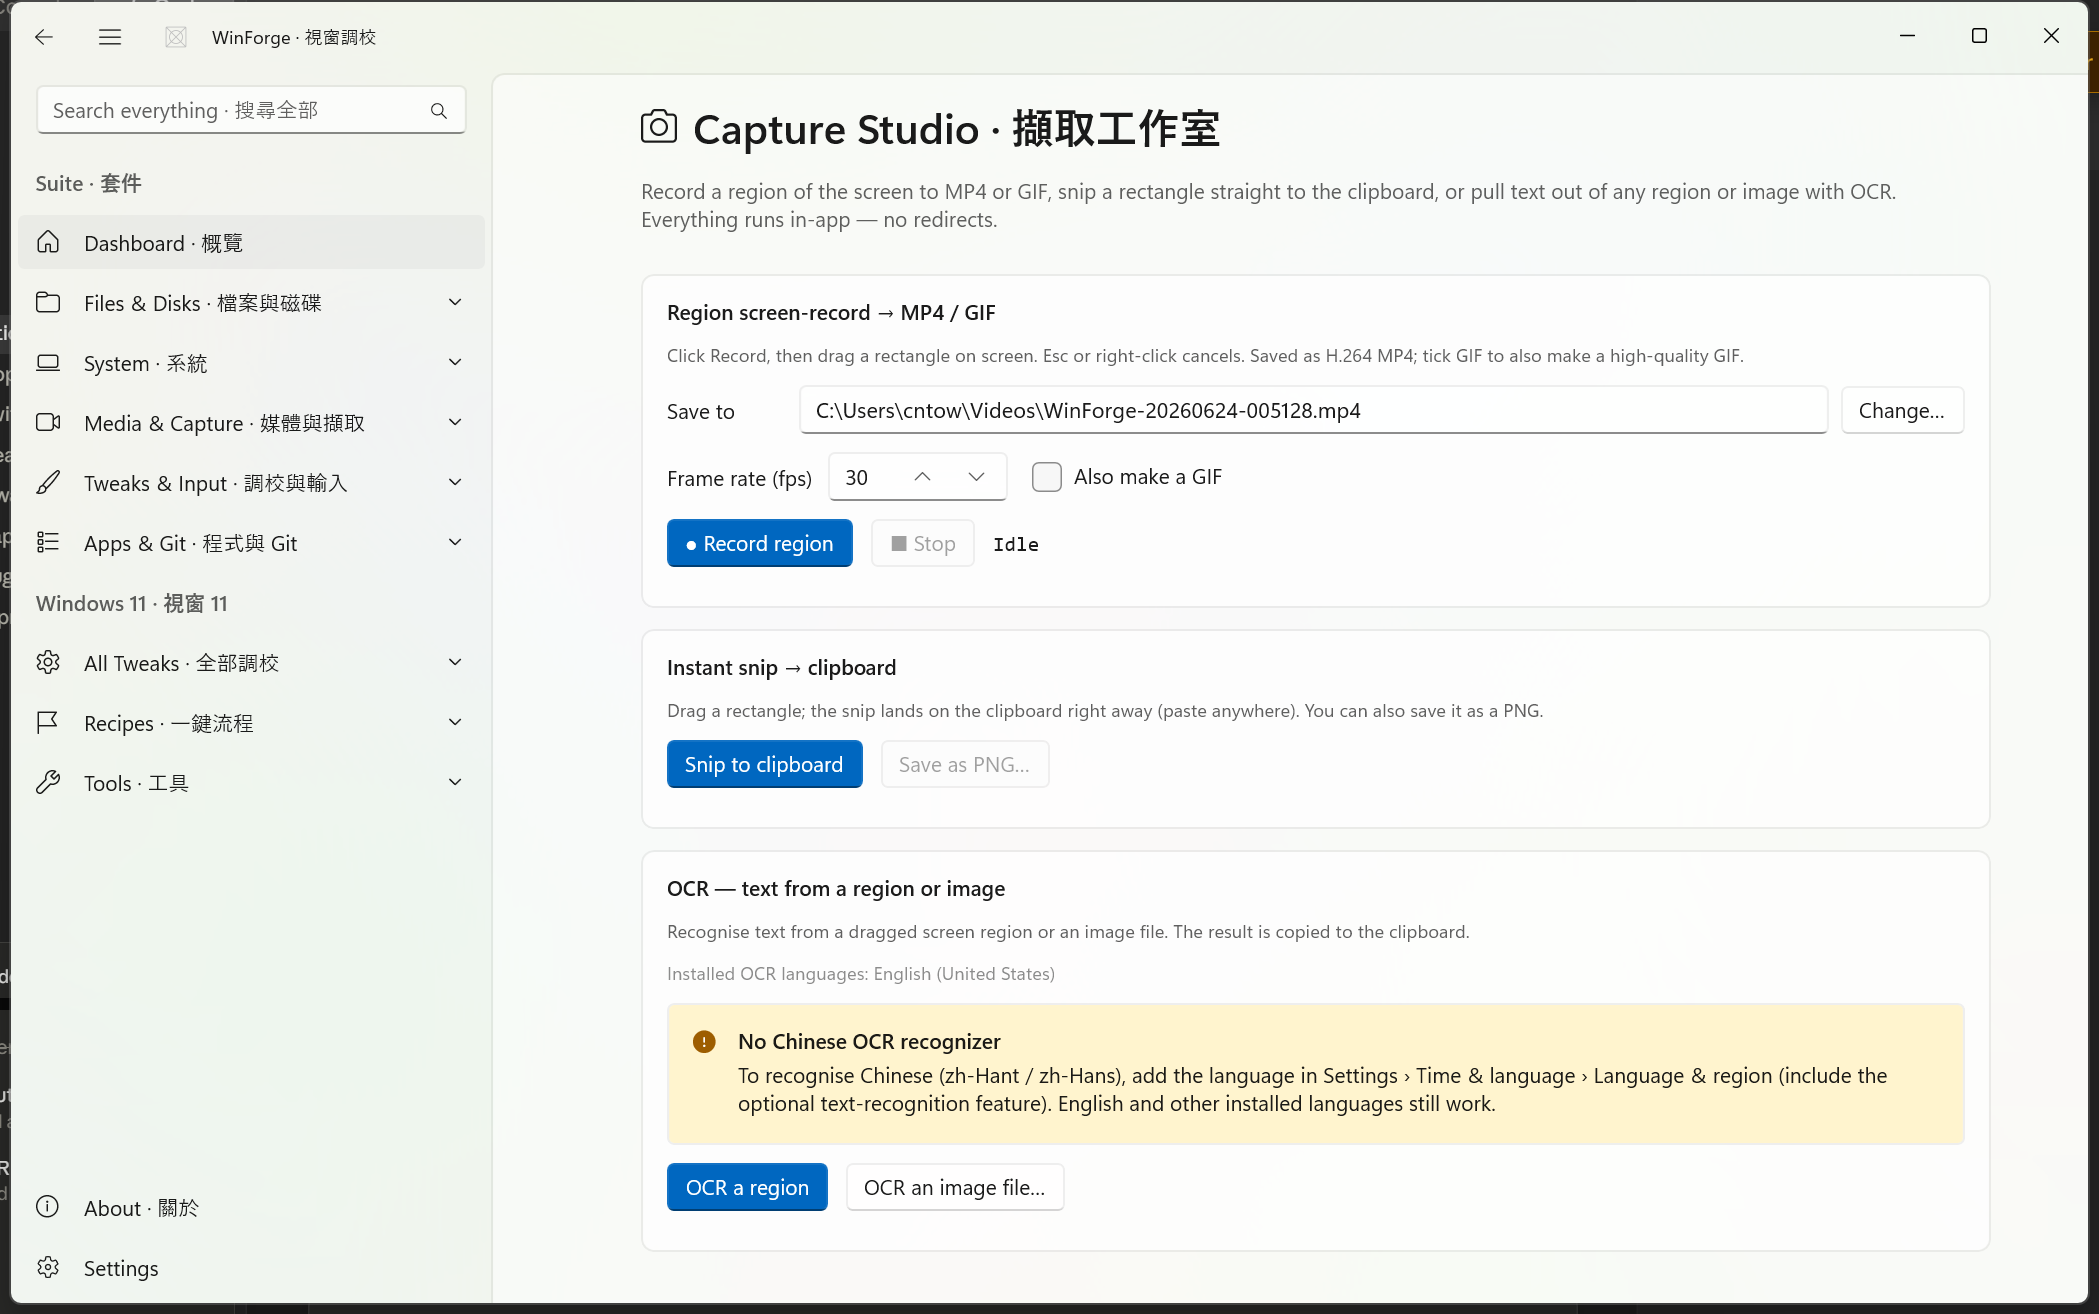
CaptureStudioModule is the most feature-dense capture surface. It combines three tools on one page, all in-app (ffmpeg + Windows.Media.Ocr + GDI), with a shared transparent region selector.
Every "drag a rectangle" action calls RegionSelector.PickRegion() — a pure-Win32 layered, topmost, dimmed full-virtual-desktop overlay with a crosshair cursor and a bright-yellow live selection box. It works over Explorer/Start and across every monitor, returns the rectangle in physical pixels, and rounds width/height to even numbers (needed for yuv420p). Esc or right-click cancels.
Click ● Record region · 錄影區域, drag a rectangle, and it records just that area:
-y -f gdigrab -framerate {fps} -offset_x {x} -offset_y {y} -video_size {w}x{h} -i desktop -c:v libx264 -preset ultrafast -pix_fmt yuv420p "<out>"
- Frame rate (fps) and a timestamped MP4 output (same My-Videos default + Change…).
-
Also make a GIF · 順手整 GIF — on Stop, additionally builds a high-quality two-pass GIF (15 fps) using
palettegen=stats_mode=diffthenpaletteuse=dither=bayer:bayer_scale=3, scaled to 720 px wide, into a.gifbeside the MP4. -
■ Stop · 停止 finishes ffmpeg gracefully (
qon stdin) before any GIF pass.
Snip to clipboard · 截圖入剪貼簿 drags a rectangle and grabs it via GDI (BitBlt with CAPTUREBLT), encodes a PNG, and puts it straight on the clipboard (Clipboard.SetContent + Clipboard.Flush, so the image survives the temp file being deleted). A preview appears, and Save as PNG… · 存做 PNG… writes it to disk. Paste anywhere immediately.
Powered by Windows.Media.Ocr (no external tool):
- OCR a region · OCR 一個區域 — drag a rectangle; the on-screen text is recognised and copied to the clipboard.
-
OCR an image file… · OCR 一個圖檔… — pick a
.png .jpg .jpeg .bmp .gif .tiff; text is recognised and copied.
The engine prefers a Traditional Chinese recognizer, then Simplified, then your user-profile default. The page lists Installed OCR languages · 已安裝 OCR 語言 and, if no zh-* recognizer is present, shows guidance:
No Chinese OCR recognizer · 未有中文 OCR 辨識器 — add the language in Settings › Time & language › Language & region (include the optional text-recognition feature). English and other installed languages still work.
Safety · 安全 — Snip and OCR copy whatever you select onto the clipboard and (for OCR file mode) read the image you choose. Region recording writes MP4/GIF with ffmpeg's
-yoverwrite.

ColorPickerModule is a PowerToys-style screen colour picker. Click Pick from screen · 螢幕取色, then click anywhere on screen to sample that pixel.
How it works · 點做: ColorPickService installs a global low-level mouse hook (WH_MOUSE_LL). While picking, it reads the pixel under the cursor live (GetPixel on the screen DC) and updates a preview swatch; a left-click swallows the click and locks the colour in; a right-click cancels.
For each picked colour it shows and lets you copy:
| Format | Example | Source |
|---|---|---|
| HEX | #2D7D46 |
ColorPickService.Hex |
| RGB | rgb(45, 125, 70) |
— |
| HSL | hsl(137, 47%, 33%) |
ColorPickService.Hsl |
- Recent · 最近 — a swatch history (up to 16); click any swatch to re-load it, hover for its HEX.
-
Apply · 套用 — type a 6-digit hex (with or without
#) to set the colour manually. - Copy buttons place the text on the clipboard.
The hook is always released when picking ends or the page unloads, so it never lingers.
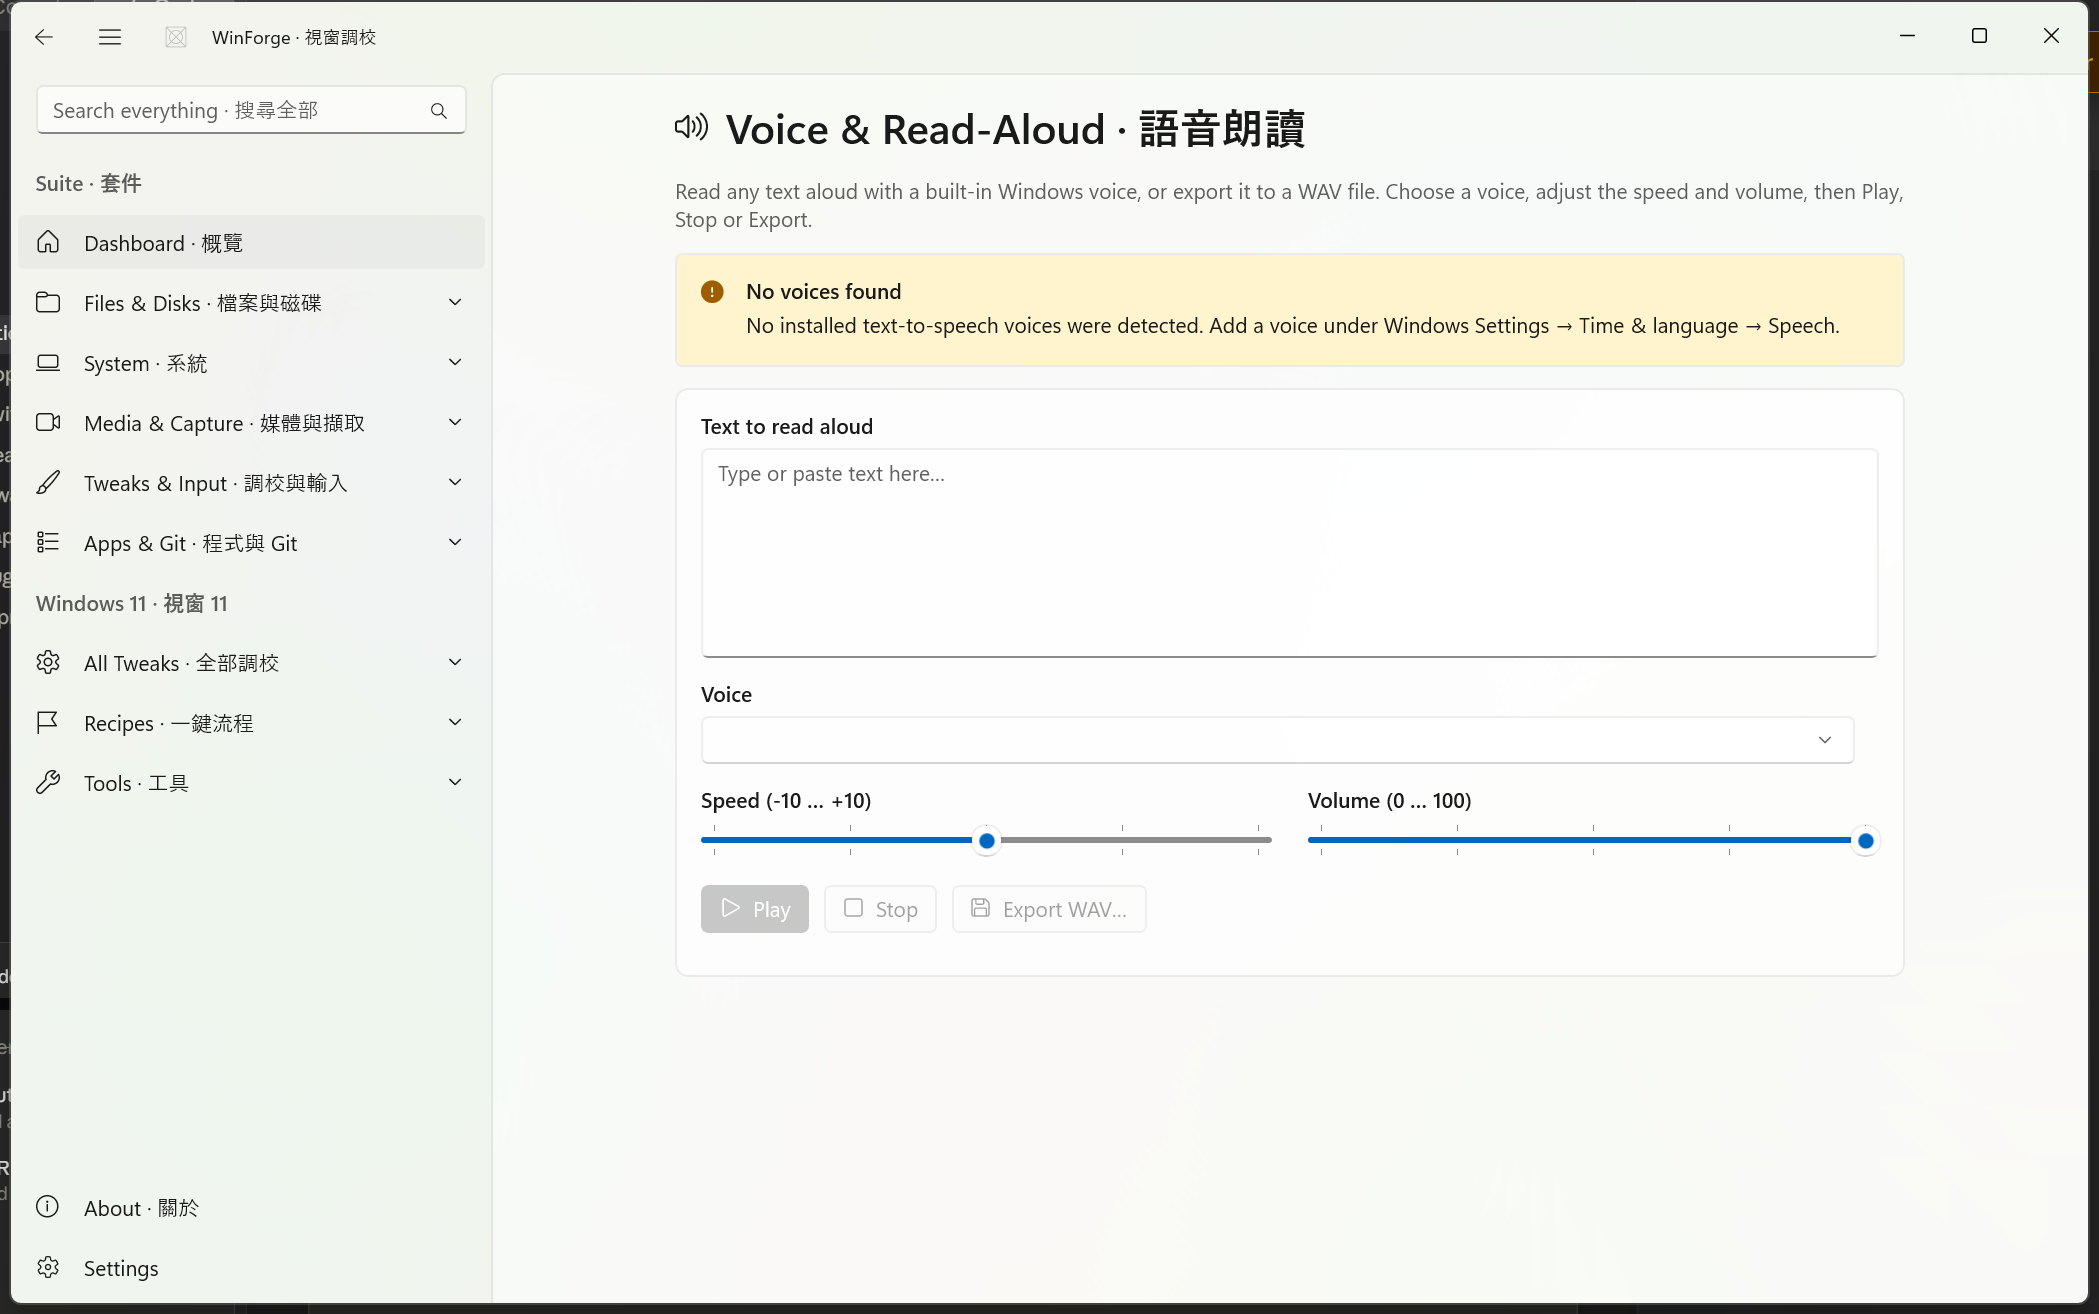
VoiceModule reads any text aloud using the built-in Windows SAPI engine via System.Speech — 100 % in-app, no redirects.
-
Voice · 語音 — a dropdown of every installed, enabled voice (
GetInstalledVoices), shown as e.g. "Microsoft Zira (en-US, Female)". If none are found, a bar points you to Settings → Time & language → Speech. -
Speed (-10 … +10) · 速度 — maps to
SpeechSynthesizer.Rate. -
Volume (0 … 100) · 音量 — maps to
SpeechSynthesizer.Volume.
Actions:
| Button · 按鈕 | Behaviour · 行為 |
|---|---|
| Play · 播放 |
SpeakAsync to the default audio device; cancels any current playback first. |
| Stop · 停止 |
SpeakAsyncCancelAll + disposes the synthesizer. |
| Export WAV… · 匯出 WAV… | Renders the text to a .wav file on a background thread (SetOutputToWaveFile + blocking Speak). |
Button state tracks playback via the SpeakingChanged event, so Play/Export are disabled while speaking and Stop is enabled only then.
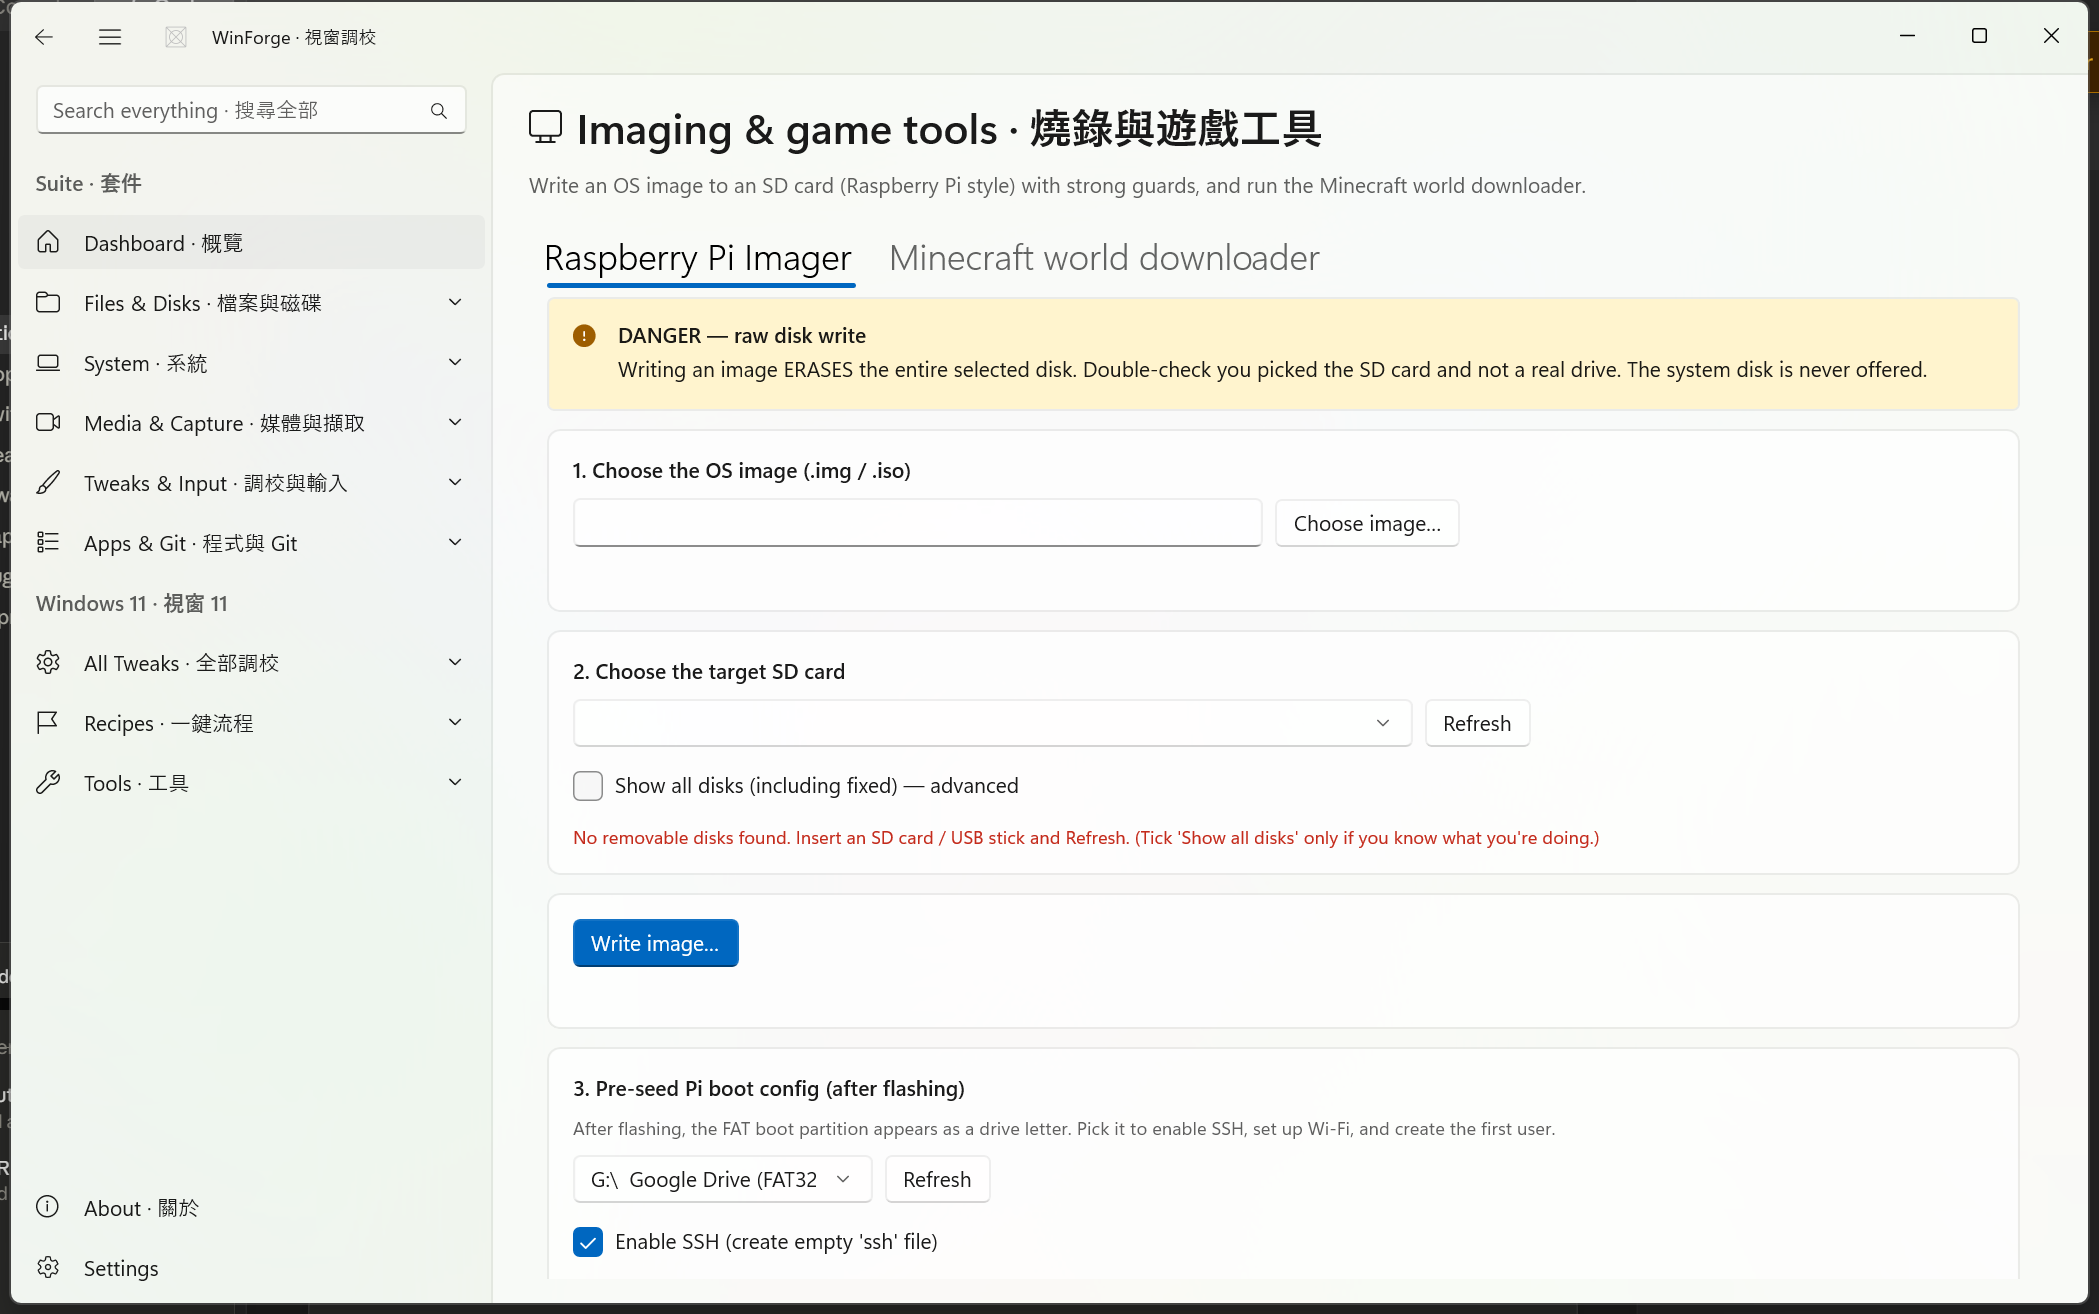
ImagingGameModule has two tabs: a Raspberry Pi / SD-card imager and a Minecraft world downloader. Both run in-app.
A raw SD-card writer (ImagingService) with heavy guard rails.
Safety · 安全 — DANGER — raw disk write · 危險 — 原始磁碟寫入. Writing an image ERASES the entire selected disk. The system/boot disk is never offered and is hard-refused even if forced. The write needs administrator rights (it offers to relaunch elevated) and a typed disk-number confirmation.
The flow:
-
Choose the OS image (.img / .iso) · 揀 OS 映像 — also accepts
.bin .raw .wic; the file size is shown. -
Choose the target SD card · 揀目標 SD 卡 — disks are enumerated via PowerShell (
Get-Disk+Get-Partition), capturing model, size, bus type, removable/system/boot flags and the drive letters each disk hosts. By default only removable, non-system, non-boot disks are listed; Show all disks (advanced) · 顯示全部磁碟 reveals fixed disks, with system disks tagged ⚠SYSTEM and unwritable. -
Write image… · 燒錄映像 — checks the image fits, refuses system/boot disks, then opens a confirmation dialog you can only accept by typing the disk number. Under the hood it:
- Locks + dismounts every hosted volume (
FSCTL_LOCK_VOLUME/FSCTL_DISMOUNT_VOLUME), - Opens
\\.\PhysicalDriveNwithFILE_FLAG_NO_BUFFERING | FILE_FLAG_WRITE_THROUGH, - Re-verifies the device length at the metal (
IOCTL_DISK_GET_LENGTH_INFO), - Streams the image in 4 MiB sector-aligned blocks with a live byte/percent progress bar,
- Unlocks the volumes in a
finally.
- Locks + dismounts every hosted volume (
Pre-seed Pi boot config (after flashing) · 預設樹莓派啟動設定 — after writing, re-insert the card; its FAT boot partition appears as a drive letter. SeedBootConfig can write, onto that partition:
| Option · 選項 | File written · 寫入嘅檔 |
|---|---|
| Enable SSH · 開啟 SSH | empty ssh file |
| Wi-Fi (SSID / password / country) · Wi-Fi |
wpa_supplicant.conf (country defaults to GB) |
| First user + password · 第一個使用者 |
userconf.txt with a SHA-512 crypt ($6$) password hash |
Integrates the local minecraft-world-downloader GitHub repo (MinecraftService) and runs it as a headless proxy.
Engine — repo + JDK · 引擎:
-
Locate repo… · 指定 repo… — points at the repo folder (must contain
pom.xml); WinForge also auto-searches common GitHub roots and the expected…\Documents\GitHub\minecraft-world-downloader. -
Build jar · 建置 jar — runs
mvn -q -DskipTests package(withJAVA_HOMEpointed at the located JDK) to producetarget\world-downloader.jar, streaming the build log. -
Install JDK · 安裝 JDK —
winget install Microsoft.OpenJDK.21. Java is located viaJAVA_HOME,PATH, or common install roots (Adoptium / Microsoft / Oracle / Zulu).
Run the downloader (proxy) · 執行下載器: start a tracked java -jar … --no-gui process with:
| Field · 欄位 | Flag |
|---|---|
| Server · 伺服器 | -s |
| Local port · 本機 port (default 25565) | -l |
| World output · 世界輸出 | -o |
| Extended render · 延伸視距 |
-r (when > 0) |
| Auto-open containers (experimental) · 自動開啟容器 | --auto-open-containers |
Start · 開始 launches the proxy and streams stdout/stderr to a live log; then you connect Minecraft to localhost:<port> and the explored world is saved to the output folder. Stop · 停止 kills the whole process tree. Open folder · 開資料夾 opens the world output directory.
Safety · 安全 — Building runs Maven and installing the JDK runs winget; both download from the network. The proxy listens on a local port and writes world data to the folder you choose.
- Home — back to the WinForge wiki index.
Part of Home · WinForge wiki.
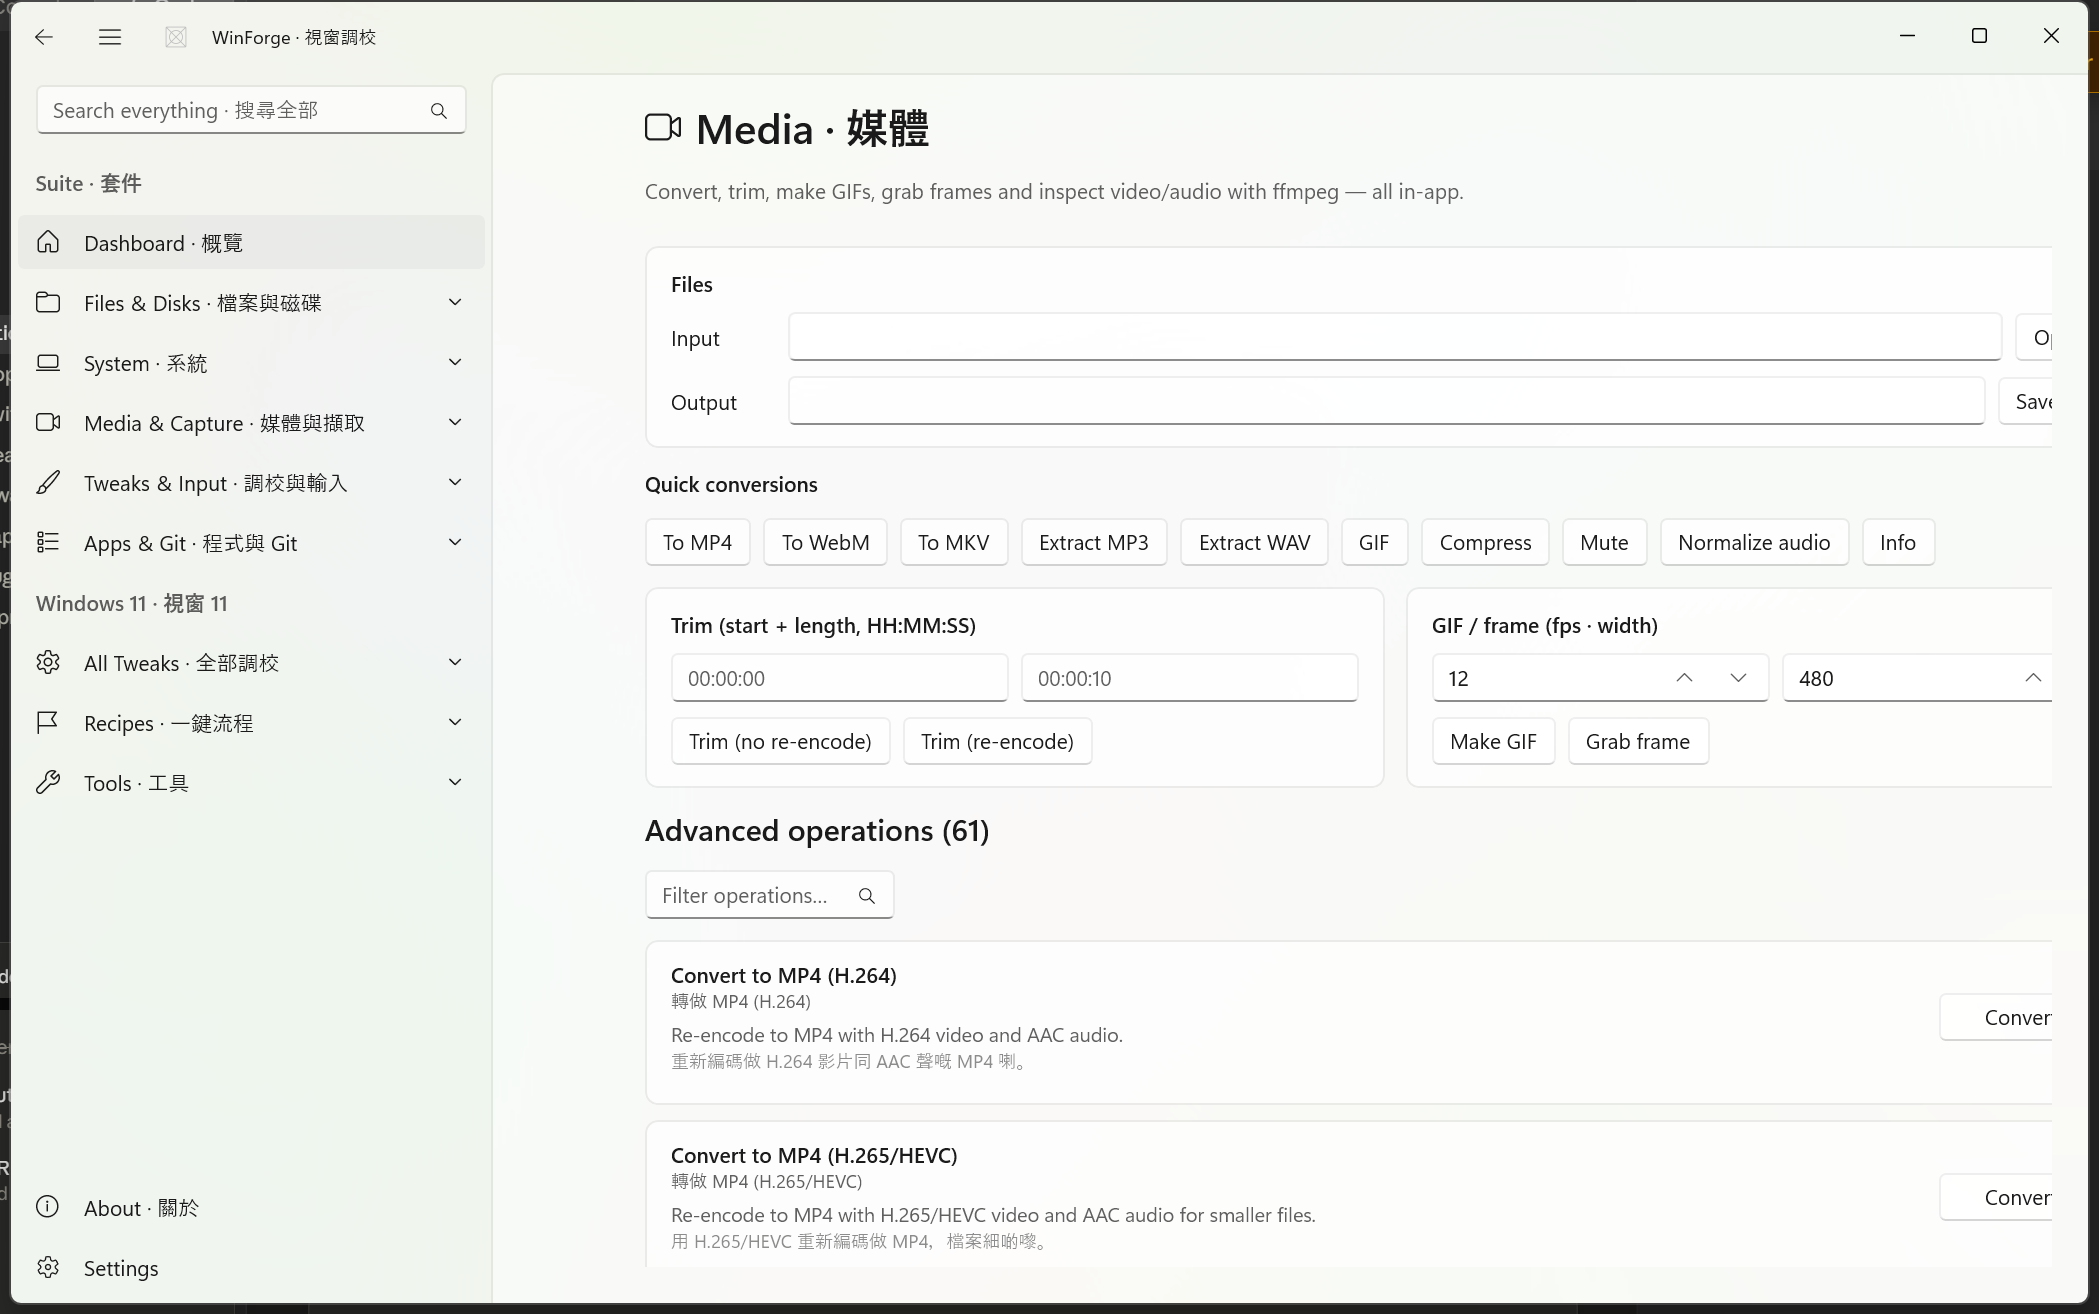
Each control on the live page is numbered on the screenshot below and explained in the legend — what every button, toggle, tab, box and label does, in English and 粵語. Captured from the running app via UI Automation. 下面每個控件都有編號,逐個解釋佢哋嘅功能同標籤意思。

| # | Control | What it is & does · 功能 | Label meaning · 標籤意思 |
|---|---|---|---|
| 1 | Button | Goes back to the previous page in the app's navigation stack. | "Back" — return / 返回上一頁. |
| 2 | Button | Collapses or expands the left navigation pane (the hamburger toggle). | "Toggle Navigation" — show/hide the side menu / 開關側邊導覽。 |
| 3 | Search box | App-wide search bar in the title region; type to find modules and tweaks across all of WinForge. | "Search everything · 搜尋全部" — search everything in the app. |
| 4 | Read-only field | Shows the chosen input file path. It's read-only — you set it with the Open… button (5), not by typing. | Empty (the Input box). Caption beside it reads "Input · 輸入". |
| 5 | Button | Opens a Win32 Open-file dialog filtered to media files (mp4, mkv, mov, avi, webm, mp3, wav, flac, etc.); after you pick a file it auto-runs ffprobe and shows the media info. | "Open…" / "開啟…" — choose the source file. |
| 6 | Read-only field | Shows the chosen output file path, set via Save as… (7). Optional — most quick conversions auto-name the output beside the input. | Empty (the Output box). Caption beside it reads "Output · 輸出". |
| 7 | Button | Opens a Save-file dialog so you can name/place the result (mp4, mp3, gif, wav, webm, mkv, png). | "Save as…" / "另存…" — choose where to save. |
| 8 | Button | One-click convert to MP4 (H.264 video + AAC audio, faststart), saved as name.converted.mp4 beside the input. |
"To MP4" / "轉 MP4". |
| 9 | Button | One-click convert to WebM (VP9 video + Opus audio), saved as name.webm. |
"To WebM" / "轉 WebM". |
| 10 | Button | Remux into an MKV container with no re-encode (-c copy) — fast, lossless rewrap. |
"To MKV" / "轉 MKV". |
| 11 | Button | Extracts the audio track to MP3 (LAME, quality 2), dropping the video. | "Extract MP3" / "抽 MP3" — pull out audio as MP3. |
| 12 | Button | Extracts audio to an uncompressed WAV (16-bit PCM). | "Extract WAV" / "抽 WAV" — pull out audio as WAV. |
| 13 | Button | Quick GIF at fps 12, width 480px (lanczos scaling) — the no-settings shortcut. | "GIF" / "GIF". |
| 14 | Button | Re-encodes to a smaller MP4 (H.264 CRF 28) to shrink file size, saved as name.compressed.mp4. |
"Compress" / "壓細" — make the file smaller. |
| 15 | Button | Strips the audio track (-an), keeping video copied as-is, saved as name.muted.mp4. |
"Mute" / "靜音" — remove sound. |
| 16 | Button | Applies ffmpeg loudnorm to even out loudness, video copied unchanged, saved as name.norm.mp4. |
"Normalize audio" / "正規化音量" — even out the volume. |
| 17 | Button | Runs ffprobe on the input and prints stream/format details in the output panel. | "Info" / "資訊" — show media information. |
| 18 | Time field | Trim start time (HH:MM:SS). Feeds the -ss value for the two Trim buttons; defaults to 00:00:00 if blank. |
Shows "00:00:00" — start position. |
| 19 | Time field | Trim length / duration (HH:MM:SS). Feeds the -t value; defaults to 00:00:10 if blank. |
Shows "00:00:10" — clip length. |
| 20 | Number box | GIF/frame fps (1–60, default 12). Used by Make GIF (26). | Empty number field with spin buttons; part of "GIF / frame (fps · width)". |
| 21 | Number box | GIF/frame width in pixels (80–3840, default 480; height auto). Used by Make GIF (26). | Empty number field; the "width · 闊度" half of the GIF row. |
| 22 | Button | Spin-up arrow that increments the adjacent number box by one. | "Increase" / 加 — step value up. |
| 23 | Button | Spin-down arrow that decrements the adjacent number box by one. | "Decrease" / 減 — step value down. |
| 24 | Button | Trims using start (18) + length (19) with no re-encode (-c copy) — instant but cuts only on keyframes, saved as name.trimmed.<ext>. |
"Trim (no re-encode)" / "剪裁(唔重編碼)" — fast lossless cut. |
| 25 | Button | Trims using start + length and re-encodes (H.264/AAC) for a frame-accurate cut, saved as name.trimmed.mp4. |
"Trim (re-encode)" / "剪裁(重編碼)" — precise cut, re-renders. |
| 26 | Button | Creates a GIF from the input using the fps (20) and width (21) values, saved as name.gif. |
"Make GIF" / "整 GIF". |
| 27 | Button | Grabs a single still frame at the start time (18) as a PNG, saved as name.frame.png. |
"Grab frame" / "擷取畫格" — capture one still image. |
| 28 | Search box | Live filter for the "Advanced operations" list (~60 ffmpeg recipes); type to narrow the cards shown below it. | "Filter operations…" / "篩選操作…" — type to filter the advanced ops. |
How to use it · 點用 — Click Open… (5) and pick a video or audio file; WinForge auto-runs ffprobe so you immediately see its details. For everyday jobs just hit one of the Quick conversions (8–17) — each writes a sensibly-named file next to the source, with progress and the ffmpeg log shown in the output panel. To clip a section, fill the start (18) and length (19) fields then choose Trim (no re-encode) (24) for speed or Trim (re-encode) (25) for an exact cut; for a GIF or still, set fps/width (20–21) and use Make GIF (26) or Grab frame (27). If you need something beyond these presets, type in the Filter operations box (28) to search the full ~60-recipe advanced library below. (If ffmpeg isn't installed, a warning bar at the top installs it automatically via winget — no restart needed.)

| # | Control | What it is & does · 功能 | Label meaning · 標籤意思 |
|---|---|---|---|
| 1 | Button | Goes back to the previous page in the app's navigation history. Standard chrome, not part of the recorder itself. | "Back" — return to the previous screen (返回). |
| 2 | Button | Collapses or expands the left navigation pane, giving the recorder more room. App chrome, not recorder-specific. | "Toggle Navigation" — show/hide the side menu (開關導覽列). |
| 3 | Search box | Global app search. Type here to find any module or setting across WinForge; it does not search recordings. | "Search everything · 搜尋全部" — search all of WinForge; 搜尋全部 = "search everything". |
| 4 | Text field (output path) | Shows where the recording will be saved. Pre-filled with a timestamped MP4 in your Videos folder (e.g. WinForge-20260624-143000.mp4); you can edit the path directly. Bound to "Save to · 存去". |
Empty accessible name; this is the "Save to / 存去" file-path box. 存去 = "save to". |
| 5 | Button | Opens a Save File dialog so you can pick a different folder/filename for the MP4 instead of typing it. Disabled while recording. | "Change…" (存 "更改…") — change the save location. 更改 = "change". |
| 6 | Number box (fps) | Sets the recording frame rate in frames per second; this value is passed to the recorder when you press Record. Type a number or use the spinner. Disabled while recording. | Empty accessible name; this is the "Frame rate (fps) · 幀率 (fps)" field. 幀率 = "frame rate". |
| 7 | Button | Spinner up-arrow for the fps box — increases the frame rate by one step. | "Increase" — raise the fps value (增加). |
| 8 | Button | Spinner down-arrow for the fps box — decreases the frame rate by one step. | "Decrease" — lower the fps value (減少). |
| 9 | Button | Starts recording the whole desktop (via ffmpeg gdigrab) to the file in box 4 at the fps in box 6. Resets and starts the live timer, shows the REC indicator, and disables itself, Change, and the fps box. If ffmpeg isn't installed or start fails, an error bar appears instead. | "● Record" (粵 "● 開始錄影") — begin recording. 開始錄影 = "start recording"; the ● is a record dot. |
| 10 | Button | Stops the active recording, finalises the MP4, and shows a "Saved · 已儲存" bar with the file path (or an error). Then auto-generates a fresh timestamped filename for your next take. Disabled until a recording is running. | "■ Stop" (粵 "■ 停止") — stop recording. 停止 = "stop"; the ■ is a stop square. |
How to use it · 點用 — Confirm or change the save target: the "Save to · 存去" box (4) is pre-filled with a timestamped MP4 in your Videos folder, or press "Change…" (5) to choose your own. Set the frame rate in the fps box (6) using the spinners (7/8) if you want something other than the default. Press "● Record" (9) to capture the entire desktop — including File Explorer and the Start menu that Xbox Game Bar can't grab — and watch the live REC timer. When done, press "■ Stop" (10); the file is finalised, a "Saved" bar shows the path, and a fresh filename is queued for your next recording. (First time only: if ffmpeg is missing, a warning bar offers a one-click winget install with no restart.)

| # | Control | What it is & does · 功能 | Label meaning · 標籤意思 |
|---|---|---|---|
| 1 | Button | Back — returns to the previous page / dashboard in the app's navigation stack. | "Back" = 返回上一頁。 |
| 2 | Button | Toggle Navigation — shows or hides the app's left-hand navigation pane (the hamburger menu). | "Toggle Navigation" = 開/關側邊導覽欄。 |
| 3 | Search box | Global "search everything" box in the app header; type to filter/find modules and tweaks across WinForge. Not specific to Capture Studio. | "Search everything · 搜尋全部" — search across all of WinForge; 搜尋全部 = search everything. |
| 4 | Edit (path box) | The "Save to" output-file path for region recordings. Pre-filled with a timestamped WinForge-….mp4 under your Videos folder; you can edit it directly or set it via Change… (5). |
Empty accessible name; it is the Save to · 存去 path field — where the recorded MP4 (and optional GIF) is written. |
| 5 | Button | Change… — opens a Save-file dialog so you can pick the folder and filename for the recording instead of using the default Videos path. | "Change…" → 更改… = change the save location. |
| 6 | Edit (number box) | The "Frame rate (fps)" NumberBox for recording. Sets how many frames per second the MP4/GIF captures; type a value or use the spinners (8/9). | Empty name; it is the Frame rate (fps) · 幀率 (fps) field — frames per second. |
| 7 | Checkbox | "Also make a GIF" — when ticked, in addition to the H.264 MP4 the recorder also produces a high-quality GIF of the same region (requires ffmpeg). | "Also make a GIF" → 順手整 GIF = also make a GIF on the side. |
| 8 | Button (spinner) | Increase — steps the frame-rate value in box 6 up by one. | "Increase" = 加大幀率(加一)。 |
| 9 | Button (spinner) | Decrease — steps the frame-rate value in box 6 down by one. | "Decrease" = 減細幀率(減一)。 |
| 10 | Button | Record region — click, then drag a rectangle on screen; recording of that region to the MP4 (and GIF if ticked) starts. Esc or right-click cancels the selection. | "● Record region" → ● 錄影區域 = record a region; the ● dot is the standard record symbol. |
| 11 | Button | Stop — ends the in-progress recording and finalises/saves the file. Disabled (greyed) until a recording is running. | "■ Stop" → ■ 停止 = stop; the ■ square is the standard stop symbol. |
| 12 | Button | Snip to clipboard — drag a rectangle; the snip is copied straight to the clipboard (paste anywhere) and shown as a preview. | "Snip to clipboard" → 截圖入剪貼簿 = snip into the clipboard. |
| 13 | Button | Save as PNG… — saves the most recent snip as a PNG via a Save-file dialog. Disabled until you have taken a snip with 12. | "Save as PNG…" → 存做 PNG… = save as a PNG file. |
| 14 | Button | OCR a region — drag a rectangle on screen; Windows OCR recognises the text in it and copies the result to the clipboard (shown below). | "OCR a region" → OCR 一個區域 = run OCR on a screen region. |
| 15 | Button | OCR an image file… — opens an Open-file dialog (PNG/JPG/BMP/GIF/TIFF); recognises text from the chosen image and copies it to the clipboard. | "OCR an image file…" → OCR 一個圖檔… = run OCR on an image file. |
How to use it · 點用 — To screen-record, set the frame rate (6, with 8/9) and where to save (4/5), optionally tick "Also make a GIF" (7), then click Record region (10), drag the area you want, and click Stop (11) when done (recording needs ffmpeg). For a quick screenshot, click Snip to clipboard (12), drag a box, and paste it anywhere — or click Save as PNG… (13) to keep a file. To pull text out of the screen or an image, use OCR a region (14) or OCR an image file… (15); the recognised text is copied to your clipboard, and adding a Chinese language pack in Windows Settings enables 繁/簡 recognition.

| # | Control | What it is & does · 功能 | Label meaning · 標籤意思 |
|---|---|---|---|
| 1 | Button | Returns to the previous page in WinForge. Part of the app shell, not the module itself. | "Back" — go back / 返回上一頁. |
| 2 | Button | Shows or hides the left navigation pane so the content area gets more room. App-shell control. | "Toggle Navigation" — open/close the navigation sidebar / 開關側邊導覽。 |
| 3 | Search box | App-wide search for any module, setting or tool in WinForge. Belongs to the shell, not specific to colour picking. | "Search everything · 搜尋全部" — "Search everything" equals 搜尋全部 (search across the whole app). |
| 4 | Button | Starts screen picking: arms ColorPickService.StartPick, then clicking anywhere on screen grabs that pixel's colour (it fills the swatch, HEX/RGB/HSL and history); right-click cancels. A live hint and a moving preview follow your cursor while picking. |
"Pick from screen · 螢幕取色" — "Pick from screen" matches 螢幕取色 (grab a colour off the screen). |
| 5 | Button (icon, copy) | Copies the current colour as a HEX string (e.g. #2D7D46) to the clipboard (CopyHex_Click). Sits on the HEX row of the value readout. |
Icon-only copy button; inferred purpose: copy the HEX value / 複製 HEX 色值。 |
| 6 | Button (icon, copy) | Copies the current colour in RGB form, e.g. rgb(45, 125, 70), to the clipboard (CopyRgb_Click). On the RGB row. |
Icon-only copy button; inferred purpose: copy the RGB value / 複製 RGB 色值。 |
| 7 | Button (icon, copy) | Copies the current colour in HSL form (e.g. hsl(...)) to the clipboard (CopyHsl_Click). On the HSL row. |
Icon-only copy button; inferred purpose: copy the HSL value / 複製 HSL 色值。 |
| 8 | Text box | Type or paste a hex colour here, then press Apply (9) to set it. Accepts six hex digits with or without a leading #; invalid input is ignored. |
"#RRGGBB" — the placeholder shows the expected format: two hex digits each for Red, Green, Blue / 紅綠藍各兩位十六進位數。 |
| 9 | Button | Applies the hex typed in box 8: parses it, updates the swatch and HEX/RGB/HSL readout, and adds the colour to the Recent history (ApplyHex_Click). |
"Apply · 套用" — "Apply" equals 套用 (use this hex value). |
How to use it · 點用 — Click Pick from screen (4), move the cursor over anything on your display while watching the live preview, then click to capture that pixel's colour; right-click cancels. The captured colour shows as a swatch with HEX, RGB and HSL values — use the small copy buttons (5–7) to put any format on the clipboard. Alternatively, type a known hex code into the #RRGGBB box (8) and press Apply (9). Every colour you pick or apply is stored in the Recent strip (up to 16); click a recent swatch to reload it.

| # | Control | What it is & does · 功能 | Label meaning · 標籤意思 |
|---|---|---|---|
| 1 | Button | Goes back to the previous page / the module list you came from. Standard app navigation, leaves Voice & Read-Aloud. | "Back" — return to the previous screen. Icon-only chevron in the title bar. |
| 2 | Button | Collapses or expands the left navigation pane, giving the text area more room or showing the module list again. | "Toggle Navigation" — show/hide the side menu. |
| 3 | Search box | App-wide search for jumping to any module or setting by name; not specific to Voice — it filters everything in WinForge. | "Search everything · 搜尋全部" — 搜尋 = search, 全部 = everything/all. |
| 4 | Text box | The main input. Type or paste the text you want spoken or exported here; it's what Play and Export WAV read from. Empty text triggers a "Nothing to read / 冇文字可讀" warning. | "Type or paste text here…" (粵語 placeholder: 喺呢度打字或者貼上文字…). This is the "Text to read aloud · 要朗讀嘅文字" field. |
| 5 | Dropdown | Picks which installed Windows text-to-speech voice to use. Populated from the system SAPI voices; if none are installed it stays empty and a "No voices found · 搵唔到語音" notice appears with a pointer to Windows Settings → Time & language → Speech. | The "Voice · 語音" selector. 語音 = voice/speech. |
| 6 | Slider | Sets the speaking speed, from -10 (slowest) to +10 (fastest); the value is passed to the speech engine when you Play or Export. | "Speed (-10 … +10) · 速度(-10 … +10)" — 速度 = speed. |
| 7 | Slider | Sets the loudness, from 0 (silent) to 100 (full); applied when you Play or Export. | "Volume (0 … 100) · 音量(0 … 100)" — 音量 = volume. |
| 8 | Button | Play — speaks the typed text aloud through the chosen voice at the set speed and volume (SpeakAsync). Disabled while no voice is available or while speech is already playing. | "Play · 播放" — 播放 = play / read aloud. Shown disabled here. |
| 9 | Button | Stop — immediately halts any ongoing playback. Enabled only while something is being spoken, so it appears greyed out at rest. | "Stop · 停止" — 停止 = stop. Shown disabled here. |
| 10 | Button | Export WAV… — renders the text to an audio file instead of playing it: opens a Save dialog and writes a timestamped .wav with the current voice, speed and volume. Disabled when there is no voice or while speech is playing. | "Export WAV… · 匯出 WAV…" — 匯出 = export. Saves spoken audio to a WAV file. |
How to use it · 點用 — Type or paste your text into the big box (4), pick a voice from the dropdown (5), then nudge the Speed (6) and Volume (7) sliders to taste. Press Play (8) to hear it, Stop (9) to cut it short, or Export WAV… (10) to save the spoken audio as a file you can keep or reuse. If the voice dropdown is empty, install a text-to-speech voice via Windows Settings → Time & language → Speech and reopen the module.

| # | Control | What it is & does · 功能 | Label meaning · 標籤意思 |
|---|---|---|---|
| 1 | Button | App-wide back navigation — returns you to the previous module / the home grid. Not part of this module's own logic. | "Back" — go back / 返回上一頁. |
| 2 | Button | App-wide control that collapses or expands the left navigation pane. | "Toggle Navigation" — show/hide the side menu / 開關側邊導覽列. |
| 3 | Search box | The global app search box; type to filter and jump to any module or tweak across WinForge. | "Search everything · 搜尋全部" — "Search everything" = search the whole app; 搜尋全部 = "search all". |
| 4 | Tab | Switches to the Raspberry Pi / SD-card imager view (the one currently shown): pick an OS image, pick the target disk, write it raw, then pre-seed the boot partition. | "Raspberry Pi Imager" — in 粵語 the header reads 樹莓派燒錄 = "Raspberry Pi burn/flash". |
| 5 | Tab | Switches to the Minecraft world downloader view: locate the local repo + JDK, build the jar, then start/stop the headless proxy that captures a world. | "Minecraft world downloader" — 粵語 header 是 Minecraft 世界下載 = "Minecraft world download". |
| 6 | Edit (text box) | Step 1 field that holds the path to the OS image you'll write. It is filled automatically by the "Choose image…" button (button 7); the file's size is shown beneath it. | Empty label — this is the image-path box under "1. Choose the OS image (.img / .iso) · 1. 揀 OS 映像(.img/.iso)". |
| 7 | Button | Opens a file picker limited to disk-image types (.img / .iso / .bin / .raw / .wic); the chosen path lands in box 6 and its size is displayed. | "Choose image…" — 揀映像… = "pick image…". The ellipsis means it opens a dialog. |
| 8 | Dropdown | Step 2 target-disk picker. Lists detected disks (by default only removable SD cards / USB sticks that look like safe targets); the selection is what gets erased and written. The system/boot disk is never offered. | Empty label — this is the SD-card selector under "2. Choose the target SD card · 2. 揀目標 SD 卡". |
| 9 | Button | Re-scans the machine for disks and repopulates dropdown 8. Use it after inserting or swapping a card. | "Refresh" — 重新整理 = "refresh / re-scan". |
| 10 | Toggle / 開關 (checkbox) | Advanced safety override. When ticked, dropdown 8 shows ALL disks including fixed internal drives (those marked ⚠SYSTEM still cannot be written). Leave it off unless you know what you're doing. | "Show all disks (including fixed) — advanced" — 顯示全部磁碟(包括固定碟)— 進階 = "show all disks (including fixed disks) — advanced". |
| 11 | Button | Starts the raw write. It validates the image and target, refuses the system/boot disk, requires administrator rights, checks the image fits, then pops a heavy confirmation where you must type the disk number before it erases the card and flashes the image (with a live progress bar). | "Write image…" — 燒錄映像… = "burn/flash the image…". |
| 12 | Dropdown | Step 3 boot-drive picker. After flashing, the Pi's FAT boot partition appears as a drive letter; this lists ready removable / FAT volumes so you can choose which one to pre-seed. Refreshed by its own "Refresh" button. | Empty label — boot-drive selector under "3. Pre-seed Pi boot config (after flashing) · 3. 預設樹莓派啟動設定(燒完之後)". |
| 13 | Toggle / 開關 (checkbox) | When ticked, the "Write boot config" action drops an empty file named ssh onto the boot partition, which makes Raspberry Pi OS enable the SSH server on first boot. |
"Enable SSH (create empty 'ssh' file)" — 開啟 SSH(建立空白 'ssh' 檔)= "turn on SSH (create a blank 'ssh' file)". |
How to use it · 點用 — On the Raspberry Pi Imager tab, work top to bottom: click Choose image… (7) to point box 6 at your .img/.iso, then insert your SD card and hit Refresh (9) so it appears in the disk dropdown (8). Select the card, click Write image… (11), and confirm by typing the disk number — this erases and flashes the card (run WinForge as administrator). After flashing, re-insert the card, pick its FAT boot volume in dropdown 12, tick Enable SSH (13) plus any Wi-Fi/user fields, and write the boot config so the Pi is headless-ready on first boot. Use tab 5 to switch over to the Minecraft world downloader.