Repository navigation
Editor and Montage
Flashback has a built-in editor for the jobs you actually do with game clips: cut a clip down to the good part, make a copy small enough for Discord, and stitch several clips into one montage. Your originals are never changed. This page covers the Editor tab end to end.
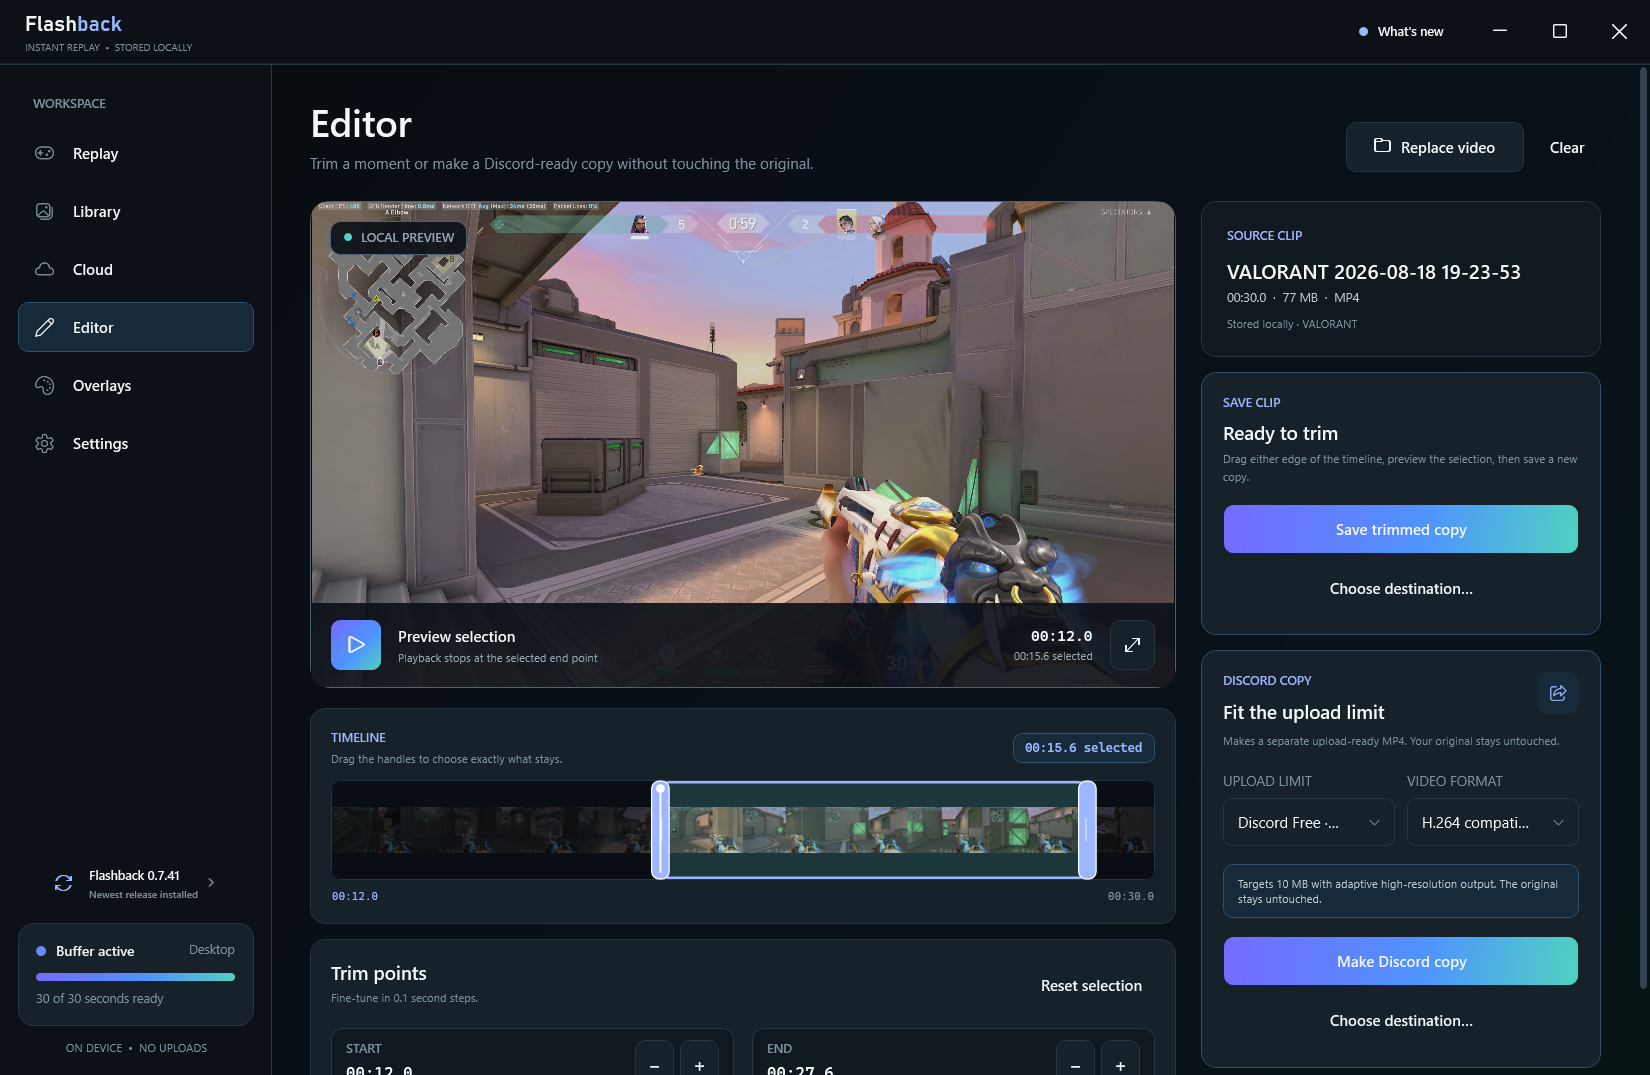
The Editor, shown on Flashback 0.7.41. In 0.8.0 the top of the Editor also has Trim and Montage modes, and From library and Open file replace Replace video.
The Editor has two modes at the top: Trim (one clip, or a Discord-ready copy) and Montage (several clips joined into one). In Trim mode there are four ways in:
- In the Library, or under Recent clips on the Replay tab, click Edit clip on any video. It always opens in Trim mode, even if you used Montage last.
- Open the Editor tab and click Choose from library to pick one of your Flashback clips.
- Click Open file to choose any MP4, M4V, MOV, MKV or WebM file on your PC, so you can trim files that didn't come from Flashback too.
- Drag a video onto the Editor.
With a clip open, From library and Open file in the Editor's toolbar swap to a different video.
Choose from library opens a picker over your Library, so you don't have to dig through File Explorer:
-
Search by clip name, game or tag, or type
#tagfor one tag only. Press Down to move from the search box into the list. - Filter to one game folder.
- RECENT shows your newest clips up front, with thumbnails, lengths and dates. The clip already open in the Editor is marked IN EDITOR.
- Double-click a clip or press Enter to open it. Open a file instead hands over to the file dialog.
If a clip is deleted while the picker is open, it's taken off the list with a notice instead of failing in the Editor.
The Editor only does work while you're using it. It builds the storyboard (the strip of frames along the timeline) once when you open a clip, holds it in memory, and closes its preview player when you leave the Editor or minimize Flashback. Nothing about editing runs in the background while you play.
- Drag the two handles on the TIMELINE to choose exactly what stays.
- Fine-tune under Trim points: the START and END buttons move each point by 0.1 seconds. Reset selection goes back to the whole clip.
- Click Preview selection to play just that part. Playback stops at the end point.
- Click Save trimmed copy.
The copy is saved next to the original as <clip name> - Trimmed.mp4, with a number added if that name is taken. (If the original is outside your clip folder, the copy goes to your clip folder instead.) To save somewhere else, use Choose destination... instead. When it's done, Show saved clip opens it in File Explorer.
| Key | Does |
|---|---|
| Up / Down | Choose the start handle, end handle or preview position |
| Left / Right | Move the chosen one |
| Shift + Left / Right | Move it in one-second steps |
Watch clip in fullscreen opens the clip in a fullscreen player on the same display. Space plays and pauses, Left and Right jump 5 seconds, Home and End go to the start and end, and Esc or a double-click closes it.
- Your original is never modified. A trim always makes a new file.
- The copy is written to a temporary file first and only moved into place when it's complete, so you never end up with a half-written clip in your library.
- Trims are re-encoded for frame-exact cut points, using your GPU's hardware H.264 encoder when it's available and a software encoder otherwise.
- The trimmed copy is capped to a bitrate based on the source, so trimming doesn't make a clip larger than it needs to be.
- Exports run at below-normal priority so they don't compete with a game you've gone back to.
If the clip was saved with the input overlay on, the INPUT OVERLAY section lets you choose whether this copy includes it. Turn Include input overlay in exported copy off to export clean video. The original clip stays clean either way, so you can make one copy with the overlay and another without.
Discord caps upload sizes, and a 1440p clip rarely fits. The DISCORD COPY section makes a separate MP4 that does.
-
Pick the UPLOAD LIMIT that matches your account or the server you're posting in:
Target Limit Discord Free (default) 20 MB Nitro Basic 50 MB, which also fits servers at Boost Level 2 Boost Level 3 server 100 MB, for everyone in a server at Boost Level 3 Discord Nitro 1 GB -
Pick a VIDEO FORMAT:
- H.264 compatibility: best playback support across Discord and Windows.
- Smaller file: uses hardware AV1 or HEVC when your GPU and Flashback's FFmpeg confirm a working encoder, and falls back safely when they don't.
-
Click Make Discord copy, or Choose destination... to pick where it goes.
The copy is named <clip name> - Discord 20 MB.mp4 (or 50 MB, 100 MB or 1 GB) and saved next to the original. It uses your trim selection, so trim first if you only want part of the clip. The card tells you what to expect, for example "Keeps the copy under 20 MB with ...".
Copies aim about 2% under the limit, so a Free copy comes out at no more than 19.6 MB and still uploads if Discord counts a little differently. If the clip already fits with that margin and nothing needs changing, Flashback copies it at original quality instead of re-encoding. A clip that's just under the limit, inside that 2% margin, is re-encoded instead. If the first encode comes out over the target, Flashback encodes it again at a smaller size. The Compress for Discord item in the Library's ... menu does the same job in one step.
Want a link instead of a file? Upload the clip to Flashback Cloud and share the link; it previews in Discord. See Sharing and Visibility.
A montage joins several clips into one MP4, in the order you choose, with each clip trimmed the way you want. You can set each clip's sound, put a song under the whole thing, fade in and out, and blend clips together. It's made entirely on your PC.
- In the Library, click Select, pick at least two videos and click Make montage. They open in montage mode in the Library's current order. Screenshots are left out with a note.
- Or in the Editor, choose Montage and click Add clips. It opens the same library picker as Trim mode, where you can pick several clips in the order you want them to play, up to the room the montage has left. Open a file instead adds videos from elsewhere on your PC, and you can also drag videos in.
- Add, beside MONTAGE CLIPS, adds more clips later from your library or your PC.
| Step | How |
|---|---|
| Order | Drag clips in MONTAGE CLIPS; a line shows where the clip will land. Or use Move up and Move down, or select a clip and press Alt+Up or Alt+Down. Clips play in list order. |
| Trim each clip | Select a clip, then drag the handles under CLIP TRIM. IN and OUT move by 0.1 seconds; Reset trim uses the whole clip. The same timeline keys as the trim editor work here. |
| Clip sound | Under the trim, CLIP SOUND sets the selected clip's own volume from 0 to 200% (100% is as recorded), and Mute leaves its sound out. The clip list shows muted or the volume next to each clip you changed. |
| Preview | Preview clip plays the selected clip's trimmed part. |
| Remove | Remove from montage on one clip, or Clear montage for all of them, song included. |
The MUSIC AND FADES card puts a song under the montage and sets how it starts, ends and moves from clip to clip.
- Add music picks a song in MP3, M4A, AAC, WAV, FLAC, OGG or Opus. Change song swaps it, and the X beside the song (Remove the music) takes it out.
- MUSIC VOLUME sets how loud the song is under the clips' own sound, from 0 to 200%.
- START THE SONG AT skips the song's intro.
- MUSIC FADE IN and MUSIC FADE OUT fade the song itself, up to 5 seconds each.
- The song is always cut where the montage ends. If it's shorter than the montage, choose Loop to play it again from the start, or Play once to let it stop (with its fade out, if you set one) while the clips' own sound goes on.
- FADE IN FROM BLACK and FADE OUT TO BLACK fade the picture and all sound together at the start and end, up to 5 seconds each.
- BETWEEN CLIPS chooses a crossfade: Off (a straight cut, the default), Short · 0.2 s, Medium · 0.5 s or Long · 1 s. A crossfade blends picture and sound from one clip into the next. Each one shortens the montage by its length, and it never takes more than half of the shortest clip.
| Option | Choices |
|---|---|
| Clips | 2 to 20 videos |
| Total length | Up to 30 minutes |
| OUTPUT SIZE | 1080p (default), 720p, or Match first clip (keeps the first clip's size, up to 2560×1440) |
| FRAME RATE | 60 FPS (default) or 30 FPS |
Click Export montage. Progress shows as it goes, and Cancel export stops it cleanly.
- The montage is saved as
Montage <date> <time>.mp4, for exampleMontage 2026-10-03 21-30-12.mp4, and appears in your Library. If every clip is from the same game, it goes into that game's folder. Otherwise it goes into a Montages folder inside your clip folder. - With a song, the MP4 has three audio tracks: Flashback mix (the default track most players play, also used by Discord copies and Cloud uploads), Clip audio and Music, so you can rebalance the song in a video editor later. Without a song it has one audio track.
- It's written as a partial file and moved into place only when finished.
- It runs at below-normal priority with Flashback's bundled FFmpeg. Nothing goes to the cloud.
- It keeps running if you close the window.
- While it runs, the source clips are protected from automatic storage cleanup, so the storage limit can't remove a clip the montage still needs.
When it's done, Show montage opens it in File Explorer. Upload to Cloud lets you name it and upload a copy like any other clip; that's a separate step you choose. Automatic uploads only pick up new replays, so a montage is never uploaded unless you upload it.
- Closing the window during a trim, Discord copy or montage lets it finish in the tray.
- Choosing Quit while an export or upload is running asks you first, so you don't lose it by accident.
Library · Overlays · Sharing and Visibility · Instant Replay