DFRduino_Player_MP3_SKU__TOY0008

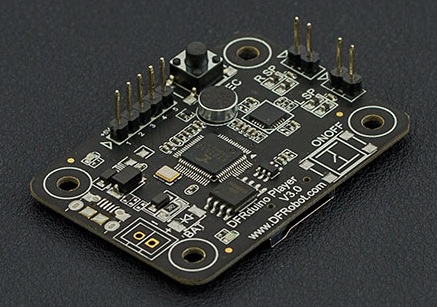
The DFRduino Player MP3 module is designed to give your project speech. The DFRduino player V3.0 is based around an ATS2513 chip and supports recording and Chinese TTS voice synthesis. The board supports a greater range of SD cards up to a maximum of a 32GB TF card. Audio is output in stereo. There is a 2-way power amplifier output and the board is able to drive a speaker up to 3W. The chip can decode MP3 files without using up any Arduino resources. All you will need is a TF card and a speaker. The "OUT" port will output a high pulse after the end of each song.
- Operating Voltage: 5V
- Operating Current: more than 200 mA (with speaker)
- Drive Load: recommend 4 ohm or 8 ohm (speaker internal resistance)
- Output Power: maximum 3W (speaker internal resistance 4 ohm)
- Supports FAT16/FAT32 file system, 32G of the TF card
- Supports Format: .WAV, .MP3 these two kinds of file formats, max 32GB TF card
- Communication Formats: 19200 bps, 8 N 1 format
- Dimensions: 52 X 37 mm
- Weight: 30 g

- Interface:
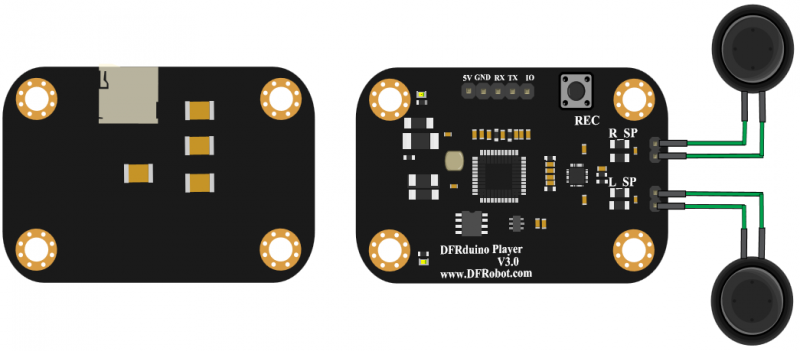
1. VCC Voltage in (Power requires 5V@1000mA)
2. GND Ground
3. RX Serial data receive
4. TX Serial data sender
5. OUT Voice interrupt output, outputs a high pulse after the end of each song
- Speaker Interface:
L_SP: left sound channel
R_SP: right sound channel
- Red LED: power indicator
- Green LED: Normal ON after successful initialization, if an SD card is not inserted or the SD card is corrupt the indicator light will keep flashing, at the same time, the serial port will output "Please check micro SD card \ r \ n"
Serial port mode, baud rate @19200 bps, 8, N, 1 format.
Communication instructions use a string form, "\r\n" express a enter newline character , it will get the return value of a string form after sending the command.
| Feature Name | Instruction | The Return Value | Note |
| Pause | \:p\r\n | Return pause\r\n | \r\n Enter newline character |
| Play | \:s\r\n | Return start\r\n | \r\n Enter newline character |
| Next | \:n\r\n | Return next\r\n Failure false\r\n | \r\n Enter newline character |
| Previous | \:u\r\n | Return key up\r\n | \r\n Enter newline character |
| Volume | \:v X\r\n(Note: is v Spaces with digital again, range of 0-255, 0 is mute, 255 is maximum volume) | Return vol set ok\r\n | X=0-255,The greater the number, the greater the volume |
| Song List | \:l\r\n | Return \r\n | After the last song: End of Filelist |
| Play the Specified File | \Voice File Name\r\n | Return Play ok\r\n File Not found\r\n Play End Play end\r\n | Voice file name is not more than eight capital English letters or characters, 4 input file name does not need to include type suffix |
| Record | \:r\r\n | Return record\r\n | After turning on the mic to start recording, the module will no longer support among other control commands, unless sent \ : e exit recording applications. |
| Exit Recording | \:e\r\n | Output:exit record\r\n | Stop the recording, and in turn automatically save as: REC001.mp3 REC002.mp3 …… |
| Play tts voice | \:t Voice character\r\n | Return Play ok\r\n File Not found\r\n Play end Play end\r\n | Voice is not more than 21 characters |
| Version Query | \:i\r\n | Return DFRduino Player V3.0 \r\n www.DFRobot.com \r\n |
- Insert SD card into the SD card slot
- Power supply for the module
- Press and hold the REC button and speak into the microphone, release the REC button after finish.
- The recording file will be stored in a file called RECxxx. Mp3
- Target: achieve recording mp3 files to the SD card
- Hardware
- DF_UNO 1
- ADKeyboard 1
- This module 1
- Micro SD card reader and writer
- Jumper wires
- Software
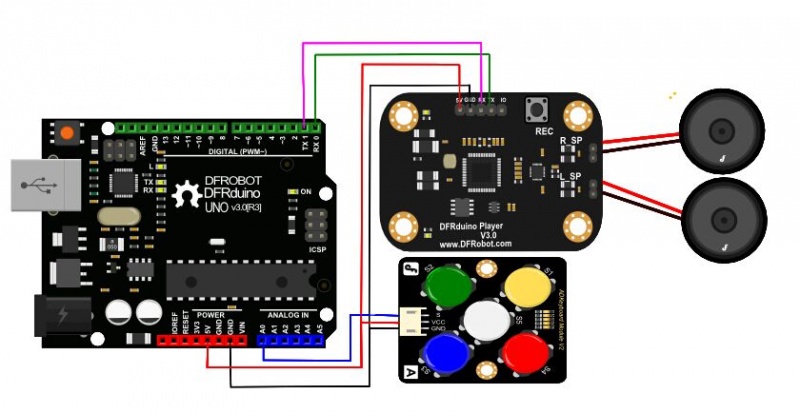
- Connection Diagram

- Steps
- Format the SD card as FAT32 on your PC, store audio files on the root directory.
- Insert SD card into the module
- Open Arduino IDE
- Upload the following code to UNO (note: UNO only has one serial port, and the program downloaded to the DFRduino Player module cannot be used at the same time)
- Wire according to the connection diagram, We recommend using external power supply to power the microcontroller.
 /////////////////////////////////////////////////////////////////////////////////
 //Use the command finished recording
 //\:r\r\n start recording command
 //\:e\r\n end of record command
 /////////////////////////////////////////////////////////////////////////////////

 //serial port connection mode
 //Arduino    MP3
 //TX         RX
 //RX         TX
 //5V         +5V
 //GND        GND

int adc_key_val[5] ={600, 650, 700, 800, 950 };
 int NUM_KEYS = 5;
 int adc_key_in;
 int key=-1;
 int oldkey=-1;

 void setup()
 {
   Serial.begin(19200);
   delay(2000);                   //Wait for initialization
   Serial.println("\\:v 200");    //Set the volume, from 0 (minimum)-255 (maximum)
   delay(50);
 }


 void loop()
 {
   adc_key_in = analogRead(0);    // read the value from the sensor

   key = get_key(adc_key_in);    // convert into key press

   if (key != oldkey)     // if keypress is detected
    {
     delay(50);     // wait for debounce time
     adc_key_in = analogRead(0);    // read the value from the sensor
     key = get_key(adc_key_in);    // convert into key press
     if (key != oldkey)
     {
       oldkey = key;
       if (key >=0){
         switch(key)
         {
            case 0:
                   Serial.println("\\:r"); // start record
                   break;
            case 1:
                   Serial.println("\\:e");// exit record
                   break;
            default:
                   break;
         }
       }
     }
   }
  delay(100);
 }

 // Convert ADC value to key number
 int get_key(unsigned int input)
 {
     int k;

     for (k = 0; k < NUM_KEYS; k++)
     {
       if (input < adc_key_val[k])
      {
             return k;
       }
    }
     if (k >= NUM_KEYS)k = -1;  // No valid key pressed
     return k;
 }
- Results
- S1 - start recording
- S2 - end of recording
- Target:realize play、pause、next、previous function
- Hardware
- DF_UNO 1
- Speaker 2
- ADKeyboard 1
- This module 1
- Micro SD card reader-writer
- Jumper wires
- Software
- Wiring Diagram

- Steps
- Format the SD card as FAT32 and store your audio files on the root directory
- Insert the SD card into the module
- Open Arduino IDE
- Upload the following code to the UNO (note: the UNO only has one serial port so you cannot upload a program and use the DFRduino Player module at the same time)
- Wire according to the connection diagram. We recommend using an external power supply for the microcontroller.
 /////////////////////////////////////////////////////////////////////////////////
/ / put audio files in the root directory, support. WAV, .MP3 this two kinds of file formats
/ / 5V voltage and current guarantee 1000 mA, if current is not enough, need to turn volume down, or play with a single horn
/ / the function of the lamp:
/ / after the success of initialization will long bright, if SD card is not inserted or it is bad, will keep flashing, at the same time,
/ / serial port output Please check micro SD card \ r \ n
/ / / / / / / / / / / / / / / / / / / / / / / serial port communication / / / / / / / / / / / / / / / / / / / / / / / / / / / / / / / / / / / / / / / / / / / / /
/ / Play audio: voice file name \ r \ n Play songs of the corresponding name, if found songs played right will return to Play ok \ r \ n
/ / return if failure  Not found \ r \ n.  return If play end  over \ r \ n \ r \ n said carriage returns)
/ /voice file name no more than eight English alphabets  , four Chinese.
// pause \ : p \ r \ n successfully return pause \ r \ n
/ / continue to play \ \ : s successfully return to start \ r \ r \ n \ n
/ / play next song  \ \ : n \ r \ n successfully return next \ r \ n, or  failure return false\ r \ n
/ / play previous song  \ \ :u \ r \ n successfully return key up \ r \ n
/ / volume Settings \ \ : v 255\ r \ n, set the volume, Numbers 0-255, the greater the number, the greater the volume, successfully return play end \ r \ n
 /////////////////////////////////////////////////////////////////////////////////

 //Serial port connection mode
 //Arduino    MP3
 //TX         RX
 //RX         TX
 //5V         +5V
 //GND        GND

 int adc_key_val[5] ={600, 650, 700, 800, 950 };
 int NUM_KEYS = 5;
 int adc_key_in;
 int key=-1;
 int oldkey=-1;

 void setup()
 {
   Serial.begin(19200);
   delay(2000);                   //Wait for initialization
   Serial.println("\\:v 200");    //Set the volume, from 0 (minimum)-255 (maximum)
   delay(50);
 }


 void loop()
 {
   adc_key_in = analogRead(0);    // read the value from the sensor

   key = get_key(adc_key_in);    // convert into key press

   if (key != oldkey)     // if keypress is detected
    {
     delay(50);     // wait for debounce time
     adc_key_in = analogRead(0);    // read the value from the sensor
     key = get_key(adc_key_in);    // convert into key press
     if (key != oldkey)
     {
       oldkey = key;
       if (key >=0){
         switch(key)
         {
            case 0:
                   Serial.println("\\:p"); // Pause
                   break;
            case 1:
                   Serial.println("\\:s");// Continoue to play
                   break;
            case 2:
                   Serial.println("\\:n");  // Play next
                   break;
            case 3:
                   Serial.println("\\:u"); // Play previous
                   break;
            case 4:                        //Play specified song
                   Serial.println("\\YOURS.mp3");
                   break;
         }
       }
     }
   }
  delay(100);
 }

 // Convert ADC value to key number
 int get_key(unsigned int input)
 {
     int k;

     for (k = 0; k < NUM_KEYS; k++)
     {
       if (input < adc_key_val[k])
      {
             return k;
       }
    }
     if (k >= NUM_KEYS)k = -1;  // No valid key pressed
     return k;
 }
- Results
- S1 - pause
- S2 - continue to play
- S3 - play the previous song
- S4 - play the next song
- S5 - play the specified songs (designated by the program)
There are no questions about this product yet. If you have any problems or suggestions you are welcome to post on the DFRobot forum.
 For any questions/advice/cool ideas to share, please visit DFRobot Forum.
Schematic
SVG file
CAD file
V2.0 handbook
: shopping from dfrobot store or dfrobot distributor.