Repository navigation
Feature Walkthrough Tape Density
Tape Density follows a real feature - not just a dependency bump - through GrayMoon from the first branch to the last merge, on the MezzoRecovery workspace (11 repositories, 3 dependency levels).
- Prepare the workspace
- Start the feature branch
- Implement the feature
- Commit, push, and watch CI
- Create pull requests
- Merge and sync back to default
See also the Library Update walkthrough for a dependency-only rollout where some repositories stay pinned to a tag.
This is Phase 1 of the tape-density multi-repo walkthrough.
In this phase we prepare the “demo baseline context” only:
- where the demo workspace lives (
MezzoRecovery, a real multi-repo project) - what GrayMoon shows for repositories (branch/status grid + dependency-level grouping)
- what GrayMoon shows for dependencies (graph + dependency-aware filtering)
- the exact dependency subgraphs you want to reference later in the demo:
agent,api,tapetools
No feature creation, no commits, and no PR work happens in Phase 1.
This walkthrough runs on MezzoRecovery, a real multi-repo project (11 repositories across 3 dependency levels) used throughout these docs.
GrayMoon models a workspace as a set of repositories plus a dependency graph between them.
On the Dependencies page, the graph is built from multiple sources (merged into one model before layout):
-
.csprojPackageReferencerelationships (project consumes package/library) - workspace file configuration tokens (token names referencing other repos)
- user-declared custom dependency edges
In the MezzoRecovery workspace, the result is a multi-level graph:
- Level 1: “root” packages (consumed by multiple higher-level repos, but that have no workspace package dependencies)
- higher levels: consumers that depend on lower-level workspace packages/tools/services
GrayMoon later uses these levels to keep coordinated actions consistent (for example dependency update ordering, and synchronized push ordering).
This is the main workspace grid you will refer to when we create the tape-density feature branch:

This is the full dependency graph for the workspace:
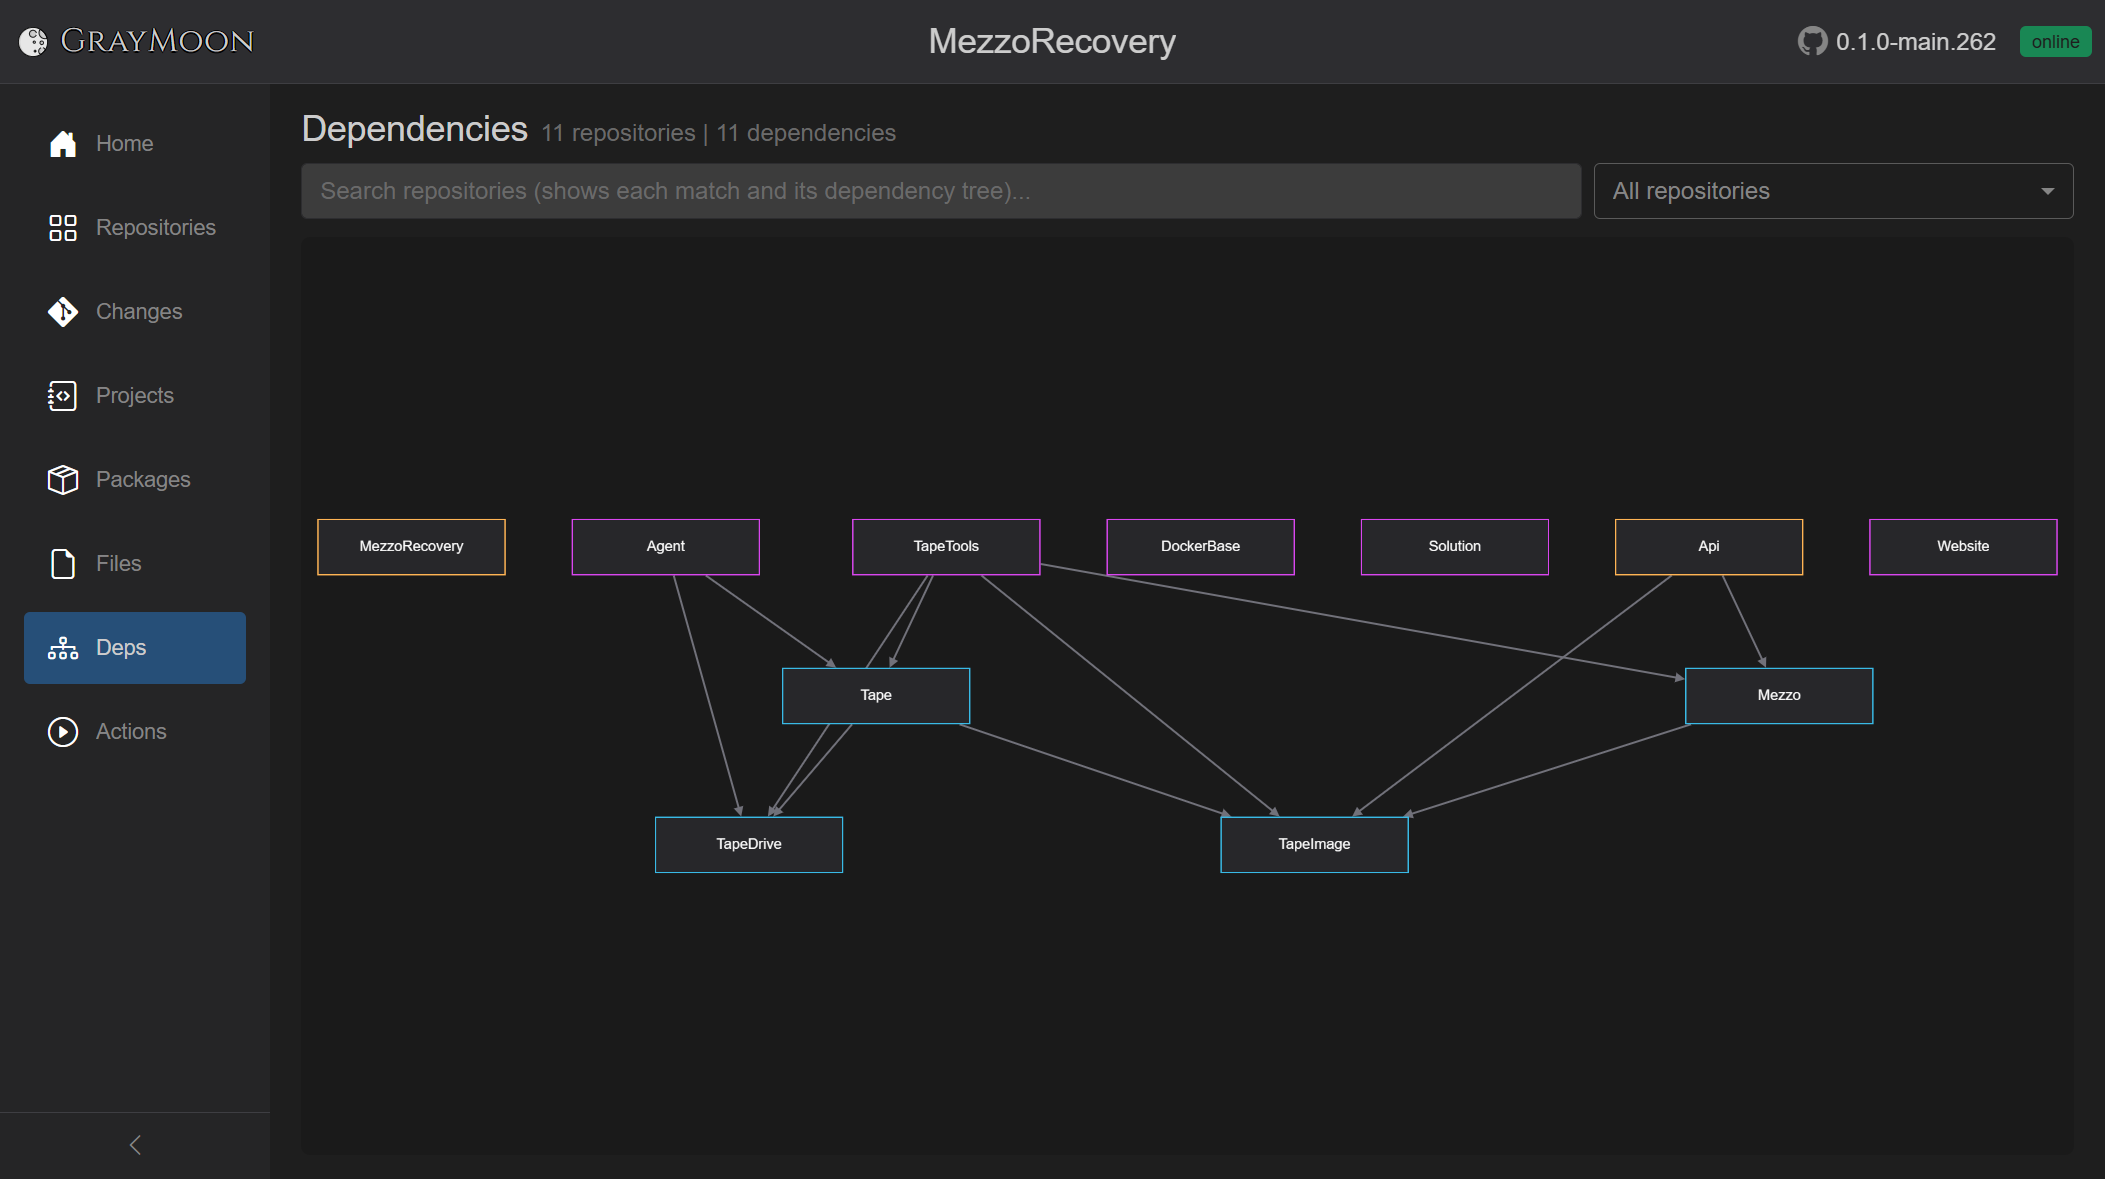
The Dependencies page includes a shared filter search bar:
- plain terms match repository names
- a match keeps the node and its dependency tree (so you see what it consumes, and what depends on it)
- you can use one term at a time for single-consumer trees (
apivstoolsvsagent)
In Phase 1 we capture the dependency subgraphs you requested.

What this subgraph is meant to communicate in the walkthrough:
-
Agentis a consumer of lower-level tape components (so future “coordinated change” actions need to respect this direction)

What this subgraph is meant to communicate in the walkthrough:
-
Apiis a higher-level service that depends on shared libraries and components (so dependency-level ordering matters)

What this subgraph is meant to communicate in the walkthrough:
-
TapeToolsis a standalone tool that consumes the same shared libraries, which makes it a good multi-repo demo candidate
Phase 1 context is complete. Continue with Phase 2 - Prepare Workspace to create the tape-density branch in GrayMoon.
This is Phase 2 of the tape-density multi-repo walkthrough.
Phase 2 uses GrayMoon Prepare Workspace to create the coordinated feature branch across the MezzoRecovery workspace, roll dependency versions forward, and synchronized-push every repository so downstream consumers can build against the new branch packages.
No feature code is written in this phase. After GrayMoon finishes, you implement the baseline plan locally (your separate AI agent / IDE work).
Before starting Phase 2:
- Step 1: Prepare the workspace is complete.
- The Worker badge is green online.
- Connectors are Active with OK status (GitHub + NuGet).
- Workspace MezzoRecovery is on the default branch (
main) with a clean grid (no leftovertape-densitybranch from a prior run).
If you need to reset, use Switch Branch back to main on every repo, or run Return to Default from the Branch menu.
| Field | Value |
|---|---|
| Branch name | tape-density |
| Based on |
main (default branch) |
| Update dependencies | on (default) |
| Push changes | on (default) |
GrayMoon applies this to all 11 workspace repositories in one job. For the tape-density plan, the impacted repos span every dependency level (libraries such as MezzoRecovery.TapeDrive, services such as MezzoRecovery.Api and MezzoRecovery.Agent, and tools such as MezzoRecovery.TapeTools). Prepare Workspace does not pick a subset - it keeps the whole workspace on the same branch name.
Reference: Prepare Workspace (full UI and phase details).
Open Repositories. Every repository should show branch main, divergence 0 | 0, and blue in sync.

This is the baseline the walkthrough assumes: one coordinated default branch, no open feature work.
On Repositories, open the Branch caret and choose Prepare Workspace.

Other Branch menu items (New Branch, Switch Branch, Create PRs, Return to Default) are separate flows. Prepare Workspace is the all-in-one path for branch + dependency update + synchronized push.
The dialog explains the default path: create a branch everywhere, commit dependency updates per level, then synchronized push.

Fill in:
-
Branch name:
tape-density -
Based on:
mainwith the green Default badge (each repo starts from its default branch tip) -
Update dependencies: checked - bumps
PackageReferenceversions (and configured version-file tokens) to the new branch semver and commits per dependency level - Push changes: checked - pushes level-by-level and waits for NuGet packages on the connector feed before pushing the next level

Click Create. The dialog closes and one background job starts (Abort is available on the loading overlay for the whole run).
Create runs a single workspace job. You stay on Repositories; the loading overlay covers the page until the job finishes or faults.
GrayMoon runs git checkout -b tape-density (from main) on every workspace repository. Progress shows Creating branches... then Created N of M. The terminal streams per-repo git output.
When Update dependencies is on, GrayMoon rewrites .csproj package versions (and file-config tokens) to match the new branch semver, then commits per dependency level (Updating dependencies..., Committed N of M). Level 1 packages commit first; Level 2 and 3 consumers pick up the new versions in order.
During this phase the overlay terminal shows git and dotnet activity across repos (GitVersion output, commits, restores).
When Push changes is on, GrayMoon pushes level-by-level. After each level it polls the NuGet connector until required packages appear on the feed (timeout 5 minutes per package at that level). While waiting, the overlay shows Waiting for N packages... with a countdown.

GitHub Actions lines in the terminal are status only. The gate is NuGet feed availability, not a green workflow badge.
If packages never appear within the timeout, GrayMoon stops the job. Fix CI/publish, then re-run push or Prepare Workspace as needed.
When the job completes successfully, every repository row shows:
- Branch tape-density
- GitVersion strings containing
tape-density(for example0.1.0-tape-density.40) - Green dependency badges where packages already match the branch versions
- Divergence
0 | 1on updated repos (the dependency commit is ahead ofmain) - Yellow create on repos that are ahead of default with no open PR (PR work is Phase 3)
- Blue in sync (synchronized push already ran)

Header Push is outline (nothing left to push from the Prepare Workspace run). You are now on a consistent feature branch across the workspace with dependency versions aligned for cross-repo builds.
Compared to a traditional multi-repo workflow:
| Traditional | With GrayMoon Prepare Workspace |
|---|---|
| Create/checkout the same branch name in 11 repos manually | One dialog, one job |
Edit .csproj versions repo-by-repo, easy to miss a consumer |
Level-ordered dependency update with commits |
| Push Level 1 packages, wait for CI/NuGet, then push Level 2, repeat | Synchronized push with feed polling built in |
Hard to see which repos still pin main versions |
Grid shows branch, semver, and dependency badges together |
GrayMoon has prepared the branch and dependency baseline. Continue with Phase 2 - Baseline implementation (AI coding) - you can start coding there.
When your baseline changes are ready, ask for Changes screenshots and Phase 3 (demo + PRs).
This is the bridge between Phase 2 - Prepare Workspace (GrayMoon prepared the branch) and Phase 3 (demo changes and PRs).
GrayMoon work for branch setup is done. You implement the tape-density feature next, using your AI IDE against the full multi-repo workspace. How each class or API is written is not part of this walkthrough - only the GrayMoon context and why the layout helps AI-assisted development.
After Prepare Workspace completed in Step 2, MezzoRecovery looks like this on Repositories:
- All 11 repositories are on branch
tape-density(same name everywhere). - Dependency versions were updated and committed per level, then synchronized push ran so NuGet consumers can resolve branch packages.
- Working trees are clean relative to the last dependency commit - ready for feature edits.
You are not starting from "11 repos still on main with mismatched package refs." GrayMoon already aligned the cross-repo baseline.
A feature like tape-density touches several packages and services (TapeDrive, Tape, Agent, Api, App UI, tools, and others). In a traditional setup you would:
- remember which repos need the same branch name
- open each repo in a separate window or hope one solution covers everything
- manually track which repos you already edited
GrayMoon Prepare Workspace gave you one coordinated tape-density branch and dependency baseline across the whole workspace. Your AI agent can now assume:
- the branch name is consistent everywhere it needs to commit
- downstream
.csprojreferences already point at branch package versions where Prepare Workspace updated them - the Repositories grid and Git hooks will reflect progress as you edit on disk
GrayMoon clones workspace repositories as sibling folders under the workspace root (Settings Root Path + workspace name). For MezzoRecovery that is typically:
C:\Workspace\MezzoRecovery\
Each catalog repo is its own folder next to the others, for example:
MezzoRecovery.TapeDriveMezzoRecovery.TapeMezzoRecovery.AgentMezzoRecovery.ApiMezzoRecovery.TapeTools- ... and the rest of the 11 repos
That layout is deliberate: one directory on disk holds the entire dependency graph the feature spans, not a single monorepo and not eleven unrelated paths scattered across the machine.
Cursor / VS Code multi-root workspace
Add the workspace root folder (or selected repo folders) to one editor window:
-
File -> Add Folder to Workspace... and pick
C:\Workspace\MezzoRecovery, or add individual repo folders. - Save as a
.code-workspacefile if you want a reusable layout (for exampleMezzoRecovery.code-workspacelisting each repo path).
The AI then indexes every folder in that workspace. Questions like "where is tape preflight handled?" or "which Api DTO maps Agent tape generation?" can span repositories without you pasting paths by hand.
Visual Studio
Open the solution that matches your workflow (MezzoRecovery.Solution lives in its own repo in this workspace). For cross-repo edits, many teams use multi-root in VS Code/Cursor for AI sessions and Visual Studio for focused debugging - GrayMoon does not care which editor writes the files; git hooks and watchers keep the App in sync.
| AI IDE has | This walkthrough documents |
|---|---|
| Full source across sibling repos | GrayMoon UI and workflow only |
| Your plan file and prompts | Not private implementation details |
| Ability to edit, build, test locally | Not step-by-step code for tape-density |
Implementation choices stay in your plan and AI session. GrayMoon shows whether repos changed and whether the workspace is ready to commit or push - not how you wrote the code.
Open Changes. With clean working trees you should see:
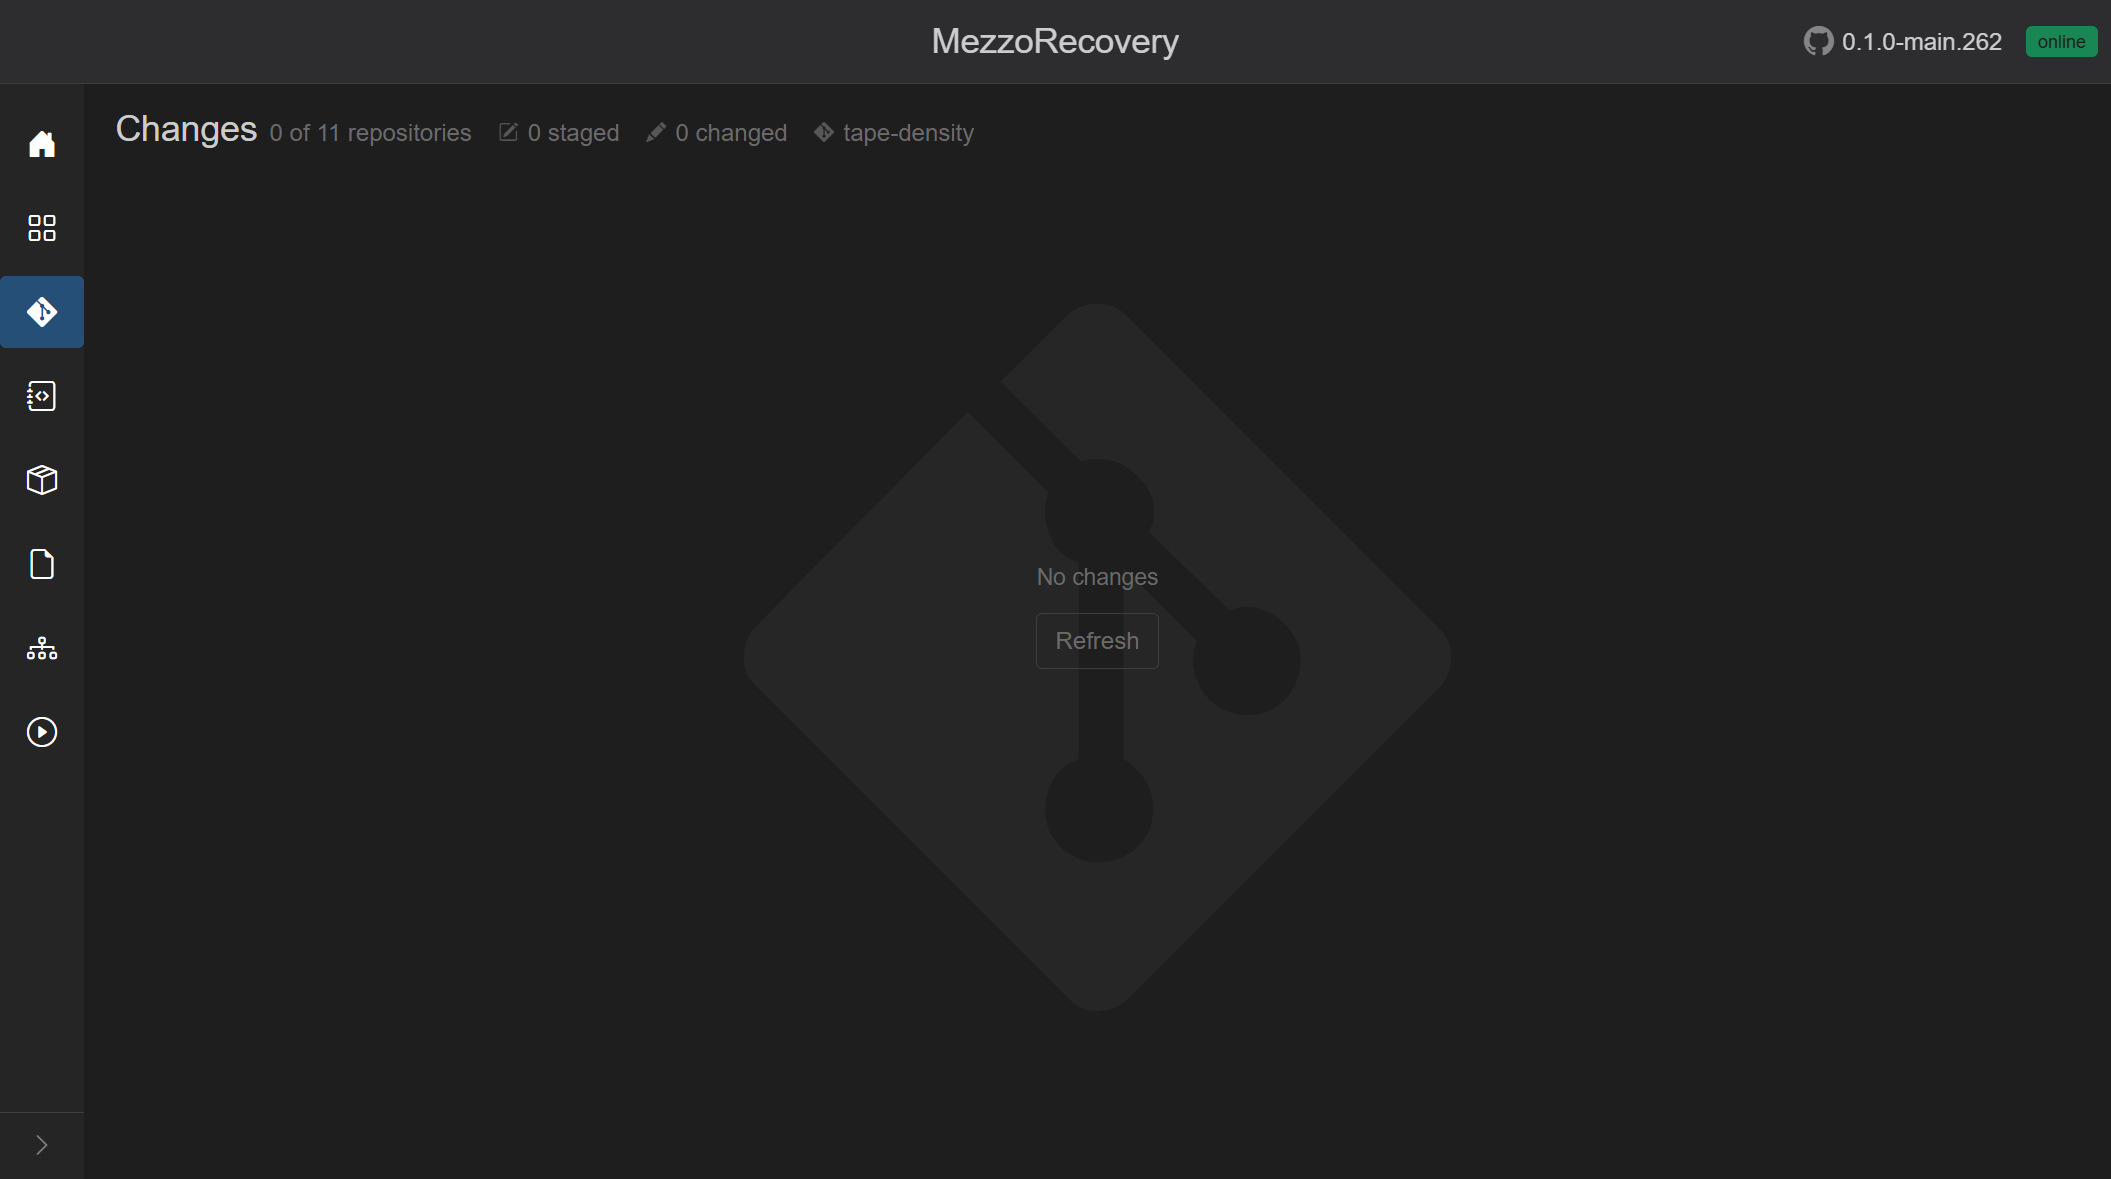
- Header:
0 of 11 repositories,0 staged,0 changed - Branch context:
tape-density - Center: No changes (Refresh is available but watcher-driven updates usually appear automatically once you save files on disk)
This is the "before" snapshot. After you implement, we will capture Changes again (on your signal) to show GrayMoon tracking edits across multiple repositories in one tree - see Workspace Changes for how staging, diff, and commit work.
GrayMoon does not poll from the browser. The Worker watches working trees; edits in Cursor/VS Code/git on the CLI show up here without keeping the Changes tab focused.
As soon as your AI-assisted edits start landing on disk, GrayMoon’s watcher-based sync updates this page.
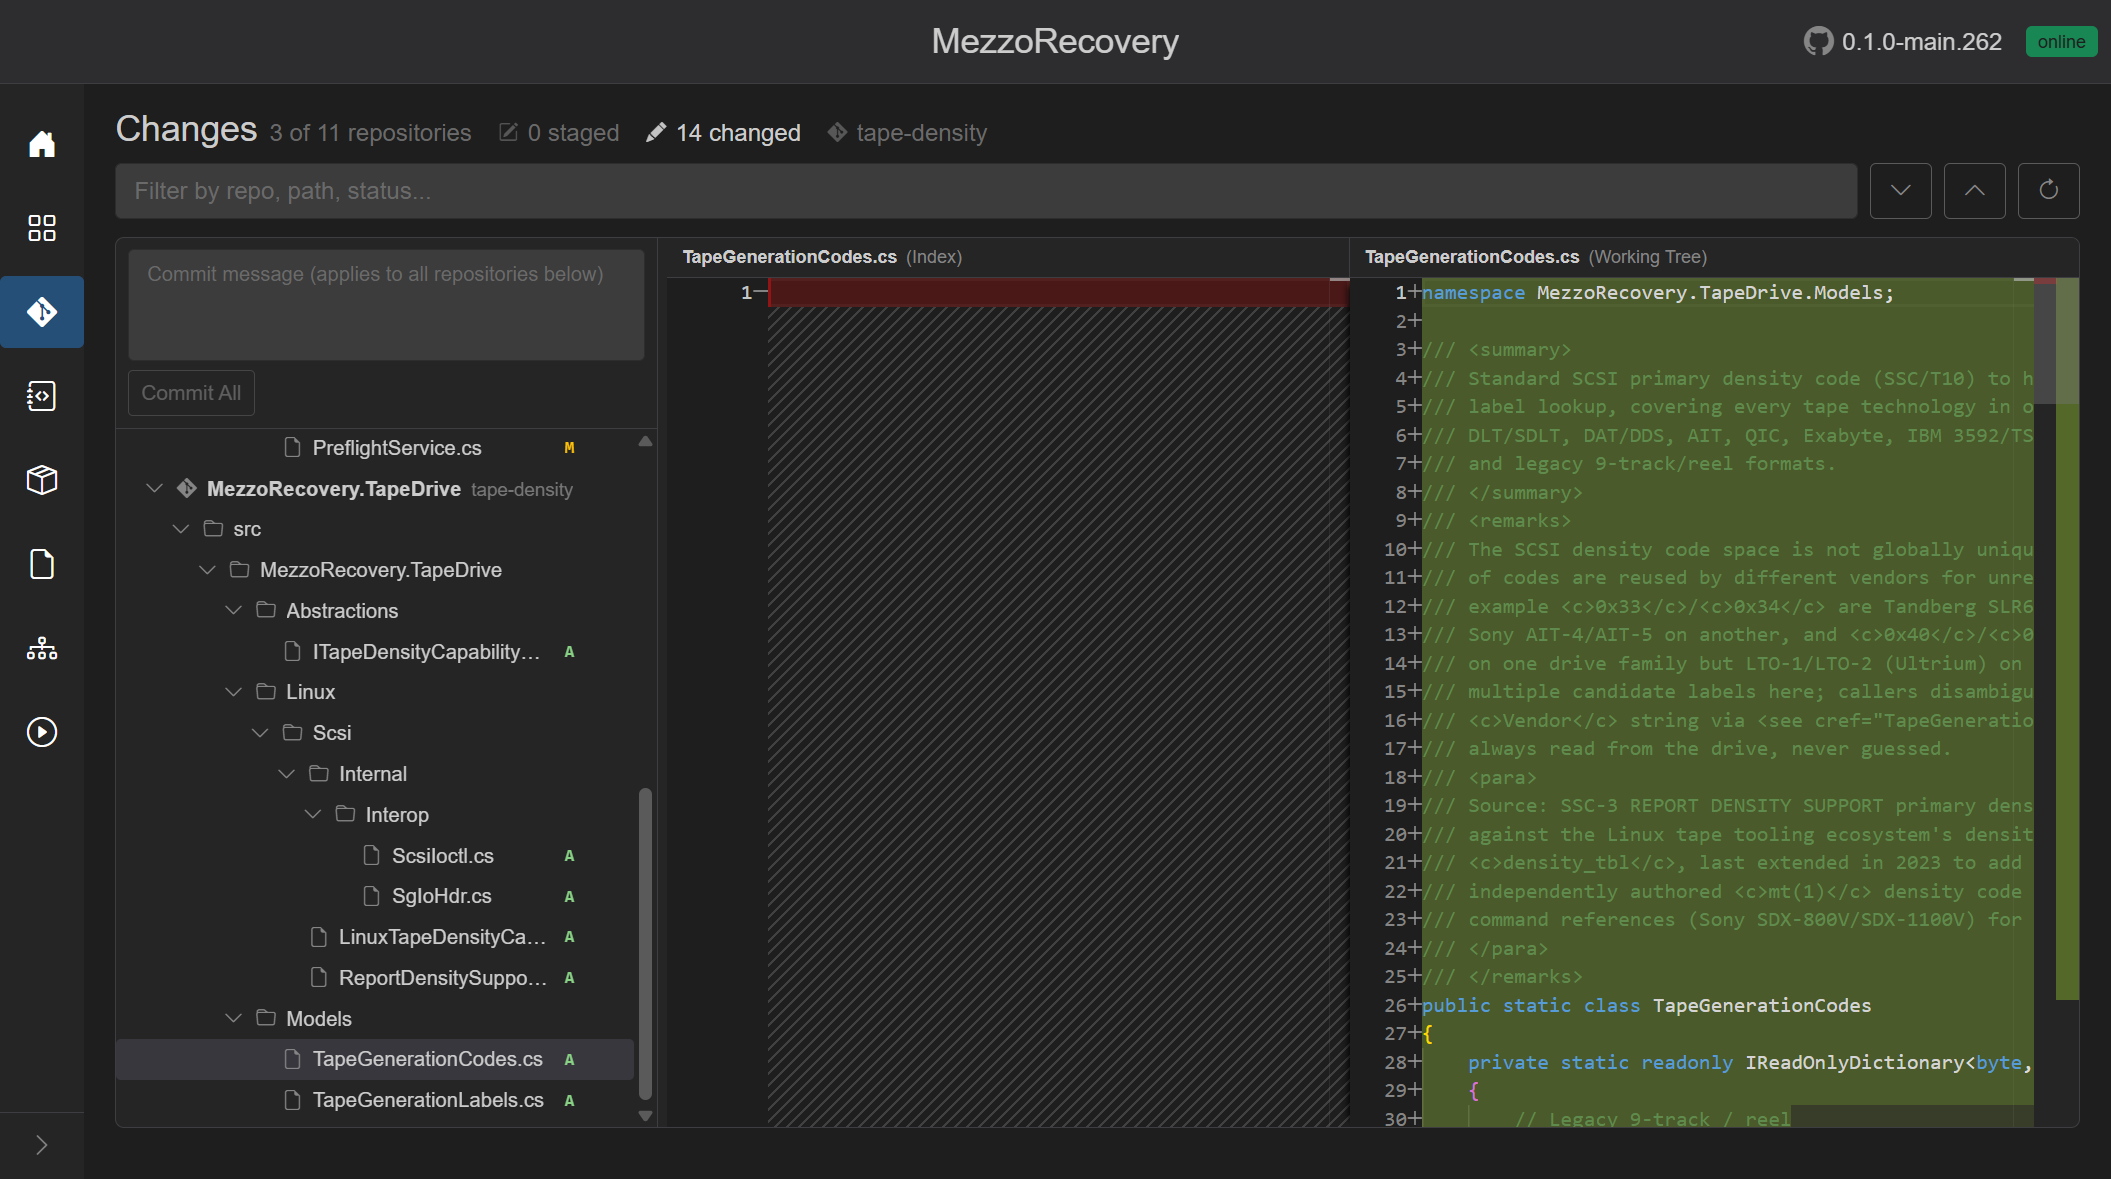
In this snapshot you can see:
- Header:
3 of 11 repositories 0 staged14 changed- Branch context:
tape-density - Multiple repos in the tree (
MezzoRecovery.TapeDrive,MezzoRecovery.Tape, and others)
This is the key "GM value" moment for Phase 2: the app is already tracking your edits across repos, so when you ask for a demo later, GrayMoon can show diffs/staging/commit readiness without you opening and comparing separate git status windows manually.
Click a file whose status letter is A (added). The right pane shows an empty Index side and the full new file on the Working Tree side.

GrayMoon uses Monaco for side-by-side review. New files appear as all-green additions without opening each repository separately.
Click a file whose status letter is M (modified). The right pane shows Index vs Working Tree with inline additions highlighted.

This is the second "GM value" signal for Phase 2: GrayMoon detects changes across repositories and renders the correct diff for whichever file you select, while your AI coding session continues to update the tree in the background.
As your AI session continues, the header counts climb without you opening separate git windows. A later snapshot on the same tape-density branch shows the feature spanning more of the workspace:

In this snapshot:
- Header:
5 of 11 repositories 0 staged-
34 changed(counts grow while coding continues) - Branch context:
tape-density - Repositories with edits:
MezzoRecovery,MezzoRecovery.Agent,MezzoRecovery.Api,MezzoRecovery.Tape,MezzoRecovery.TapeDrive
Collapse each repository row (chevron on the left) to see which repos are dirty at a glance. Expand when you need folder paths and individual files:

| What you need during a cross-repo feature | What GrayMoon Changes gives you |
|---|---|
| Know how many repos are touched | Header: N of 11 repositories
|
| See scope without scrolling every folder | Collapse repos to a short list (five rows above) |
| Review a specific file | Click the file - Monaco diff on the right (see earlier screenshots) |
| Stage only what you are ready to commit | Per-file, per-folder, per-repo, or whole Changed section |
| Same branch everywhere | Branch badge on every repo row (tape-density) |
| Keep coding - page updates itself | Worker file watchers push new snapshots; no manual Refresh needed |
For tape-density, library (TapeDrive, Tape), agent contracts, API surface, and App UI can all appear in one tree while your AI IDE keeps editing sibling folders under C:\Workspace\MezzoRecovery\.
GrayMoon splits the tree into Staged and Changed sections once anything is staged. You can move files one at a time with the + / - buttons on each row (file, folder, repository, or whole section).
Stage one file - Devices.razor in MezzoRecovery:

- Header flips to
1 staged/33 changed - STAGED (1) section appears above CHANGED
- Commit All becomes Commit Staged (blue) - only repos with staged files would commit
Stage a second file in another repo - ApiDtos.cs in MezzoRecovery.Agent:

- Header:
2 staged/32 changed - Staged files can span multiple repositories in one view
Unstage one file - move Devices.razor back to Changed:

- Header returns to
1 staged/33 changed -
Devices.razoris back under CHANGED;ApiDtos.csstays in STAGED
You could repeat this pattern to commit in smaller batches (for example, Agent contracts first, then Api, then UI). GrayMoon supports that workflow via Commit Staged.
Type a message in the shared box at the top. The same text applies to every repository that has staged (or all changed, for Commit All) files when you click commit:
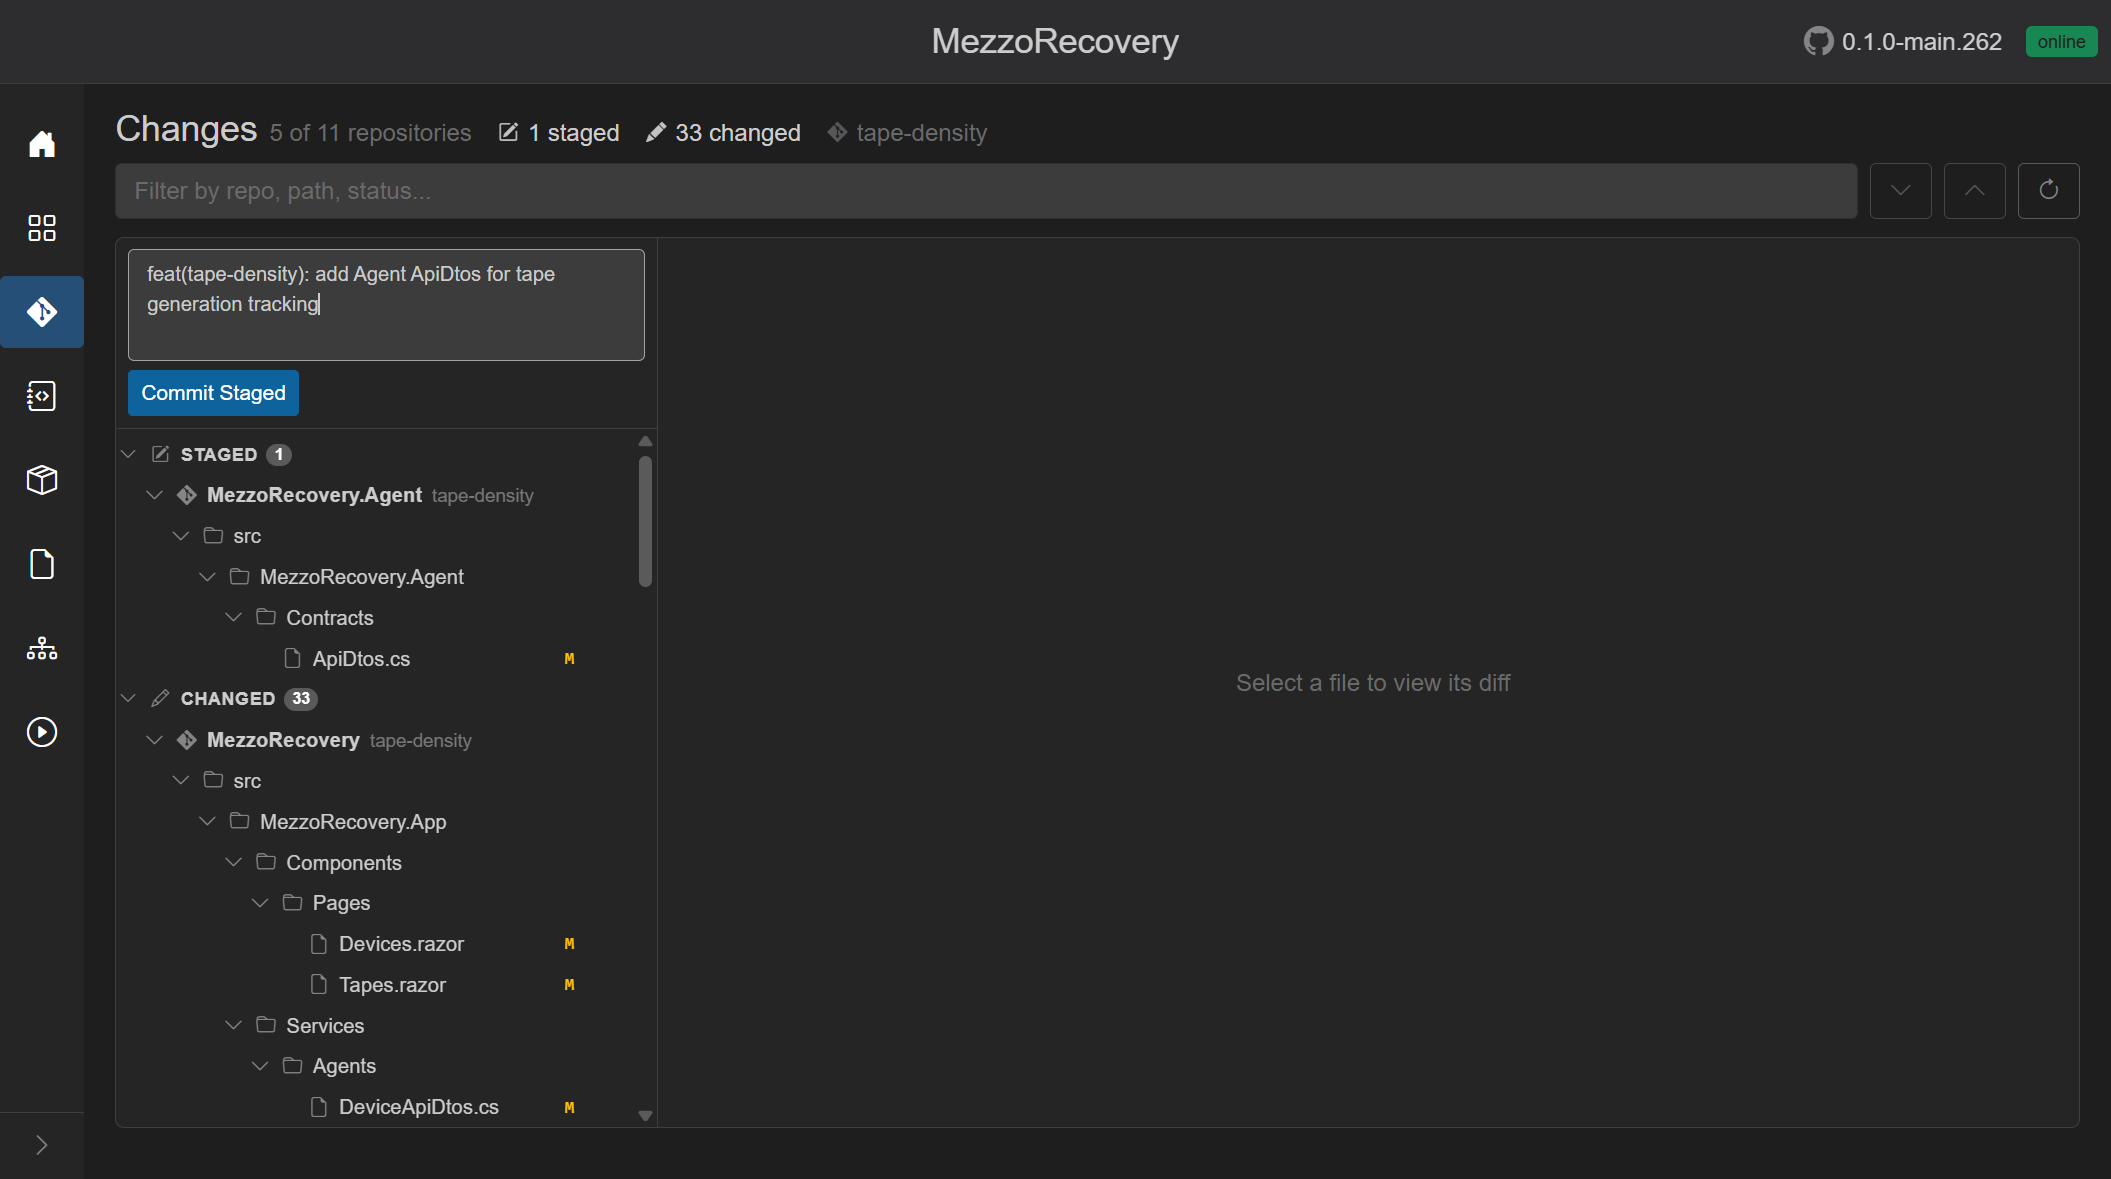
Example message shown: feat(tape-density): add Agent ApiDtos for tape generation tracking
Important for this walkthrough: the screenshots above demonstrate staging and message entry only. No commit was created - your working trees still hold all edits unstaged (or as they were before the demo).
For the coordinated tape-density feature, the plan is one shared commit message across all repositories when implementation is complete:
- Stage all (or use Commit All, which stages everything then commits per repo with the same message)
- Enter a single message such as
feat(tape-density): track LTO generation density across tape stack - Commit All or Commit Staged - GrayMoon creates one commit per affected repository with that same message
- Continue to Phase 3 (grid signals, push, coordinated PRs)
You could commit multiple times with different messages (Agent first, Api second, and so on). GrayMoon allows it. This walkthrough deliberately saved one message for the full feature so every repo stays aligned for the demo push.
Completed in Phase 3: Commit, push, and GitHub Actions - Commit All, Push Updated, synchronized push, Actions before/after.
See Workspace Changes - Commit across repositories for button tooltips and default-branch warnings.
| Without coordinated workspace + GM | With MezzoRecovery + GrayMoon baseline |
|---|---|
| AI sees one repo; you paste context from others | AI workspace spans all sibling repos |
Branch drift (tape-density in Api but main in Tape) |
Same branch name on every repo after Prepare Workspace |
| Consumers still pin old package versions | Dependency update + synchronized push already ran |
| Review means N separate git status windows | One Changes tree for all repos (no 25-repo cap like VS Git Changes) |
| Unclear which repos are dirty before PRs | Grid badges + Changes header (N of 11 repositories) |
| Push order surprises downstream CI | Level-ordered push already established branch packages on NuGet |
For tape-density specifically, the plan crosses library, agent, API, and UI boundaries. A single AI session rooted at the workspace folder matches that scope better than editing one repository in isolation.
- Open your AI IDE against
C:\Workspace\MezzoRecovery(multi-root or whole folder). - Use your existing plan (Tape density LTO generation tracking) with your AI agent.
- Implement across the repos the plan touches (
TapeDrive,Tape, Agent, Api, App, and related packages). - Build and test locally as you normally would.
GrayMoon does not need to stay open while you code. Keep the Worker service and Docker App running so hooks and watchers can update state when you commit or push.
Do not expect this walkthrough to describe code changes. Staging and commit-message demos are in the sections above. Commit, push, and Actions are documented in Phase 3. Next: coordinated PRs on your signal.
If Phase 2 Prepare Workspace finished successfully on your machine (all repos on tape-density, synchronized push complete) and Changes matches the empty screenshot above, you can start implementing now.
When you have a meaningful set of edits to show, tell me and we will:
- screenshot Changes with files across multiple repos
- continue toward Phase 3 (demo grid signals and coordinated PRs)
Until then, GrayMoon's role is passive tracking: watch Changes climb from 0 of 11 repositories to 5 of 11 (and higher) as your AI-assisted edits land on disk.
This phase follows Phase 2 - Baseline implementation. Implementation is on disk; GrayMoon now shows the full commit -> push -> CI loop across the workspace.
GrayMoon's Commit All on Changes stages every unstaged file, then creates one git commit per affected repository using the same message. You do not open five terminals or repeat the message by hand.
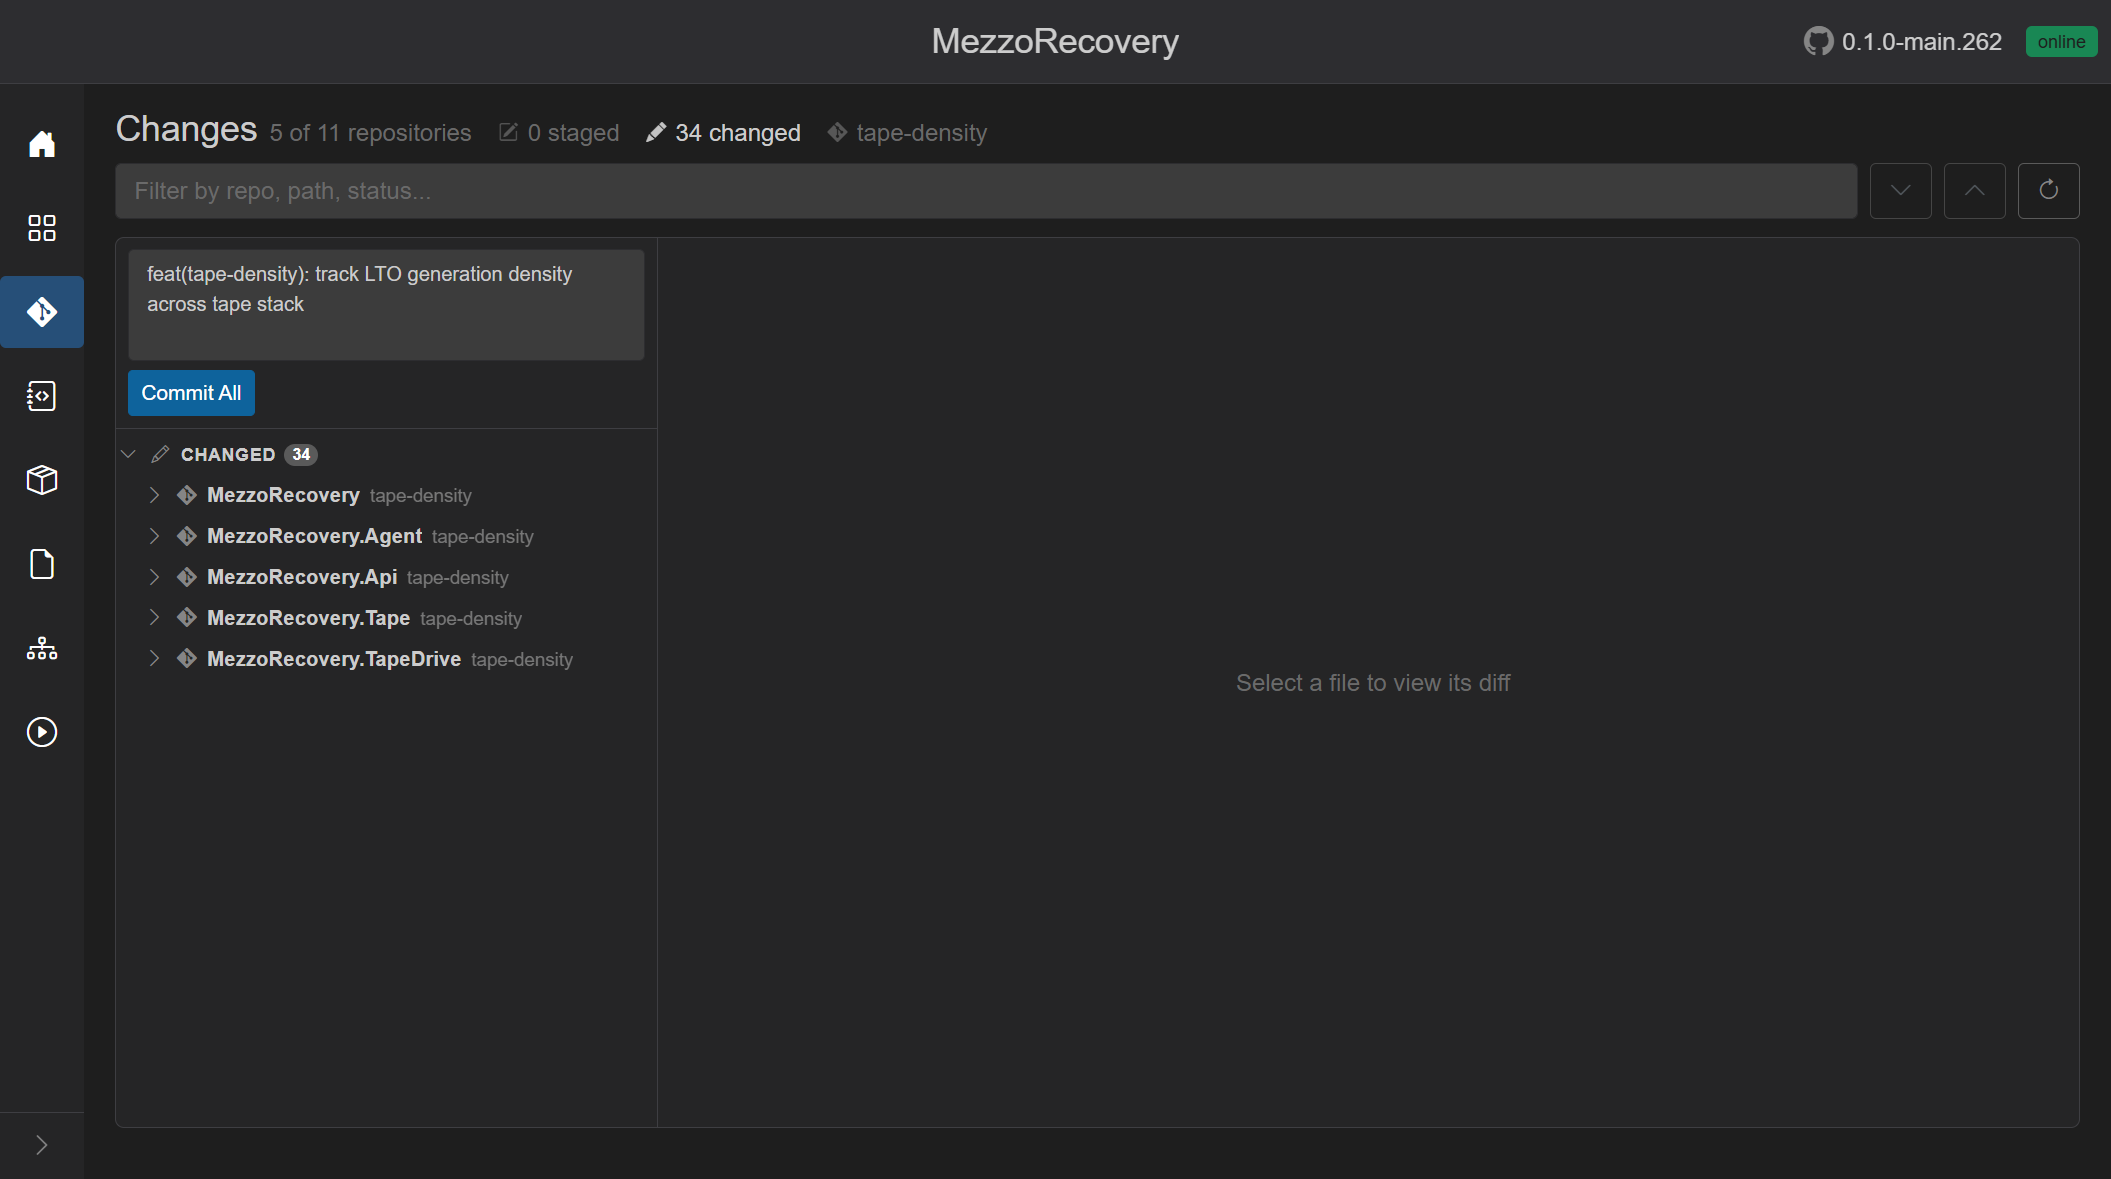
Message used for this walkthrough:
feat(tape-density): track LTO generation density across tape stack
Commit All ran against all five dirty repos:
MezzoRecoveryMezzoRecovery.AgentMezzoRecovery.ApiMezzoRecovery.TapeMezzoRecovery.TapeDrive
| Traditional multi-repo | GrayMoon Commit All |
|---|---|
| Copy/paste message into each repo | One textarea, one click |
| Easy to typo or diverge messages | Identical commit text everywhere |
| Hard to know which repos still need a commit | Header shows N of 11 repositories until clean |
| Working tree vs unpushed commits mixed up | Changes clears; outgoing commits move to the notification card |
After commit, Changes is empty - working trees are clean:
-
0 of 11 repositories,0 staged,0 changed - Unpushed commits do not stay in the Changes tree; they appear on the notification card and Repositories grid badges instead.
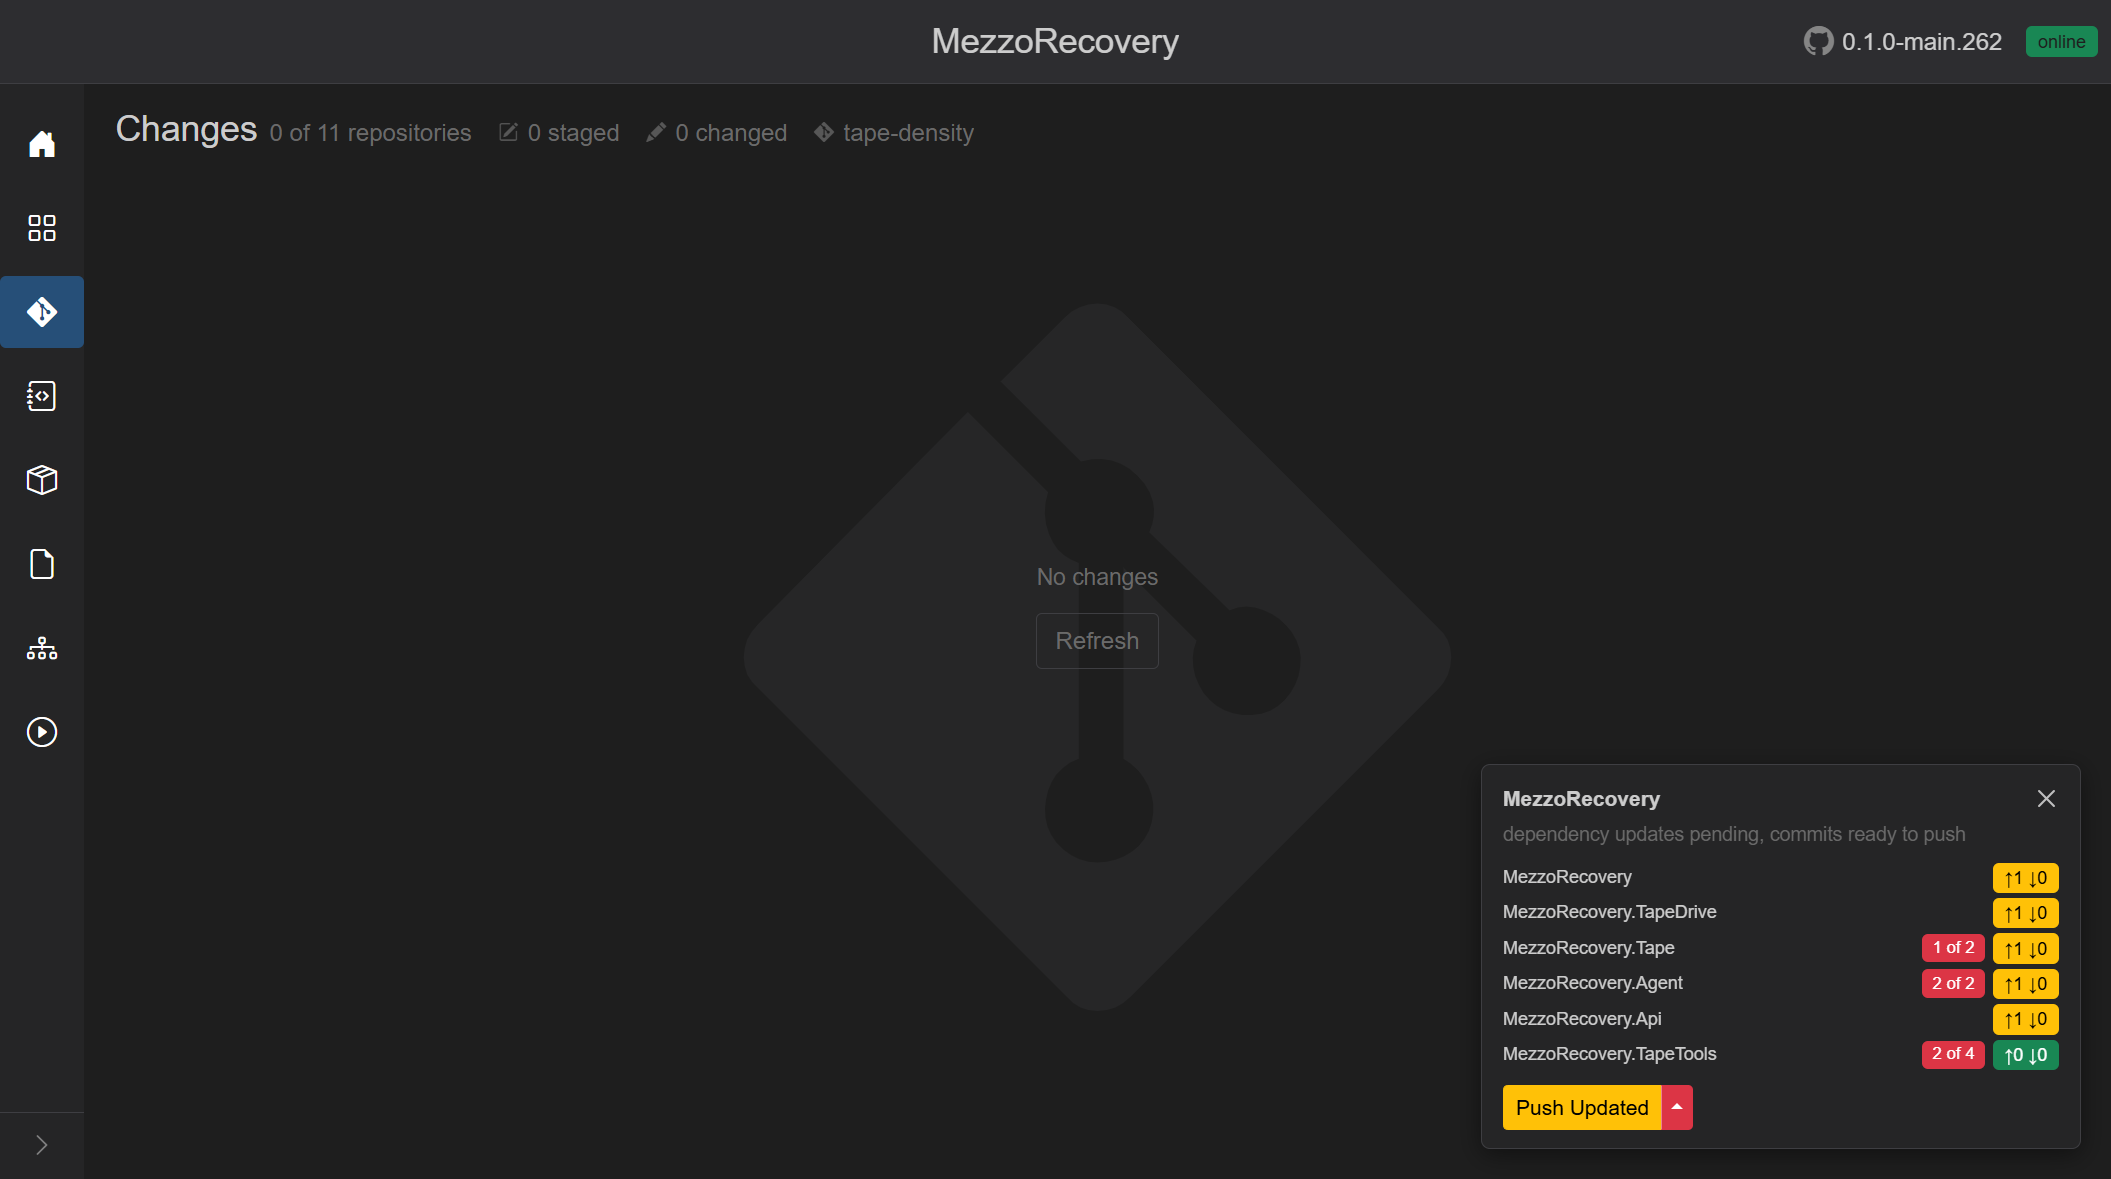
The floating card lists every repo in the workspace that still needs action. From Changes (or Worker, Actions, and other non-Repositories pages) you can push without opening the grid:

This snapshot shows:
- Description:
dependency updates pending, commits ready to push - Per-repo rows with commits badges (
↑1 ↓0) and dependency badges (1 of 2,2 of 2,2 of 4) - Primary Push Updated (yellow) - update deps, then synchronized push in one job
- Caret menu: Level N Only, Update Only, Update Files, Push Only, Undo Push Commits
The card is hidden on Repositories because the same header buttons are already there.
Open Actions before pushing to capture the "all green" baseline on tape-density:

-
11 workflows,success 11 - Last runs from the earlier Prepare Workspace push (~40 min ago)
- No running chip yet - CI has not reacted to the new feature commits
Use this as the before picture: after push, the same page will show orange running rows and live terminals.
On Repositories, unmatched package refs (consumers still pin old -main versions while Level 1 packages already report -tape-density) turn the header primary into yellow Push Updated:

Grid signals after the feature commit:
- Yellow
↑1 ↓0on repos with outgoing commits (feature commit not on origin yet) - Red
N of Mdependency badges on Level 2 / 3 consumers - Yellow
createPR badges (ahead of default, no open PR)
The split menu is how you run update and push separately:

| Menu item | What it does |
|---|---|
| Level N Only | Update + push only the lowest level that still needs work |
| Update Only | Rewrite .csproj / file-config tokens and commit per repo |
| Update Files | Version-file token pass only |
| Push Only | Push outgoing commits with level-ordered synchronized push |
| Undo Push Commits | Roll back local update/feature commits (when shown) |
Push Updated (primary click) = Update Only then Push Only in one background job - the same combined path Prepare Workspace uses after branch creation.
Push Updated starts with the update confirmation:

- Rewrites
.csprojpackage versions to match branch package versions already on disk - Optional commit message (default
chore(deps): update package versions) - Include updated dependencies in commit message lists which packages changed
- Proceed commits in each affected repo, then continues to push
This walkthrough used Proceed with the default message. GrayMoon created a second commit per consumer repo (deps alignment) before pushing.
After updates, GrayMoon pushes by dependency level and polls NuGet connectors until required packages appear before starting the next level. The loading overlay shows git commands, registry checks, and wait countdowns:

In this frame:
- Level 1 packages already pushed; overlay shows Found 1 of 2 packages with countdown
- GitHub Actions API lines in the terminal are status only - the gate is "is this nupkg on the NuGet feed?", not a green workflow badge
- Abort cancels the job
When you choose Push Only (or yellow Push with no pending updates), GrayMoon may show the Synchronized Push dialog first:
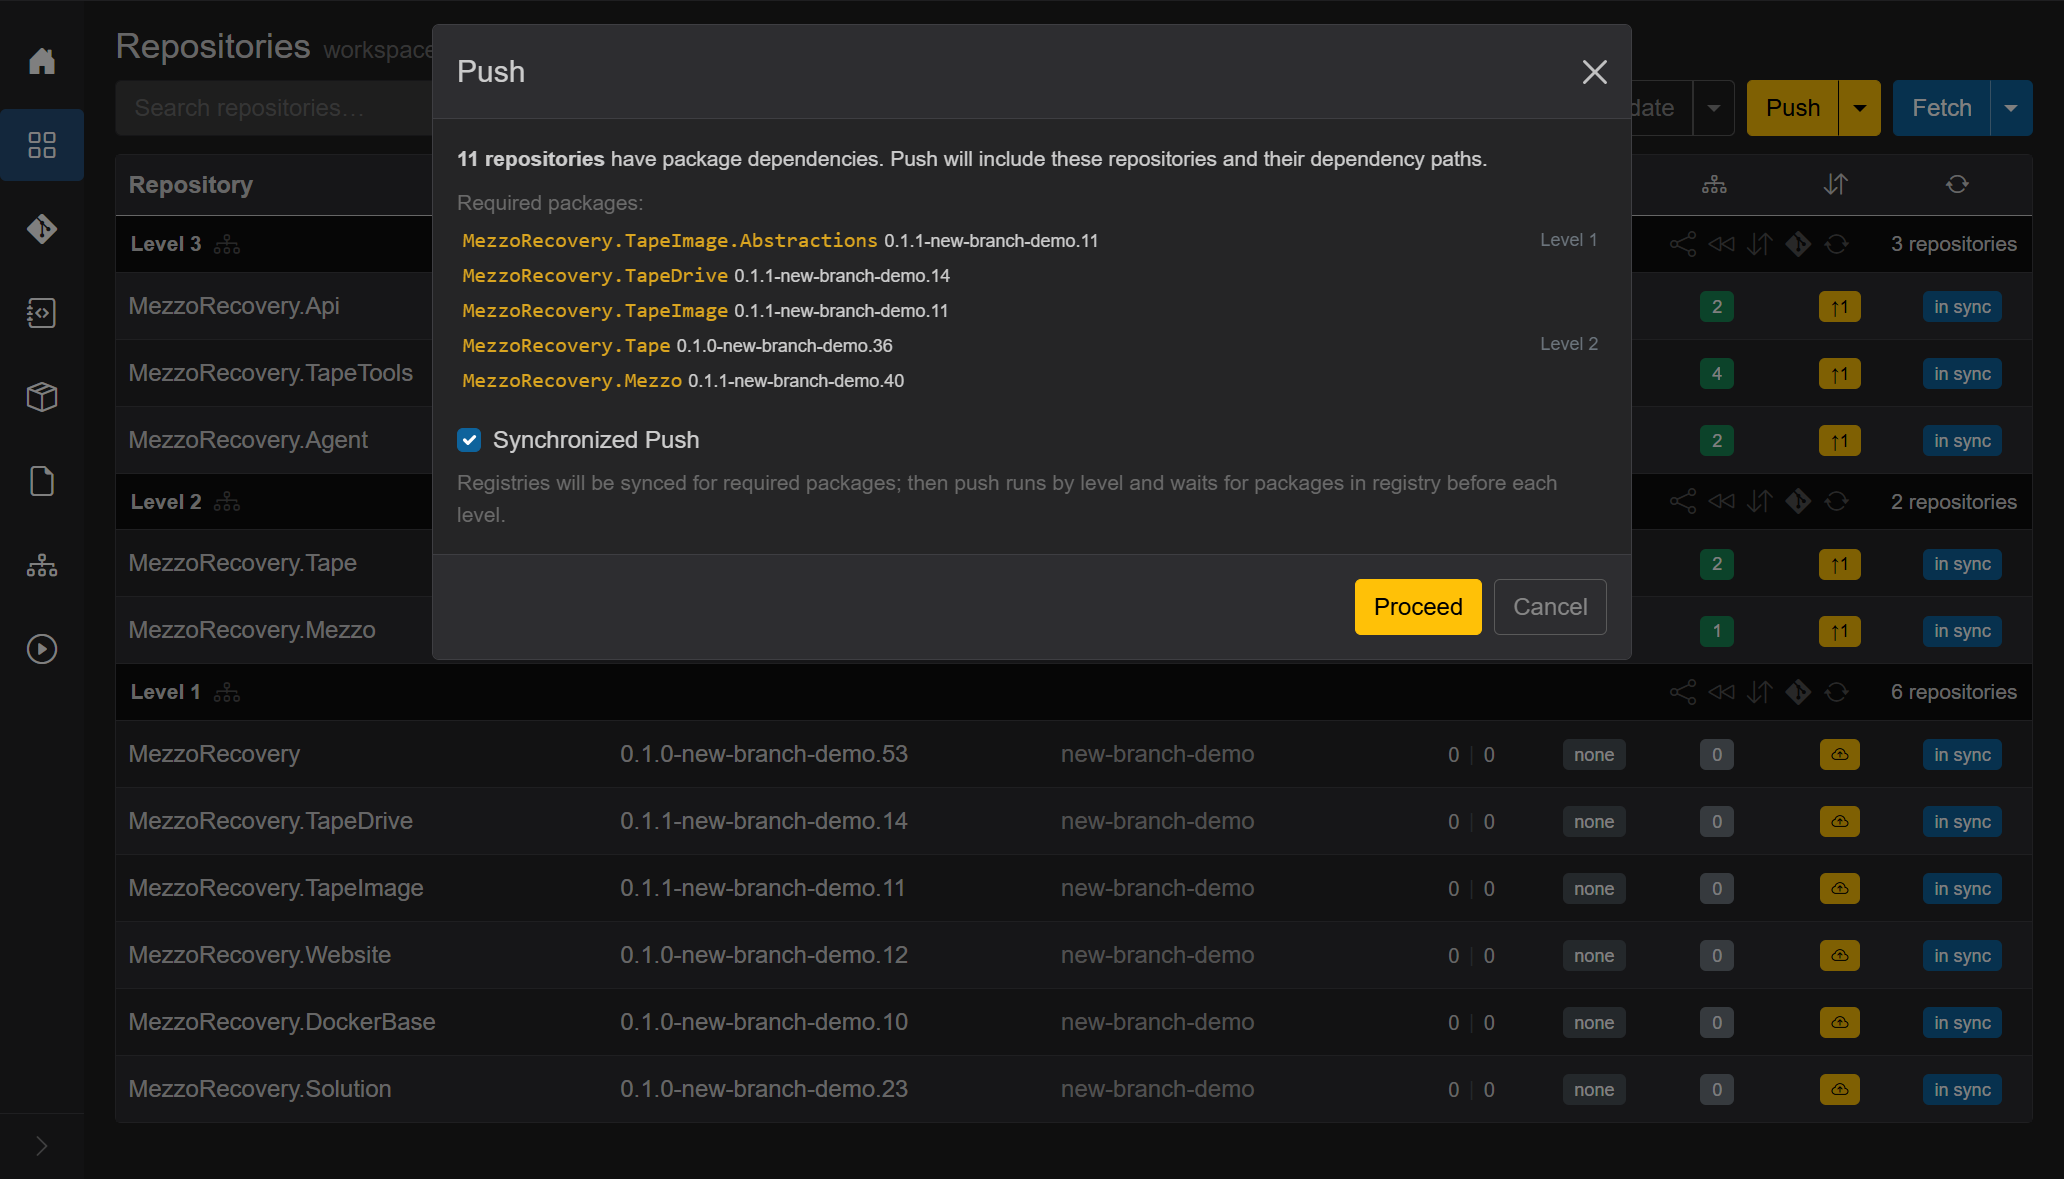
(from Repositories - Push Only)
- Lists required packages grouped by level
- Synchronized Push (default): sync registries, push level-by-level, wait for packages on the feed between levels
- Proceed starts the job; timeout is 5 minutes per package per level
Push Updated skips this separate dialog when update+push is already implied, but the overlay behavior is the same during the push phase.
When the job finishes:

- Header Push back to outline (nothing left to push)
- Commits badges green
↑0 ↓0 - Dependency badges green (counts match branch packages)
- Yellow
createPR badges remain until PRs are opened - Divergence
0 | Nstill shows commits ahead ofmain(feature branch on origin, PR not merged)
Navigate to Actions via the sidebar (same workspace, no context loss). After the push, GitHub triggered builds on tape-density:

- Header chips:
running 2,success 9(counts shift as jobs finish) - Orange running badges on Agent, Api, TapeTools workflows
- Abort replaces Run while a run is in flight
- Expanded live terminal rows under running workflows (steps on the left, log output on the right)
This is the payoff of checking Actions before push: you can watch CI wake up across repos from one page instead of opening each GitHub repo.
Poll Refresh or wait - statuses flip to green success as GitHub completes. Logs opens the full run log modal on demand (Actions reference).
Push-triggered Build workflows usually show success after the first feature push. Deploy workflows (and other workflow_dispatch-only YAML) often stay gray none with Last Run never until you start them.
Filter none (turn success off, none on) to list what has not run on tape-density yet:

Typical rows include Deploy MezzoRecovery to VPS, TapeTools Build AOT, and DockerBase image push workflows - all with Run on the right. Header chip none 4 is the workspace total; the filtered grid shows 5 workflows on this branch.
This answers: "Build CI passed from the push - what deployment steps are still waiting?"
From the none filter (or search deploy), click Run on Deploy MezzoRecovery to VPS. GrayMoon dispatches GitHub workflow_dispatch on the current branch (tape-density) - no branch switch in GitHub, no local git commands.

- Orange running badge, running 1 chip in the header
- Abort cancels the run on GitHub
- Expanded live terminal: jobs/steps on the left (e.g. Setup .NET), log output on the right
- Branch column stays
tape-densitythroughout
When GitHub finishes, status returns to success; open Logs for the full run text. See Actions - Deploy from a feature branch.
GrayMoon keeps workspace context in the sidebar on every page:
- Repositories - grid, header Push / Push Updated / Update, PR badges
- Actions - CI status and live terminals for the same repos on the same branch
- Changes - empty when clean; notification card visible when commits are ready to push

From here you can:
- Click Actions in the sidebar to watch remaining workflows finish
- Return to Repositories to confirm
↑0 ↓0and open Create PR (next walkthrough step) - Open Changes - still No changes while CI runs; unpushed work is already on origin
No full page reload is required; enhanced navigation keeps the circuit (and any background job for this workspace) alive.
| Step | GrayMoon capability demonstrated |
|---|---|
| Commit All | One message -> N repo commits |
| Empty Changes + card | Working tree vs outgoing commits separated |
| Push Updated | Deps rewrite + synchronized push in one job |
| Split menu | Run update or push alone when needed |
| NuGet wait overlay | Level-ordered push without breaking consumers |
| Actions page | Multi-repo CI dashboard with live terminals |
| none filter | Workflows never run on current branch (deploy candidates) |
| Run Deploy VPS | Feature-branch deployment via workflow_dispatch from GM |
| Sidebar navigation | Repositories <-> Actions without losing workspace |
Now that PRs are created, the next focus is the PR check pipeline:
- Monitor PR checks until CI is green
- Merge (or open them in GitHub for review) when everything passes
See Phase 4 - Create coordinated PRs.
This phase follows Phase 3 - Commit, push, and GitHub Actions. Your feature branch tape-density now has commits on the impacted repositories, and the Repositories grid shows yellow create PR badges where a PR is still needed.
Goal: create one coordinated PR set (same title/body) across the repos affected by the tape-density feature.
The Repositories page determines the eligible PR targets from:
- Dependency ordering (repos grouped by dependency level)
- Whether the repo's branch is already on its default branch
- Whether an open PR already exists for
tape-density
So the PR creation happens in batches by dependency level. You may run the bulk PR action multiple times, and any remaining repos can be created via the per-repository create badge.
You can create a PR for a single repo by clicking its yellow create badge. This opens the same modal, but with a single target.

From the Repositories grid, click Open Pull Request for the dependency level batch you want to process. This opens the multi-target PR modal.

Then:
- Confirm the shared PR title
- Paste/keep the shared description (the same markdown body everywhere)
- Click Create
GrayMoon shows a confirmation modal, including how many PRs will be created.

After the first bulk create, GrayMoon updated the PR badges only for the repos included in that dependency-level batch.

The remaining repos were left with yellow create badges because they were not part of the eligible target set for that bulk action (they were in a different dependency level and/or were not eligible for the batch run at that time).
For the remaining Level 1 repos, use their per-repo create badges.


At the end, the Repositories grid shows green PR badges with the created PR numbers for every impacted repo.

After PRs are created, merge them by dependency level on GitHub (Level 1 first). Then use the Level 1 header rewind (Return to Default) to check out main, delete the merged feature branch, and pull latest default in those clones.
Continue in Phase 4 - Merge PRs and Return to Default.
This phase follows Phase 4 - Create coordinated PRs. PRs for the tape-density feature are open (or already merged on GitHub). This step shows the happy path: merge PRs level by level, run scoped Level N Only updates between merge waves, then use each Level N header rewind to drop the feature branch and pull latest main in dependency order.
We document the full merge path: Level 1 rewind, Level 2 Only, Level 2 merge/close in GitHub, Level 2 rewind, Push Updated for Level 3, Level 3 merge in GitHub, and Level 3 rewind. The walkthrough ends with all 11 repos on main.
See also the general reference: Return to Default.
After Step 5: Create pull requests, every impacted repo had a PR link on tape-density. By this point:
-
Level 1 PRs are merged on GitHub for the repos that had feature work (
MezzoRecovery,MezzoRecovery.TapeDrive). GrayMoon paints those rows with a purple merged badge. -
Level 2 / 3 still show green open PR badges (
#42,#66, and so on) and remain ontape-density. -
Header Push Updated (yellow) is expected: Level 1 packages are back on
*-main.*GitVersion while Level 2 / 3.csprojfiles still pin-tape-densitypackage versions.
In this run, four Level 1 repos (TapeImage, Website, DockerBase, Solution) had already been rewound to main in an earlier partial sync. Only two Level 1 clones still needed cleanup when we opened the dialog.

What to notice in the screenshot:
| Area | State |
|---|---|
| Level 3 |
tape-density, open PRs, red dependency badges (e.g. 1 of 2, 2 of 4) |
| Level 2 |
tape-density, open PRs, red dependency badges (e.g. 2 of 2) |
| Level 1 |
MezzoRecovery / TapeDrive on tape-density with purple merged; other Level 1 rows already on main
|
| Header | Push Updated (yellow) - consumers still pin feature package versions |
Branch caret Return to Default across all 11 repos is for discard/rollback when you are abandoning unmerged work. With open PRs still on Level 2 / 3, that path would show red commits will be lost warnings and a countdown.
For this walkthrough you only want per-level cleanup after merge. Use the Level 1 header rewind icon (Return to Default), not the workspace-wide menu item.
On the Level 1 header, click the rewind control (Return to Default).
GrayMoon does not open the confirm dialog immediately. It first runs a workspace job: Fetching latest branch state for N repositories... (refreshes GitHub PR records and git fetch per repo). When the fetch finishes, the Return to Default dialog opens scoped to Level 1 only.

Dialog details for this merged-PR case (reason 2 in Return to Default):
- Title: Return to Default
-
Lead copy: This will sync 2 repositories to their default branch: checkout default, remove the current branch locally, and pull. (Only repos still on a non-default branch are listed; clones already on
mainare skipped.) - No red alert - merged PRs are treated as landed work, not commits about to be destroyed.
-
Repo list -
MezzoRecoveryandMezzoRecovery.TapeDrive, both leavingtape-density. No N commits will be lost line. -
Delete local branches - default on. After checkout of
main, GrayMoon deletes the localtape-densityref. - Proceed stays blue and runs immediately (no five-second countdown).
Click Proceed.
A second job: overlay Synchronizing to default branch..., then per-repo git steps (remote branch delete when upstream existed, fetch --prune, checkout main, delete local feature branch, pull). The overlay may be brief for two repos.
For each synced repo GrayMoon recaptures GitVersion, branch lists, and commit counts, then recomputes workspace dependency stats once at the end.

Level 1 after this step:
| Column | Level 1 state |
|---|---|
| Branch |
main on every Level 1 row |
| Version |
*-main.* GitVersion strings |
| PR | none (merged PR is closed; feature branch ref is gone locally) |
| Deps | gray 0 (Level 1 repos do not consume workspace packages) |
| Commits | in sync with origin |
Level 2 / 3 unchanged - still on tape-density with open PRs. That mixed grid is correct, not a failed job.
Level 1 packages now report *-main.* again. Level 2 / 3 .csproj files on tape-density still pin -tape-density package versions. GrayMoon compares every workspace package reference to live GitVersion and paints red N of M badges on consumers (e.g. Tape 2 of 2, TapeTools 2 of 4).
Hover a badge and GrayMoon lists each drifted pin as current -> new. TapeTools might show only 2 of 4 mismatches because its Level 2 deps still match -tape-density on disk - only the Level 1 package pins are stale relative to main.
Those badges are the signal that consumers no longer match the package versions GitVersion reports on disk. They are expected immediately after Level 1 rewind. What you do next depends on whether you are merging level by level or trying to clear every badge in one shot.
Yellow Push Updated is available because unmatched deps exist. The primary button and the split-menu item Level 2 Only both run Update Only then Push Only, but they differ in scope:
| Action | Scope | What happens on tape-density after Level 1 rewind |
|---|---|---|
| Push Updated (primary click) | Every level that still needs work | Rewrites .csproj / file tokens on Level 2 and Level 3, commits everywhere, then synchronized push walks Level 2 push, NuGet wait, Level 3 push |
| Level 2 Only (split menu) | Lowest level needing work only (maxLevel: 2) |
Rewrites and commits only Level 2 repos (Tape, Mezzo), synchronized push stops after Level 2 packages publish |
The menu label tracks the lowest red-badge level. After Level 1 is on main, that item reads Level 2 Only. After Level 2 merges and rewinds, it becomes Level 3 Only for the final consumer pass.
See the full menu in Phase 3 - Push Updated caret.
If you click the primary Push Updated button while Level 2 and Level 3 PRs are still open:
-
Level 3 picks up extra commits before its PR merges. GrayMoon adds a
chore(deps): update package versionscommit on Api, TapeTools, and Agent while their PRs are still in review. Reviewers see a moving target; CI runs again on commits that were not part of the original feature scope. -
Level 3 pins Level 2 packages that are not on
mainyet. A workspace-wide update rewrites Level 3 to whatever GitVersion Level 2 reports on the feature branch today (*-tape-density.*). After you merge Level 2 tomainand it publishes new-main.*packages, Level 3 pins are stale again - you need another update pass. -
You pay for NuGet wait and push work you do not need yet. Synchronized push continues into Level 3 (registry polling, overlay time) even though your immediate goal is only to land Level 2 PRs against packages that already live on default.
-
It breaks the same rhythm as per-level rewind. Return to Default already proceeds level by level so each finished layer drops the feature branch before the next merges. Full Push Updated jumps ahead and couples Level 3 to dependency state that will change again when Level 2 merges.
When your focus is merge Level 2 PRs next, open the Push Updated caret and choose Level 2 Only:
-
Scope matches merge order. Only
MezzoRecovery.TapeandMezzoRecovery.Mezzoget.csprojrewrites so their Level 1<PackageReference>versions point at-main.*packages (the versions Level 1 clones report after rewind). Level 3 repos are not touched. -
Level 2 PRs absorb exactly one deps commit. The open PRs for Tape and Mezzo gain a single alignment commit that explains why they now consume default-branch packages. You merge that PR set, then Level 2 header rewind - same pattern as Level 1.
-
Level 3 PRs stay stable. Api, TapeTools, and Agent keep the commits reviewers already signed off on. Red badges may remain (often partial, e.g. 2 of 4 on TapeTools) until Level 2 is merged and published - that is fine.
-
The next pass is obvious. After Level 2 rewind, Level 2 packages report
*-main.*, Level 3 still pins-tape-densityLevel 2 versions, and the menu offers Level 3 Only. One scoped update/push per merge wave instead of rework.
Use the primary Push Updated button when you want to clear every unmatched dep and push every outgoing commit in one job - for example right after feature coding (Phase 3) when no PRs exist yet, or when every level is ready to move together.
During coordinated PR merge, prefer Level N Only so each dependency layer gets one update/push cycle aligned with that layer's merge and rewind.
After Level 1 rewind, yellow Push Updated is back because Level 2 / 3 still pin -tape-density package versions while Level 1 clones report *-main.*. The next scoped action is Level 2 Only from the split menu - not the primary button.
Level 1 is on main. Level 2 shows red 2 of 2 (Tape) and 1 of 1 (Mezzo). Level 3 still has open PRs and partial red badges (e.g. TapeTools 2 of 4 - only Level 1 pins are stale).

Open the Push Updated caret. The first item reads Level 2 Only because Level 2 is the lowest dependency level with unmatched refs:

Click Level 2 Only.
GrayMoon opens the same Update dependencies modal as a full Push Updated run, but the job that follows is scoped to Level 2 (maxLevel: 2).

Leave the default message (chore(deps): update package versions) and Include updated dependencies in commit message on. Click Proceed.
One background job runs Updating Level 2... then synchronized push only through Level 2:
-
Update phase - rewrites
.csprojinMezzoRecovery.TapeandMezzoRecovery.Mezzoso Level 1<PackageReference>versions point at-main.*(matching the Level 1 clones after rewind). Level 3 repos are not edited. - Commit phase - one deps commit per Level 2 repo with the shared message.
- Push phase - synchronized push publishes Level 2 packages and stops. No Level 3 push, no NuGet wait for Level 3 consumers.
The overlay may finish quickly when only two repos update and push:

| Area | What changed | What did not change |
|---|---|---|
| Level 2 | Dep badges green (2, 1). Tape / Mezzo gained a deps commit and push (0 | N ahead of main). Open PR badges #39 / #52 still point at the same PRs - now including the alignment commit. |
Branch still tape-density. |
| Level 3 | Red badges may increase (e.g. TapeTools 2 of 4 -> 4 of 4, Api 1 of 2 -> 2 of 2) because Level 2 package GitVersion moved on the feature branch while Level 3 .csproj files were left untouched. No new commits on Level 3. |
PR set unchanged - reviewers still see the original feature commits only. |
| Level 1 | Still main, gray 0, none PR. |
Unchanged. |
| Header | Still yellow Push Updated - Level 3 is now the lowest level needing work. Menu will offer Level 3 Only after Level 2 merges and rewinds. | Primary Push Updated would still jump into Level 3 - avoid until that wave. |
That split grid is the proof Level 2 Only worked: Level 2 is aligned and pushed; Level 3 was deliberately not updated.
Pushing the deps commit re-runs GitHub Actions on the open Level 2 PRs. While workflows are in flight, the check badge beside #39 / #52 is orange (running). After CI finishes successfully, Sync (or a page refresh) picks up the new status and the badge turns green.

In this frame:
-
Level 2 -
#39and#52with green check badges (2and1workflows passed). Ready to merge on GitHub. - Level 3 - open PRs unchanged; check badges still red (those PRs were not part of this push).
-
Level 1 - still
main, no PR.
Merge PRs... on the level menu merges the selected pull requests (the method starts as Squash) and can return repositories to the default branch (see Repositories). This walkthrough merged on GitHub. GrayMoon still tracks PR state, check status, and mergeability on the grid. When checks are green, you can merge here or open each PR on GitHub.
Two shortcuts from the Repositories page:
-
Per-repo PR badge - click the green
#39/#52link on a row. GrayMoon opens that pull request on GitHub in a new tab. -
Level header dropdown - hover the
N repositorieslabel on a Level N header (e.g. 2 repositories on Level 2). A menu titled Open in GitHub... lists Branches, Pull Requests, Actions, Tags, Settings, and more. Choose Pull Requests to open every open PR for that level (exact PR URL when GrayMoon knows the number). Full option list and why level-scoped open is useful: Open in GitHub... (level header).
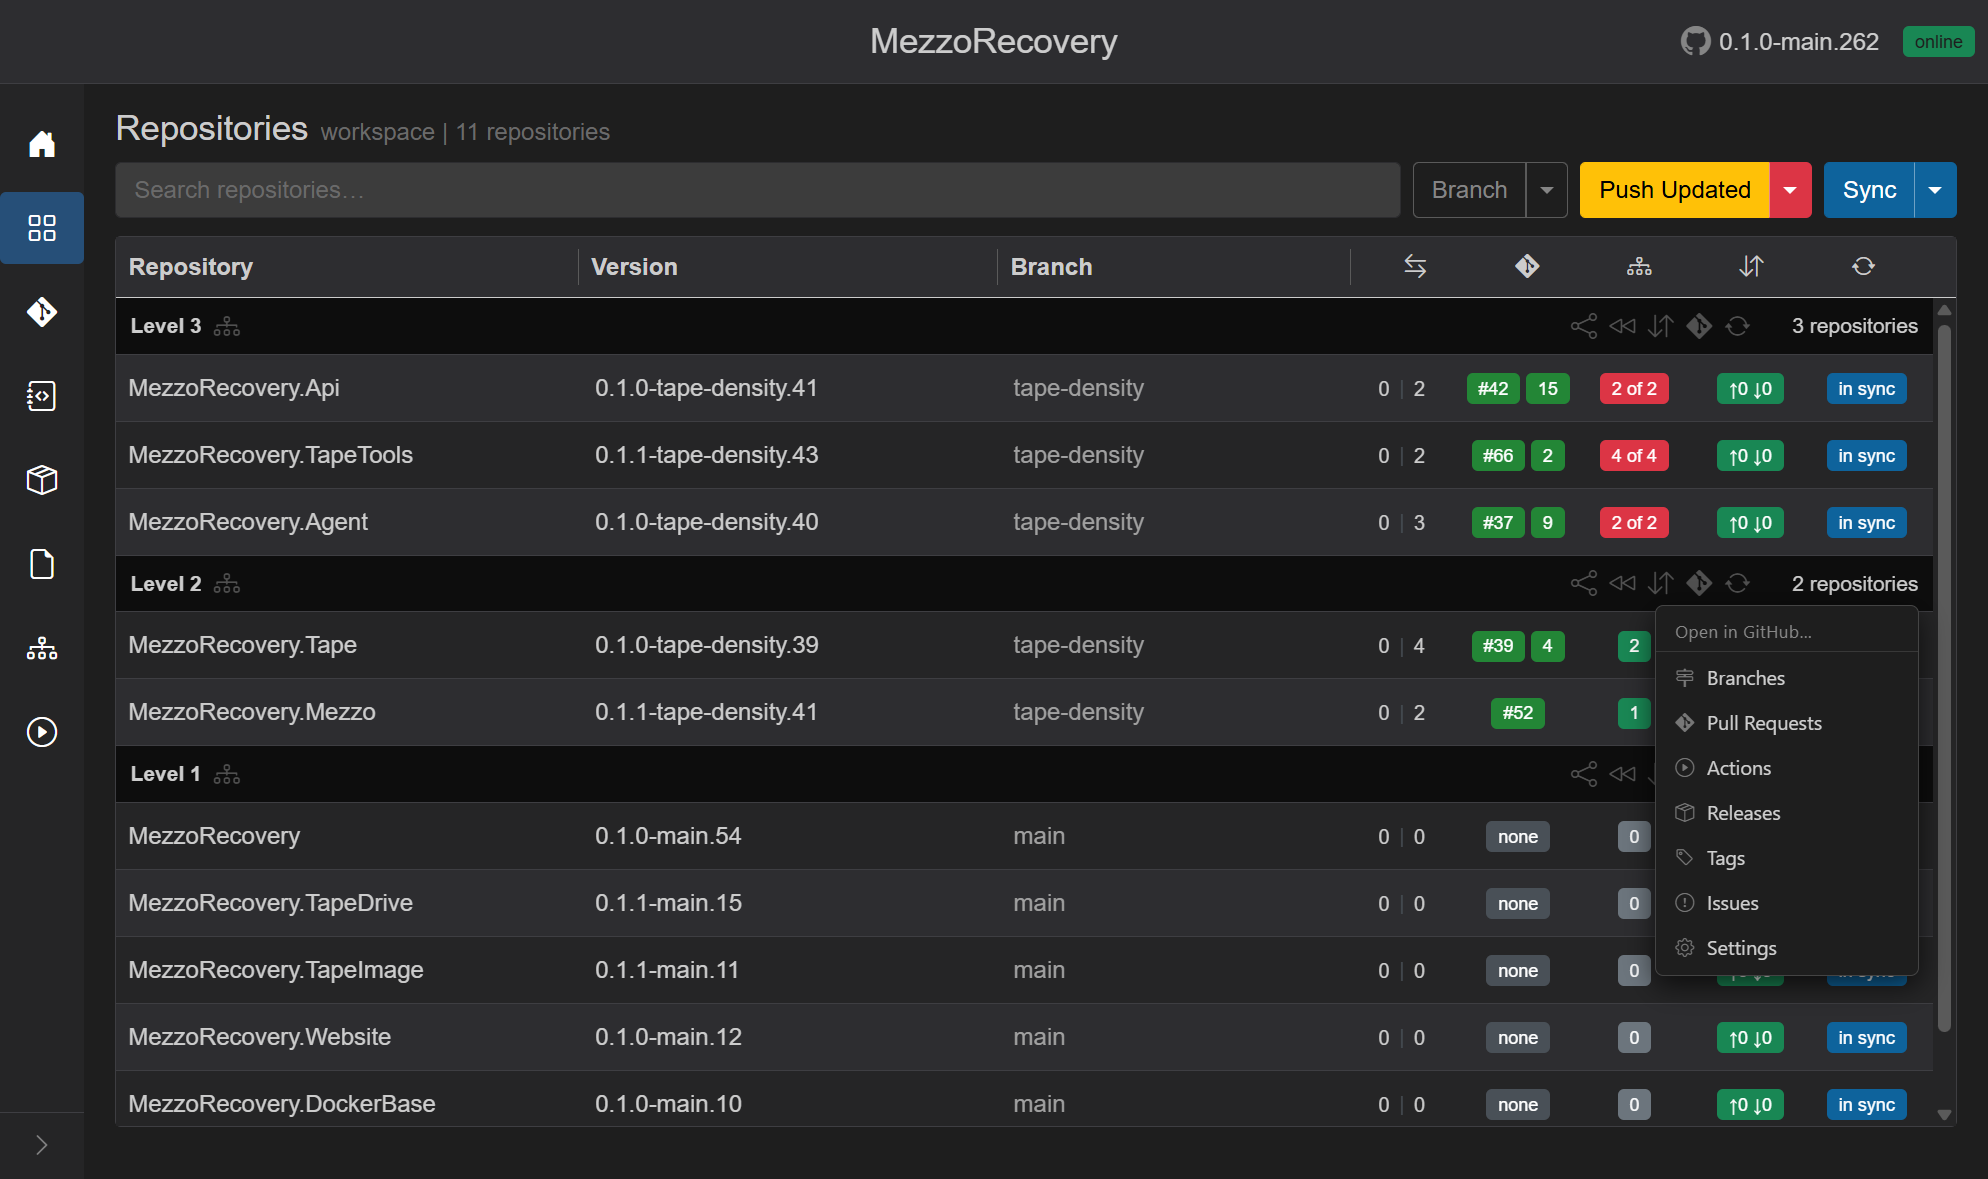
Use whichever path fits: one PR via the row badge, or the whole level via the header menu before you merge.
After Level 2 Only, not every Level 2 PR carries feature edits. MezzoRecovery.Tape (#39) picked up the deps alignment commit and still has package work in scope. MezzoRecovery.Mezzo (#52) may have no changed files in the PR - only the deps bump GrayMoon committed, or an empty diff if Mezzo had nothing to rewrite.
On the grid, Tape shows a file-count beside the PR badge (e.g. 4 next to #39). Mezzo shows #52 with a green check but no file-count - a signal the PR has little or nothing left to land as product code. In that case you can close PR #52 on GitHub instead of merging it, then continue with Tape and the rest of the level merge plan. You perform that decision in GitHub; GrayMoon will reflect merged/closed state on the next sync.
You performed the merge decisions in GitHub (GrayMoon only reflects the outcome):
-
Merge
MezzoRecovery.Tape(#39) - feature work plus the deps alignment commit from Level 2 Only. -
Close
MezzoRecovery.Mezzo(#52) - no file changes left to land; closing avoids an empty merge.
Refresh the grid - hover PR badges, press F5 (persisted state only), run header Sync, or click Level 2 header Return to Default (<<, which refreshes PR status for the level before the dialog). See Refreshing PR status. GrayMoon paints purple merged on Tape and red closed on Mezzo. Both rows still show branch tape-density locally until you run Level 2 header rewind.

| Row | GitHub outcome | Grid badge | Branch (local) |
|---|---|---|---|
| MezzoRecovery.Tape | Merged #39
|
purple merged | tape-density |
| MezzoRecovery.Mezzo | Closed #52
|
red closed | tape-density |
| Level 3 | Open PRs unchanged | green #42 / #66 / #37
|
tape-density |
| Level 1 | Already rewound | none | main |
That mixed state is correct. Merged and closed PRs are finished on GitHub; local clones still need per-level cleanup.
On the Level 2 header, click Return to Default (rewind icon). Same pattern as Level 1: PR refresh for the level first, then fetch job, then dialog scoped to Level 2 only. No need to hover badges before clicking.

Dialog details for this merged/closed-PR case:
- Lead copy: This will sync 2 repositories to their default branch: checkout default, remove the current branch locally, and pull.
-
Repo list -
MezzoRecovery.Tapeleavingtape-density;MezzoRecovery.Mezzoleavingtape-densitywith a gray remote hint (closed PR; origin may still have the feature branch until delete runs). - No red alert - merged and closed PRs are treated as resolved work, not commits about to be destroyed.
-
Delete remote branch and Delete local branches - both default on. After checkout of
main, GrayMoon removes the localtape-densityref and deletes the remote feature branch when it existed. - Proceed stays blue with no countdown.
Click Proceed. Overlay Synchronizing to default branch..., then per-repo checkout / pull / branch cleanup for Tape and Mezzo only.

Level 2 after this step:
| Column | Level 2 state |
|---|---|
| Branch |
main on Tape and Mezzo |
| Version |
*-main.* GitVersion strings |
| PR | none (merged PR closed; closed PR stays closed; feature branch ref gone locally) |
| Deps | green badges (2, 1) - Level 1 package pins match |
| Commits | in sync with origin |
Level 3 unchanged - still on tape-density with open PRs. Red dependency badges remain (e.g. TapeTools 4 of 4, Api 2 of 2) because Level 2 packages now report *-main.* while Level 3 .csproj files still pin -tape-density Level 2 versions. Header Push Updated stays yellow; the split menu will offer Level 3 Only next.
After Level 2 rewind, Level 3 is the only level with red dependency badges. The split-menu label becomes Level 3 Only. At this point it matches primary Push Updated exactly:
| Action | Scope | When only Level 3 has red badges |
|---|---|---|
| Push Updated (primary click) | Every level that still needs work | Rewrites Level 3 .csproj refs to Level 2 -main.* packages, commits, synchronized push through Level 3 |
| Level 3 Only (split menu, first item) | Lowest level needing work (maxLevel: 3) |
Same job - there is no lower level left to skip and no higher level to accidentally include |
During earlier merge waves you needed Level 2 Only so Level 3 PRs stayed stable while Level 2 landed. Now every repo below Level 3 is already on main with green badges, so scoping buys nothing. Click the yellow Push Updated button or choose Level 3 Only from the caret - either path runs update + push for Api, TapeTools, and Agent only.
See the full menu shape in Phase 3 - Push Updated caret (the first scoped item label tracks the lowest red-badge level).
We clicked primary Push Updated here. Level 3 Only would have opened the same Update dependencies modal and run the same job.
Level 1 and Level 2 are on main with green dep badges. Level 3 still shows red 2 of 2, 4 of 4, 2 of 2 on tape-density with open PRs #42, #66, #37. Header is yellow Push Updated.

GrayMoon opens the Update dependencies modal (same shell as Level 2 Only and Phase 3 Push Updated).

Leave the default message (chore(deps): update package versions) and Include updated dependencies in commit message on. Click Proceed.
One background job runs Updating Level 3... then synchronized push through Level 3:
-
Update phase - rewrites
.csprojinMezzoRecovery.Api,MezzoRecovery.TapeTools, andMezzoRecovery.Agentso Level 1 and Level 2<PackageReference>versions point at-main.*(matching clones after Level 2 rewind). Level 1 / 2 repos are not edited. - Commit phase - one deps commit per Level 3 repo with the shared message.
-
Push phase - synchronized push publishes Level 3 package refs on
tape-densityand stops (Level 3 is the top level; no NuGet wait for downstream consumers).
Pushing the deps commit re-runs workflows on the open Level 3 PRs. Switch to the Actions sidebar to watch CI live (same page used in Phase 3): filter running, expand a workflow row for step-level logs. PR check badges on Repositories stay orange until runs finish; Sync or a refresh picks up green.

In this frame, Build Api and Agent AOT publish and deploy (legacy) are running on tape-density; other rows may already show success from earlier pushes on the same branch.
Return to Repositories when the overlay completes (or leave Actions open and navigate back later).

| Area | What changed | What did not change |
|---|---|---|
| Level 3 | Dep badges green (2, 4, 2). Each repo gained a deps commit and push (0 | N ahead of main). Open PR badges #42 / #66 / #37 still point at the same PRs - now including the alignment commit. |
Branch still tape-density. |
| Level 2 / 1 | Still main, green deps, PR none. |
Unchanged. |
| Header | Yellow Push Updated drops; header shows separate Update and Push (no unmatched deps left to rewrite). | - |
Wait for GHA on the Level 3 PRs to turn green (same pattern as Level 2 PR checks), then merge in GitHub.
You can merge from Merge PRs... on the level menu. This walkthrough merged on GitHub. When checks are green:
- Open each Level 3 PR via the row badge (
#42,#66,#37) or hover 3 repositories on the Level 3 header -> Open in GitHub... -> Pull Requests. - Merge each PR on GitHub (all three carry feature work plus the deps alignment commit from Push Updated).
Refresh the grid - hover PR badges, F5, header Sync, or Level 3 header Return to Default (<<). See Refreshing PR status. GrayMoon paints purple merged on Api, TapeTools, and Agent. All three rows still show branch tape-density locally until you run Level 3 header rewind.

| Row | GitHub outcome | Grid badge | Branch (local) |
|---|---|---|---|
| MezzoRecovery.Api | Merged #42
|
purple merged | tape-density |
| MezzoRecovery.TapeTools | Merged #66
|
purple merged | tape-density |
| MezzoRecovery.Agent | Merged #37
|
purple merged | tape-density |
| Level 2 / 1 | Already rewound | none | main |
On the Level 3 header, click Return to Default. Fetch job first, then dialog scoped to Level 3 only.

Dialog details (same merged-PR pattern as Level 1 and Level 2):
- Lead copy: This will sync 3 repositories to their default branch...
-
Repo list - Api, TapeTools, Agent leaving
tape-density. - No red alert - merged PRs are resolved work.
- Delete remote branch and Delete local branches - both default on.
- Proceed stays blue with no countdown.
Click Proceed. Overlay Synchronizing to default branch..., then checkout / pull / branch cleanup for all three Level 3 repos.

Every row in the workspace:
| Column | Final state |
|---|---|
| Branch |
main on all 11 repos |
| Version |
*-main.* GitVersion strings |
| PR | none - merged PRs closed; feature branch refs gone |
| Deps | green badges - every package pin matches live GitVersion |
| Commits | in sync with origin |
| Header | Update / Push / Sync - no yellow Push Updated (nothing left to align) |
The tape-density feature is fully landed. Local clones match GitHub default; the feature branch no longer exists locally or on origin (when delete-remote was checked).
Cross-repo features in GrayMoon follow one repeating pattern. You own review and merge decisions in GitHub. GrayMoon owns coordination, dependency math, and fast cleanup across every clone.
- Review each PR - read the diff, comment, request changes, approve.
-
Merge or close when satisfied (e.g. close Mezzo
#52when it had no file changes). - Decide timing - merge Level 1 before Level 2, Level 2 before Level 3. GrayMoon shows check badges and merge state but never merges for you.
| Step | GrayMoon action | Why it matters |
|---|---|---|
| Create PRs | Same title/body across repos, batched by dependency level | No missed repo; reviewers see a consistent story |
| Track status | Purple merged, red closed, green open PR badges; orange/green check badges | One grid replaces checking 11 GitHub tabs |
| Scoped update |
Level N Only rewrites .csproj pins for one dependency wave at a time |
Consumers pick up packages their upstream level just landed on main - without extra commits on PRs still in review |
| Push + NuGet wait | Synchronized push publishes packages level-by-level | Downstream .csproj updates see the correct package version on the registry |
| Per-level rewind | Return to Default on each Level N header | Every clone checks out main, deletes the feature branch, pulls latest - in dependency order |
| Live CI | Actions page polls GHA; Repositories shows check badges | Spot failing workflows without leaving the workspace |
For each dependency level from bottom (Level 1) to top (Level 3):
- Merge (or close) that level's PRs in GitHub.
- Rewind that level in GrayMoon (Return to Default on the level header).
- Update the next level - Level N Only from the Push Updated menu (or primary Push Updated when only the top level remains).
- Wait for GHA green, then repeat for the next level.
Level 1 had six repos; Level 2 had Tape merged and Mezzo closed; Level 3 had three merges. After the last rewind, all 11 repos sit on main with green deps - done.
If you clicked full Push Updated while Level 2 and Level 3 PRs were still open, GrayMoon would commit deps bumps onto every consumer at once. Reviewers would see moving targets, CI would re-run on PRs they already approved, and you would need another update pass after each merge wave anyway. Level N Only keeps each PR set stable until its level merges, then adds exactly one alignment commit before you merge that level.
At the final level, Push Updated and Level 3 Only are the same job - there is nothing below Level 3 left to protect.
| Traditional | With GrayMoon |
|---|---|
| Manually track which of 11 repos have open PRs, merged PRs, or stale branches | One Repositories grid with PR badges, branch column, and dep badges |
Hand-edit .csproj package versions after each merge wave |
Level N Only or Push Updated rewrites pins and commits in one job |
| Push repos one-by-one; guess when NuGet packages are available | Synchronized push with NuGet wait between levels |
git checkout main && git pull && git branch -d tape-density in 11 folders |
Per-level Return to Default - fetch, dialog, proceed |
| Easy to forget a repo or leave a stale feature branch | Level headers scope rewind; delete-remote cleans origin too |
Bottom line: code review stays human. Branch creation, dependency alignment, push ordering, PR tracking, and cleanup across the whole workspace is what GrayMoon accelerates.