Repository navigation
Getting Started
This walkthrough takes a brand-new GrayMoon install (no connectors, no repositories, no workspaces) all the way to a cloned workspace on disk.
You need two things working before real work can start: the Worker online, and every connector you rely on Active with status OK. Install the Worker first, then add and test connectors - do not skip testing, since a connector showing Error blocks fetch, clone, push, and GitHub Actions exactly as if it did not exist.
Workspace folders are created under Settings -> Root Path. Add Workspace stays disabled until that path is set. See Settings.
The App never touches the host disk (it runs in Docker as a web app, or alongside GrayMoon Desktop - Desktop never connects to a Docker App; see Install the App). The Worker is a Windows service on this machine: it clones, fetches, writes hooks, and talks to the App over SignalR. A clean Docker install (or after uninstall) starts with the top-bar badge offline.
Home is the first place you see that. The Worker tile button is red Install Worker, and the top-bar badge is red offline.
Click Install Worker (or Worker in the sidebar). While the Worker is offline the Install tab is selected (styled red). Host stays hidden until the service connects.
Copy: Run this PowerShell command as Administrator to install the GrayMoon Worker as a Windows service. The read-only box is:
irm http://127.0.0.1:8384/api/worker/install | iexCopy puts that on the clipboard. The Windows service needs the .NET 10 x64 runtime on the host (Download the .NET 10 runtime on the same tab).
Open an Administrator PowerShell window (the script exits immediately if it is not elevated). Paste the command and run it.
The script downloads the worker zip from the App, extracts it under C:\Program Files\GrayMoon, and runs graymoon-worker.exe install. A fresh install always prompts for the current Windows user's password so the GrayMoonWorker service can run as that account (workspace ACLs and git credentials). Type it at Password for DOMAIN\user: - the input is masked. You must enter the password; the service will not install without it. The installer then grants Log on as a service and starts the service.
PS C:\Windows\System32> irm http://127.0.0.1:8384/api/worker/install | iex
GrayMoon Worker Installation
Preparing installation directory...
Downloading worker from http://127.0.0.1:8384...
Download completed.
Extracting worker...
Installing service...
Service will run as: MATT80\matt
Password for MATT80\matt: *********
Granting 'Log on as a service' right...
Creating Windows service...
Service 'GrayMoonWorker' installed and started successfully.

Installation completed!
When it finishes, the top-bar badge turns green online. The Host tab appears with Worker / Dotnet / Git / GitVersion versions. Full page reference: Worker.
The install script is also the update. After an App upgrade (or if you replace the host binary with a different build), the worker semver may not match the App. The top-bar badge turns red update, Home's Worker tile becomes red Upgrade Worker, and the Worker page tab is labeled Update.
Open Worker. The Update tab is selected (red). A note names the running worker version. The command box is the same install command:
irm http://127.0.0.1:8384/api/worker/install | iexHost stays available because the old worker is still connected. The Worker row shows the mismatched semver next to the App version in the top bar.
Run the command in Administrator PowerShell. Because GrayMoonWorker already exists, there is no password prompt. The script stops the service, downloads the zip from the App, replaces C:\Program Files\GrayMoon, updates the existing service, and starts it. When the new worker reconnects and versions match, the badge is green online again.
You do not have to copy the command. Click the red update badge in the top bar.
That sends a SelfUpdate command to the running worker. The badge turns blue updating while a detached PowerShell process runs the same irm .../api/worker/install | iex script (no password). When the new service connects and the version matches, the badge returns to green online.
If the click cannot start the update, a toast shows Worker update failed. and GrayMoon opens /worker so you can run the command yourself. Full write-up: Worker - Self-update from the badge.
To remove the service later, use the Uninstall tab command in an Administrator PowerShell window:
irm http://127.0.0.1:8384/api/worker/uninstall | iexPS C:\Windows\System32> irm http://127.0.0.1:8384/api/worker/uninstall | iex
GrayMoon Worker Uninstallation
Removing service...
Stopping service...
Service 'GrayMoonWorker' removed.
Removing installation directory...
Installation directory removed.
Uninstallation completed!
That stops and deletes GrayMoonWorker and removes C:\Program Files\GrayMoon. The App stays running; the badge goes offline again.
Working connectors are required. GrayMoon cannot fetch the repository catalog, clone from GitHub, check package availability during push, or load GitHub Actions until every connector you need is Active with status OK. Inactive switches or red Error badges block those operations until you fix the token or URL and re-test. See Connectors for activation and testing.
GrayMoon talks to GitHub (catalog, clone URLs, Actions) and to NuGet feeds (package availability during synchronized push) through connectors. A clean install starts empty.
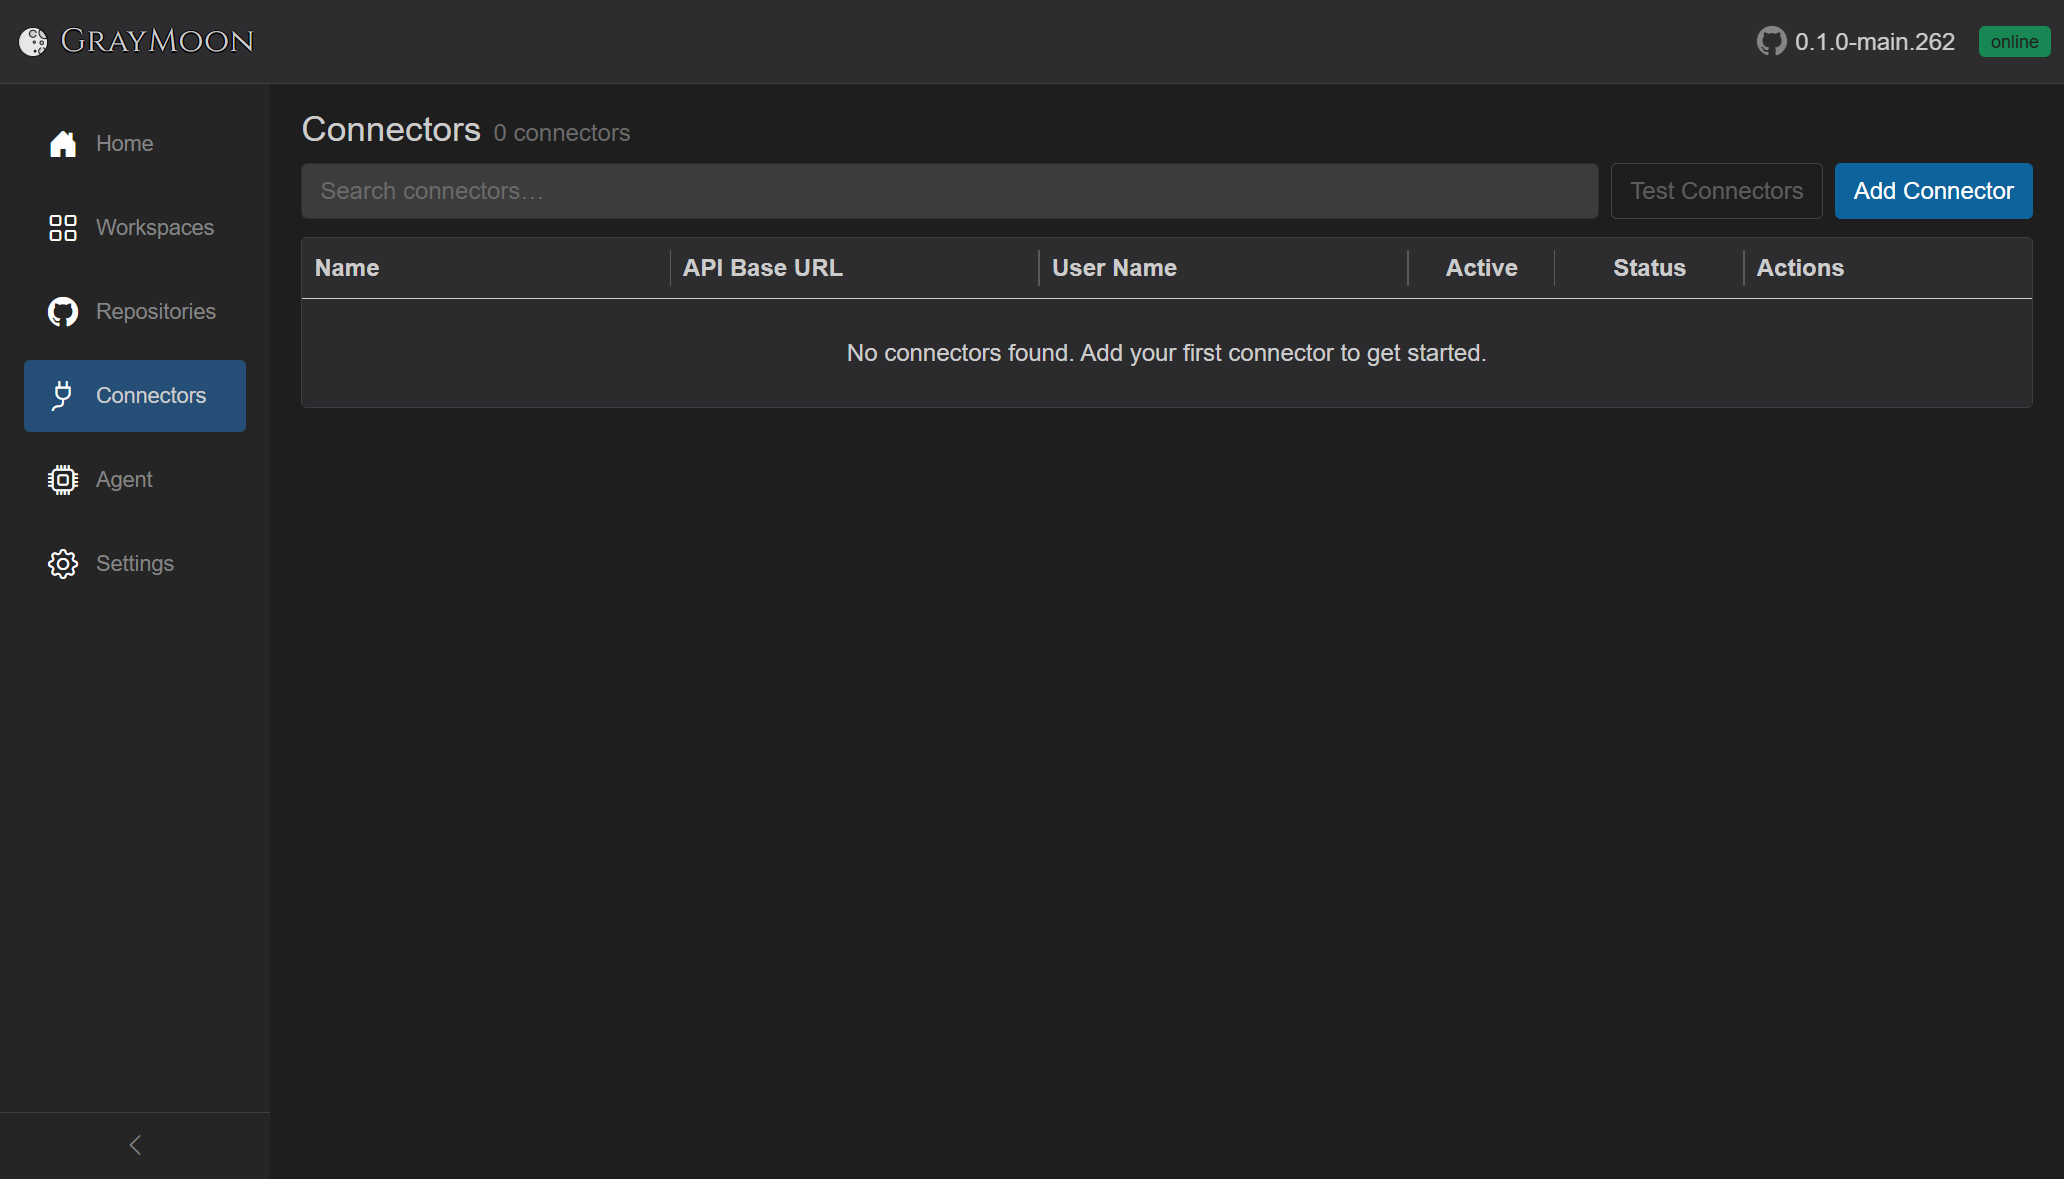
Copy: No connectors found. Add your first connector to get started. Search is disabled until at least one connector exists. Test Connectors is disabled too.
Click Add Connector.

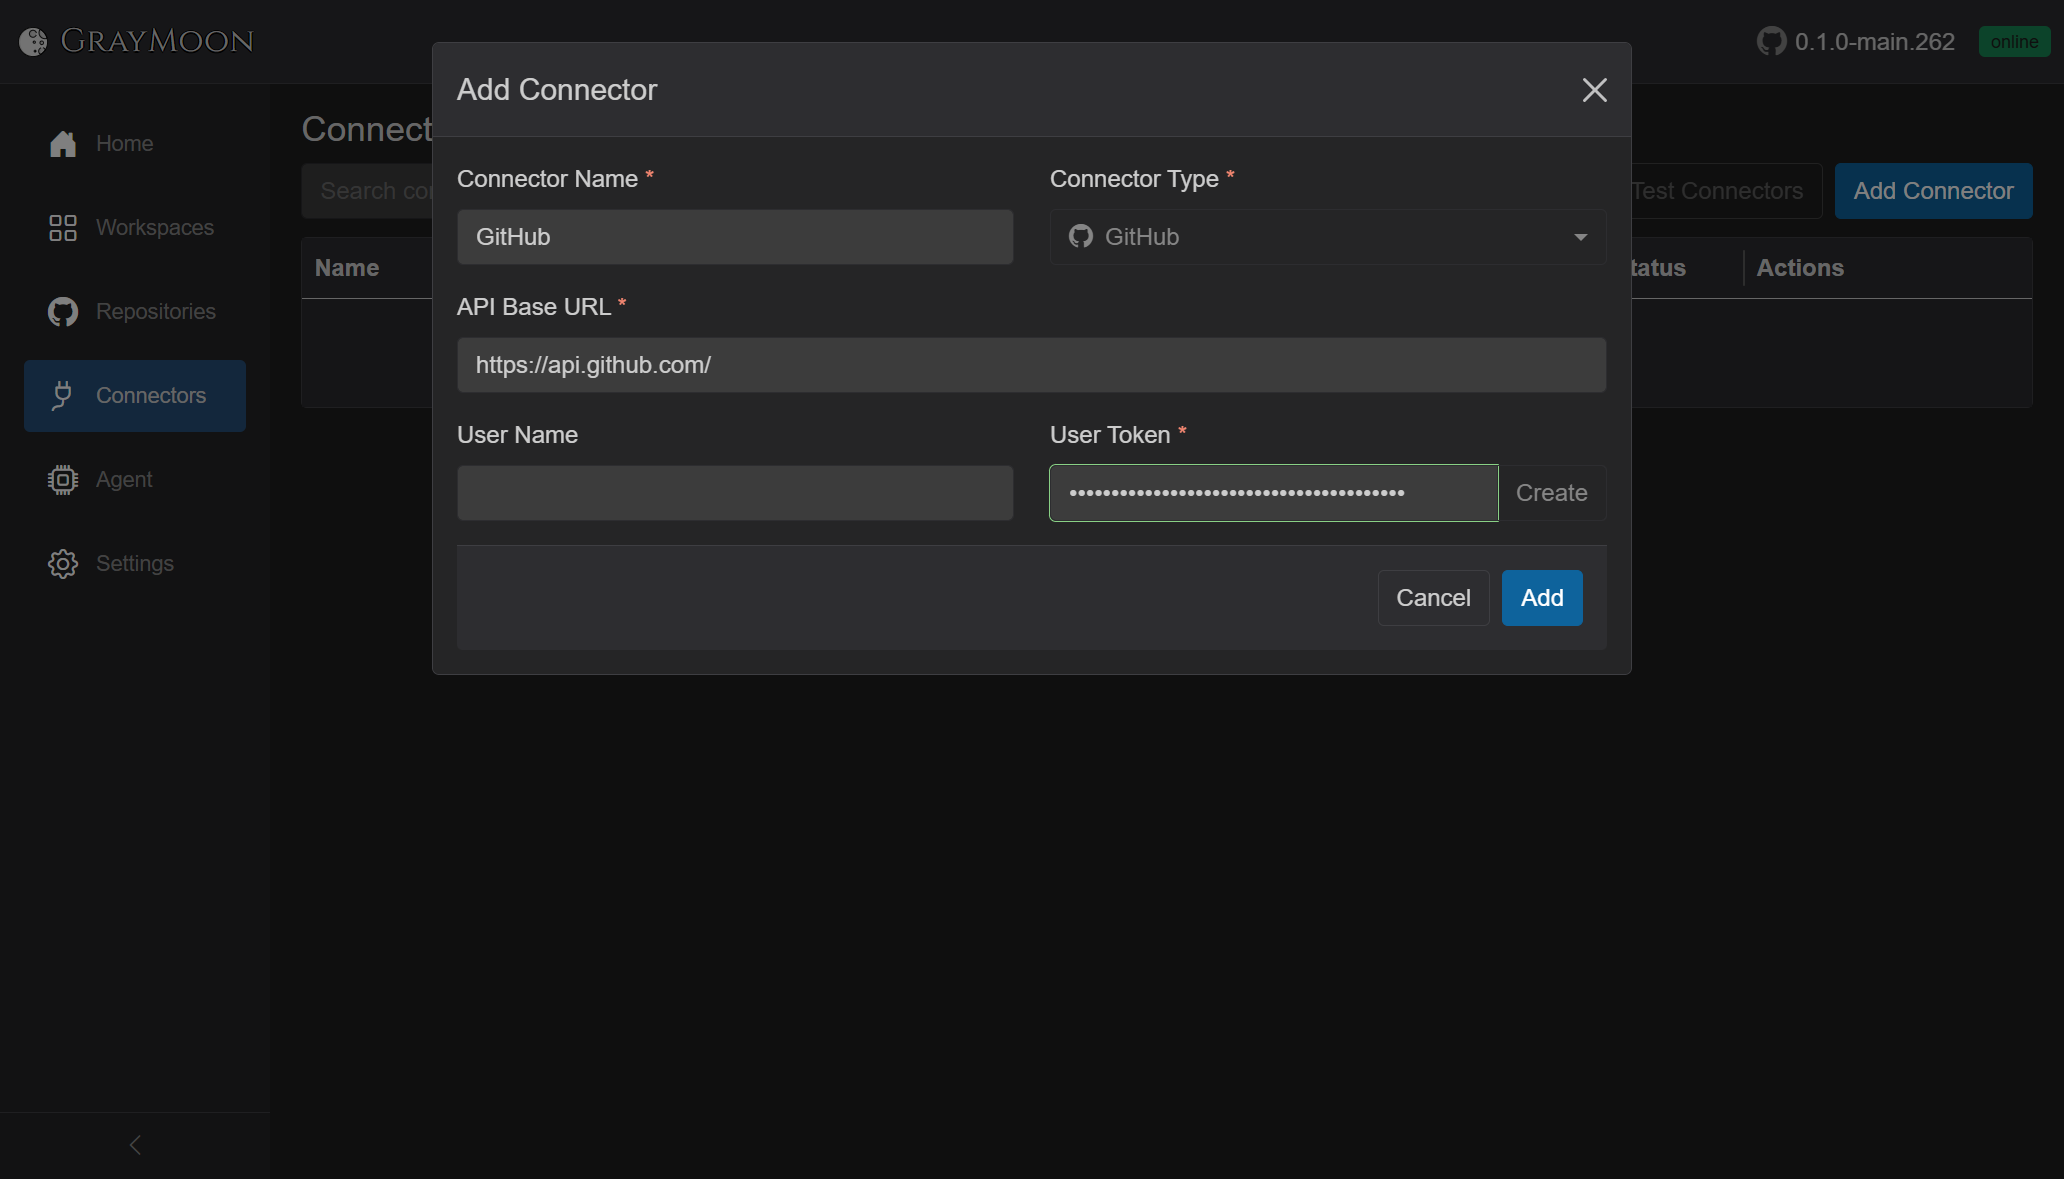
Fields:
-
Connector Name - any label. Use
GitHub. - Connector Type - GitHub. Changing type fills a default API URL.
-
API Base URL -
https://api.github.com/for github.com (GitHub Enterprise uses its own API host). - User Token - classic personal access token. The field is a password box, so the value stays masked.
Next to User Token, Create is a link (not the form submit). It opens GitHub's new classic PAT page in a new tab, already filled with the scopes GrayMoon needs:
| Scope | Why GrayMoon asks for it |
|---|---|
repo |
Private and public repository list, clone, fetch, push, PR metadata |
workflow |
GitHub Actions (workflow list, runs, logs) |
read:packages |
GitHub Packages (same token can later back a NuGet connector) |
Generate the token on GitHub, paste it into User Token, then Add. Do not store the token in docs or screenshots. After save, GrayMoon tests the connector automatically (status Testing, then OK or Error).
Close the dialog after Add. The GitHub row shows OK, Active on.
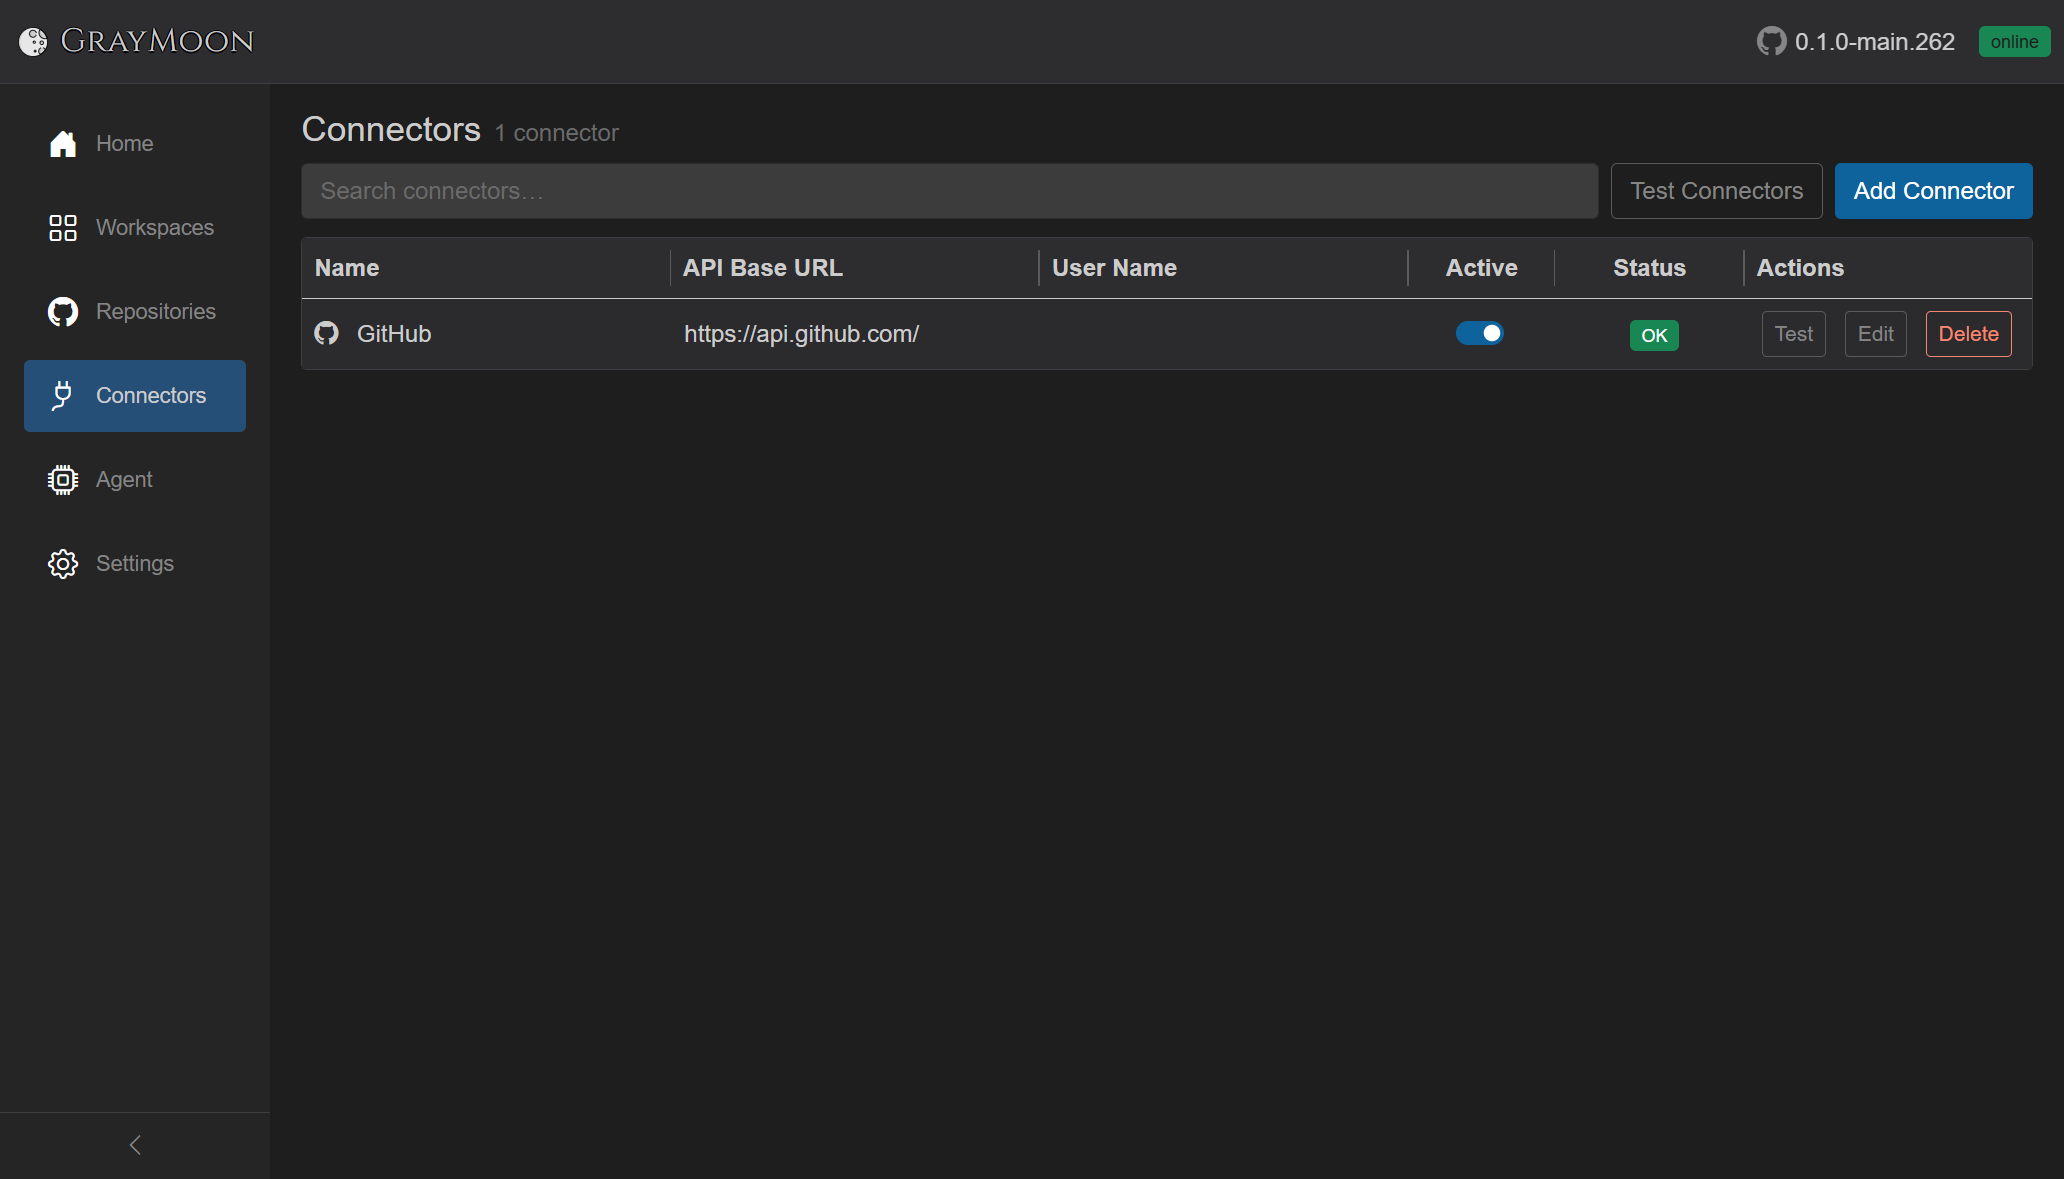
Row Test runs the same health check again without editing. Tooltip on OK is "Connection OK." Test Connectors in the header tests every connector in parallel.
GrayMoon also needs a NuGet feed if workspace repos publish packages that other workspace repos consume. For GitHub Packages, add a second connector that reuses the same PAT.
Add Connector again:
-
Connector Name -
NuGet - Connector Type - NuGet
-
API Base URL -
https://nuget.pkg.github.com/Jandini(org or user that owns the packages) -
User Name - shown for GitHub Packages basic auth. Use the GitHub user (
Jandini) -
User Token - the same classic PAT (
read:packagesis the scope that matters here). Create is GitHub-type only, so paste the token you already made.

Save. Status goes Testing then OK. Click row Test (or Test Connectors) to confirm both rows stay OK.

Active switches stay on after a successful test. Keep both rows OK before moving on - if either connector is inactive or in Error, fetch and workspace steps will fail.
A used connector in Error is what turns Home Manage Connectors red.
Requires step 2 from getting started: at least one Active GitHub connector with OK status. Fetch is blocked if connectors are missing, inactive, or in Error.
This is the global catalog of GitHub repositories. It is not a workspace and it does not clone anything. Until you fetch, the page is empty even if connectors already test OK.
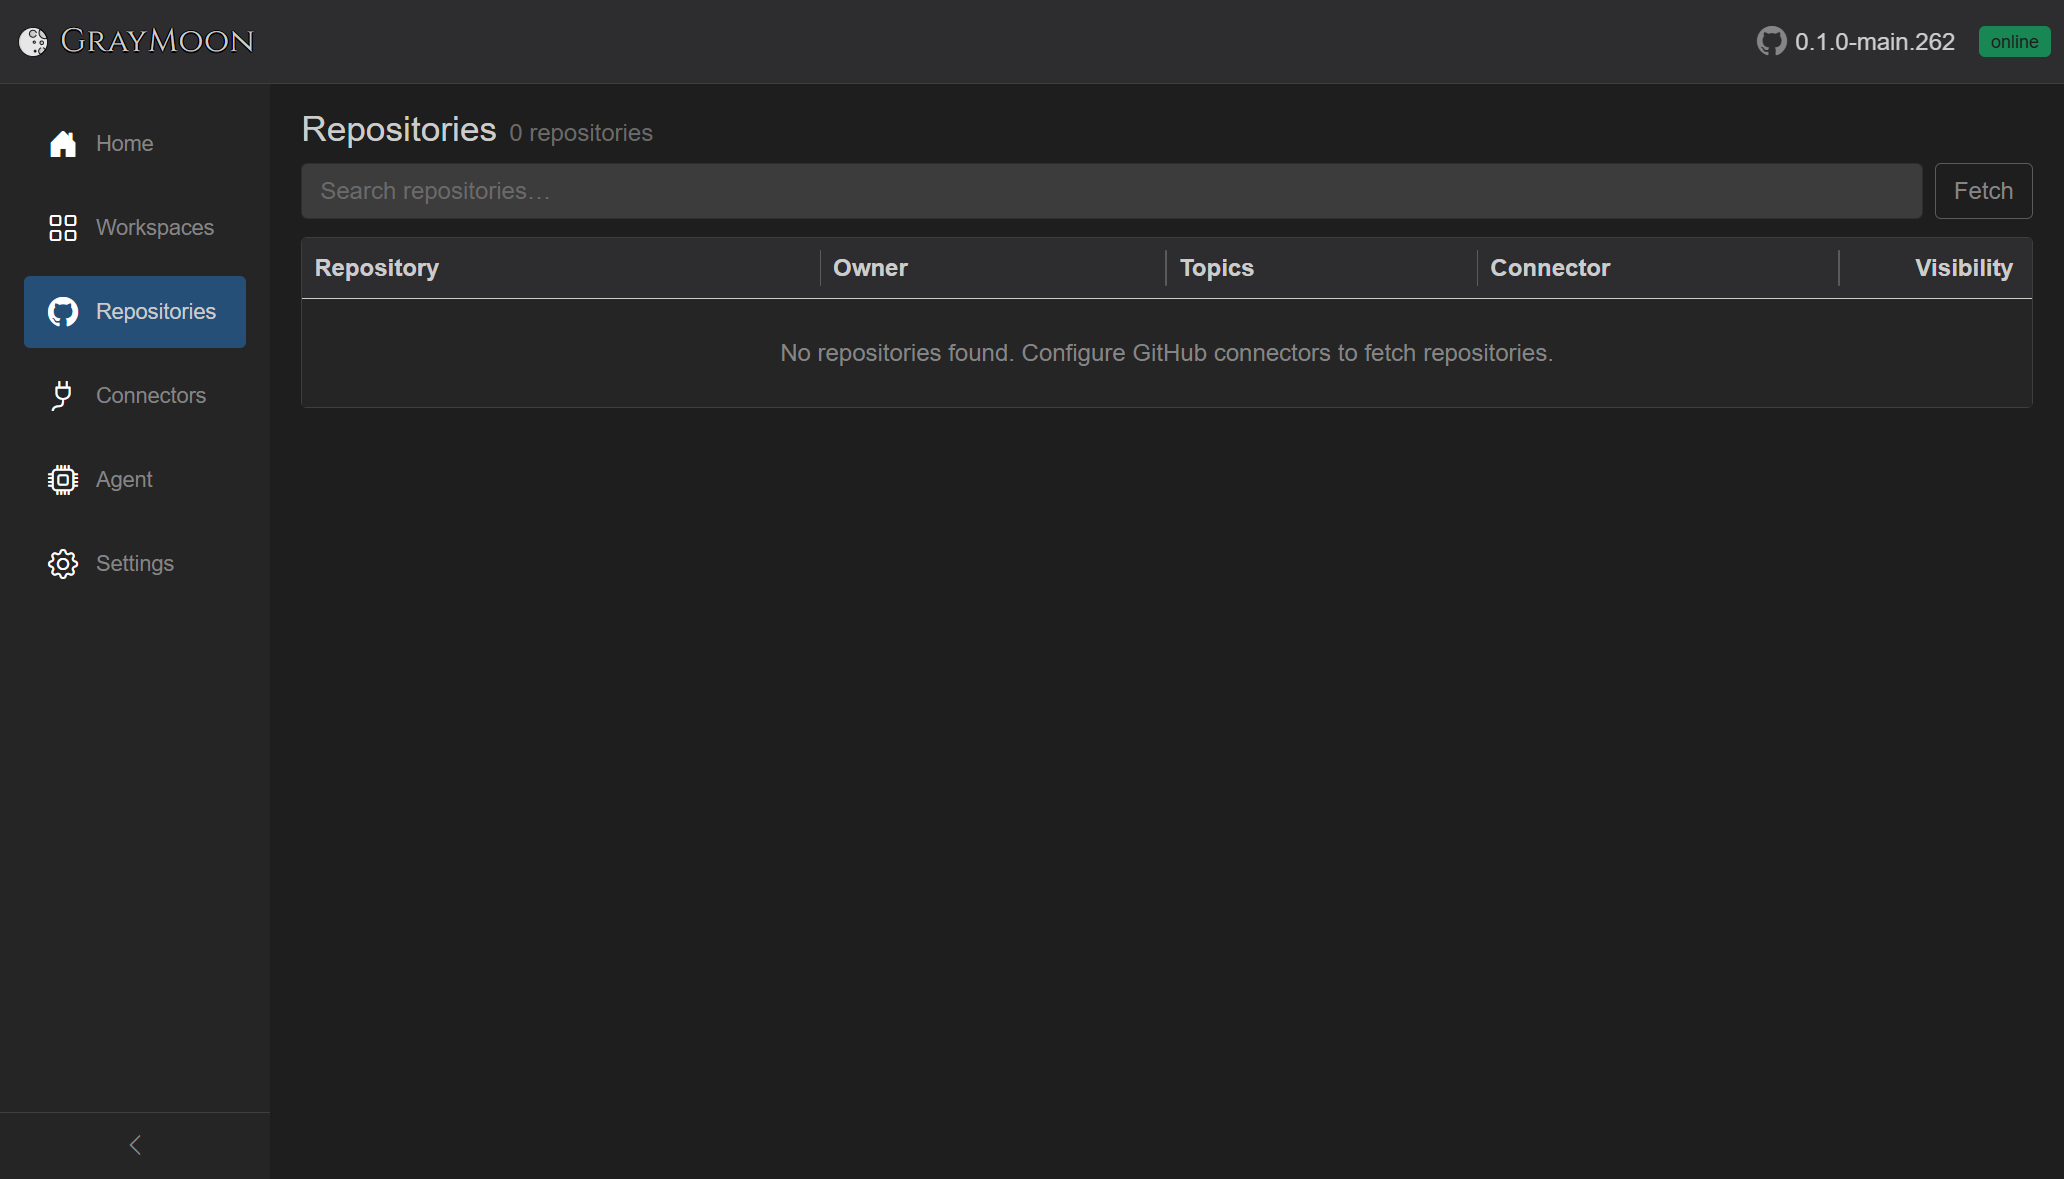
Copy: No repositories found. Configure GitHub connectors to fetch repositories.
Click Fetch. The loading overlay shows Fetching repositories..., then Fetched N repositories, with Abort. GrayMoon pages GitHub through every Active GitHub connector and upserts name, owner, topics, visibility, and clone URL.
When it finishes, the grid is the full catalog (here 158 repositories). Columns: Repository, Owner, Topics, Connector, Visibility (public / private). Virtual-scrolled, so large accounts stay usable.

Search uses the shared filter search: plain words match name, owner, topics, and connector. topic: matches only the topics string (used in the next step when picking workspace repos).
There is no row click-through from this page. Linking repos into a workspace is Create workspace and clone.
You can Fetch again later to pick up new repos, topic changes, and renames. A yellow Repository rename detected alert appears if GitHub renamed a catalog row.
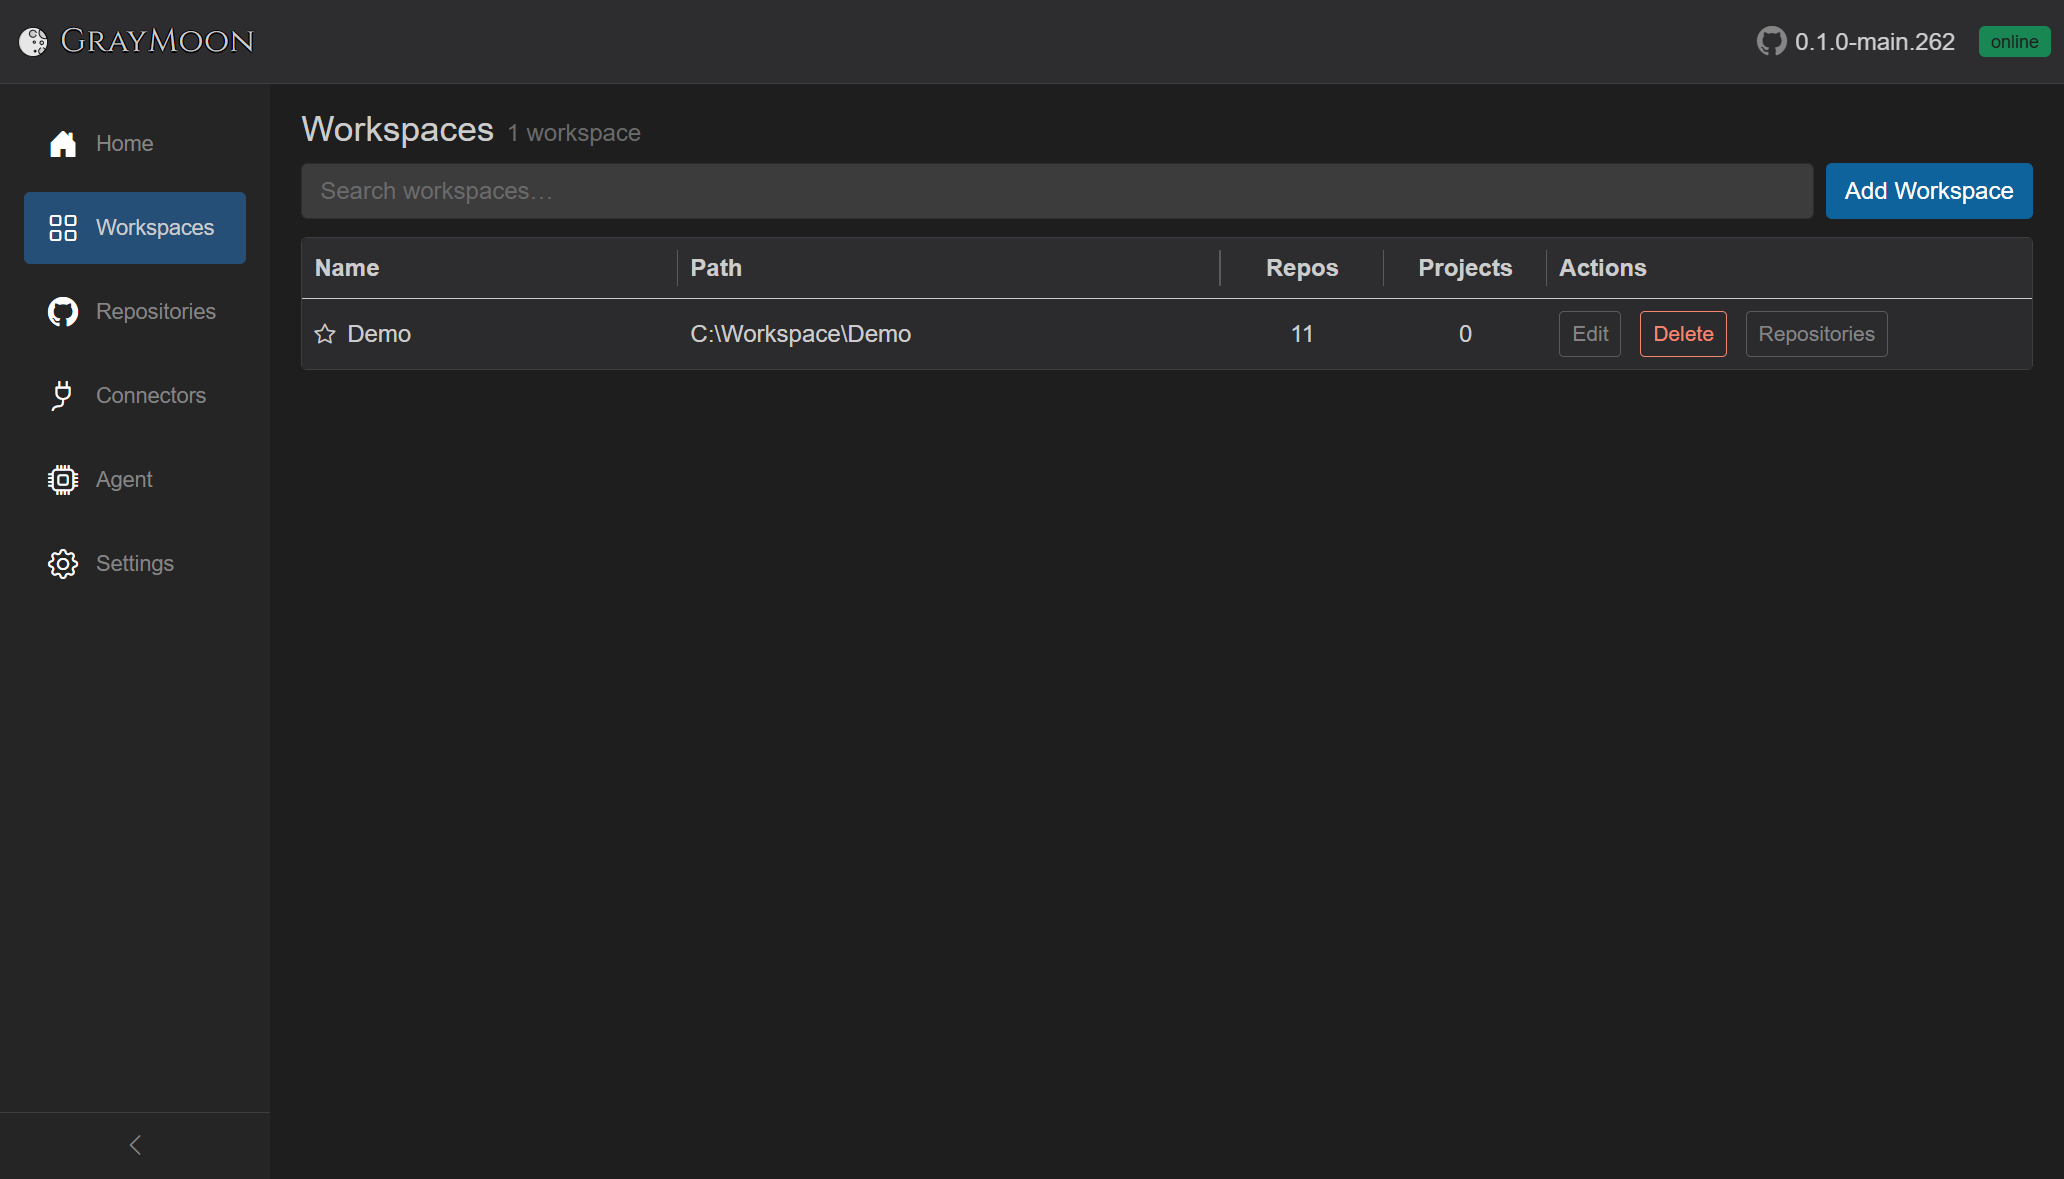
A workspace is a named folder under Settings Root Path, plus a set of catalog repositories GrayMoon should manage together. The first Sync clones every missing folder as a sibling under that workspace path.
A clean install shows 0 workspaces / No workspaces found. Add your first workspace to get started. Worker must be online and Root Path must be set.
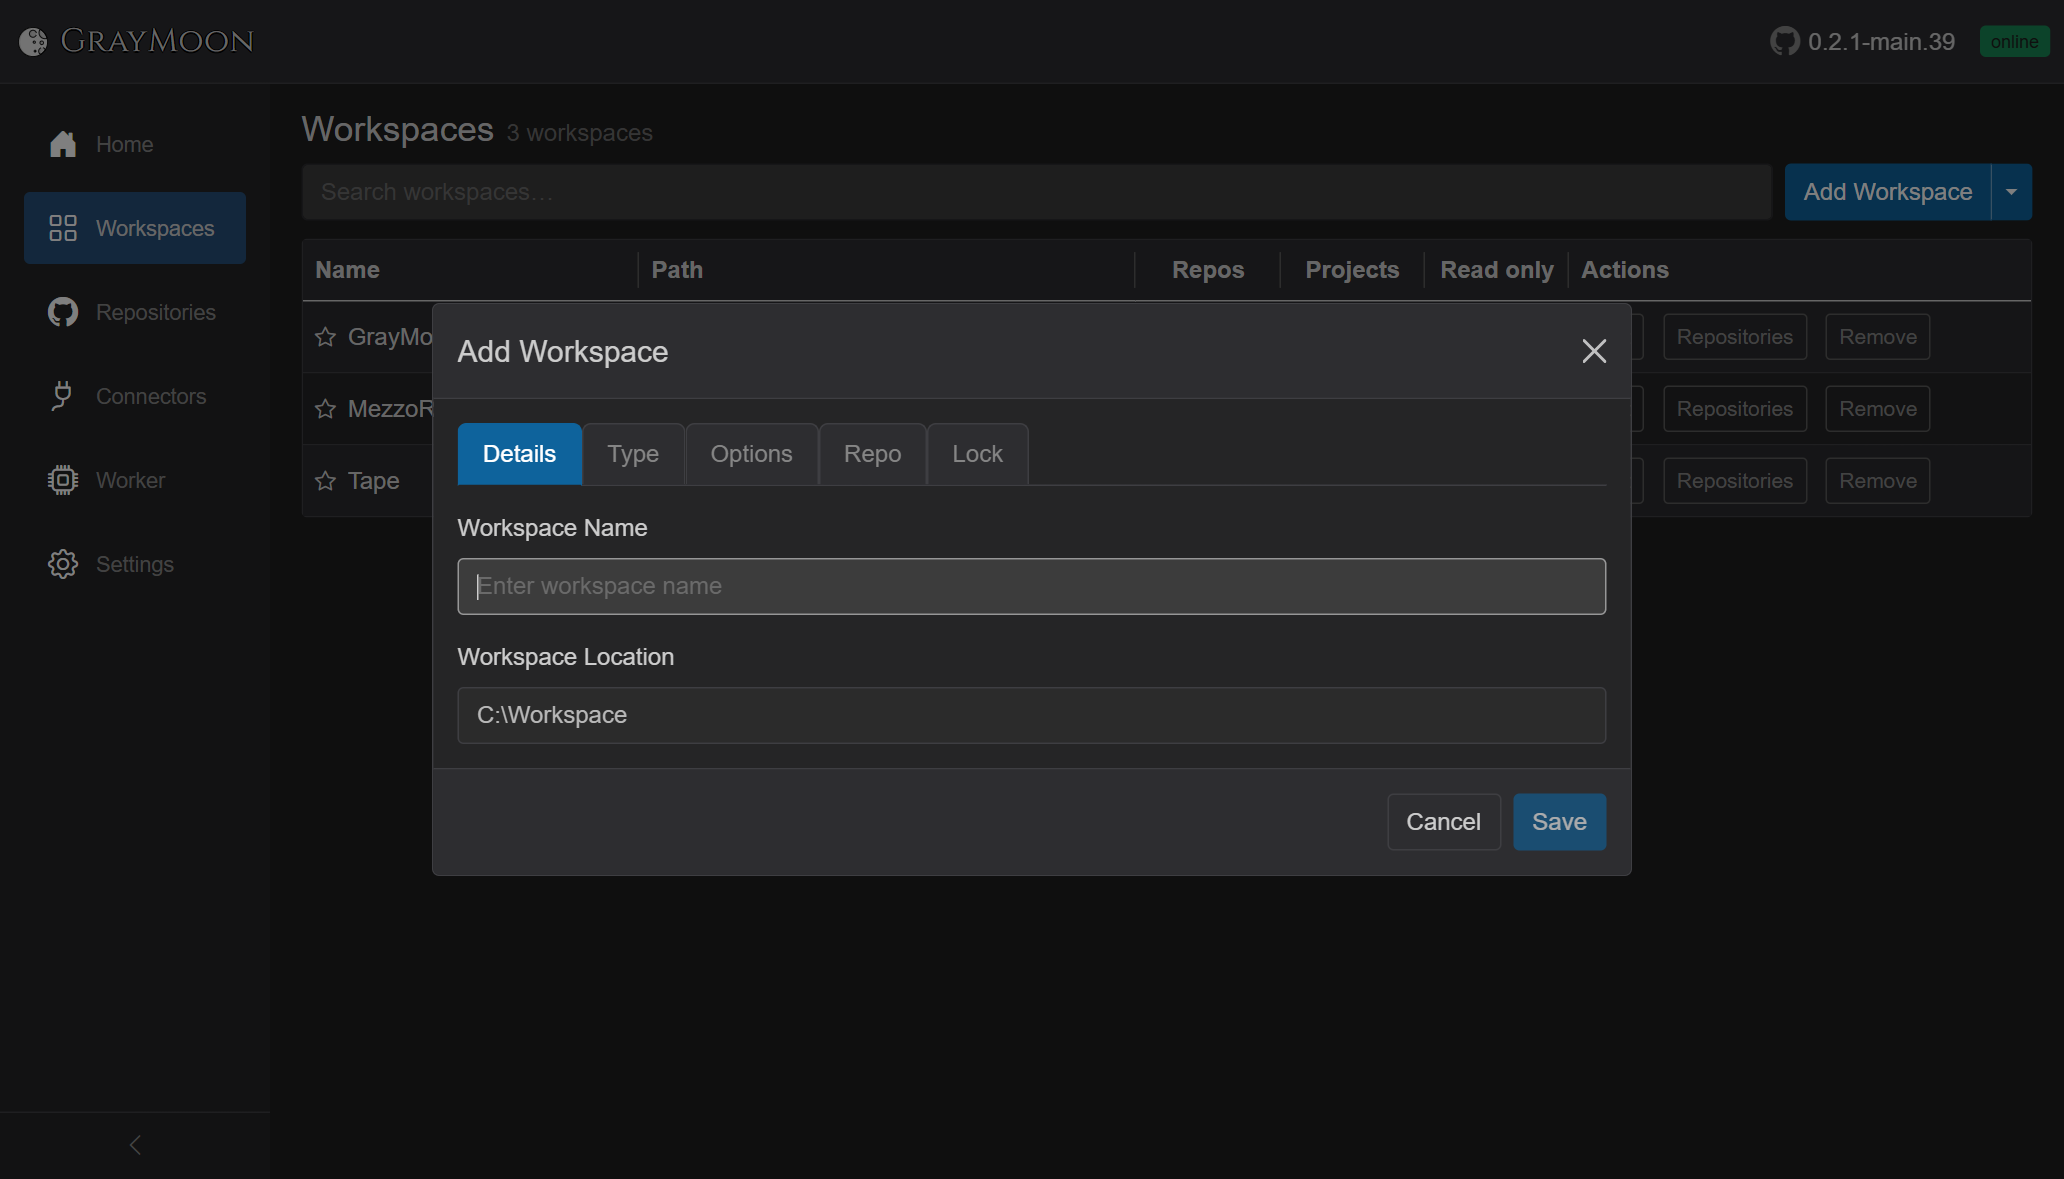
Add Workspace:
-
Workspace Name -
Demo(focused on open). The path updates live. -
Workspace Location - read-only
{Root Path}\{Name}- hereC:\Workspace\Demo.
Add Workspace creates a new workspace, so the folder must not exist yet or must be empty. If it exists and has content, the modal says "This folder already exists and is not empty. Use Import from disk to add it as a Workspace." and Save stays disabled. The arrow next to Add Workspace opens Restore from repository and Import from disk; see Restore from repository and Import from disk.

Save. The first workspace is starred Default (Home redirects here on a new tab). Repos and Projects are still 0.
Open Repositories on the Demo row (or click the name later and use the subtitle count). That is the select-repositories modal, not the nested Repositories grid.
Title: Select repositories for Demo. This is the same catalog you fetched, with checkboxes.
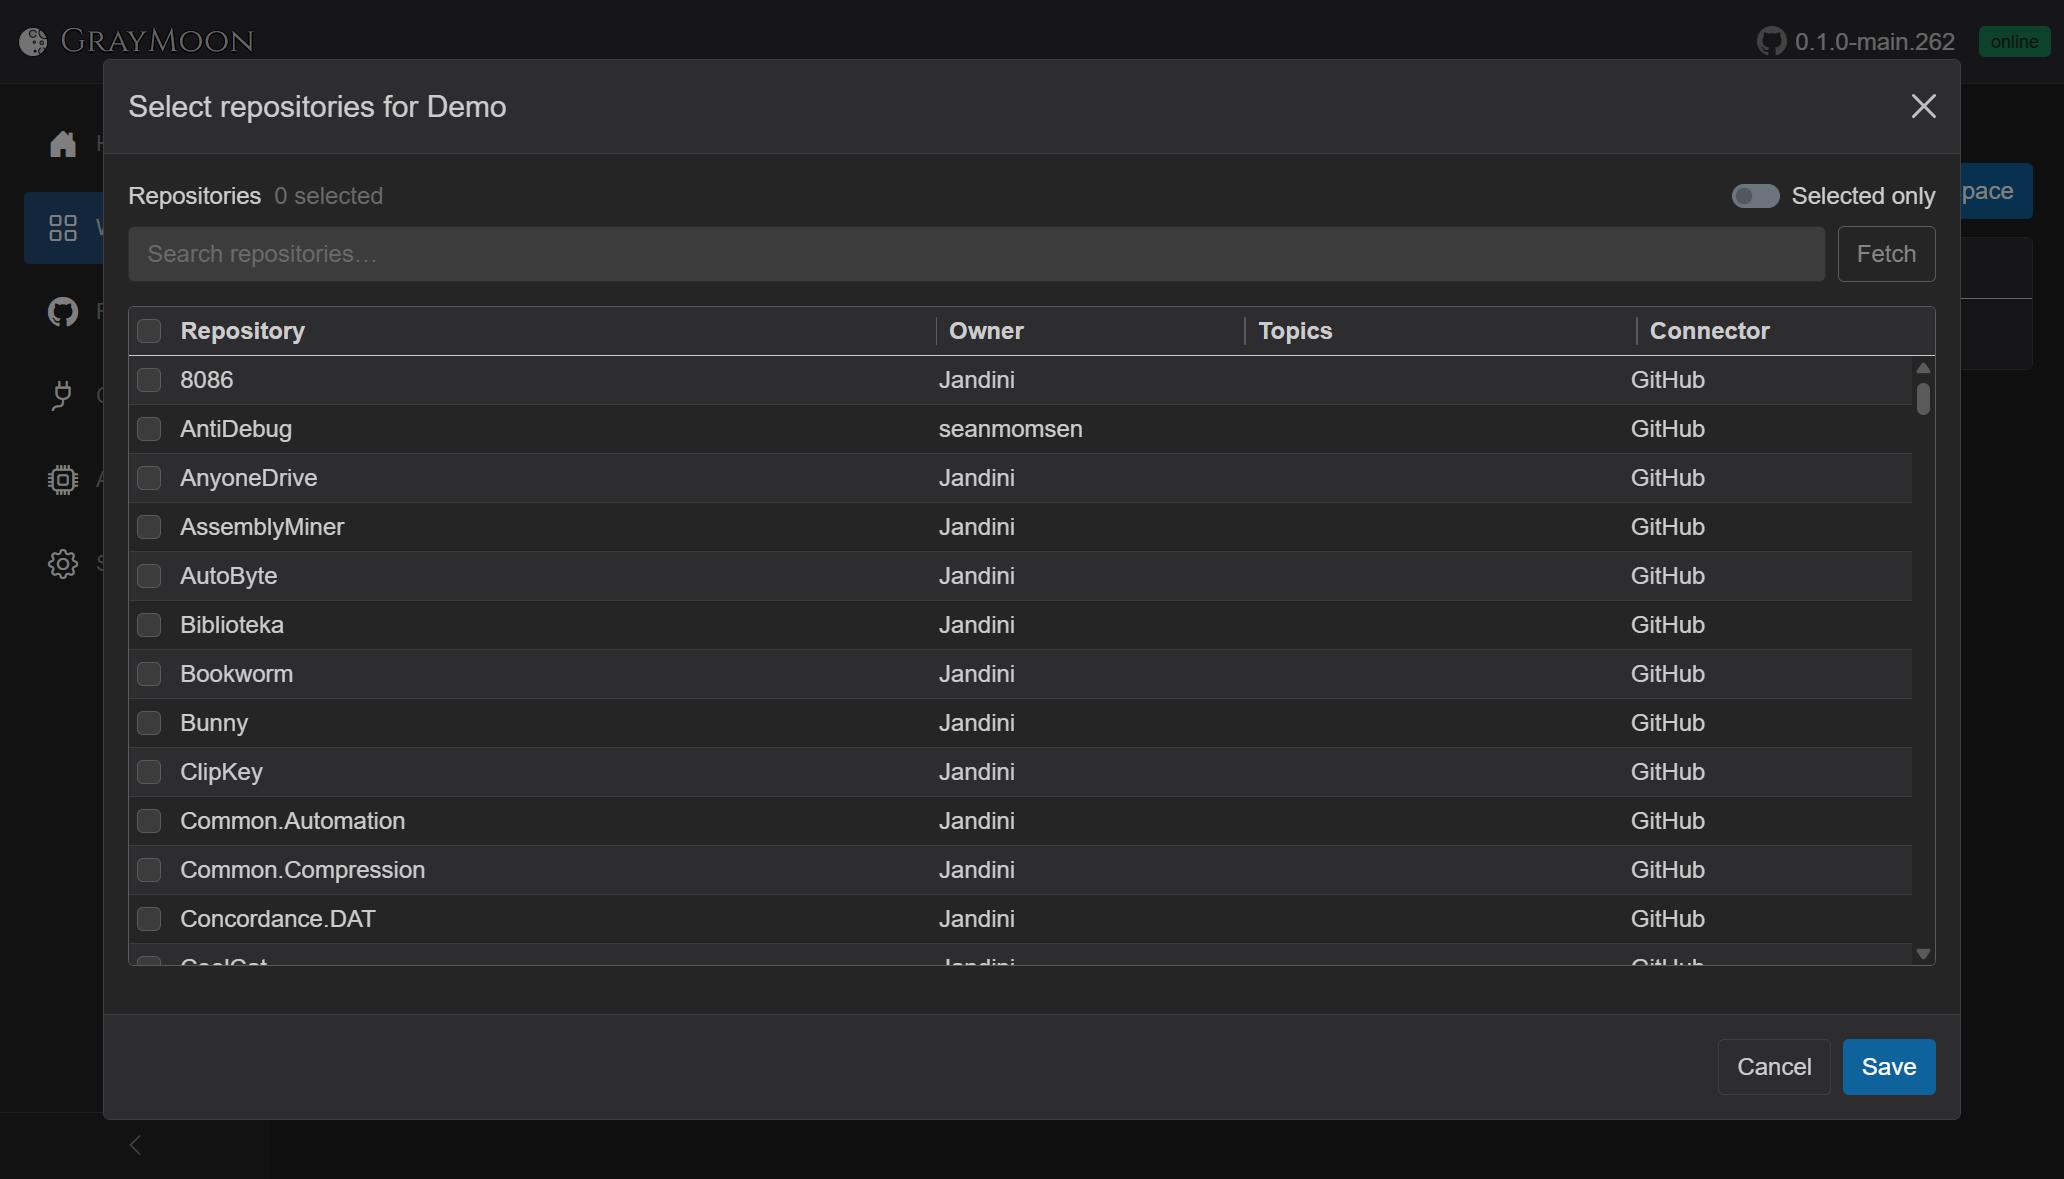
What the dialog gives you:
- Header Repositories N selected
- Selected only - hide rows that are not checked (useful after a search)
- Search - same fields as the catalog: name, owner, topics, connector.
topic:is the fast path for GitHub Topics - Fetch - refresh the catalog from GitHub without leaving the dialog
- Checkbox column, plus the header checkbox which selects all currently filtered rows (not the whole catalog)
- Columns: Repository, Owner, Topics (pills), Connector
- Save needs at least one selected repo. Escape / Cancel closes without linking
Clearing or changing the filter does not uncheck rows. Selection is a set of ids, independent of what the grid is showing.
Type TapeTools. Two rows match (MezzoRecovery.TapeTools by substring, and TapeTools). Check TapeTools only. Header becomes 1 selected.


Clear the search (empty box or the input X). The full catalog comes back; TapeTools stays checked. Selected only on makes that obvious: one row, still selected.

Turn Selected only off. Search topic:mezzorecovery. Every catalog repo tagged mezzorecovery is listed (here 11), with a blue topic pill. TapeTools without that topic is hidden from the grid but stays selected.

Click the header checkbox to select the whole filtered set. That adds those rows; it does not drop TapeTools.

Selected only again: TapeTools plus every mezzorecovery repo. Save.

Workspaces now shows Demo with 11 repos and 0 projects. Projects stay 0 until clones exist and .csproj files can be scanned.
Click Demo. Sidebar switches to workspace pages.

This is the state that needs the first Sync:
- Subtitle workspace | 11 repositories
- One group: No dependencies / 11 repositories. There are no Level 1 / 2 / 3 groups yet. Levels come from a topological sort of package references in
.csprojfiles (plus file-config tokens and custom edges). Nothing is on disk, so there is nothing to scan. GrayMoon is not missing the graph - it has not been able to read it. -
Version and Branch are
-(no GitVersion, no checkout) - PR badge none, commits
0, no↑/↓ - Each row has a red sync (folder missing / never cloned)
- Header split control is red (workspace out of sync). Label is Fetch or Sync depending on the last choice stored in the browser (
graymoon:sync-mode)
Row sync clones that one repo. The header control clones every missing repo in the workspace.
Open the caret next to the red button. The menu is Fetch, Sync, Restore.
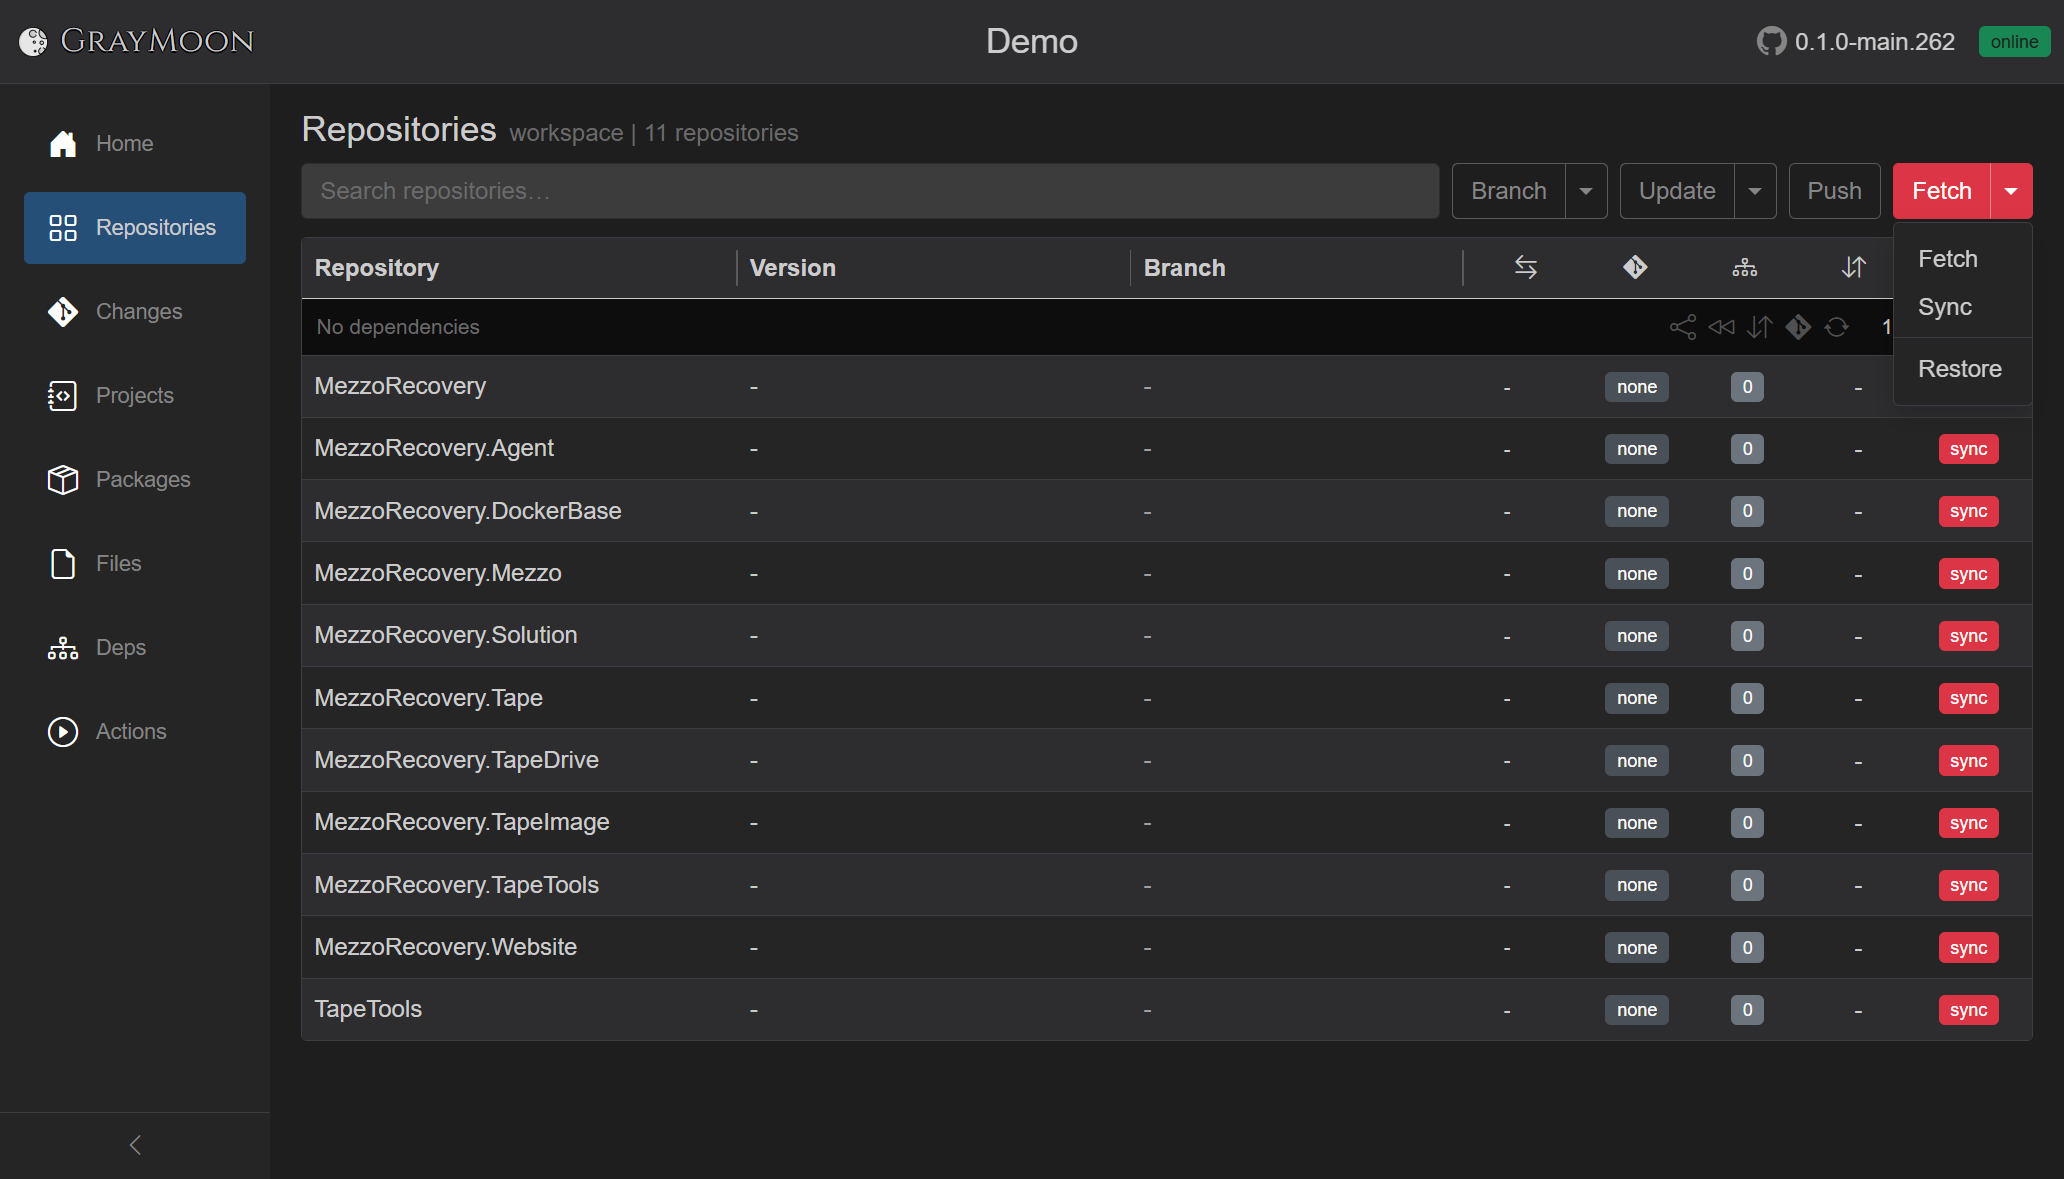
On a machine that already used Fetch as the daily refresh, the primary label is Fetch. Fetch only talks to remotes of folders that already exist: it does not create {Root}\{Workspace}\{Repo} and it does not write hooks. Restore runs dotnet restore on tracked projects - there are no .csproj paths until clones exist, so Restore cannot do the first-day job either.
For a clean workspace, pick Sync from that menu. That both remembers Sync as the primary button and starts the job. After this, the red (then blue) primary stays Sync until you choose Fetch again.
Sync is the first-time clone. For each selected repo the Worker:
- Creates
C:\Workspace\Demo\{RepositoryName}if it is missing (git clone) - Fetches origin (prune + tags)
- Runs GitVersion (version string + branch)
- Writes live git hooks into
.git/hooks - Recounts outgoing / incoming vs upstream and ahead / behind vs default
- Scans
.csprojfiles so Levels and project counts appear
Repos that already have a folder are refreshed in place, not cloned a second time.
Overlay: Synchronizing..., then Synchronized N of 11, Abort, live git terminal (Cloning into 'MezzoRecovery.TapeTools'..., fetch, GitVersion). Worker queue in the top bar: Worker is completing N tasks.
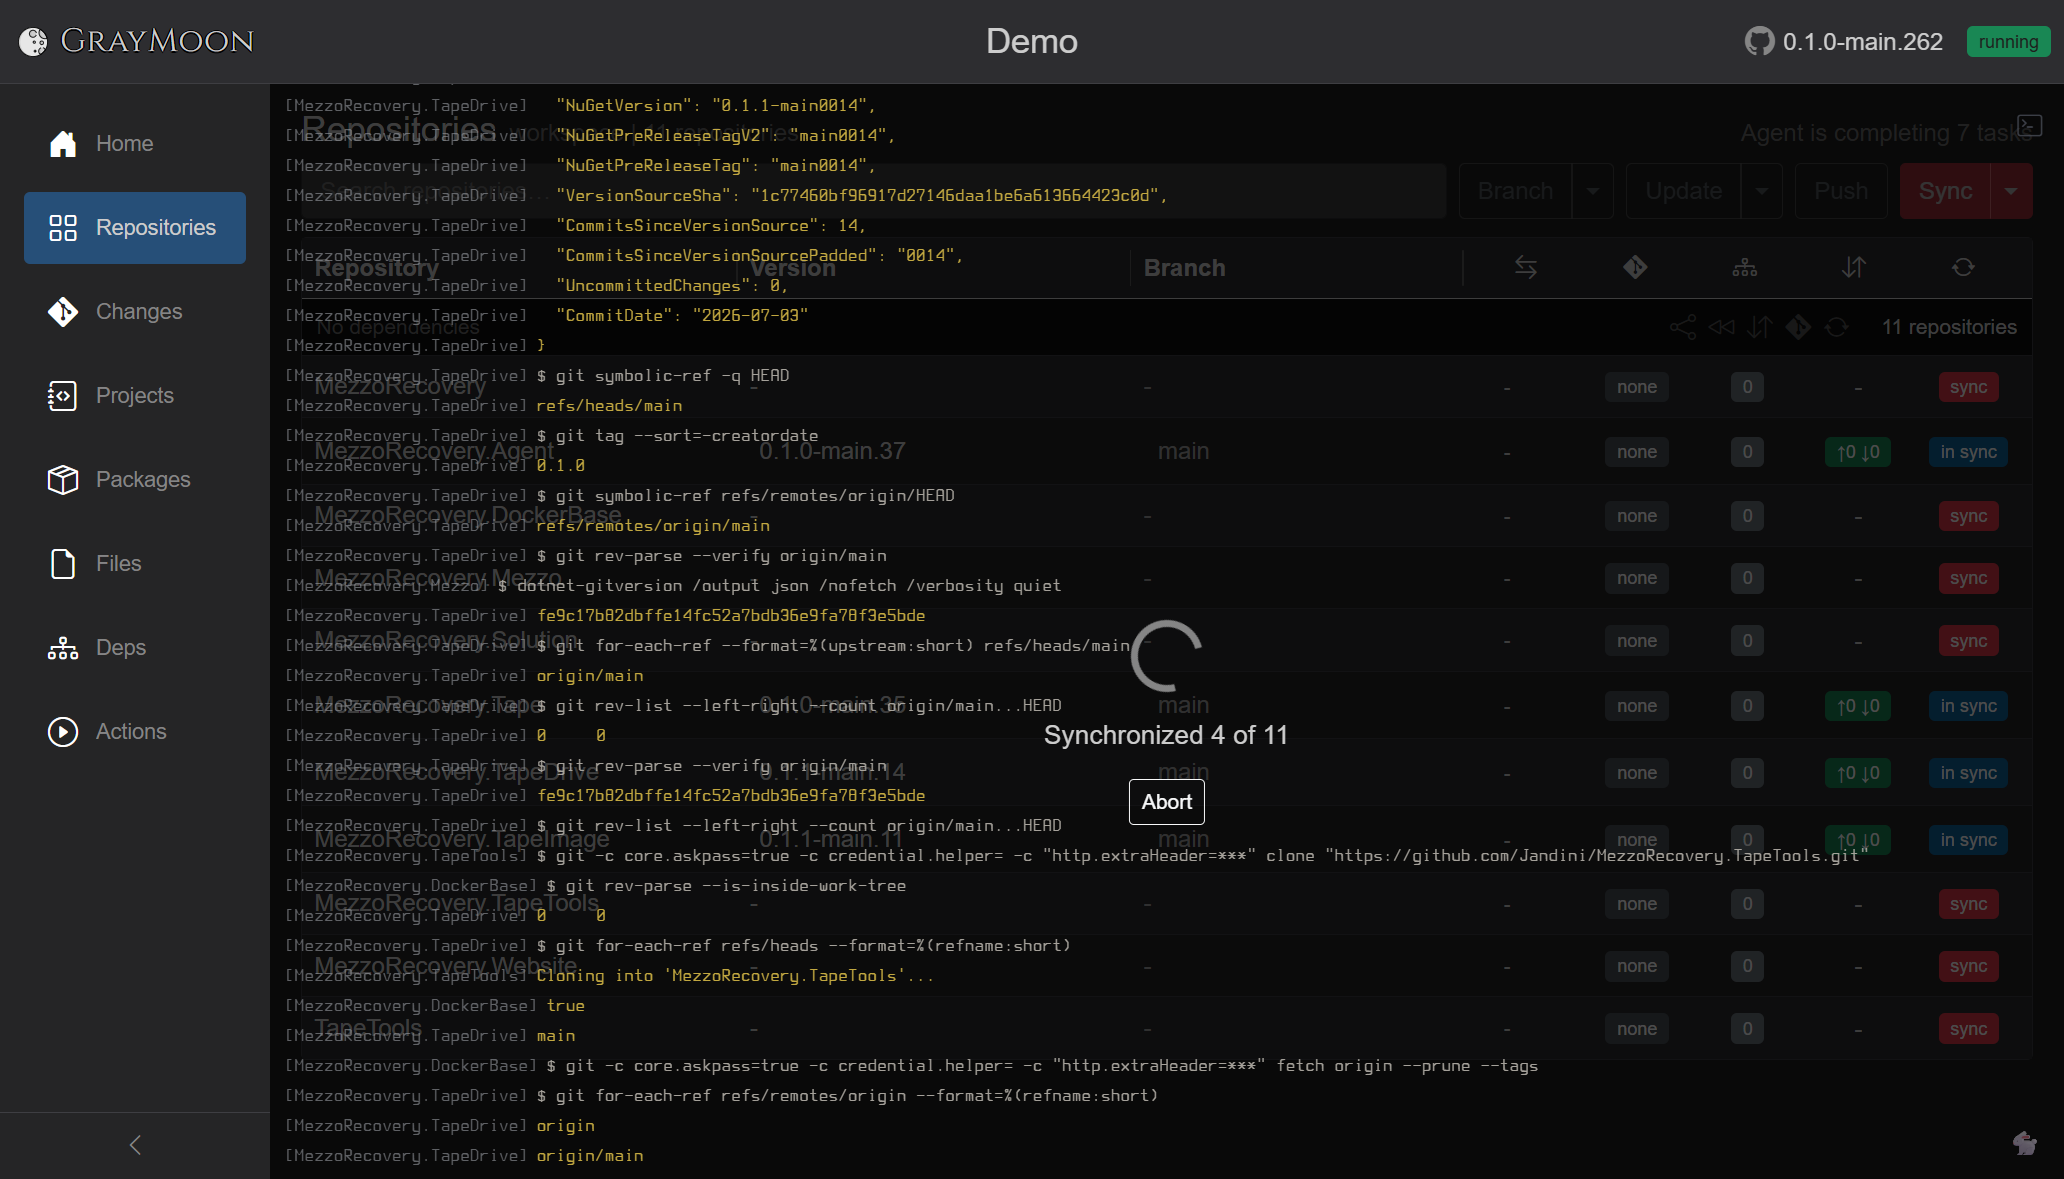
Benefit: one Sync clones every selected repository as siblings under C:\Workspace\Demo\. You do not open 11 terminals or clone into nested folders. Each repo is {Root}\{WorkspaceName}\{RepositoryName} next to the others - the layout IDEs and solution files expect for this kind of workspace.
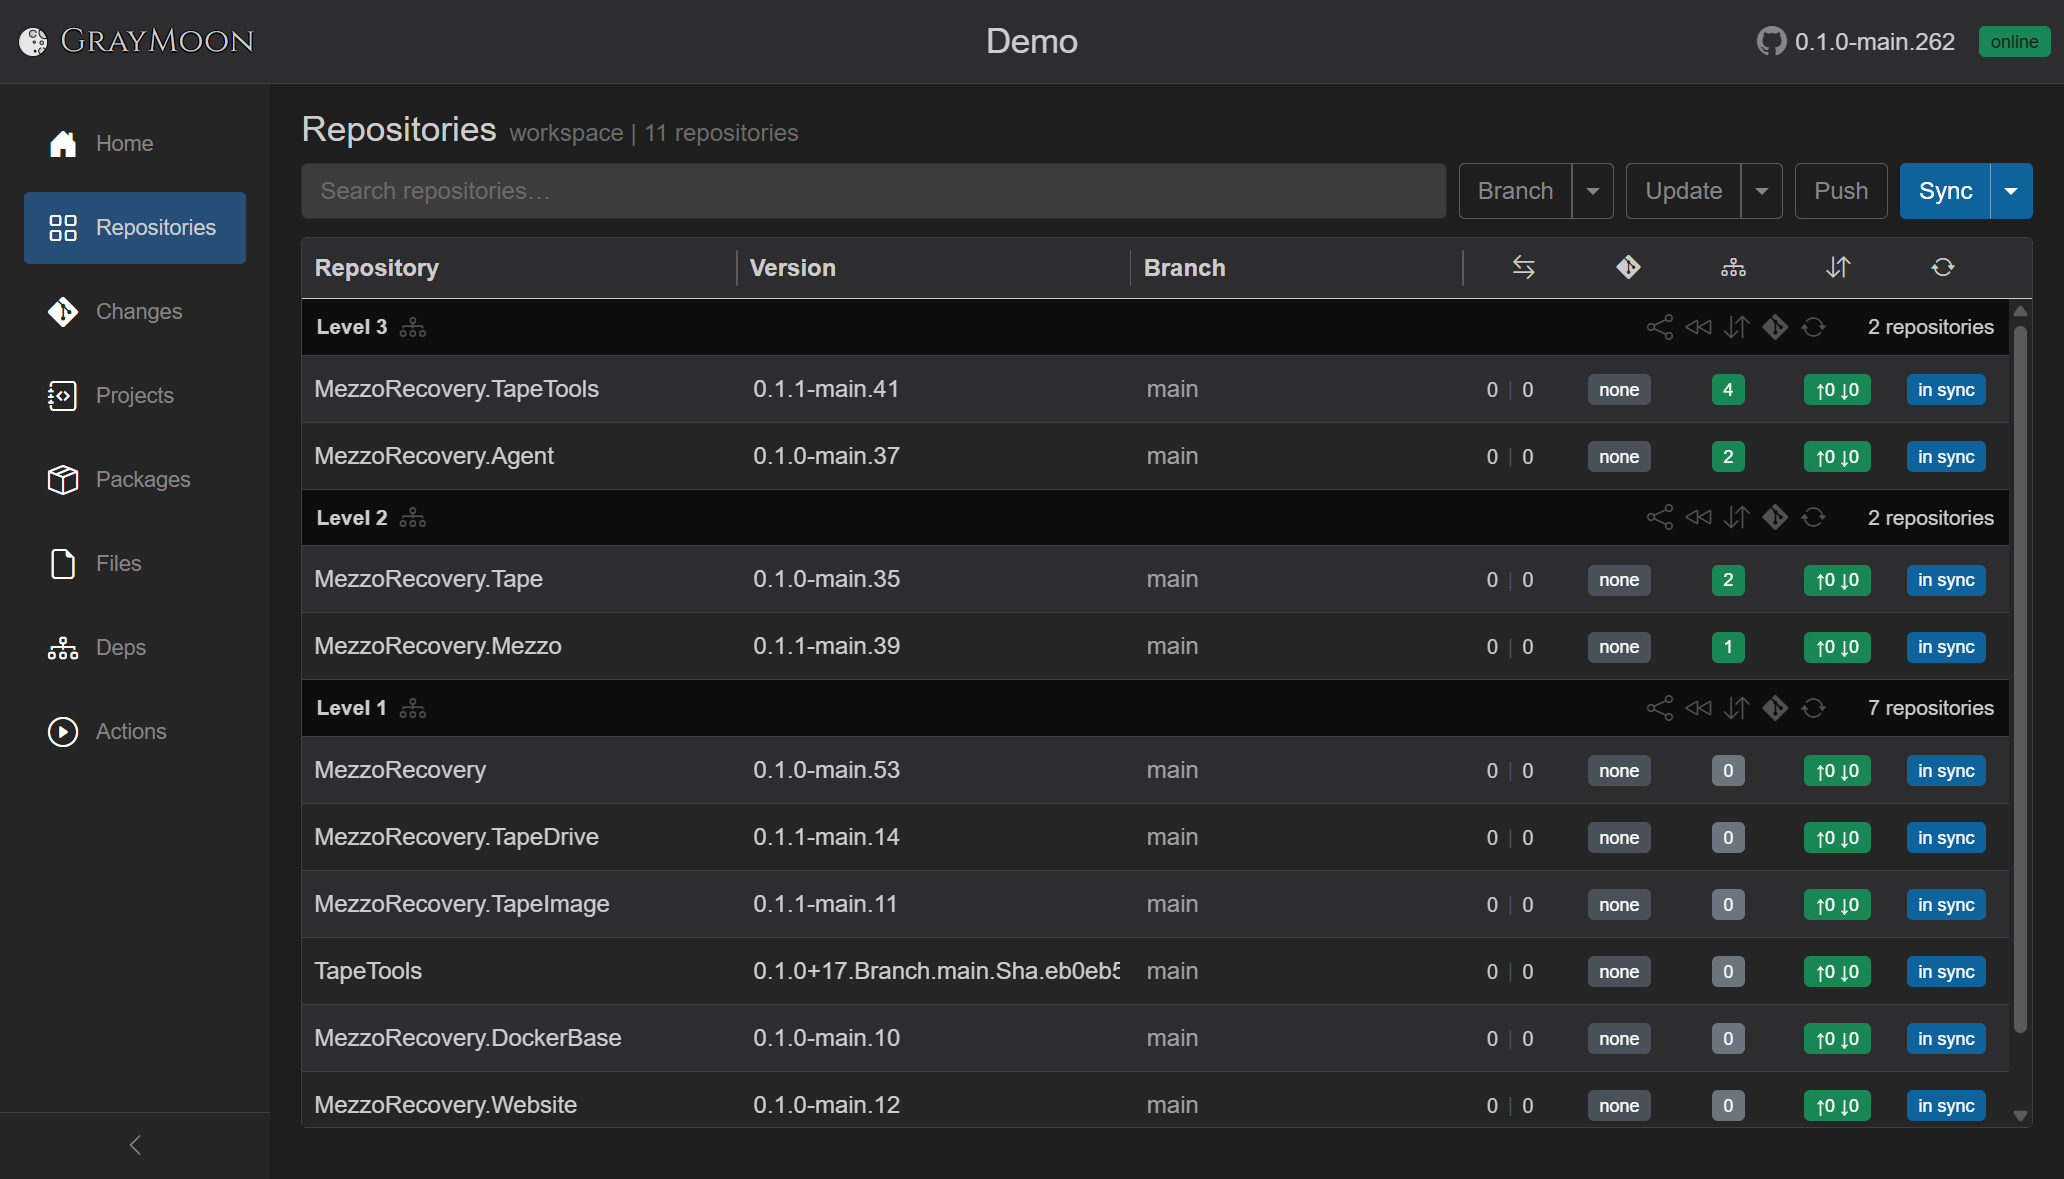
When the job finishes, rows are in sync, versions and main are filled, and the grid is grouped by Level (Level 1 = no workspace package deps, higher levels consume lower ones). Header Sync turns blue.
On clone (and on later Sync), the Worker writes these hooks into each repo's .git/hooks:
| Hook | When it fires | Worker URL |
|---|---|---|
post-commit |
After a commit (GrayMoon, IDE, or terminal) | POST http://127.0.0.1:9191/hook/commit |
post-checkout |
After a branch/commit checkout ($3 = 1 branch checkout) |
.../hook/checkout |
post-merge |
After a merge (including pull that merged) | .../hook/merge |
post-update |
After a ref update | .../hook/commit |
pre-push |
Before a push | .../hook/push |
Each hook is a small #!/bin/sh script that curls JSON { repositoryId, workspaceId, repositoryPath } to the Worker's local listener (port 9191). Timeouts are short (--connect-timeout 1 --max-time 2) and failures are ignored (|| true) so git is never blocked if the Worker is stopped.
The Worker then recounts commits / version / branch and pushes a snapshot to the App. That is how workspace action notification cards appear even when you commit outside GrayMoon. Full write-up: Worker - Live git tracking.
Sample post-commit after this Demo clone (TapeTools):
#!/bin/sh
# Created by GrayMoon.Worker at ...
curl -s --connect-timeout 1 --max-time 2 -X POST "http://127.0.0.1:9191/hook/commit" ...
The job is done when every row is in sync and C:\Workspace\Demo contains the sibling clones. Daily refresh after that can use Fetch. Restore and dependency Update need those clones (and the NuGet connector) first.
A fresh Worker install asks for a one-time pairing code. Show pairing code on the Worker page shows it. GrayMoon Desktop enters that code for you.