Repository navigation
ai_assistants
Let the AI assistant you already use (Claude, GitHub Copilot, Gemini, Codex, or a model running on your own computer) open, check and edit your QElectroTech drawings. It does this through QElectroTech's MCP server, a small program that runs on your computer next to your drawings. Nothing is uploaded to us. What the assistant reads goes to whichever AI company runs it, as with anything else you show it.
This page is the setup for each assistant. What the tools do, and every option, is on the MCP server page.
-
Python 3.9 or later. Nothing else to install: the server uses only
Python's standard library. On Windows, get it from
python.org and tick "Add python.exe
to PATH" in the installer. If typing
pythonin a terminal opens the Microsoft Store, Python is not installed: that is a shortcut Windows ships in its place. -
The server itself, one file,
qet_mcp.py.-
Development builds made after 29 September 2026 install it with
QElectroTech: in
share/qelectrotech/mcp/on Linux, and in themcp\folder of the installation on Windows (installer component "AI assistant (MCP)", on by default). The Windows installer can also add Python for it: tick "Python for the AI assistant" and step 1 is done (mcp\python\python.exe). - With those builds, Help → Connect an AI assistant... writes the setup text below for you, with this installation's paths filled in: choose the assistant and the folder, then click Copy.
-
With an older version, download the file:
qet_mcp.py, and save it anywhere, for example next to your drawings.
-
Development builds made after 29 September 2026 install it with
QElectroTech: in
-
A folder for the drawings the assistant may use. The server only
reads and writes inside it (
QET_MCP_WORKSPACE). Pick a folder of drawings, not your whole home folder.
In every setup below, replace:
| Placeholder | With |
|---|---|
/path/to/qet_mcp.py |
where you saved the server |
/path/to/drawings |
your drawings folder |
/path/to/qelectrotech |
the QElectroTech program: /usr/bin/qelectrotech on Linux, C:\Program Files\QElectroTech\bin\qelectrotech.exe or wherever you installed it on Windows |
On Windows, write each \ in a JSON file as \\, and use python where
the examples say python3.
| Setting | Tools the assistant gets |
|---|---|
| nothing extra | read projects and symbols, compare two versions of a project (qet_diff), search the symbol collection, export to PDF/PNG/SVG/DXF and lists |
QET_ENABLE_SCRIPTING=1 |
also edit: place symbols, draw wires (straight, or around other symbols), set labels, add sheets, size sheets for a paper size, check design rules, score how tidy a drawing is (qet_layout_check), query the project database |
Leave QET_ENABLE_SCRIPTING out if you only want the assistant to read.
Edits are never saved over an existing file unless the assistant asks for it
explicitly. They go to a new file you name.
Be careful with projects from other people. An assistant reads the text in a project: labels, notes, symbol names. Text written to look like an instruction can steer it. Keep editing off when you work on drawings you did not make, and check what an assistant changed (it can show you with
qet_diff).
With a QElectroTech built before
PR #1129
(September 2026), QET_BINARY is ignored: tell the assistant in the chat
where the QElectroTech program is when it asks.
Exports and edits start QElectroTech in the background. The server finds it
from QET_BINARY, else from qelectrotech on your PATH. The assistant
cannot pick another program.
Each was checked as far as the "Tested" column says, on 2026-09-29.
| Assistant | Where the setup goes | Tested |
|---|---|---|
| Claude Desktop | Settings → Developer → Edit Config | not on Windows or macOS; same format as Claude Code |
| Claude Code |
.mcp.json in your drawings folder, or claude mcp add
|
a real tool call, Claude Code 2.1.283 |
| GitHub Copilot in VS Code | .vscode/mcp.json |
format from VS Code's documentation; not run |
| Cursor | ~/.cursor/mcp.json |
format from Cursor's documentation; not run |
| Gemini CLI | ~/.gemini/settings.json |
connects (gemini mcp list: Connected) |
| Codex CLI | ~/.codex/config.toml |
setup accepted (codex mcp list: enabled); no tool call |
| LM Studio | Program → Install → Edit mcp.json | format from LM Studio's documentation; not run |
Settings → Developer → Edit Config, add this, then quit the app fully and start it again:
{
  "mcpServers": {
    "qet": {
      "command": "python3",
      "args": ["/path/to/qet_mcp.py"],
      "env": {
        "QET_MCP_WORKSPACE": "/path/to/drawings",
        "QET_BINARY": "/path/to/qelectrotech",
        "QET_ENABLE_SCRIPTING": "1"
      }
    }
  }
}The same block, saved as .mcp.json in your drawings folder, or in one
command:
claude mcp add qet \
  -e QET_MCP_WORKSPACE=/path/to/drawings \
  -e QET_BINARY=/path/to/qelectrotech \
  -e QET_ENABLE_SCRIPTING=1 \
-- python3 /path/to/qet_mcp.pyCopilot uses tools in agent mode only. Save as .vscode/mcp.json in the
folder you open in VS Code. VS Code asks you to trust the server the first
time it starts:
{
  "servers": {
    "qet": {
      "type": "stdio",
      "command": "python3",
      "args": ["/path/to/qet_mcp.py"],
      "env": {
        "QET_MCP_WORKSPACE": "/path/to/drawings",
        "QET_BINARY": "/path/to/qelectrotech",
        "QET_ENABLE_SCRIPTING": "1"
      }
    }
  }
}
Note the key is servers here, not mcpServers.
~/.cursor/mcp.json for every project, or .cursor/mcp.json in one:
{
  "mcpServers": {
    "qet": {
      "type": "stdio",
      "command": "python3",
      "args": ["/path/to/qet_mcp.py"],
      "env": {
        "QET_MCP_WORKSPACE": "/path/to/drawings",
        "QET_BINARY": "/path/to/qelectrotech",
        "QET_ENABLE_SCRIPTING": "1"
      }
    }
  }
}~/.gemini/settings.json, or .gemini/settings.json in your drawings
folder:
{
  "mcpServers": {
    "qet": {
      "command": "python3",
      "args": ["/path/to/qet_mcp.py"],
      "env": {
        "QET_MCP_WORKSPACE": "/path/to/drawings",
        "QET_BINARY": "/path/to/qelectrotech",
        "QET_ENABLE_SCRIPTING": "1"
      }
    }
  }
}
Gemini CLI starts no server in a folder you have not trusted: it asks the
first time you run gemini there. gemini mcp list should then show
qet … Connected.
~/.codex/config.toml:
[mcp_servers.qet]
command = "python3"
args = ["/path/to/qet_mcp.py"]

[mcp_servers.qet.env]
QET_MCP_WORKSPACE = "/path/to/drawings"
QET_BINARY = "/path/to/qelectrotech"
QET_ENABLE_SCRIPTING = "1"
codex mcp list should show qet as enabled.
LM Studio 0.3.17 or later. In the Program tab of the right-hand sidebar, Install → Edit mcp.json, and add the same block as Gemini CLI. A model running on your own computer sends nothing anywhere, but small models use tools less reliably than the big hosted ones. Expect more mistakes with edits.
Most take the same command / args / env block under mcpServers.
The server speaks MCP over standard input and output.
Four changes make this simpler. All four merged on 29 September 2026, so they are in builds made after that (on Windows, nightlies newer than git10275). With an older build, the setup above is the way.
Without it, on Windows only the reading tools work: every export, edit, check and query fails, because the server could not start QElectroTech there.
qet_mcp.py comes with QElectroTech (share/qelectrotech/mcp/ on Linux,
mcp\ in the Windows installation folder) and finds that QElectroTech and
its symbols by itself, so no download and no QET_BINARY are needed.
The installer offers "Python for the AI assistant" (unticked by default),
so Windows users need not install Python themselves. The command becomes
C:\Program Files\QElectroTech\mcp\python\python.exe (in JSON, each \ is written \\).
Help → Connect an AI assistant... writes the setup for your assistant with this installation's paths filled in:
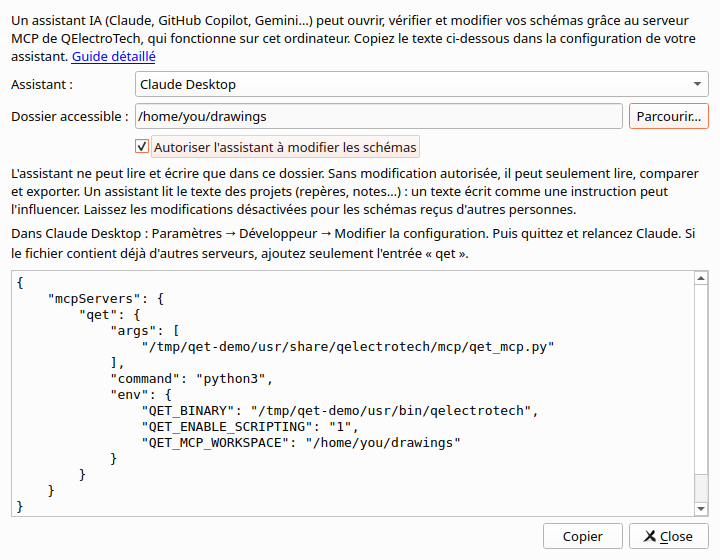
- Pick the assistant: Claude Desktop, Claude Code, GitHub Copilot (VS Code), Cursor, Gemini CLI, Codex CLI or LM Studio.
- Pick the folder of drawings it may use (Folder it can use).
- Tick Allow the assistant to edit diagrams only if it may edit them. It is unticked by default.
- Copy, and paste where the dialog says. The dialog writes nothing and starts nothing itself.
It also tells you, in bold, when something is missing:
| Message | Meaning |
|---|---|
| The MCP server is not installed with this version | this QElectroTech was installed without the server: use the download above |
| Python est introuvable sur cet ordinateur | the Python the setup names is not there. On Windows, run the QElectroTech installer again and tick Python pour l'assistant IA, or install Python; elsewhere, install Python 3 from your system's packages |
| Python may not be installed (Windows) | only the Microsoft Store shortcut answers to python, which opens the Store instead of running the server |
Merged on 2 October 2026 (#1219–#1225, #1227, #1228), so in development builds made since then. Each has its own page:
- Script buttons: ask the assistant for a button; it writes the script, tests it on a copy of a project, and stores it with an icon. You press it.
- Live mode: with a setting turned on and a warning accepted at start, the assistant works in the project you have open, one Ctrl+Z per action. Since 5 October 2026 it can also create, open, save, close and print projects in your window, asking you before it prints.
- Macro recorder: do the task once by hand while recording, paste the request, and the assistant writes a script it has checked does the same.
Every company draws a little differently: which way the circuit flows, how far apart symbols sit, where tags go. Write your rules down once, in your own words, and every assistant that connects reads them before it draws — Claude, Copilot or any other, with no need to repeat them in each chat (PR #1315, merged 5 October 2026).
QElectroTech keeps the text in its own settings, the same for every project.
There is no box for it in the settings window yet: it is set by a script,
with qet.setHouseStyle(). Two ways:
-
Ask the assistant, in live mode: "set my house style to: …". It sends a one-line script, which the ask-first box shows you before it runs.
-
Run a script yourself: save something like this as
house-style.jsand run it with Project > Scripts > Run a script...:qet.setHouseStyle([ "Grid and spacing", "- Never place a symbol off the 10 px grid.", "- Symbols on the same rail line up on one axis.", "Flow", "- Left to right, top to bottom; inputs on the left, outputs on the right.", "Wires", "- Orthogonal only. Never a 4-way junction dot: make two T-junctions.", "Tags", "- Every tag in the same place relative to its symbol, to the right." ].join("\n"));
qet.setHouseStyle("")clears it, andqet.log(qet.houseStyle())shows what is set.
The assistant reads it with qet_about (as house_style), whose
description tells it to follow the text like any instruction you give it.
QElectroTech writes it to qet-assistant.json as soon as you set it from the
editor; a headless --run stores the setting, but the file only catches up
the next time a QElectroTech window opens. Separately, qet_layout_check
(and qet_live_layout_check in live mode) checks three rules of this kind
on its own: labels drawn over wires, 4-way junctions, and side branches out
of line.
These reach a server only through the internet, from their own computers. QElectroTech's server does not open itself to the internet, and there is no plan to: it stays on your computer. A web chat that can run Python can still use the server's reading tools on a project you upload to it. See Using it without Claude Code.
- MCP server: every tool and setting
- JavaScript Scripting: what edits run underneath
- Script buttons, Live mode, Macro recorder: what an assistant can do with buttons, the open project and recordings
