Repository navigation
drawing_arcs
Lighting and house-wiring layouts often draw the wire from a switch to a lamp as a curve rather than a straight line, so it stands apart from walls and furniture on the plan. QElectroTech draws these as arcs: free drawing on the sheet, like lines and rectangles, not conductors. An arc is not connected to anything — it does not appear in the wiring list, the parts list or any export that follows wires.
There are two ways to get one: the Arc tool, which draws a half arc in two clicks and gives it a handle to pull in or out, and the older way of cutting an ellipse down with its end handles.
Added in PR #1202.

The Add an arc button sits on the drawing toolbar
between the ellipse and the polyline. It is also in Edit → Add, and
in the command search (Ctrl+Shift+M, type arc).
- Click where one end of the arc should be.
- Move to the other end, and up or down to the height the arc should reach. The arc follows the cursor.
- Click again. Right-click instead to cancel.
The result is always a half arc: its two ends sit on one horizontal line, and it bulges up if you finished above the first click, down if you finished below it.
| Hold | Result |
|---|---|
| nothing | both clicks snapped to the grid |
| Shift | a true half circle — the height is half the distance between the ends |
| Ctrl | off the grid |
A new arc takes the line colour, thickness and style of the last shape you drew, but never its fill: a filled arc would close into a half disc. The tool stays active, so you can draw the next arc straight away; Escape, or clicking the Arc button again, ends it, and Enter starts it again later (see Drawing faster).
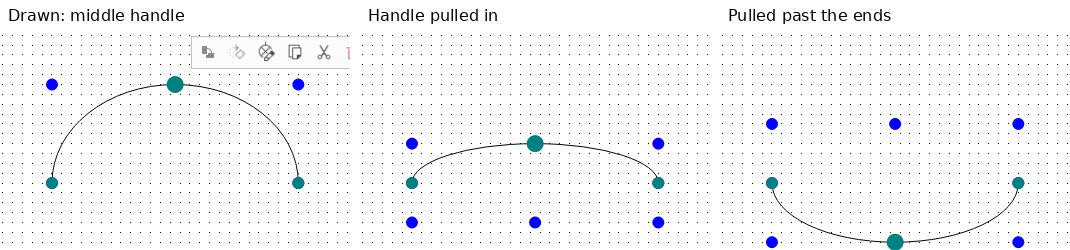
Select a half arc and it shows a turquoise handle in the middle of the curve, as well as one at each end.
- Drag the middle handle away from the ends to make the arc deeper.
- Drag it towards the ends to make it flatter.
- Drag it past the line between the ends and the arc turns over to the other side.
The two ends do not move while you do this, so an arc drawn between a switch and a lamp stays connected to both by eye. Ctrl frees the handle from the grid. One drag is one undo step.
The middle handle is only there on a half arc — every arc the Arc tool draws, also after you rotate it, and an ellipse cut down to exactly a half along its width or height (section 2, with Shift). Drag one of the end handles and the arc stops being a half arc: the middle handle disappears, and the end handles work as in section 2. Drag the end back to make a half arc again and the middle handle returns.
Since PR #1211 (2 October 2026) the middle handle shows with the size handles only. Click the arc again to switch to the rotate and skew handles and it goes away, so the skew handle at the top of the arc can be grabbed. With the size handles, the resize handle that would sit under it is hidden: the middle handle already changes that height.
Any ellipse can be turned into an arc. Select it, and drag one of the two turquoise handles on its outline: that end of the curve follows the cursor round the ellipse. Hold Shift to move in 15° steps. Drag one end all the way round onto the other and the ellipse closes again.
This gives arcs of any length, not only halves, but each end moves round the ellipse rather than staying where you put it, which makes it slow to fit an arc between two fixed points. For that, use the Arc tool.
Select the arc, open Selection properties, and under Line set Type to Dashed or Dotted. The thickness and colour are on the same panel.
Because a new arc copies the last shape's line style, the next arcs you draw come out dashed too, until you change it back.
An arc is saved as an ordinary Ellipse shape with an <arc> child giving
its start angle and span in degrees, measured anticlockwise from three
o'clock. A half arc bulging upwards is startAngle="0" spanAngle="180"; the
same arc pulled past its ends is spanAngle="-180". The Arc tool adds nothing
new to the file, so a project with arcs in it opens in any version that reads
ellipse arcs. See shapes.
The fillet tool rounds the corner between two drawn lines, like the sketch fillet in a CAD program. It turns a sharp corner into a curve of the radius you choose, which is the usual way to draw a cable or pipe run that bends.
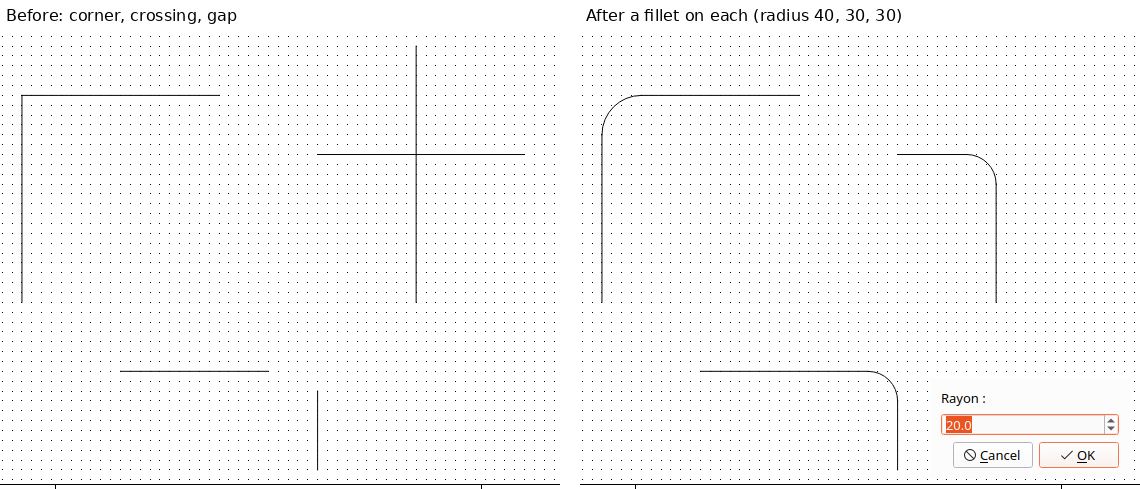
- Choose Add a fillet: in Edit → Add, on
the drawing toolbar (behind its » arrow when the window is narrow), or
from the command search (
Ctrl+Shift+M, typefillet). - Click the two lines one after the other — or click once where they meet or cross.
- A small dialog asks for the radius. Type it and press Enter. Escape in the dialog cancels that fillet.
The tool stays on, so you can go straight to the next corner. Escape, a right-click, or clicking the button again ends it. A right-click after picking only the first line drops that pick instead.
What happens to the lines:
| The two lines… | Result |
|---|---|
| meet at a corner | both are shortened to where the curve starts |
| cross each other | each keeps the part on the side you clicked; the other part is cut off. A single click on the crossing keeps the longer part of each |
| do not reach each other | both are extended to meet the curve |
The radius is in the same units as the sizes in Selection properties, and the dialog starts with the last radius you used. The curve takes the line style of the first line you clicked. One Ctrl+Z undoes the whole fillet: both lines go back and the curve goes away.
Nothing is done, and the status bar says why, when:
- the two lines are parallel, or so nearly in line that there is no corner;
- the radius is too big for the lines — the message gives the largest radius that fits.
The result is two ordinary lines and an ordinary arc (section 4), not a new kind of shape. Moving one of them afterwards does not move the others.
- The Arc tool only draws half arcs. A shallower or longer curve is a half arc pulled in or out, or an ellipse cut down by hand.
- The middle handle works only on half arcs.
- Ctrl does not draw the arc out from its centre, as it does for an ellipse; it only takes the clicks off the grid.
- The start and end angles cannot be typed in the properties panel.
- The fillet tool works on drawn lines only — not yet on a corner of a polyline, not on wires, and not in the symbol editor.
- An arc is drawing, not a wire. For a curve that is part of the circuit, use a conductor.
- Mouse modifiers — every Shift, Ctrl and Alt while drawing and reshaping
- Drawing faster — command search, repeating the last tool
- Conductors — real wires, and hops where they cross
