Repository navigation
user_manual
Complete reference guide for using QElectroTech to create electrical diagrams, schematics, and automation drawings.
- Basics
- Interface Overview
- Projects & Sheets
- Working with Elements
- Drawing Wires & Conductors
- Text, Labels & Annotations
- Schema Editing & Formatting
- Reports & Documentation
- Export & Printing
- Preferences & Settings
- Advanced Topics
- Troubleshooting
Linux/macOS/Windows:
- Double-click the QElectroTech application
- Or launch from terminal:
qelectrotech
Platform-Specific:
-
Linux: Also available via package manager (
apt install qelectrotech) - macOS: Drag from Applications to Dock for easy access
- Windows: Pin to Start menu or desktop for quick launch
- File → Exit (or File → Quit)
- Close the main window
- Save your projects before quitting
- Help → Manual — Opens the official PDF manual
- Help → About — Shows version and credits
- Right-click on elements for context help
┌─────────────────────────────────────────────────────────┐
│ Menu Bar (File, Edit, View, Insert, Tools, Help)      │
├─────────────────────────────────────────────────────────┤
│  Toolbar (Select, Wire, Text, Shapes, etc.)           │
├─────────┬─────────────────────────────┬─────────────────┤
│ Project │                             │  Elements Panel │
│ Panel   │   DIAGRAM CANVAS            │  (Search & Browse)
│         │   (Your drawing area)       │                 │
│ (Sheets)│                             │  Properties     │
│         │                             │  (Selected item)│
├─────────┴─────────────────────────────┴─────────────────┤
│ Status Bar (Coordinates, Zoom, Current Mode)          │
└─────────────────────────────────────────────────────────┘
Elements Panel (Right Side)
- Search box for finding components
- Categories for browsing
- Drag elements onto canvas
- Shows "Master" elements and connections info
Project Panel (Left Side)
- Lists all sheets (pages) in your project
- Add new sheets (diagrams)
- Organize and rename sheets
- Right-click for sheet properties
Toolbar
- Selection Tool — Select and move objects
- Wire Tool — Draw electrical connections
- Text Tool — Add labels and annotations
- Shape Tools — Add rectangles, circles, polygons
- Zoom Controls — Magnify/reduce view
Preferences Panel (Windows Menu)
- Show/hide panels as needed
- Customize workspace layout
- Save custom workspaces
- View → Panels — Show/hide side panels
- View → Toolbars — Show/hide toolbars
- Drag panels to reposition
- Double-click panel tabs to float/dock
File → New Project creates a blank project immediately — there is no wizard or settings dialog at this step. The new project starts with one empty sheet, using whatever border, conductor and title-block defaults the project inherited (see Project properties to change page size, margins and other defaults afterward).
A sheet is a single page/diagram within your project. QET does not have a "sheet type" you choose when creating one — a sheet is a sheet, and what it ends up showing (single-line, multiline, control logic…) is purely a matter of what you draw on it.
Earlier versions of QElectroTech called a sheet a folio, and so do many forum posts; it is the same thing. The French interface still says folio.
To create a new sheet, right-click in the Project panel → Add a sheet. It's added immediately, using the project's stored default border, conductor and title-block settings — again, no dialog or type choice.
- Rename sheets: Right-click sheet → Rename
- Reorder sheets: Drag & drop in Project panel
- Delete sheets: Right-click → Delete (confirm)
-
Sheet properties: Right-click → Properties
- Title block information — see Title block templates
- Author, date and other title-block fields
Opening:
- File → Open Recent — Quick access to recent projects
- File → Open — Browse for .qet files
- Ctrl+O (or Cmd+O) — Keyboard shortcut
Saving:
- File → Save — Save current project (Ctrl+S)
- File → Save As — Save with new name
- Every 20 minutes QET writes a crash-recovery copy of each project that changed, keeping the last three. If QET closes unexpectedly, the next start offers them in a Recovery files window — see FAQ, "QET crashed — how do I get my work back?".
- Separately, autosave saves the project itself on a timer. It is off until you set an interval for Automatic backup of projects in Settings → Configure QElectroTech → General, tab Projects.
File Format:
- QElectroTech projects are saved as
.qetfiles - XML-based format, human-readable
- Can be opened in text editor if needed
Search Method:
- Type in the search box at top of Elements panel
- Results appear instantly as you type
- Click element to select it for placement
Browse by Category:
- Expand categories in Elements panel
- Categories organized by electrical type (switches, relays, etc.)
- Sub-categories for specific component families
The shipped collection's top-level categories are named after their
IEC-style numbering — 10_allpole, 20_logic, 30_hydraulic,
50_pneumatic, 60_energy — each holding several levels of
sub-categories. There isn't a fixed short list worth memorizing; browse the
tree or use the search box.
Drag & Drop:
- Click and hold an element in Elements panel
- Drag onto your canvas
- Release to place
- Element appears at cursor position
Multiple Placements:
- Don't release from Elements panel, just click canvas multiple times
- Convenient for adding many of the same element
Rotating after placement:
- Select the element and press Space to rotate 90° at a time
Single Select:
- Click on element with Selection tool
Multi-Select:
- Hold Ctrl (or Cmd on Mac) and click elements
- Or drag a selection box around multiple elements
Select All:
- Edit → Selection → Select All, or Ctrl+A
Move:
- Click element to select
- Drag to new position — it snaps to the grid
- Hold Ctrl while dragging to place it off the grid (see Mouse modifiers)
Precise Positioning:
- Use arrow keys to nudge selected elements by one grid step
- Hold Alt for a 1-pixel step
Snap to Grid:
- Elements snap to the grid while you drag; there is no switch to turn that off, only Ctrl for one drag
- Display → Display the grid only shows or hides the dots
- Items already off the grid: Edit → Align → Align to grid puts them back (see Aligning items)
- Adjust grid size: Settings → Configure QElectroTech → General, tab Grid + Keyboard
Copy & Paste:
- Select element(s)
- Ctrl+C to copy
- Ctrl+V to paste (appears offset from original)
- Drag to final position
Quick Duplicate:
- Select element(s)
- Ctrl+D, or Edit → Duplicate
- The first time, a small dialog asks for a spacing in grid steps and a direction; the copy lands at that offset. Later presses reuse it without asking, each from the copy just made, so tapping Ctrl+D lays out an evenly spaced row. Edit → Configure duplication... changes the spacing or direction
Select the element(s) and press Space to rotate 90°, or right-click → Rotate. Shift+Space rotates a group selection together rather than each element individually; Ctrl+Space rotates just the labels/text, not the graphics.
There is no flip/mirror action for elements placed on a sheet — flipping a symbol is done once, in the element editor, by redrawing or mirroring the symbol itself.
- Select element(s)
- Press Delete key
- Or right-click → Delete
- Use Ctrl+Z to undo deletion
A conductor is an electrical connection between elements (the wires/lines).
Types:
- Single-line — Simplified representation
- Multiline — Individual conductor lines shown
Basic Wire Drawing (there is no wire tool):
- Press the mouse button on a terminal (connection point on element)
- Drag to the destination terminal, keeping the button down
- Release on it: the wire is drawn, automatically routed
Wire Routing:
- Automatic routing creates orthogonal (right-angle) paths
- Select a wire and drag the handles on its segments to change its path
- Edit → Reset conductors (Ctrl+K) puts the automatic route back
- Release away from a terminal and no wire is created
Modify Wire Path:
- Select wire (click on it)
- Drag the handles on its segments to adjust routing
Delete Wire:
- Select wire
- Press Delete
Wires only connect at terminals — two wires crossing on the canvas don't join unless they actually meet at a terminal. A project can draw a small hop where wires cross, so a crossing cannot be mistaken for a connection (Project → Project properties, Conductor crossings) — see Conductors §9.
Double-click a wire to open its properties dialog: colour, line style, thickness, function, section, cable, number (label) and the rest — see Conductors §3 for every field. F2 opens the colour picker for one selected wire, and the Conductor color swatch on the Diagram toolbar colours every selected wire at once.
The Selection properties panel can show the same fields for the selected wire — and edit several wires at once — once you tick the option in Settings → Configure QElectroTech → General → Appearance. See Conductors §2.
Text Tool Method:
- Click Text Tool (A icon) in toolbar
- Click on canvas where you want text
- Type your text
- Click elsewhere to finish
Quick Labels on Elements/Wires:
- Double-click the element or wire — checked directly against source
(
QetGraphicsItem::mouseDoubleClickEvent()/Conductor::mouseDoubleClickEvent(), both calleditProperty()), this opens its Properties dialog, not an inline text box - Find the label field in that dialog and type your text (e.g., "S1")
- Confirm the dialog
Common wire labels:
- Signal names: "L1", "L2", "N", "PE" (ground)
- Voltage: "24V AC", "12V DC"
- Function: "Enable", "Reset", "Alarm"
To add wire label:
- Double-click the wire to open its Properties dialog (not an inline edit — see the note above)
- Find and set the label field
- Confirm the dialog
Common element labels:
- Reference designator: "S1" (switch 1), "R1" (relay 1), "M1" (motor 1)
- Component value: "100kΩ", "10µF"
- Description: "Power Switch", "Start Button"
To add element label:
- Double-click the element to open its Properties dialog (not an inline edit — see the note above)
- Set the reference (e.g., "Q1") in the label field
- Confirm the dialog
Values already used are suggested. In the Informations tab, each field (manufacturer, supplier, reference…) offers the values other elements in the same project already use, as you type: matching ignores case and works anywhere in the text, so "ard" finds "Arduino". Pick one instead of typing it again. Label gets no suggestions, since a label names one element. Since PR #1021 (bugtracker #217).
A dynamic text field can show a live value instead of fixed text — an element's label, a sheet number, a manufacturer reference, and more. This is a whole variable language of its own, with different variables valid in different places (an element label isn't the same set as a sheet field). See Variables & formulas for the full reference — it's worth reading before guessing at a variable name, since an unrecognized one is silently left as literal text rather than flagged as an error.
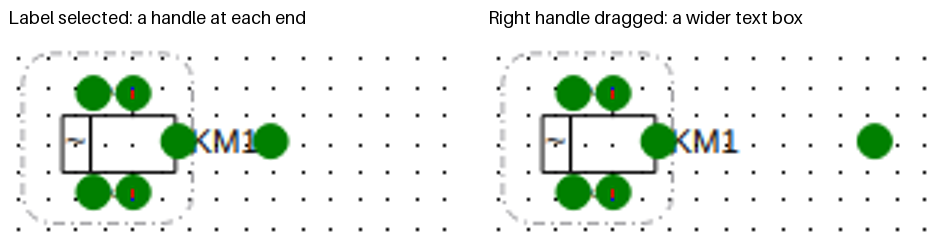
Resizing a symbol's text box by dragging. Select a text of a placed symbol (its label, an information field, a composite text) and two handles appear at its left and right edges. Drag one to set the text's width; a rotated text resizes along its own direction. One undo step per drag, and undo brings back automatic width if that is what it had. The width field in the selection properties panel follows the drag. Free texts and texts inside the element editor have no width yet, so no handles. Since PR #591 (discussion #577).
Font & Style:
- Select text element
- Right-click → Properties
-
Configure:
- Font family (Arial, Times, etc.)
- Size (points)
- Color
- Orientation (horizontal, vertical, 45°, etc.)
Select All Objects:
- Edit → Selection → Select All (Ctrl+A)
Select by Type:
- Edit → Selection also holds Select none, Invert selection, Select all conductors and Select all text fields
Multi-Select Tips:
- Hold Ctrl and click to add to or remove from the selection
- Drag box to select all within box
Groups: Edit → Group → Group ties selected items together so they select and move as one — see Grouping items.
Align Objects:
- Select two or more objects
- Edit → Align, or the same submenu in the right-click menu
- Choose: left, centre, right, top, middle, bottom — or Align to grid to put items back on the grid
There is no Distribute command yet. See Aligning items.
Grid Settings:
- Items snap to the grid while dragged; hold Ctrl for one free drag
- Display → Display the grid shows or hides the dots
- Display → Text grid sets a finer snap for dragged texts
- Default grid size is set on the General preferences page — see Preferences reference and Grid size and element size
Undo:
- Ctrl+Z (or Cmd+Z on Mac)
- Edit → Undo from menu
- Undo multiple steps repeatedly
Redo:
- Ctrl+Y (or Cmd+Shift+Z on Mac)
- Edit → Redo from menu
- Redo multiple steps repeatedly
Zoom Methods:
- Scroll wheel: Up to zoom in, down to zoom out, around the mouse pointer
- Ctrl++ / Ctrl+− (your platform's standard zoom keys): Magnify or reduce — the bare + and − keys do nothing
- Display → Zoom content (Ctrl+8): fit everything drawn
- Display → Fit in view (Ctrl+9): fit the sheet border
- Display → Reset zoom (Ctrl+0): back to 100 %
Pan (Move View):
- Middle mouse button: Click and drag to pan
- Ctrl+Scroll: Scroll up and down without zooming
- Move (hand icon): the left button pans too, nothing can be edited
Arrow keys move the selection, not the view. Trackpad settings and the full list: Moving around a zoomed-in sheet.
There is no separate "Reports" menu — a nomenclature (bill of materials) or
wiring list is produced through File → Export, or headlessly via the
command line (--export-bom, --export-wiring, --export-nets,
--export-links). See Automating QElectroTech for the
full list and The project database for what each
one actually queries.
File → Print (Ctrl+P) first opens your OS's native print dialog to pick a printer (paper size, duplex, colour vs. grayscale — whatever your driver offers; these are not QET settings). Confirming there opens a print window with a live preview — the same window used for File → Export to PDF, which skips the OS dialog and goes straight here. That window lets you choose which sheets to include, whether to keep conductor colours, and set up the page via a separate Page setup button (disabled on Windows when exporting to PDF). There is no separate "Print Preview" menu item and no manual scale setting — a sheet is fit to the page automatically.
Wire (conductor) labels are ordinary diagram content, not a separate print feature. They print or export as part of the sheet like any other item — there's no toggle to include or exclude them specifically (unlike terminal markers, which do have one — see Preferences reference §3).
QET has no built-in physical wire-marker/ferrule label printer. For
that, export the wiring list as CSV (Project menu, or --export-wiring)
and feed it into a label printer's own software — see
Automating QElectroTech, which covers the real-world
workflow (Brady, WAGO, Phoenix Contact) and a known limitation with
duplicate rows on large jobs.
Export Formats:
- PDF — Professional documents, best for sharing
- PNG — Raster image, good for web
- SVG — Vector format, editable in other software
- DXF — CAD format for collaboration (outlines and text only, see limitations)
Export Process:
- Select sheet(s) to export
- File → Export
- Choose format and location
- Configure export options
- Click Export
Settings → Configure QElectroTech opens five pages: General, New project, Export, Print and Shortcuts. There is no separate "Display" or "Grid" category — both live inside General. See Preferences reference for what each page actually controls.
Using the element editor covers drawing an element in
QET's built-in editor — tools, terminal placement, and the save-time checks.
Linking elements covers making it a master, slave or
terminal. Elements XML documents the resulting file
format directly, for anyone generating .elmt files without the editor.
Managing collections covers organizing folders, moving and deleting elements, and which of the three collections (common/custom/company) you can actually write to.
QET has no built-in multi-user or shared-editing feature — a .qet file is
edited by one instance at a time, the same way any other document is (see
The project database for why: even the in-memory
query cache is per-process, not shared). Two practical options if several
people need to work on the same project:
- Split by sheet. Since a project is sheets inside one file, agreeing who owns which sheet avoids collisions entirely.
-
Version control (Git or similar) on the
.qetfile. This works for taking turns, but a genuine merge conflict is a conflict in raw XML, not a structured diagram merge — resolving one means editing the XML by hand or picking one side wholesale. Plan for "one person at a time," not simultaneous editing.
QET has no embedded scripting language. Automation is done from the outside:
- the headless command line —
--export-pdf,--export-bom,--export-wiringand more, with real exit codes for use in scripts -
direct XML editing —
.qetand.elmtare plain XML
See Automating QElectroTech and the CLI Reference.
"Element won't connect to wire"
- Click directly on terminal (small dot)
- Not all points on element are connectable
- Check element properties for terminal definitions
"Wires crossing without connecting"
- Wires only connect at terminals
- Crossing lines don't automatically join
- Use explicit connection at terminal points
"Diagram is slow/laggy"
- Large projects with many elements slow responsiveness
- Reduce zoom level to improve performance
- Disable grid display if not needed
- Close unnecessary panels
"File won't open"
- Corrupted file or compatibility issue
- Try opening in text editor to check XML validity
- Restore from backup if available
| Action | Windows/Linux | macOS |
|---|---|---|
| New | Ctrl+N | Cmd+N |
| Open | Ctrl+O | Cmd+O |
| Save | Ctrl+S | Cmd+S |
| Ctrl+P | Cmd+P | |
| Undo | Ctrl+Z | Cmd+Z |
| Redo | Ctrl+Y | Cmd+Shift+Z |
| Select All | Ctrl+A | Cmd+A |
| Copy | Ctrl+C | Cmd+C |
| Paste | Ctrl+V | Cmd+V |
| Delete | Delete | Delete |
| Rotate selection | Space | Space |
| Rotate group as one | Shift+Space | Shift+Space |
| Zoom In | Ctrl++ | Cmd++ |
| Zoom Out | Ctrl+- | Cmd+- |
| Zoom on content (fit everything drawn) | Ctrl+8 | Cmd+8 |
| Fit to Page | Ctrl+9 | Cmd+9 |
| No zoom (100 %) | Ctrl+0 | Cmd+0 |
- Quick Start Guide — Getting started
- Tips & Tricks — Advanced workflows
- FAQ — Common questions
- Official Manual — Full documentation
- Forum — Community help
- FAQ — Quick answers
- Forum — Ask the community (very active!)
- Issues — Report bugs
- Creating Elements — Build custom components
