Pharmacy Stock Transfer Request Issue Receive
This guide walks pharmacy and store staff through the complete inter-department stock transfer workflow, where one department requests stock from another, the supplying department issues it to a staff member, and the requesting department receives it into their stock.
The workflow has three stages, performed by two departments:
| Stage | Performed by | Result |
|---|---|---|
| 1. Request | Requesting department | A transfer request is created, finalized, and approved |
| 2. Issue | Supplying department | Stock is issued to a carrying staff member |
| 3. Receive | Requesting department | Stock is received into the requesting department |
Throughout this guide we use a worked example: the GRO department requesting store items from General Stores.
- You must be logged in and have the Pharmacy Disbursement privileges for the actions you perform.
- The requesting department can only request item types it is configured to stock.
- The supplying department must have the requested items in stock.
To switch between departments during this workflow, use Logout (top-right of the menu bar) and log back in, then select the correct department on the Select Department screen.
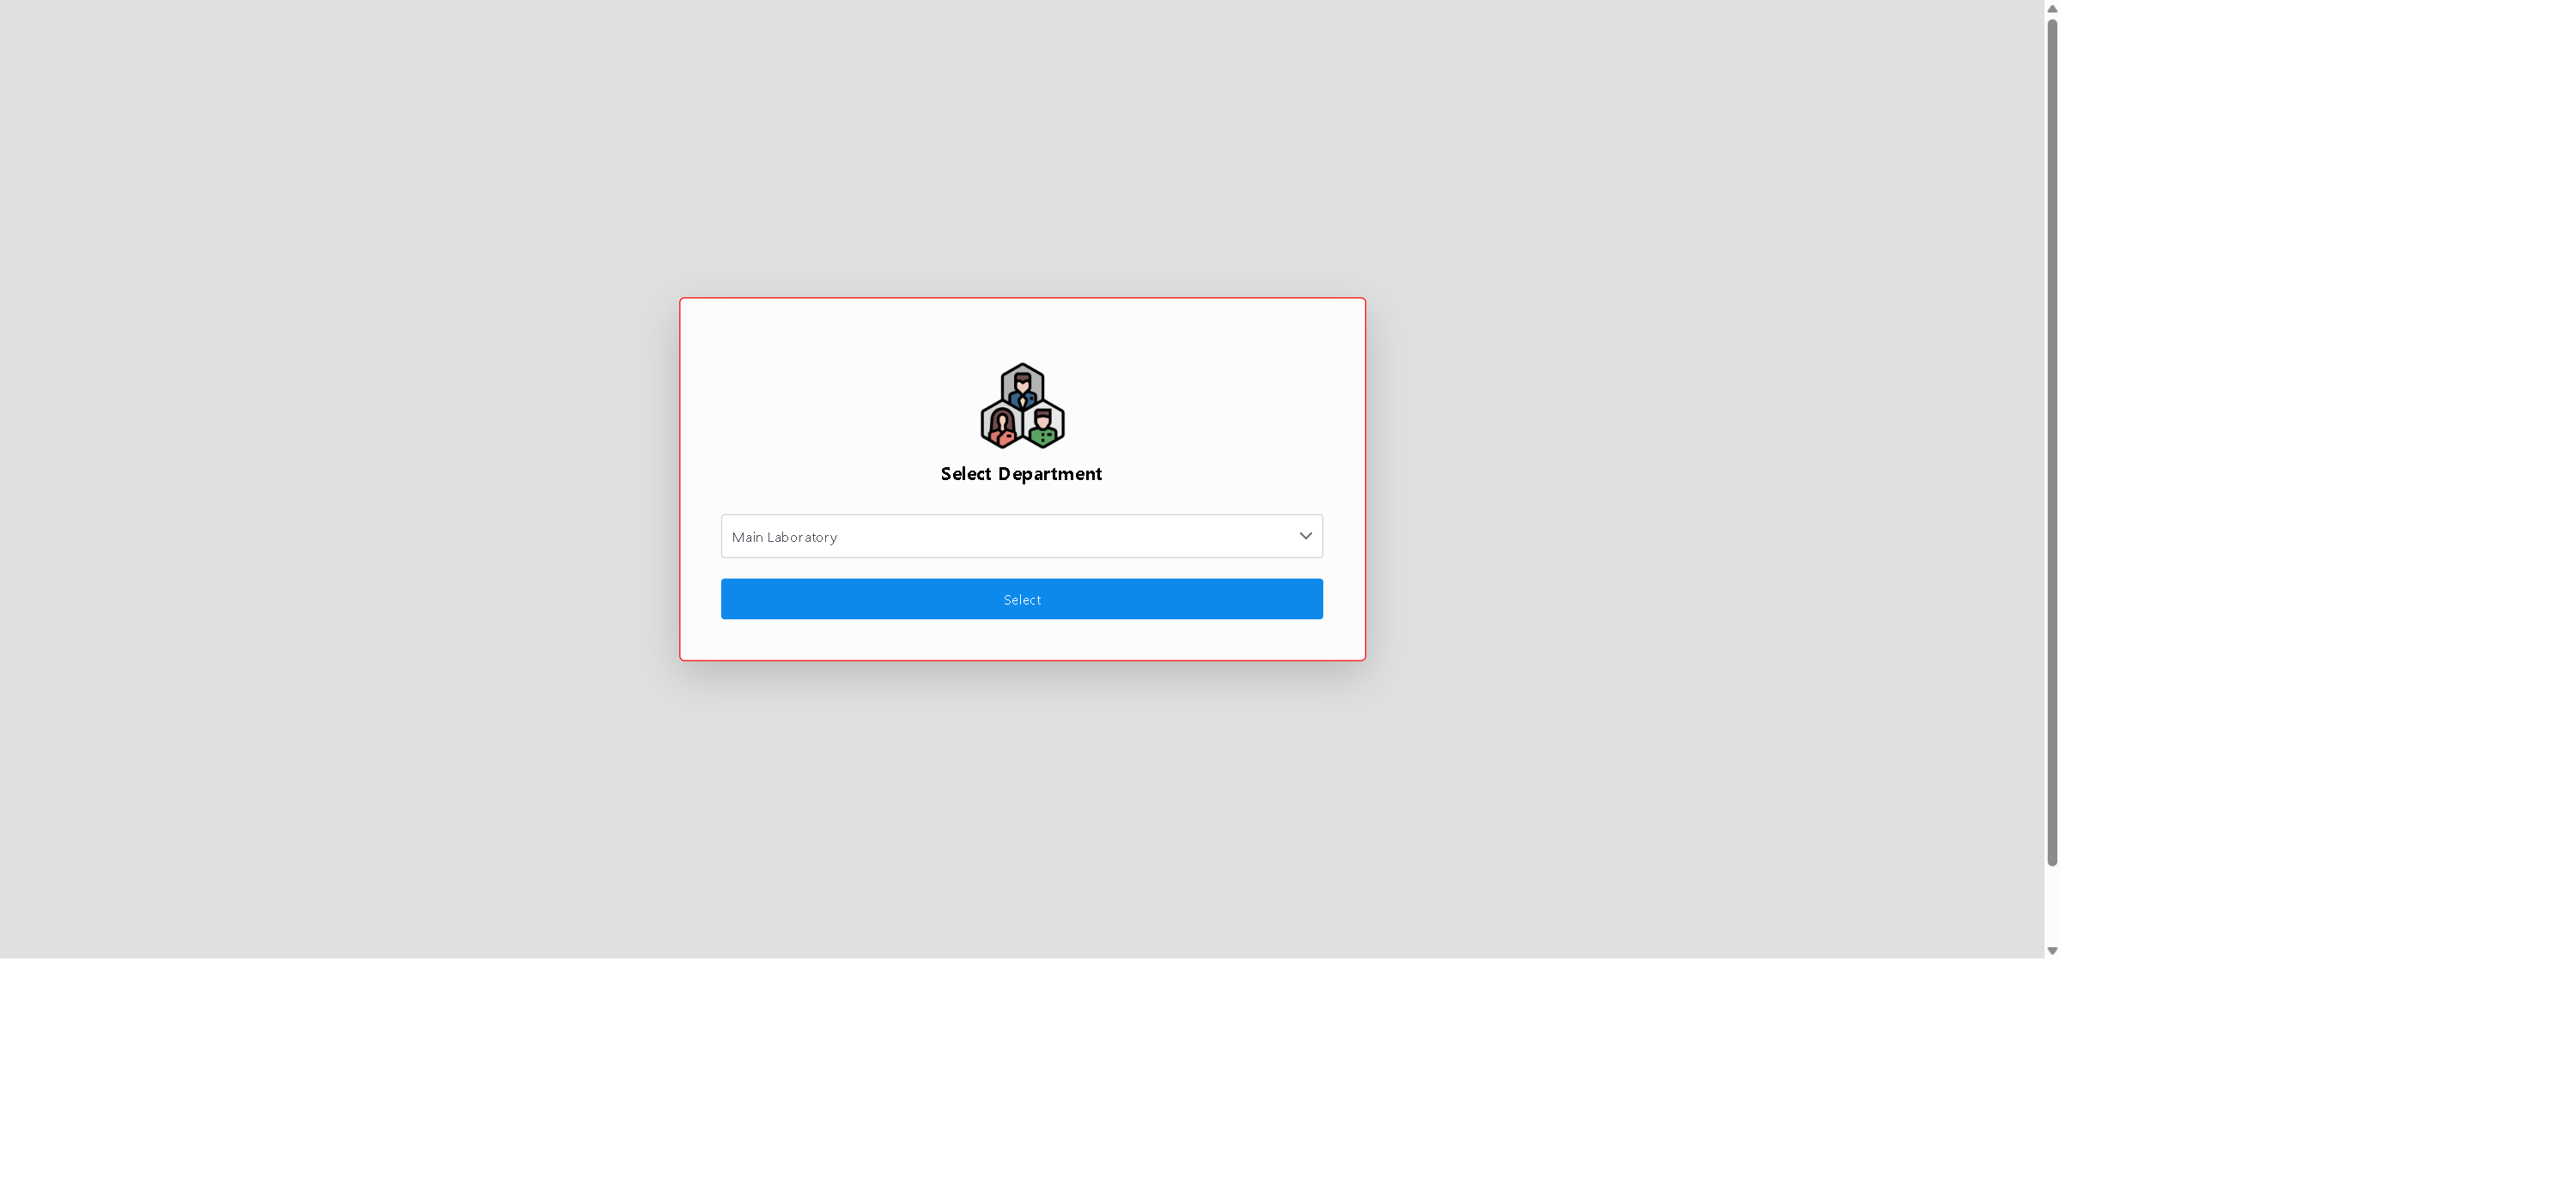
Performed while logged in to the requesting department (GRO in this example).
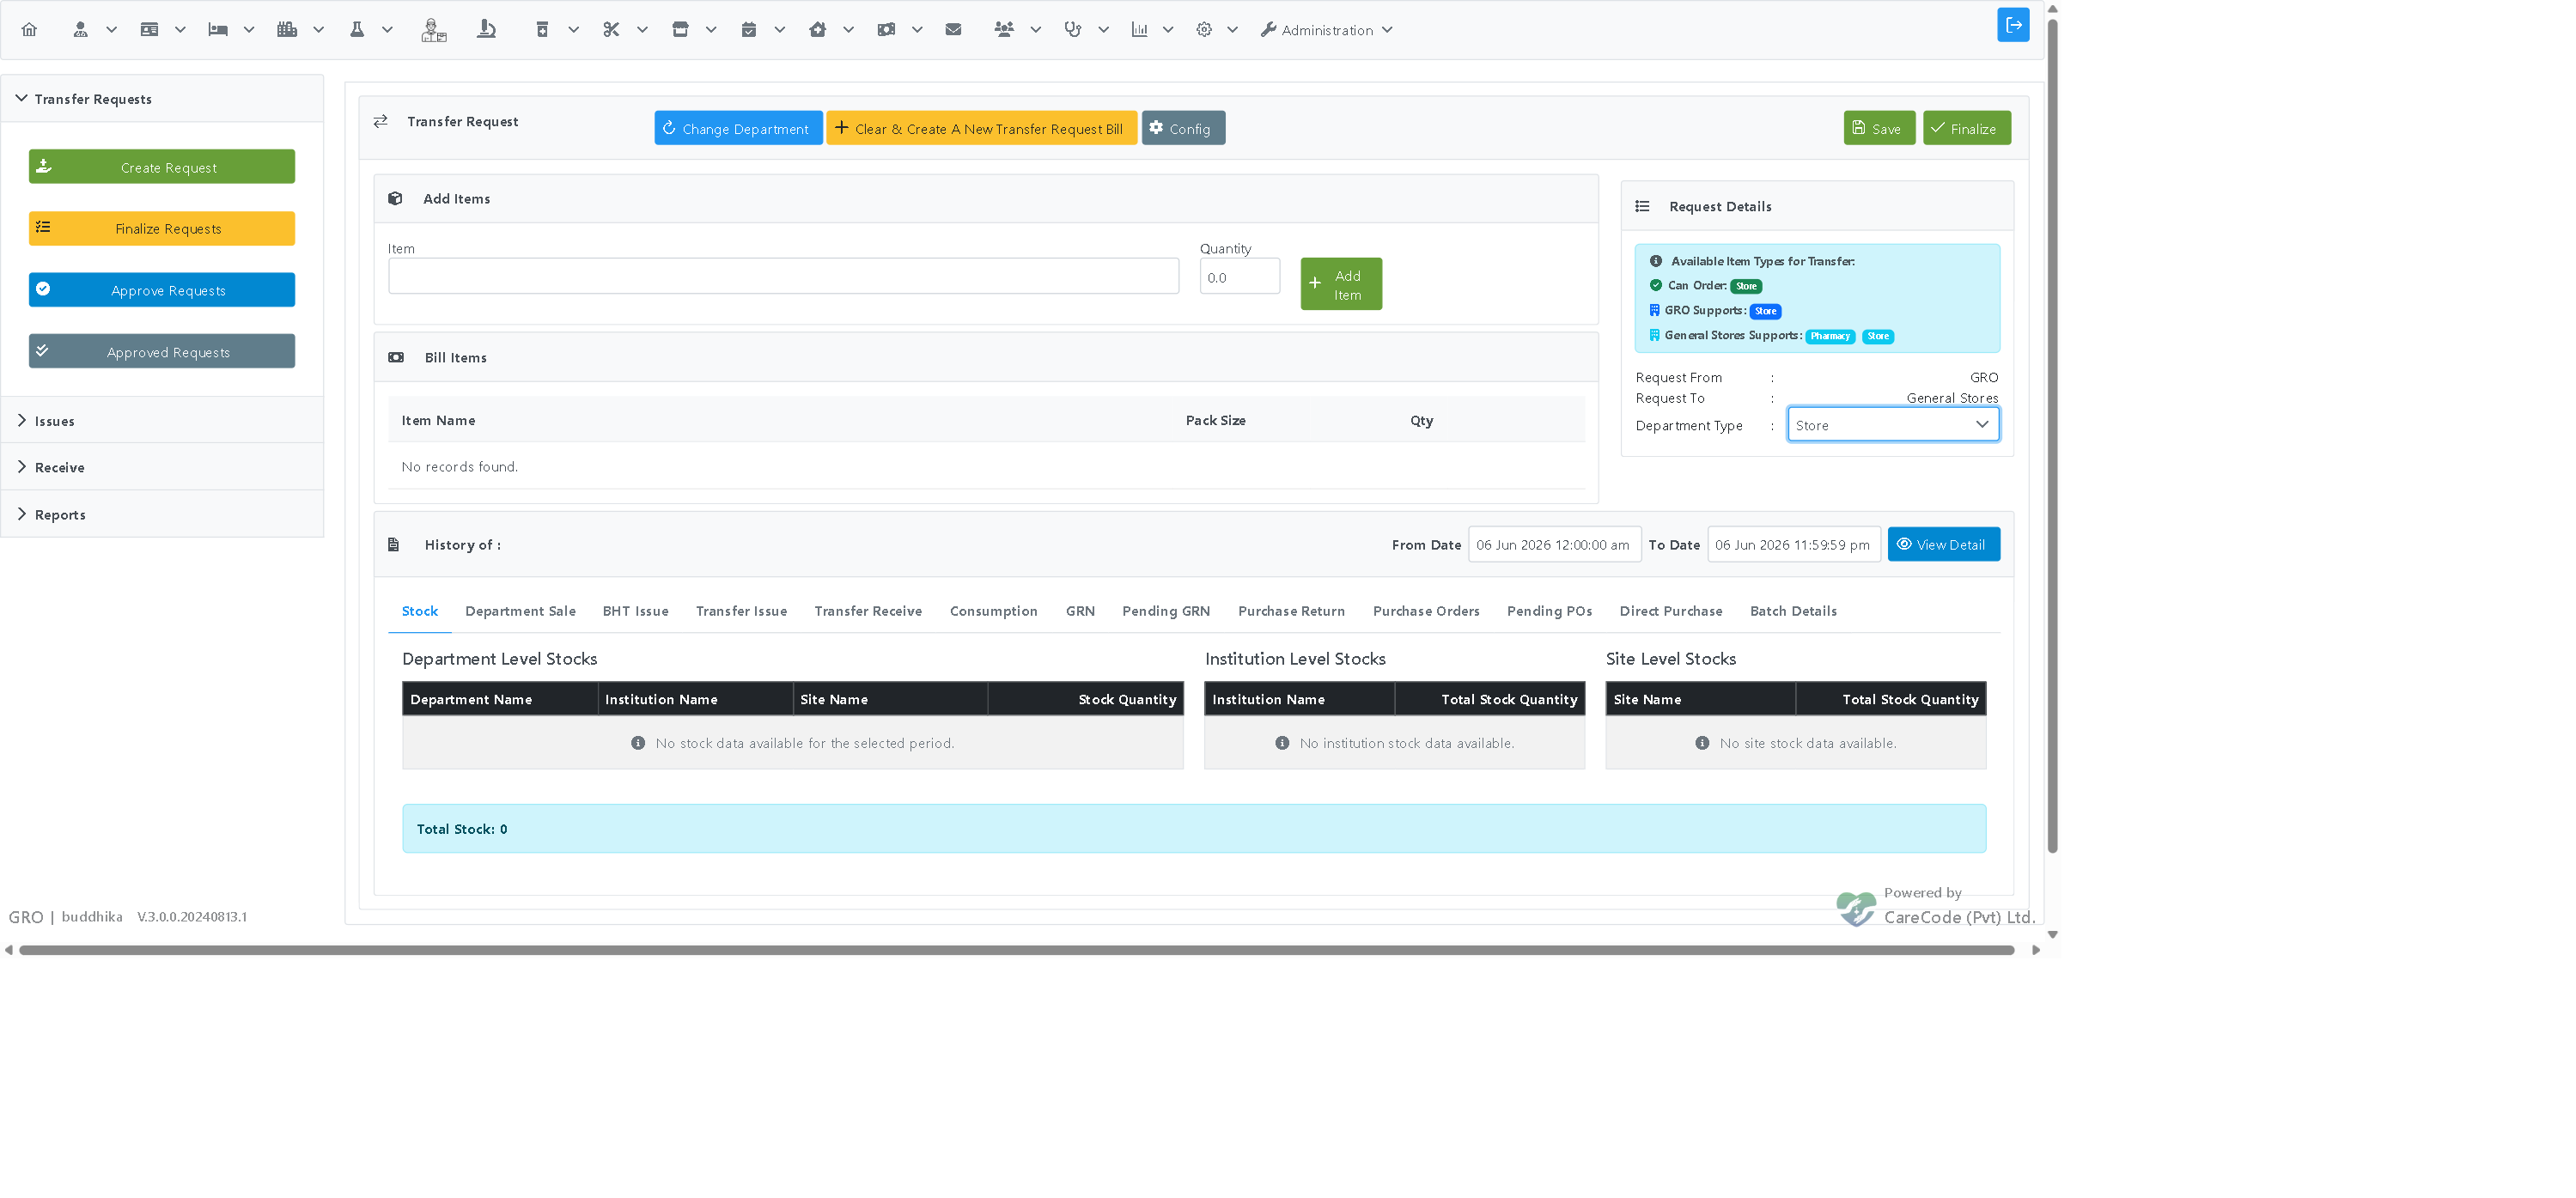
Go to Pharmacy > Disbursement. The Disbursement Management screen opens with tabs for Transfer Requests, Issues, Receive, and Reports.
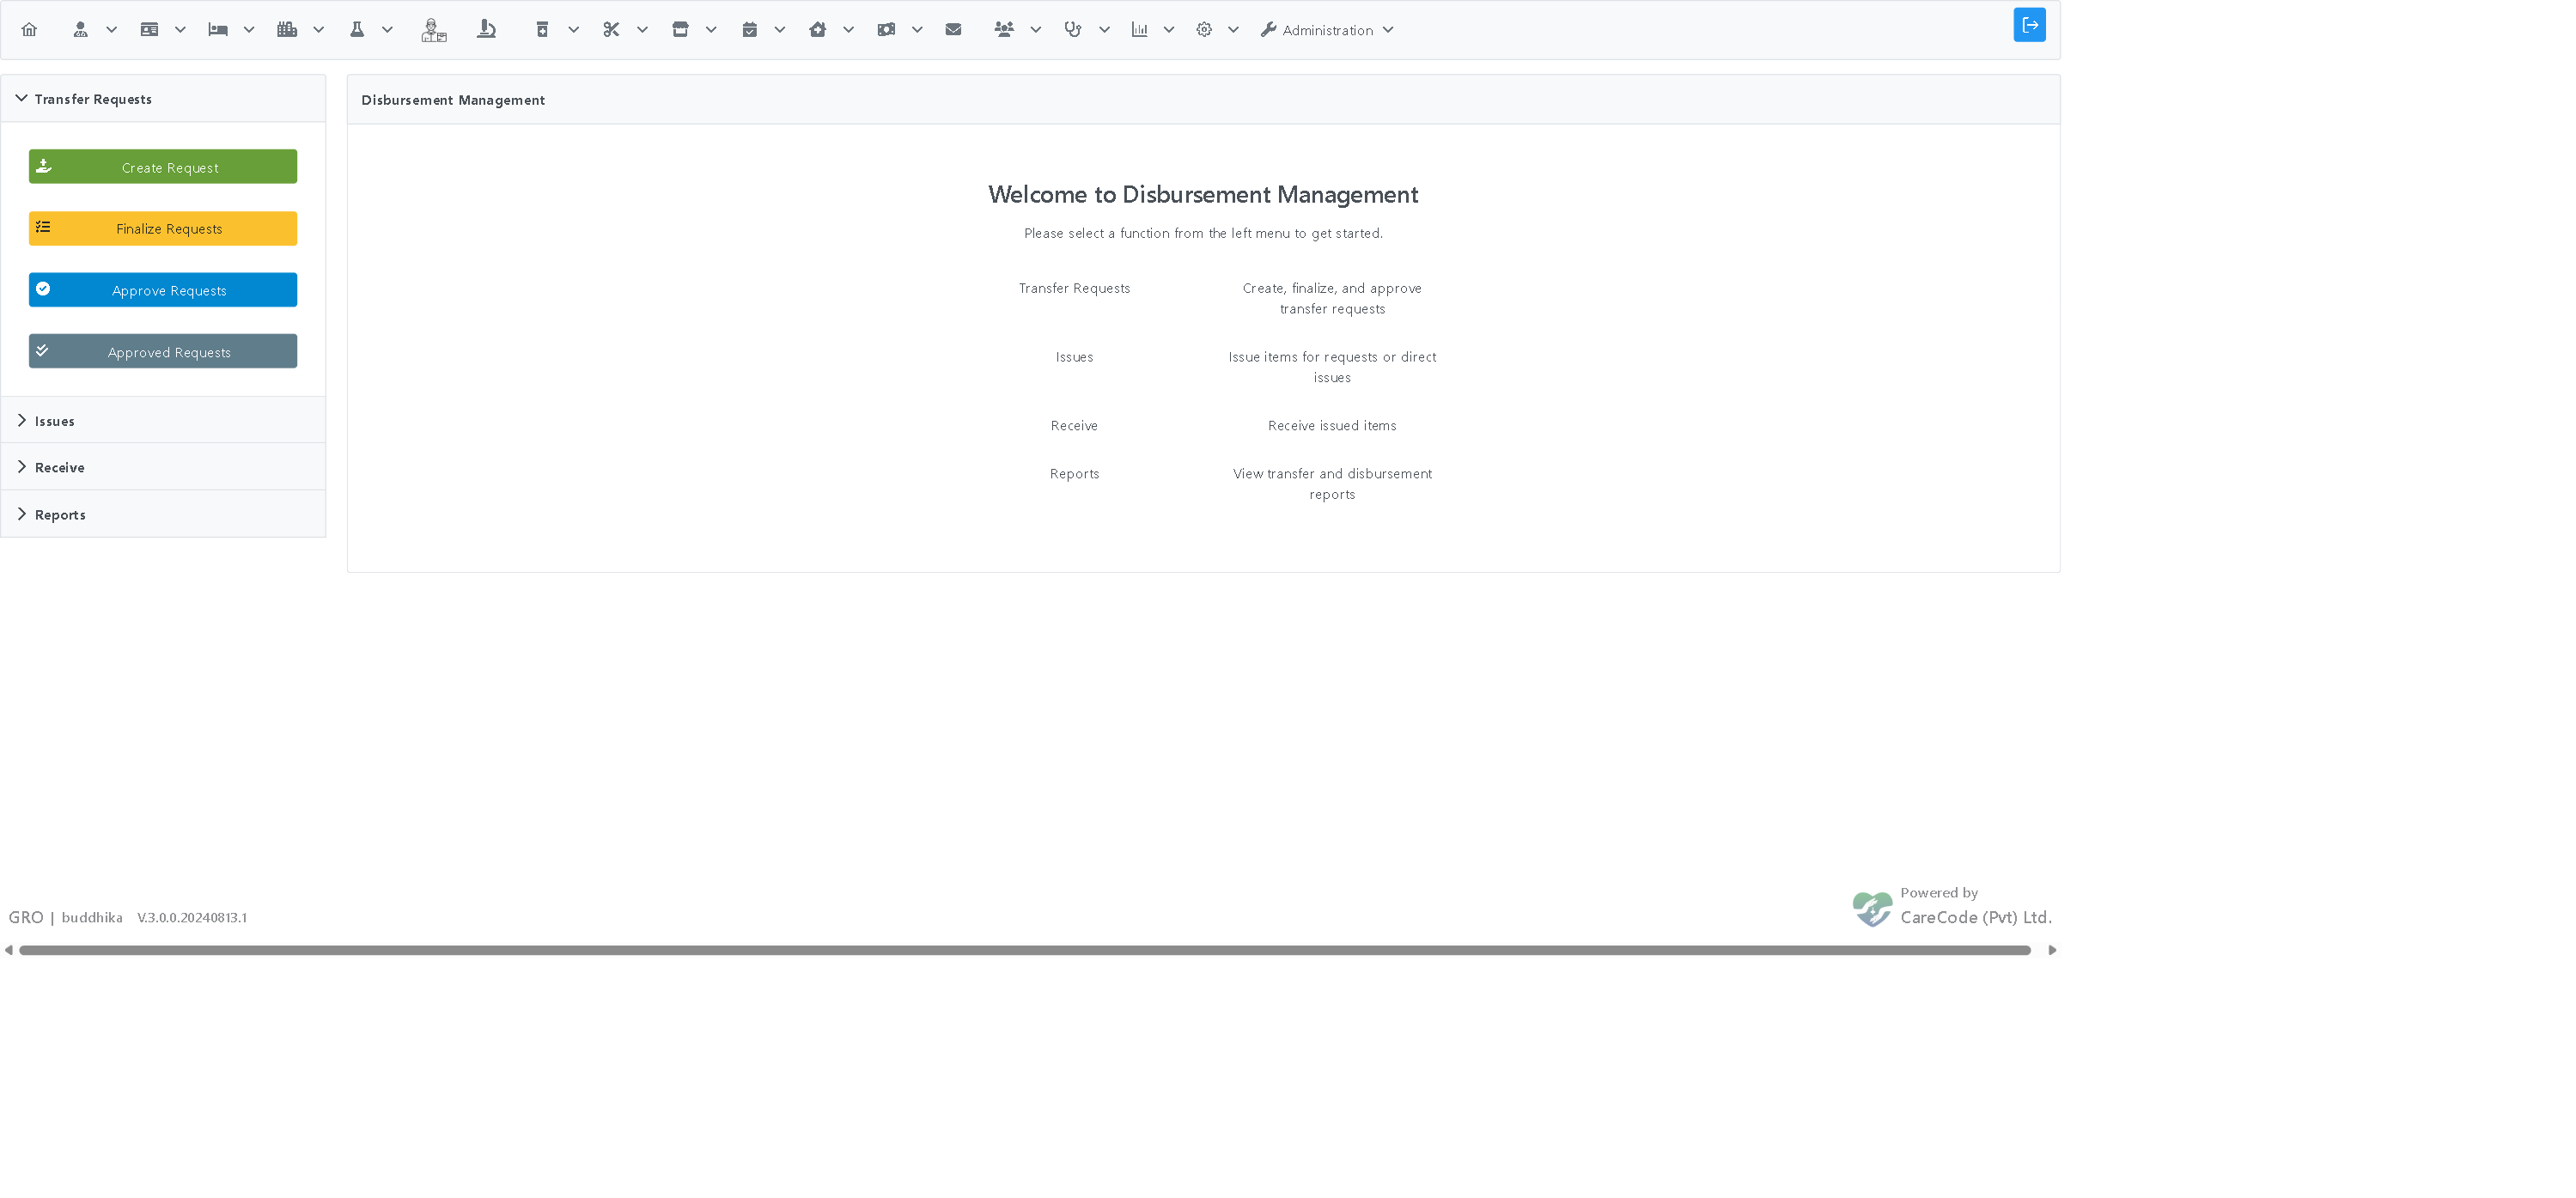
On the Transfer Requests tab, click Create Request. Select the department you are requesting from — either from the dropdown or from the Departments with Recent Requests Sent To quick-pick buttons.
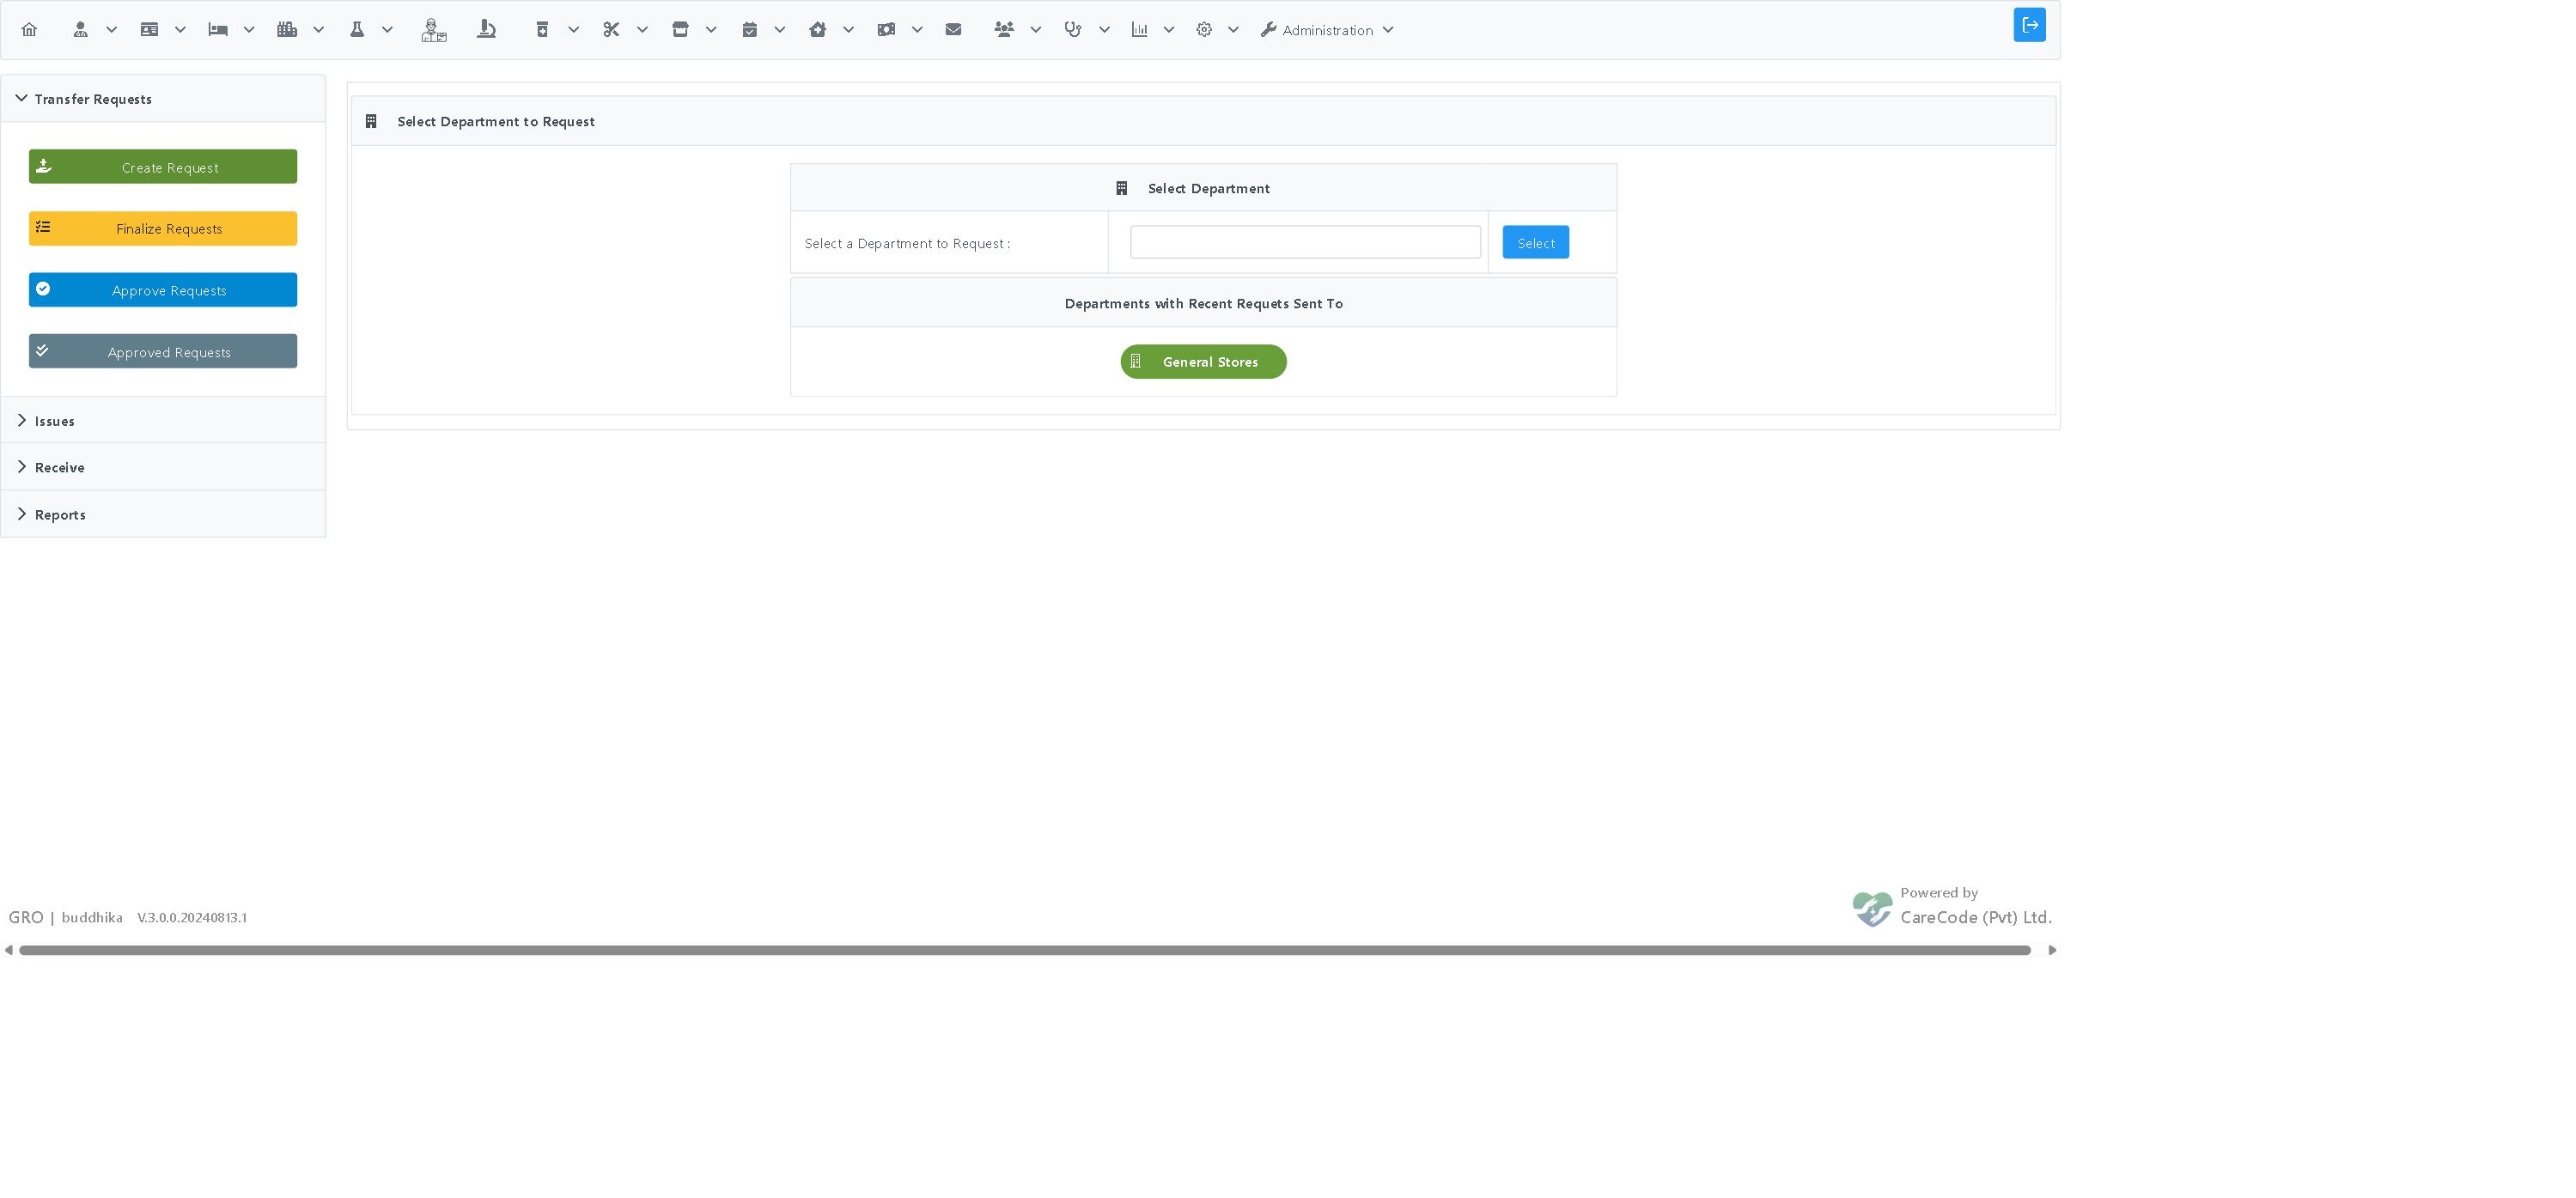
Once a department is selected, the request form shows Request From (your department) and Request To (the supplying department), along with the item types each department supports.
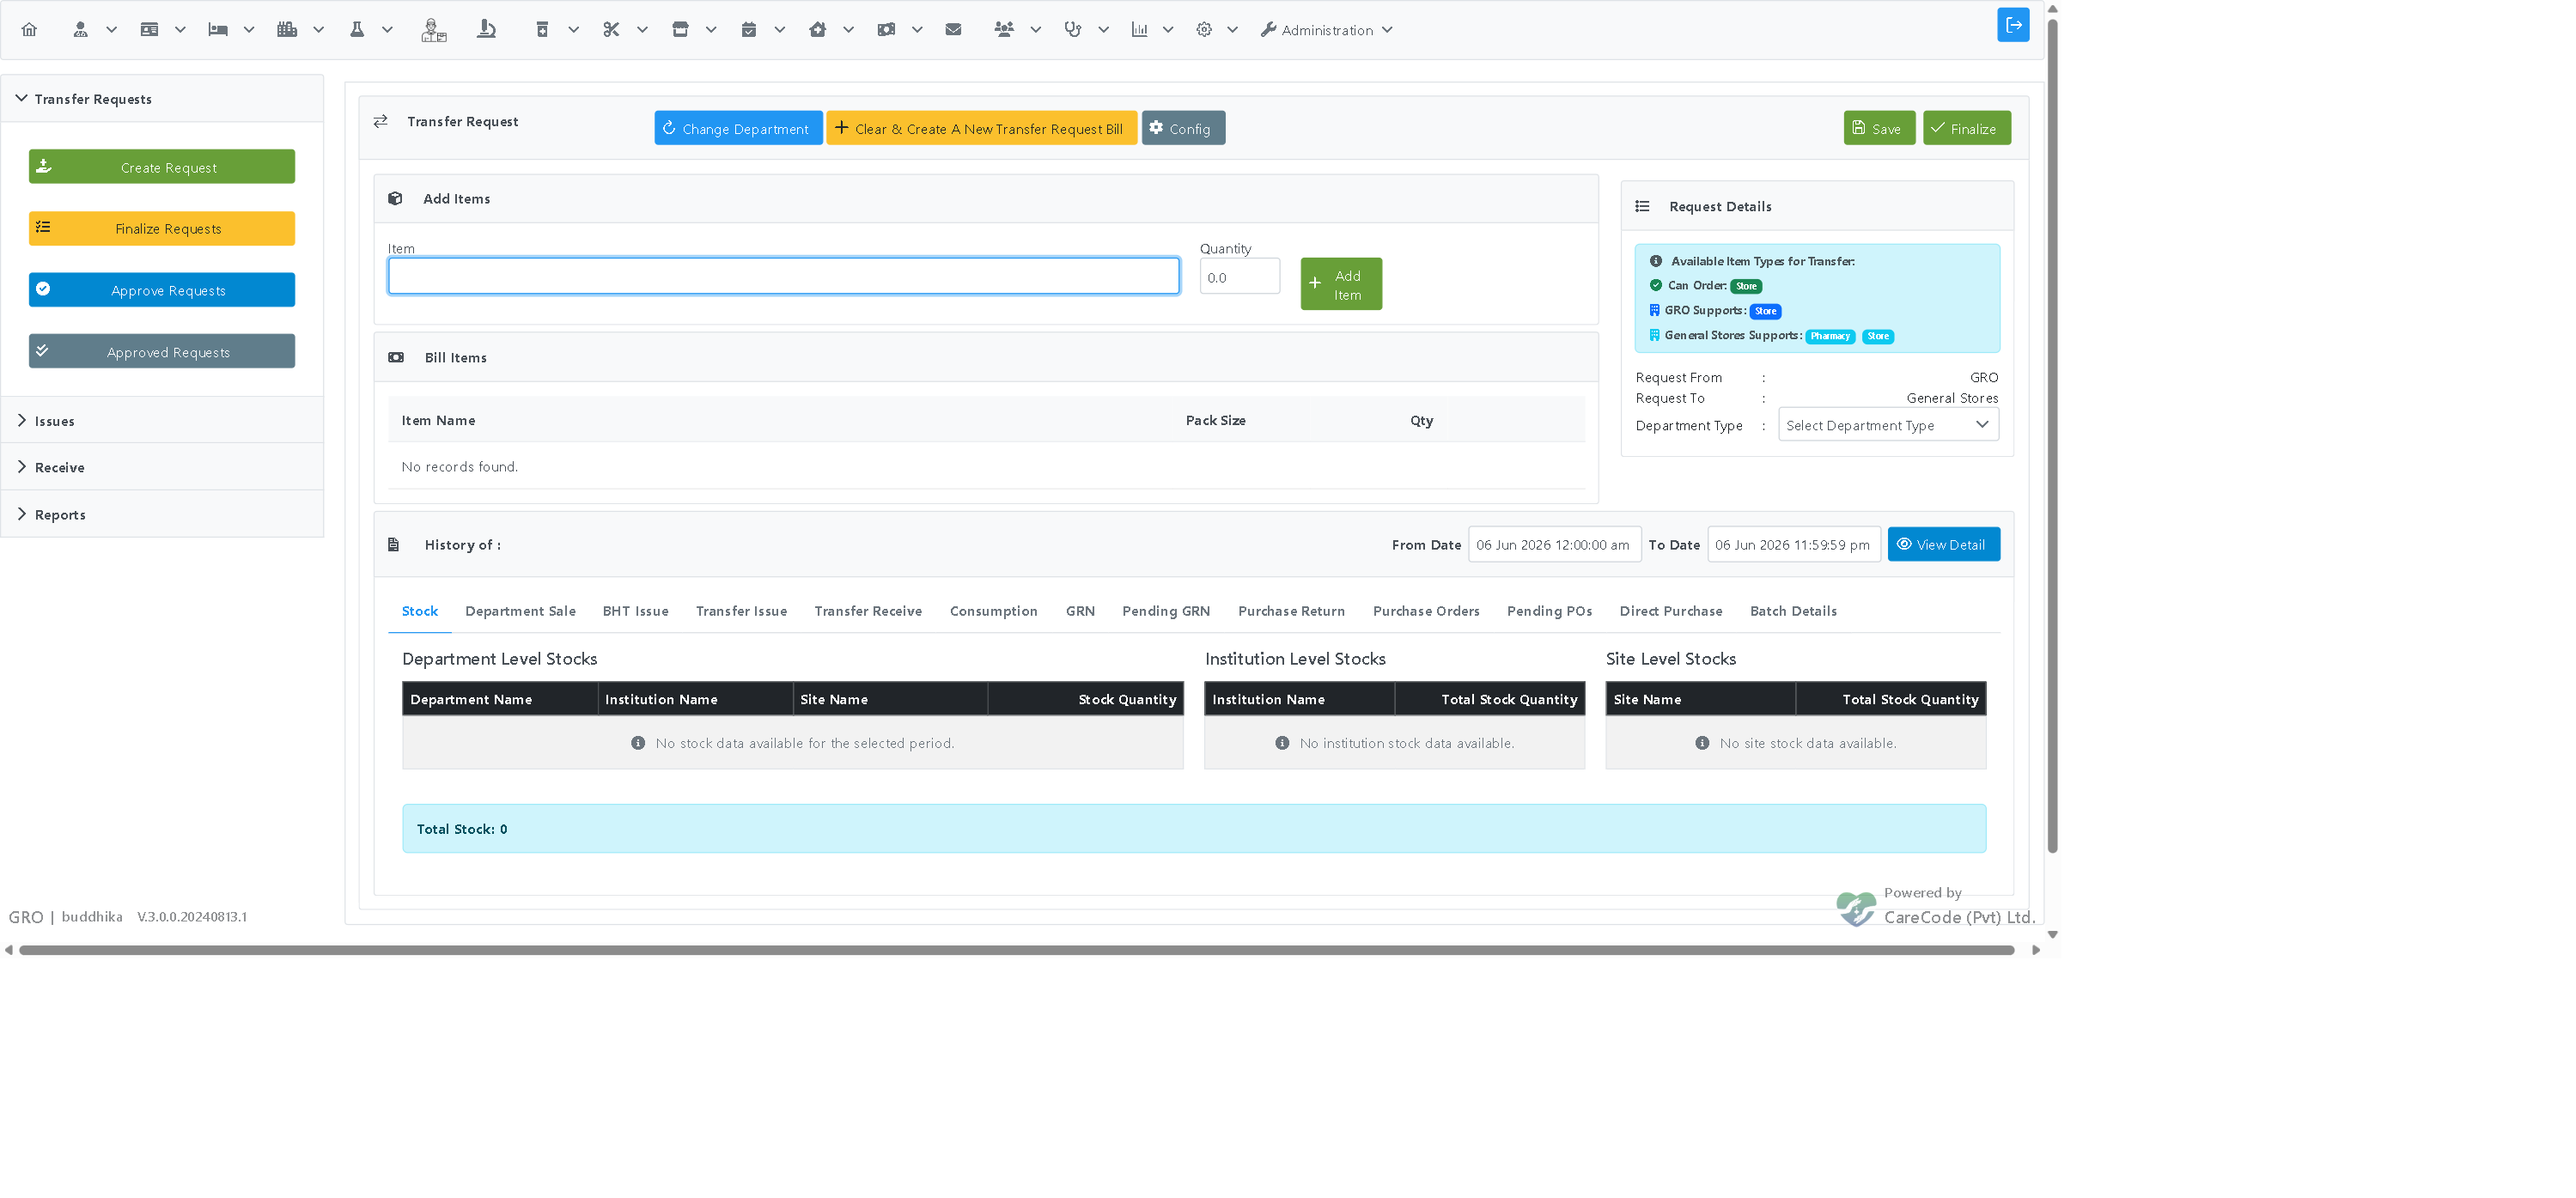
- Set the Department Type (for store consumables this is Store).
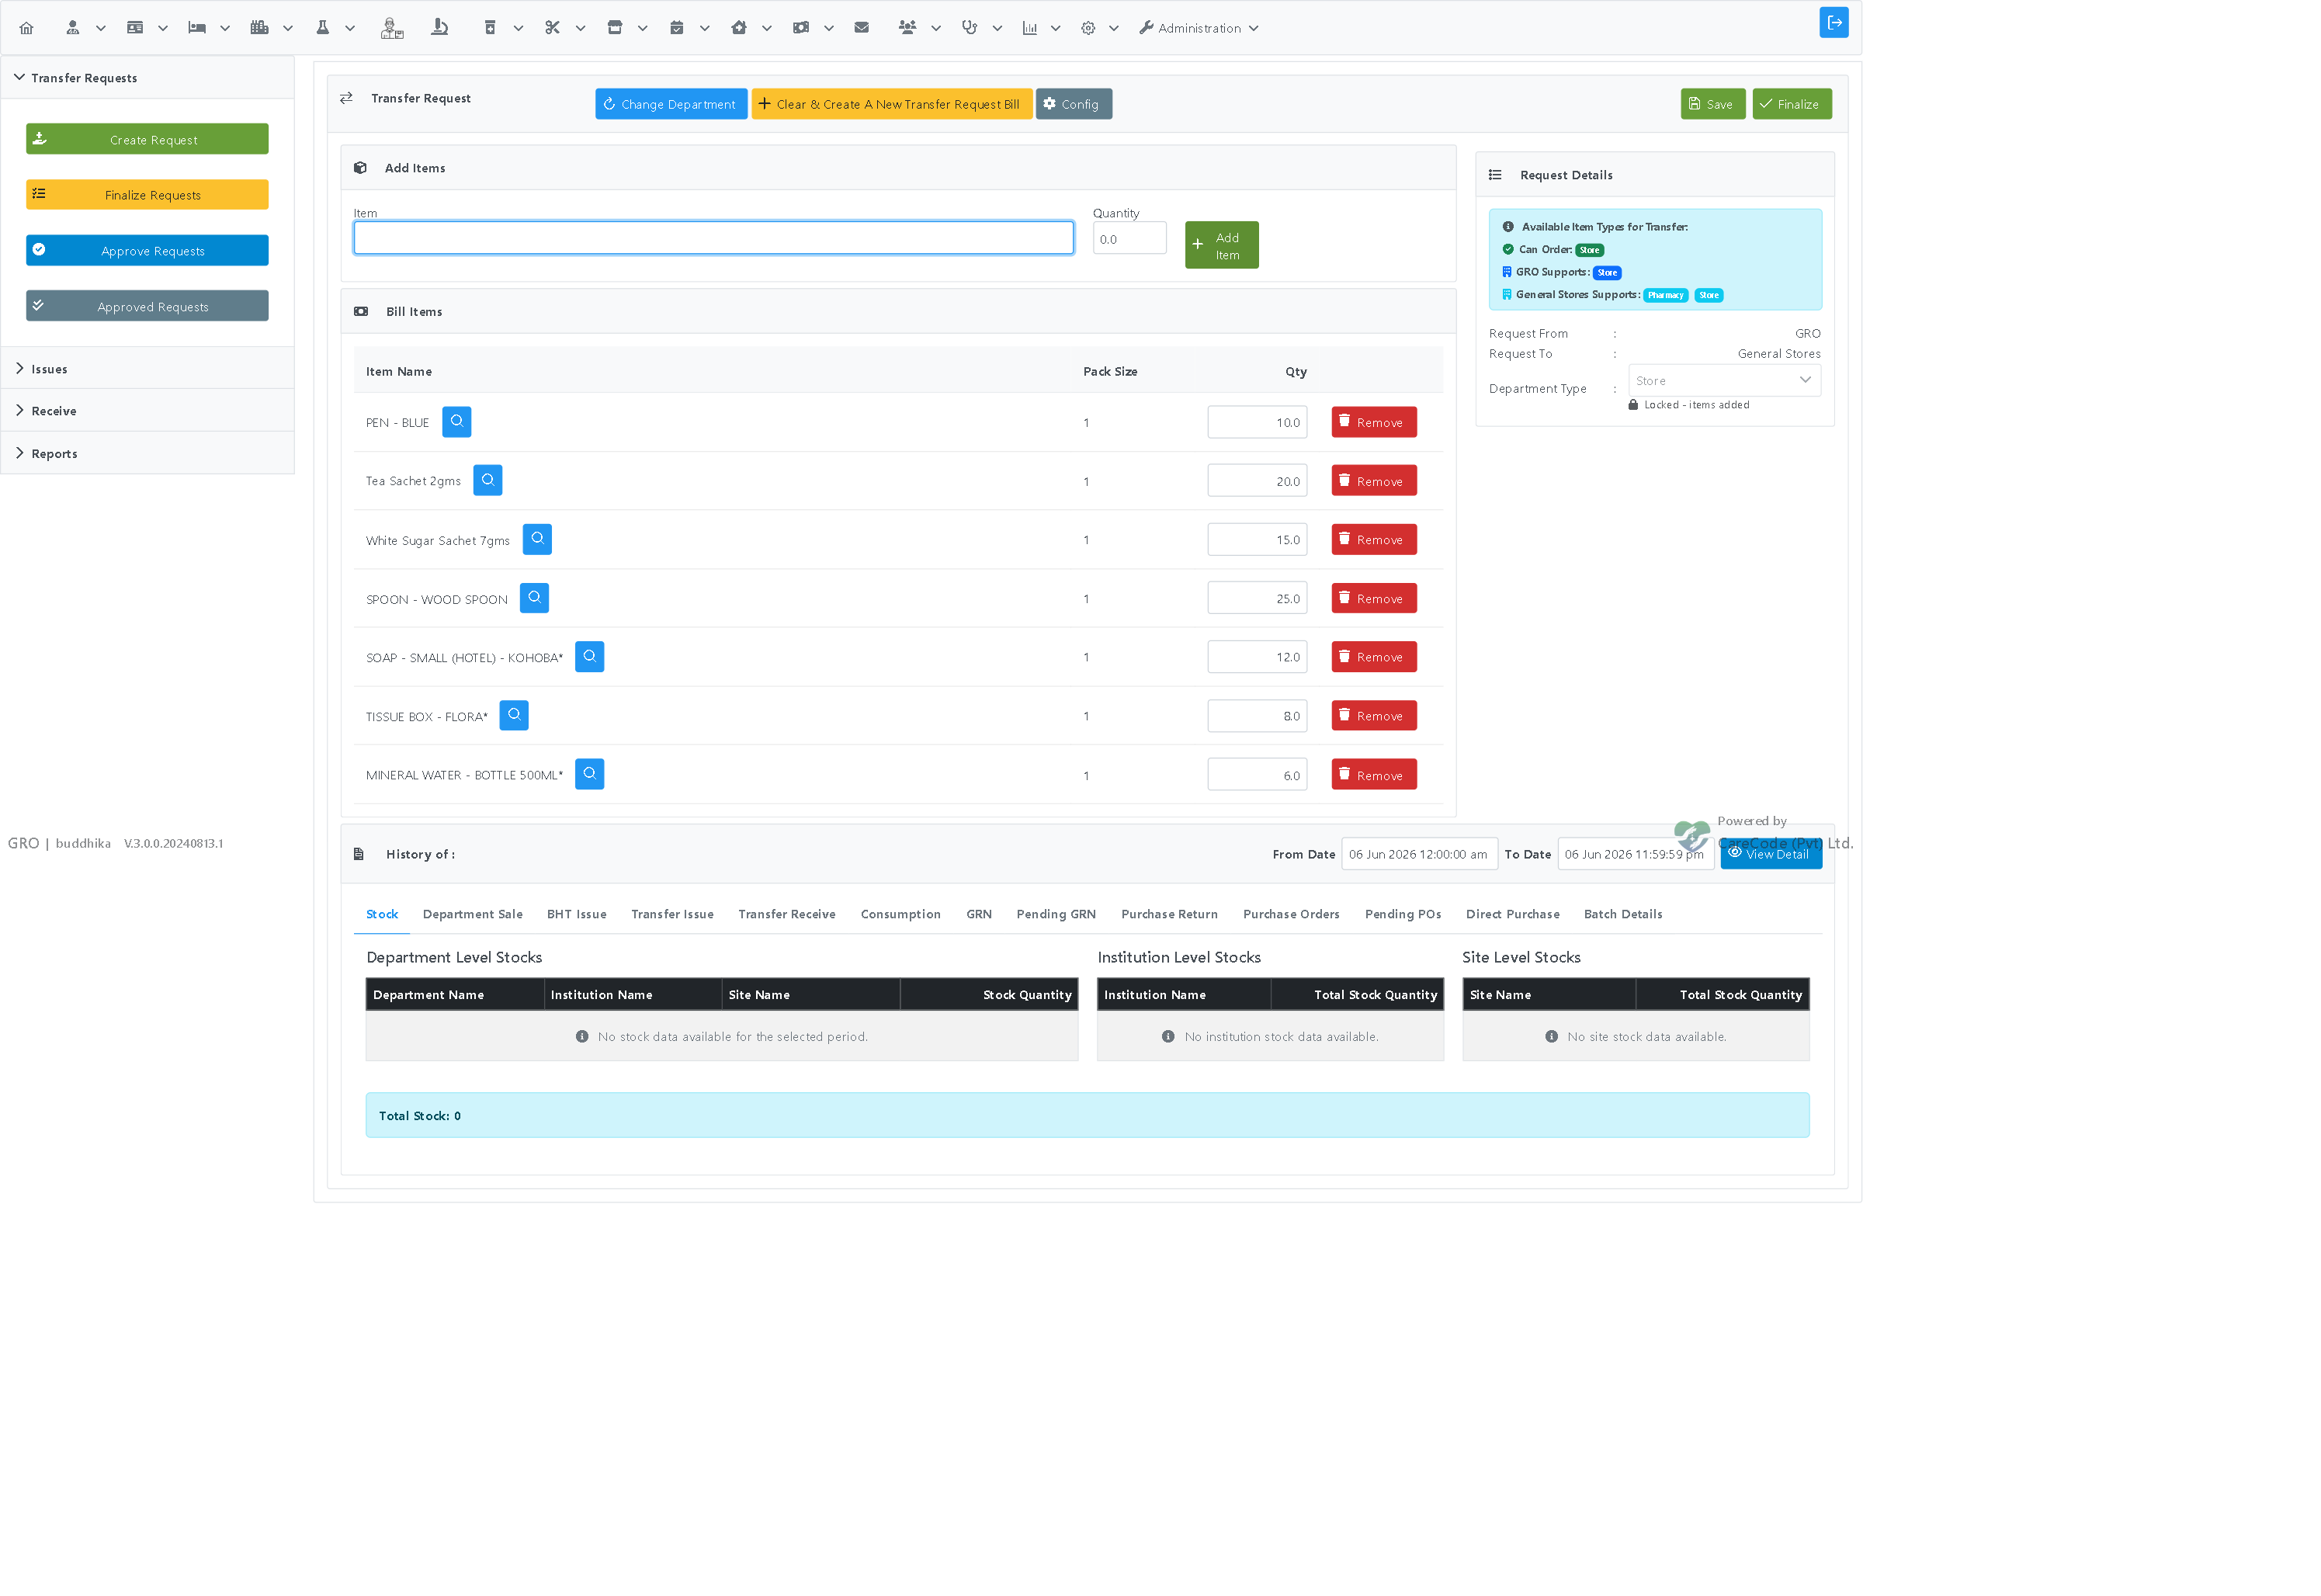
- In the Add Items section, type part of an item name in the Item box. A suggestion list appears.
- Select the item, enter the Quantity, and click Add Item.
Tip — keyboard entry: You can add items entirely from the keyboard. Type the item name, press Enter to select the highlighted suggestion, type the quantity, then press Enter again to add the row. The cursor returns to the Item box ready for the next item.
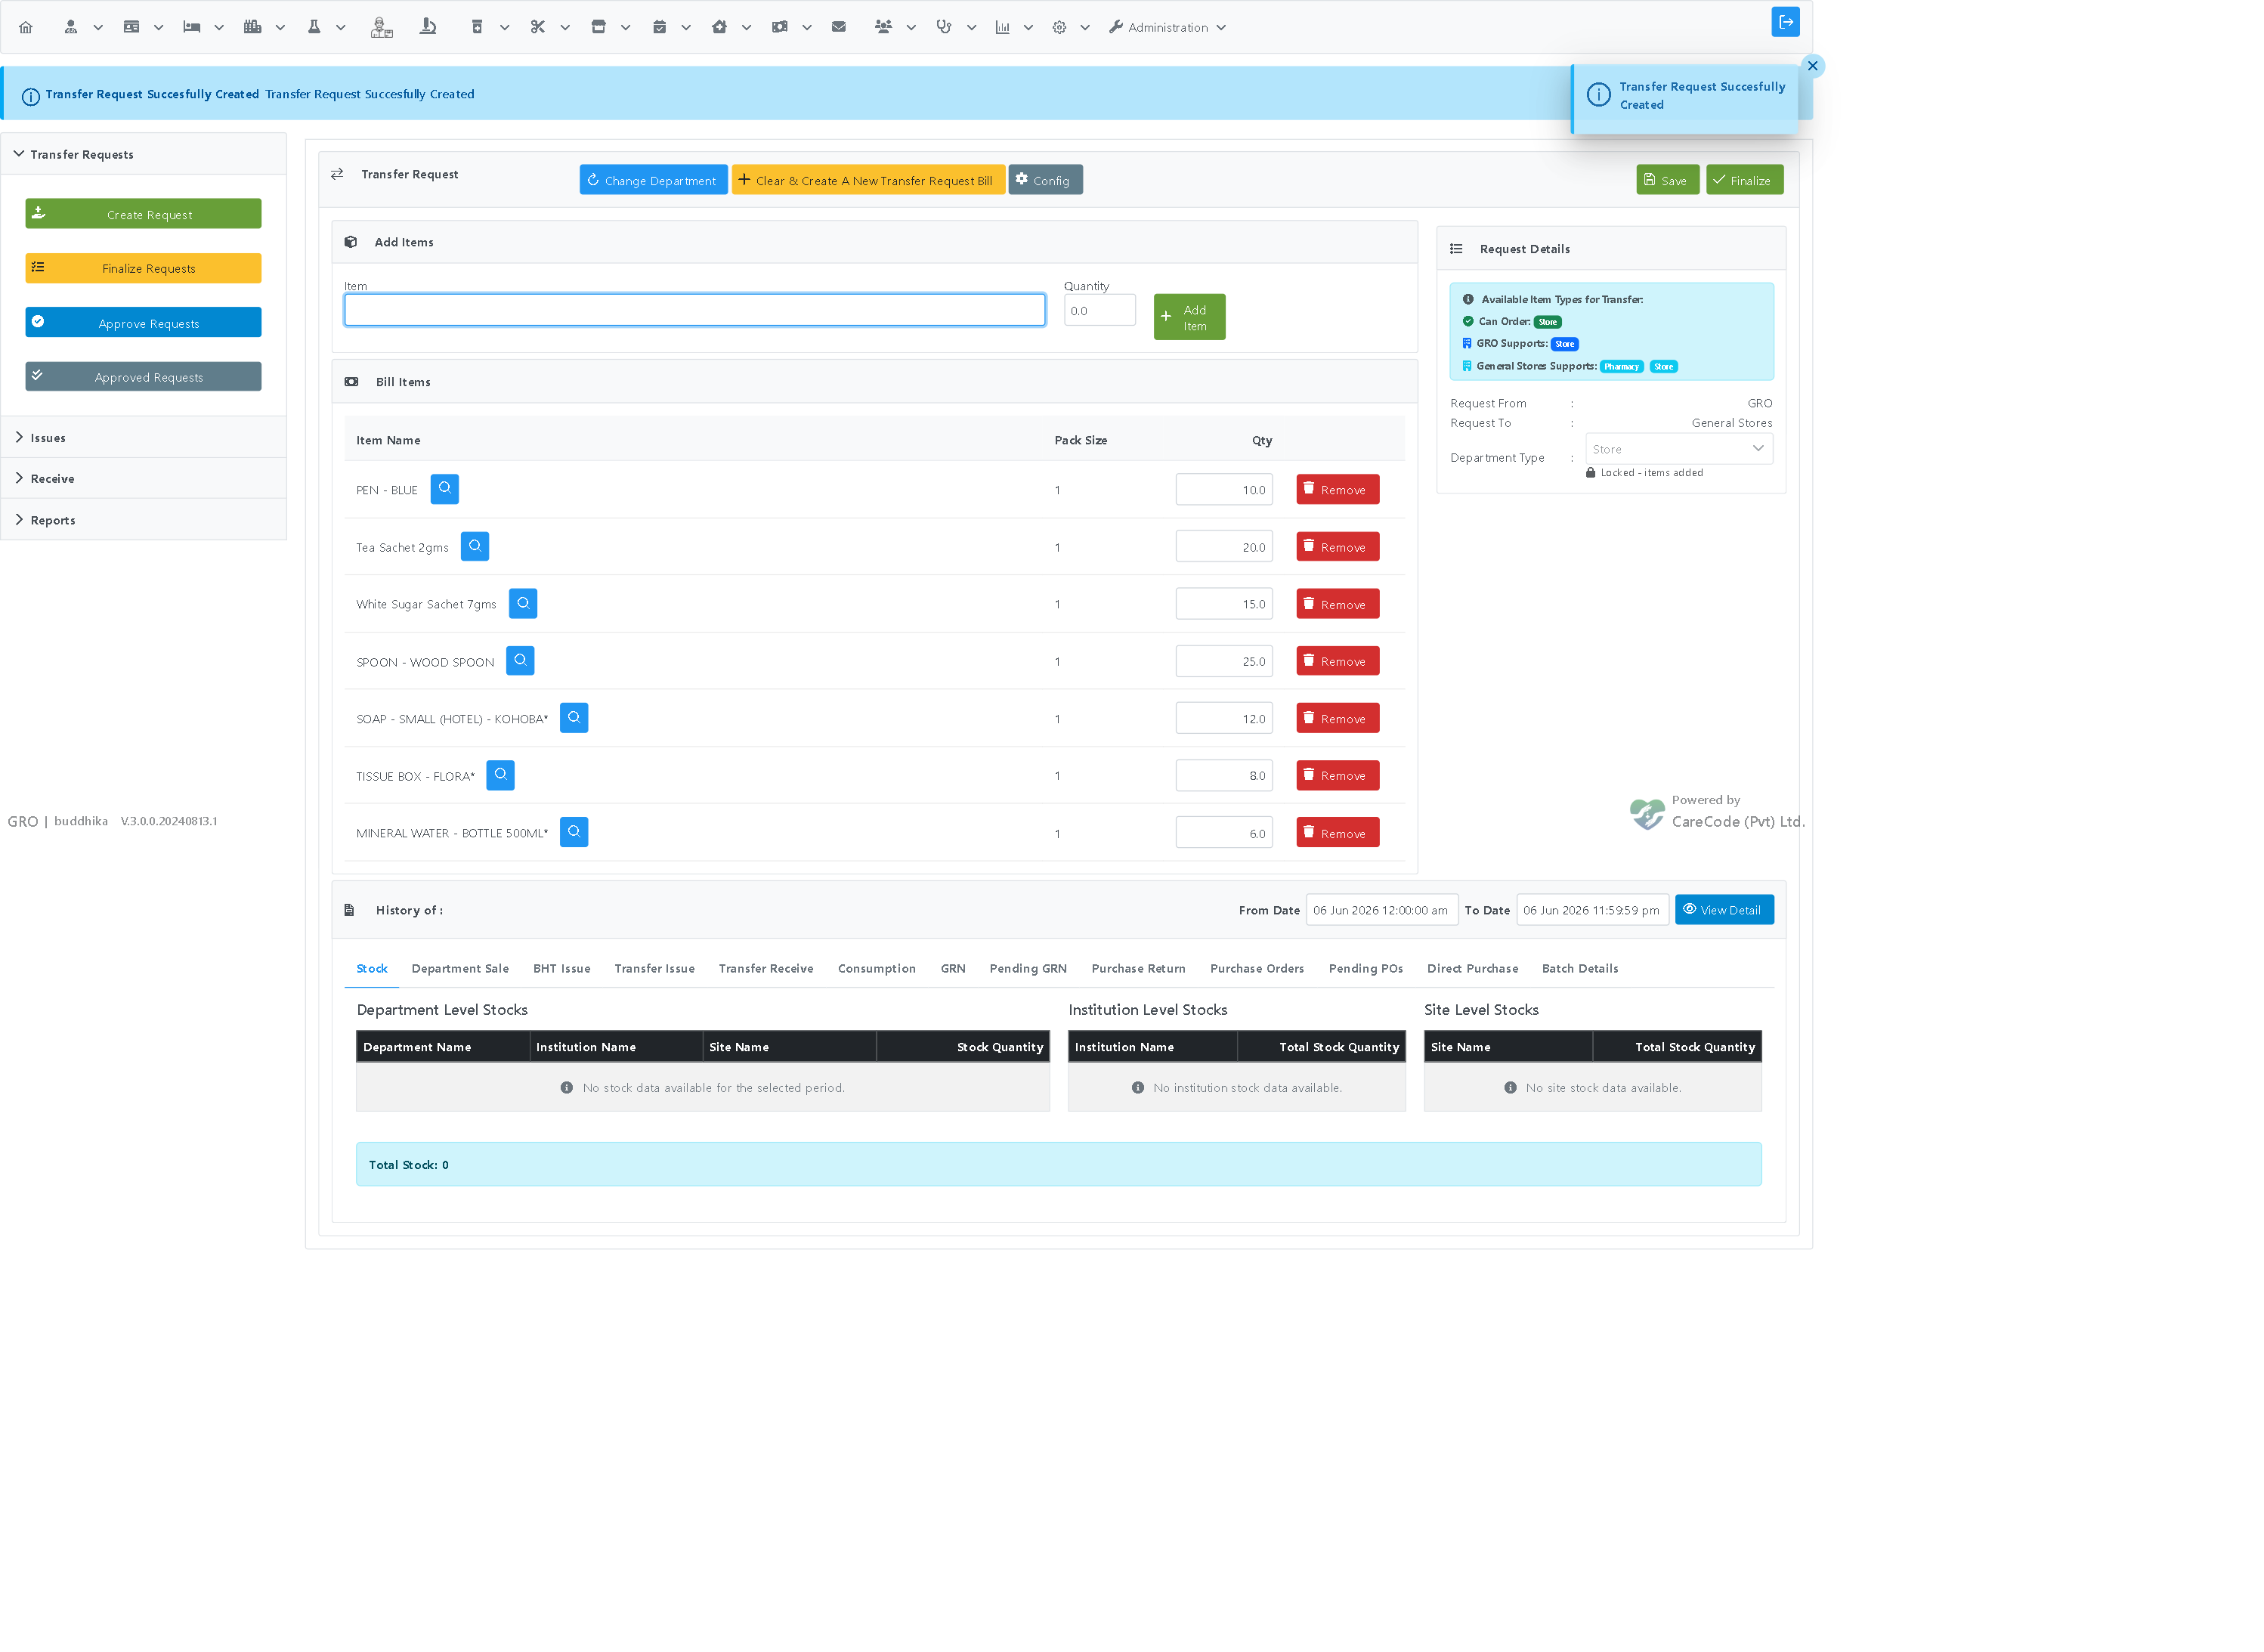
Each added item appears in the Bill Items list with its quantity.
Repeat until all required items are listed. In the example, seven items were added.
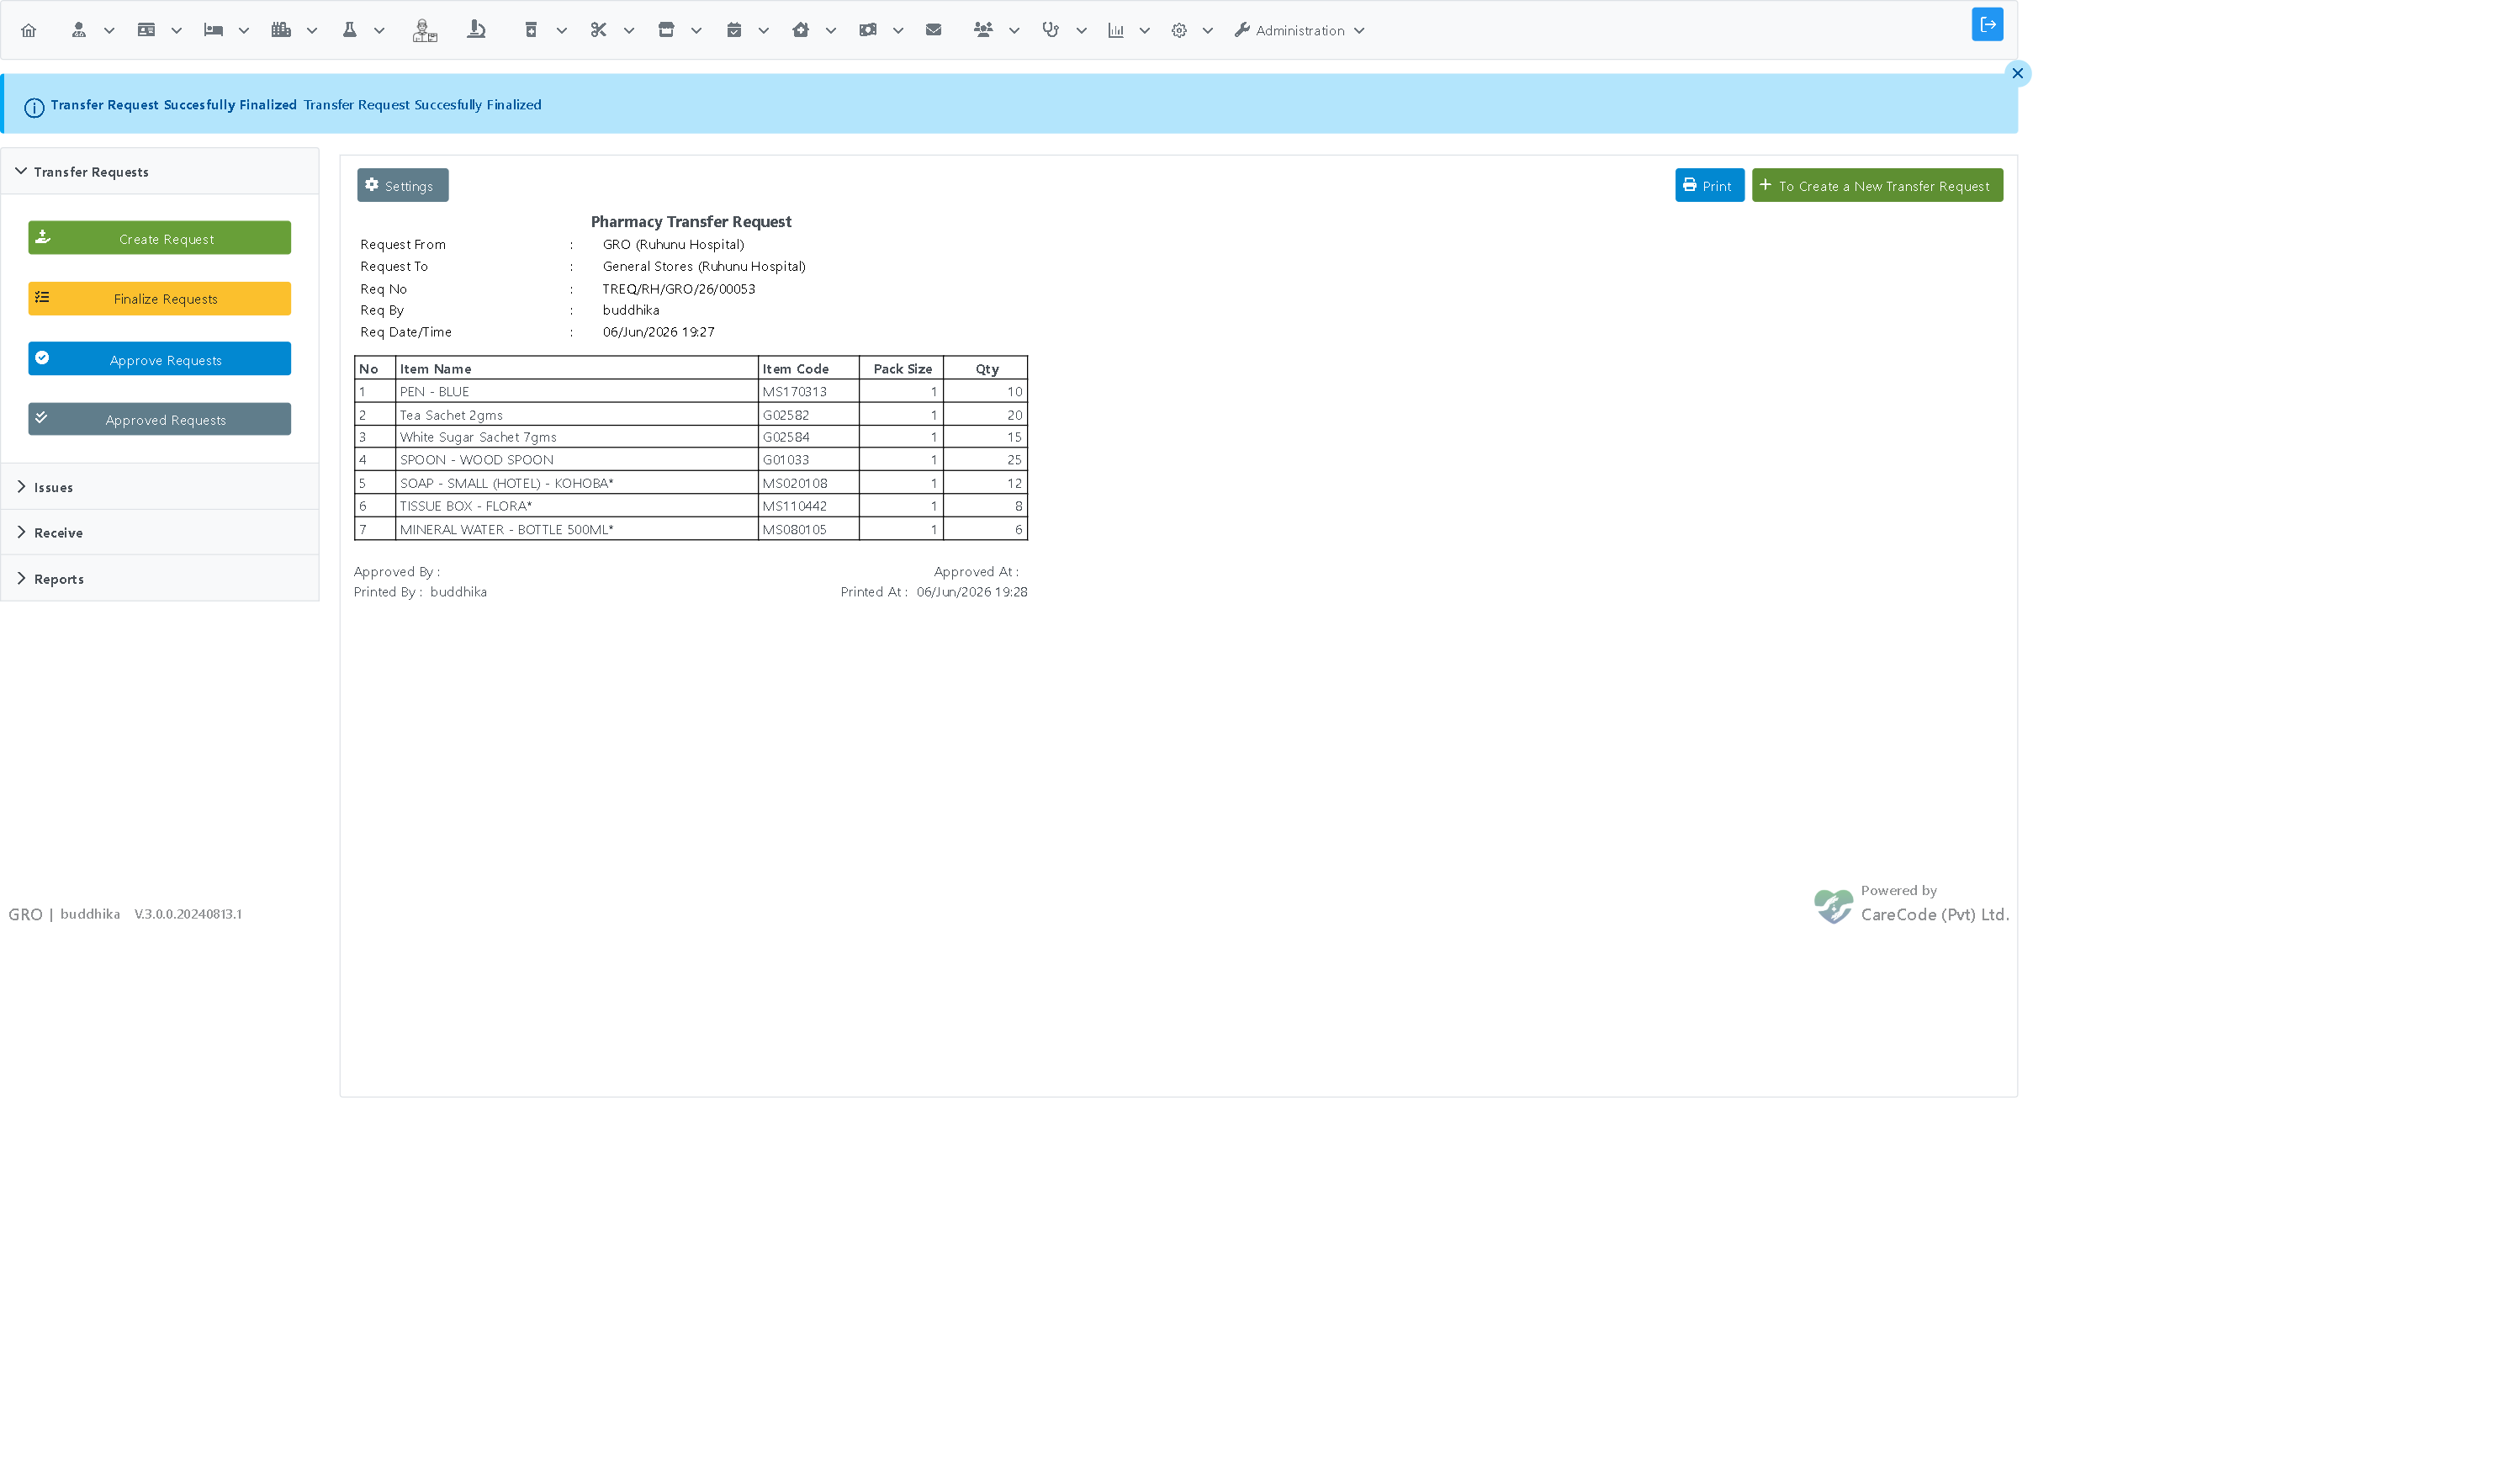
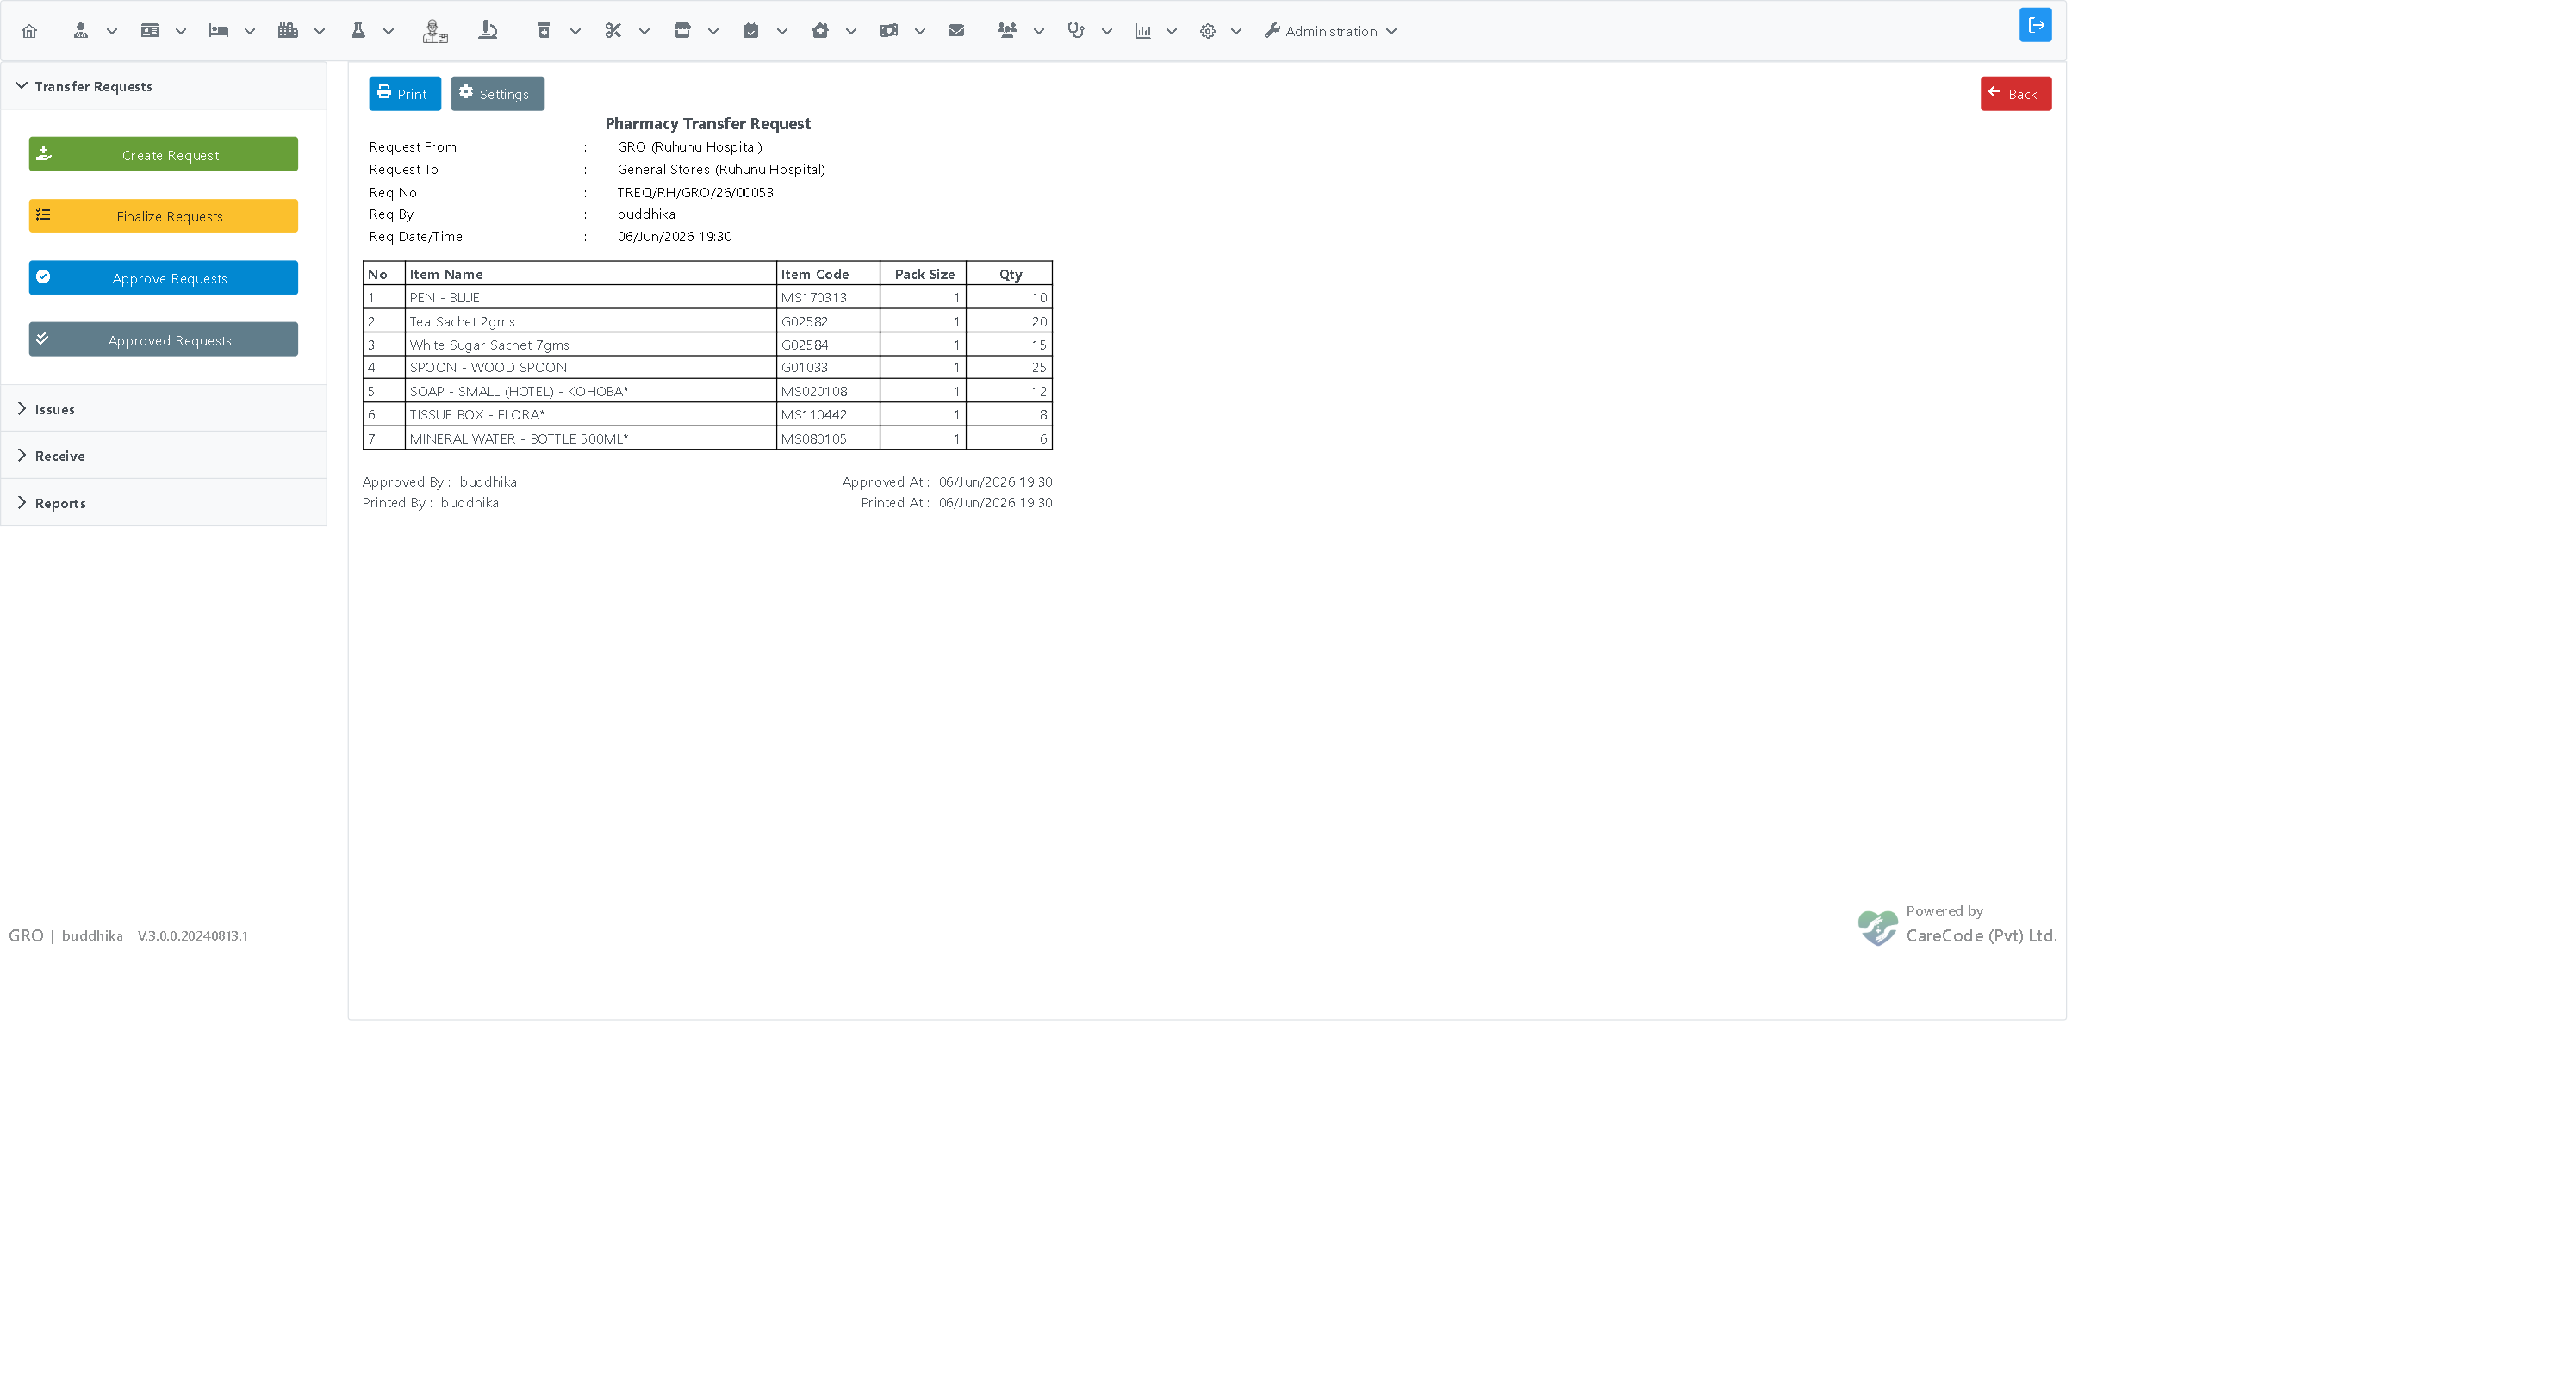
Click Save. A confirmation message "Transfer Request Successfully Created" appears, and the request receives a request number (for example TREQ/RH/GRO/26/00053).
Click Finalize. Confirm the prompt "Are you sure you want to finalize this transfer request? This action cannot be undone." A message "Transfer Request Successfully Finalized" confirms the request is ready for approval.
- On the Transfer Requests tab, click Approve Requests.
- Set the date range if needed and click Search. Your finalized request appears in the list with an Approve Request button.
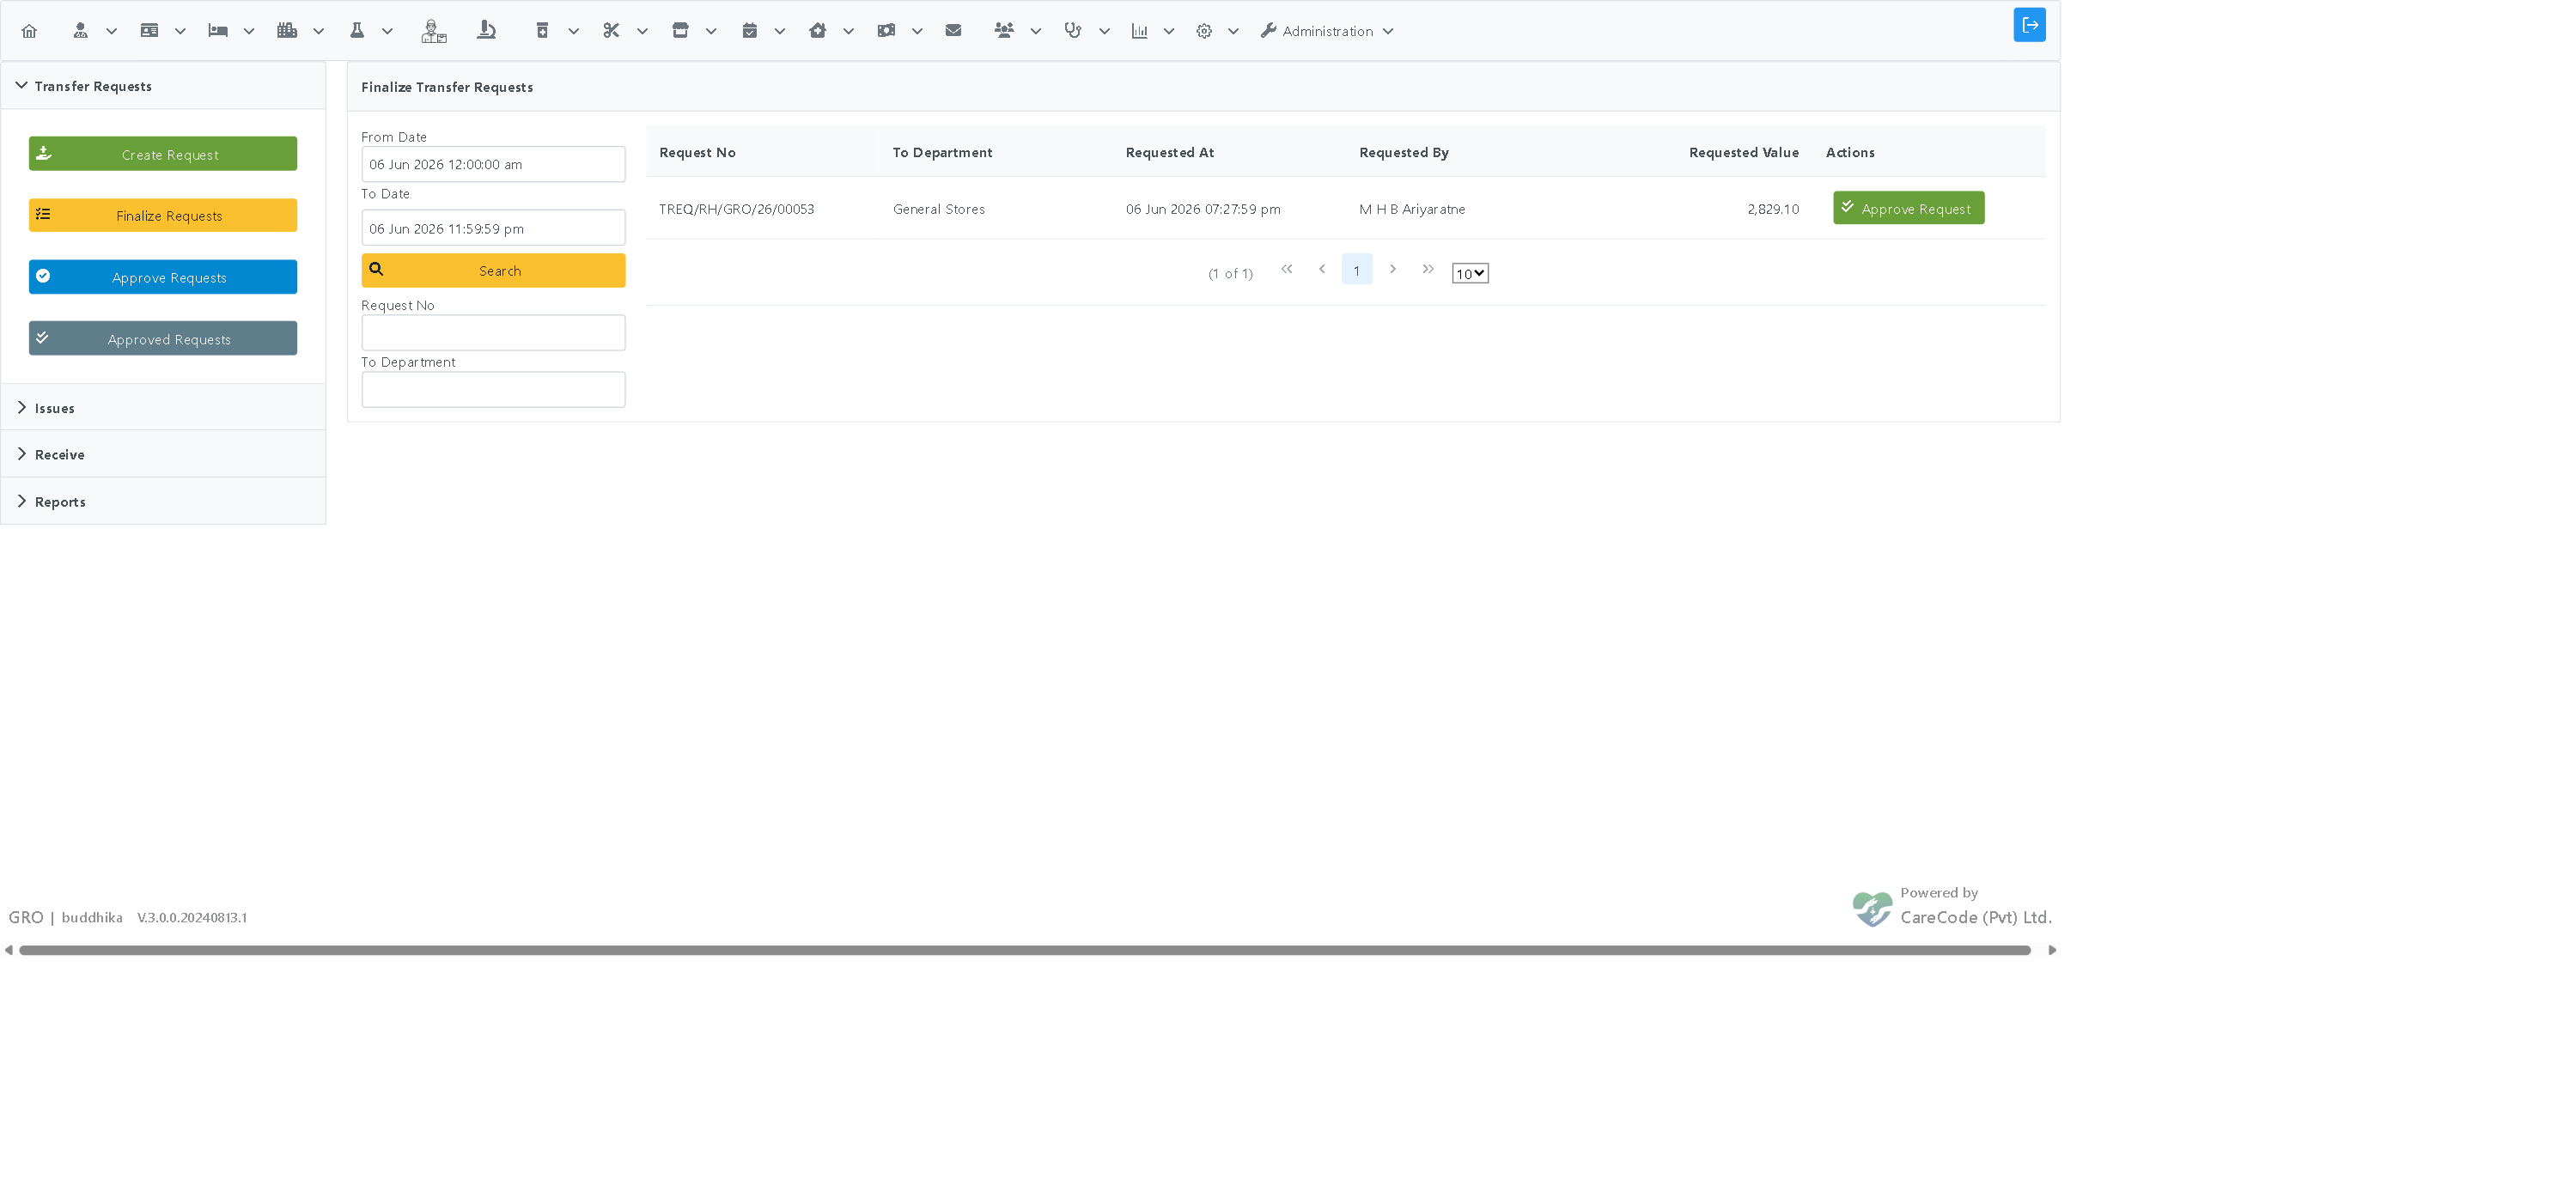
- Click Approve Request to open the approval view, which shows every requested item.
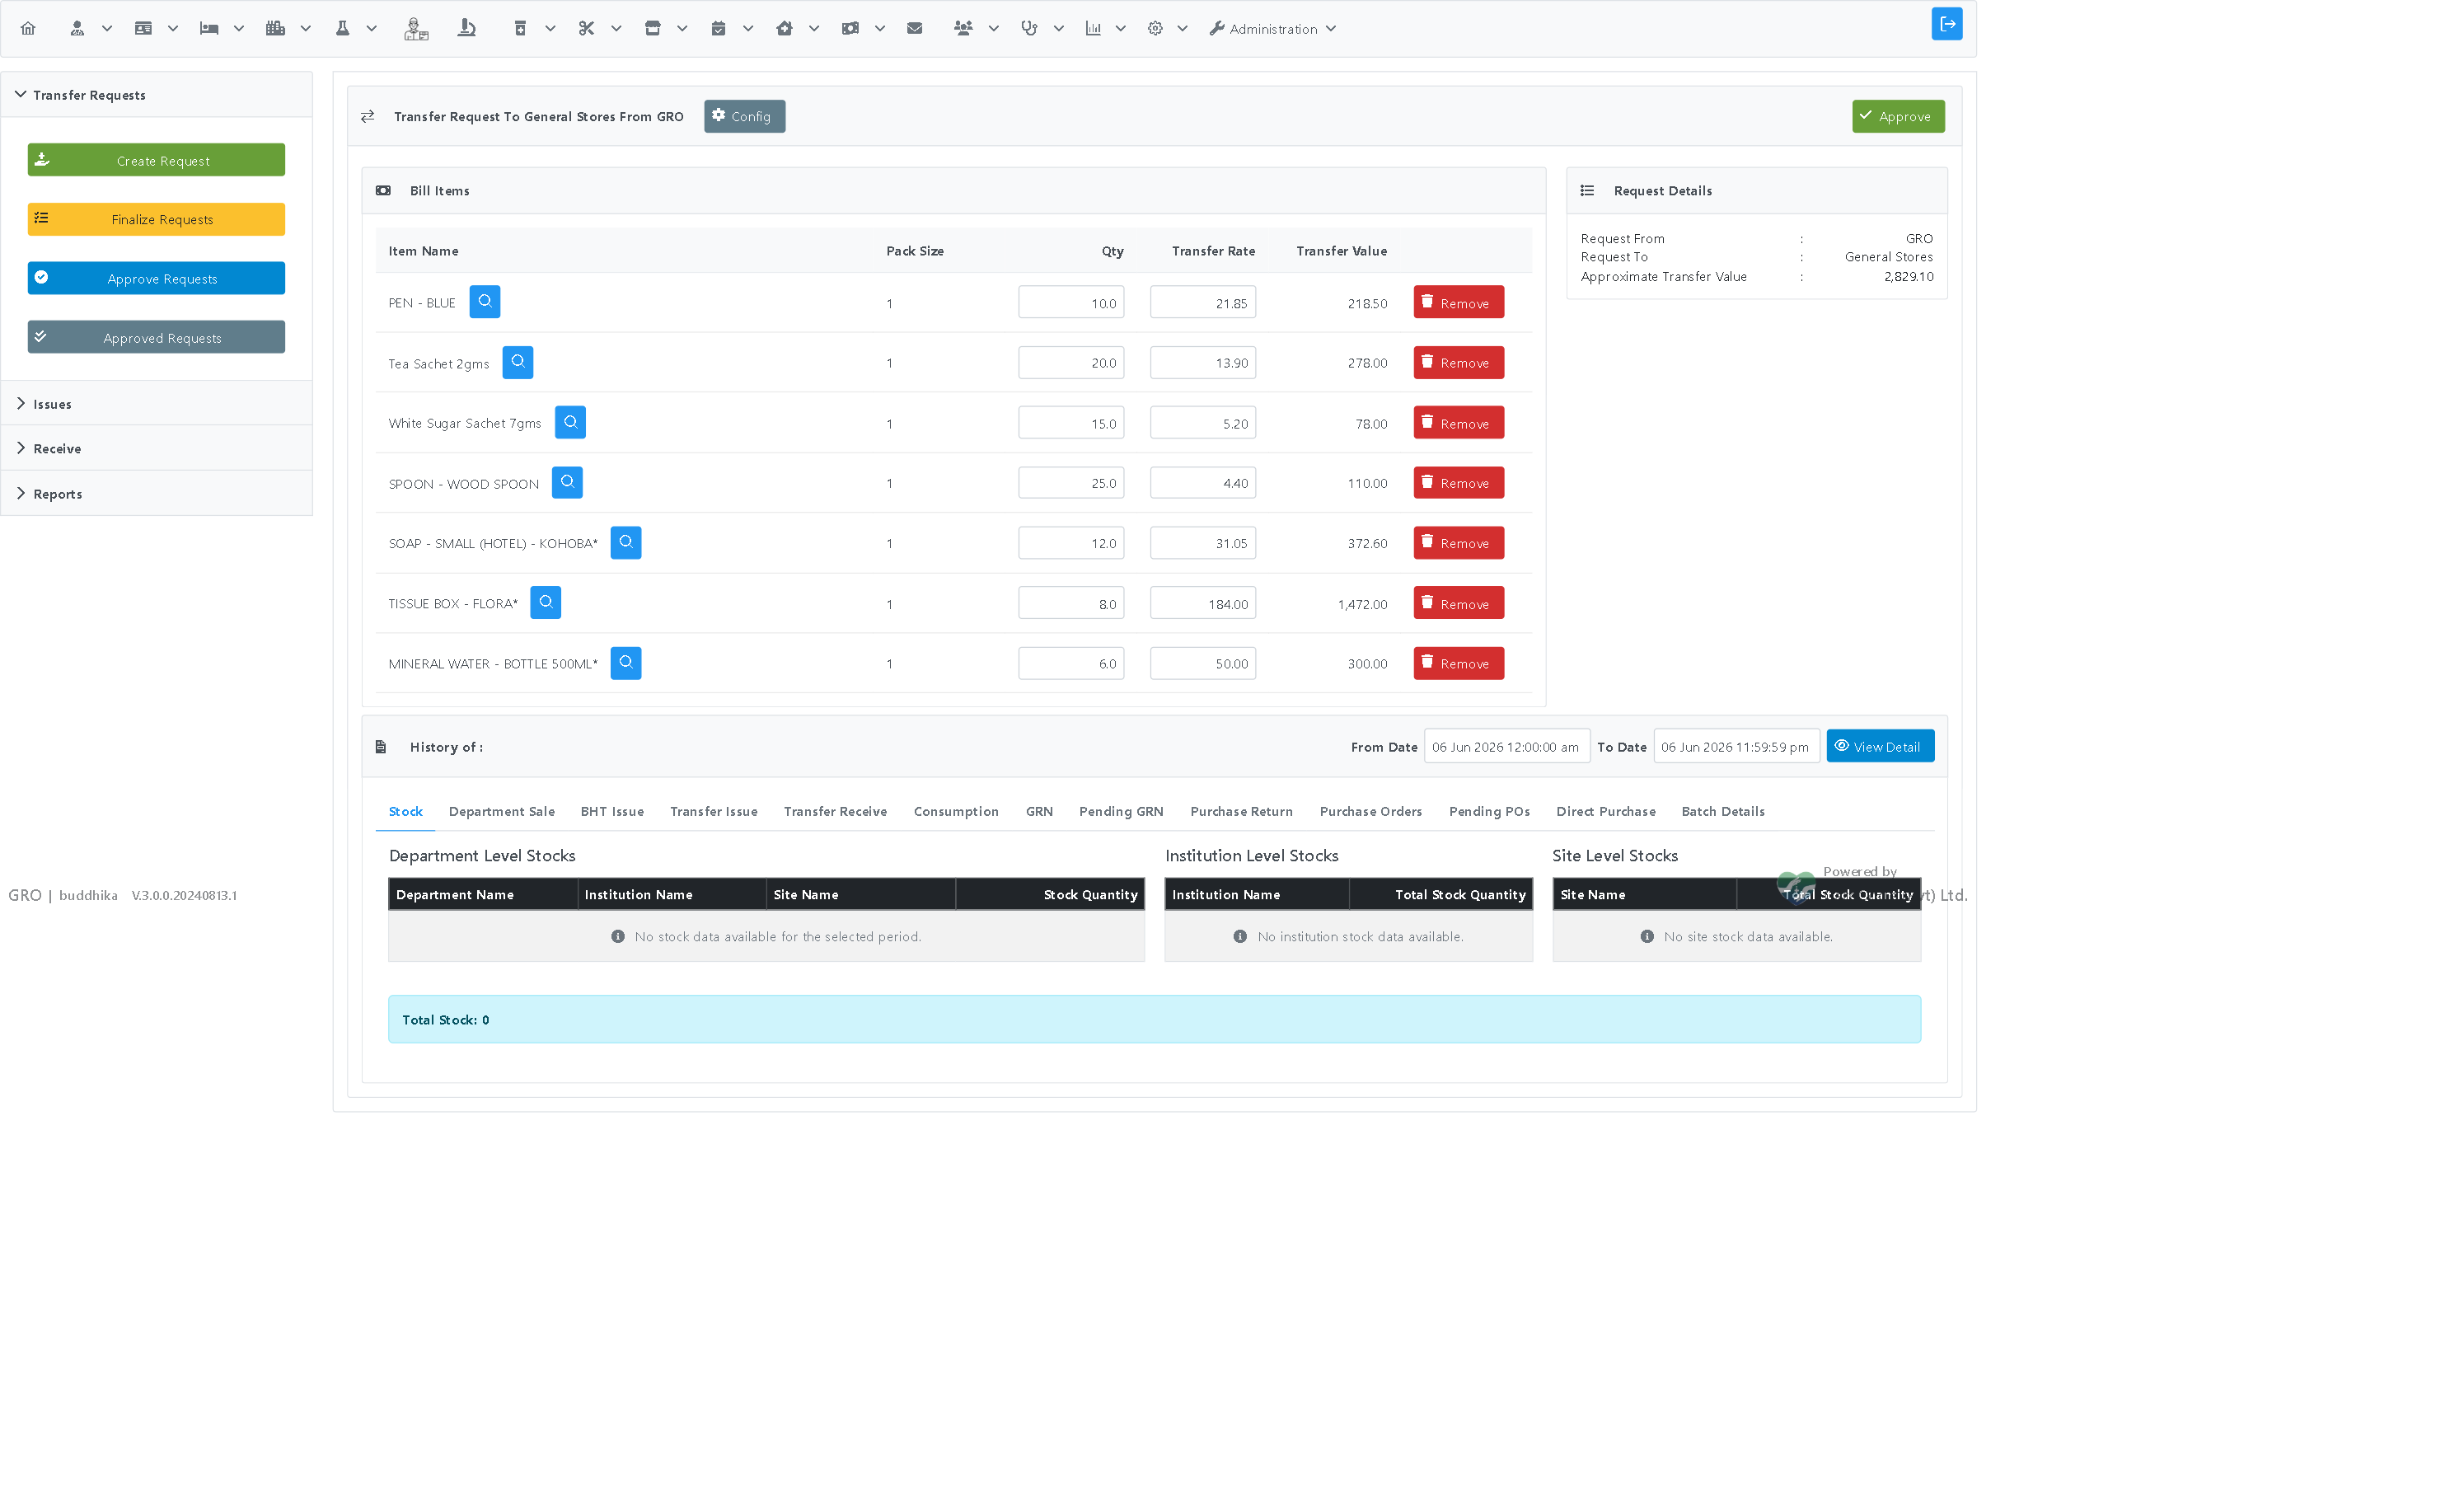
- Click Approve. The request is now approved and ready for the supplying department to issue.
Performed while logged in to the supplying department (General Stores in this example). Log out and log back in, selecting the supplying department.
Go to Pharmacy > Disbursement > Issues tab > Issue for Requests. Click Search to list approved requests awaiting issue. Find the request and click Issue.

The issue page lists each requested item with its Requested Qty, Issued Qty, Remaining Qty, Stock in Units, Expiry, and an editable Qty to issue. A batch is auto-selected for each item that has stock, and the issue quantity is pre-filled.

In Select Staff Name, type at least three letters of the staff member's name. The matching staff appear in a short list; select the person who will carry the stock to the requesting department.
Tip: You can type a full name (for example first name surname) — the search matches every word you type, in any order.
- Enter a Comment (this field is required).
- Review the issue quantities for each row.
- Click Issue and confirm the prompt "Are you sure you want to Settle This Bill ?"
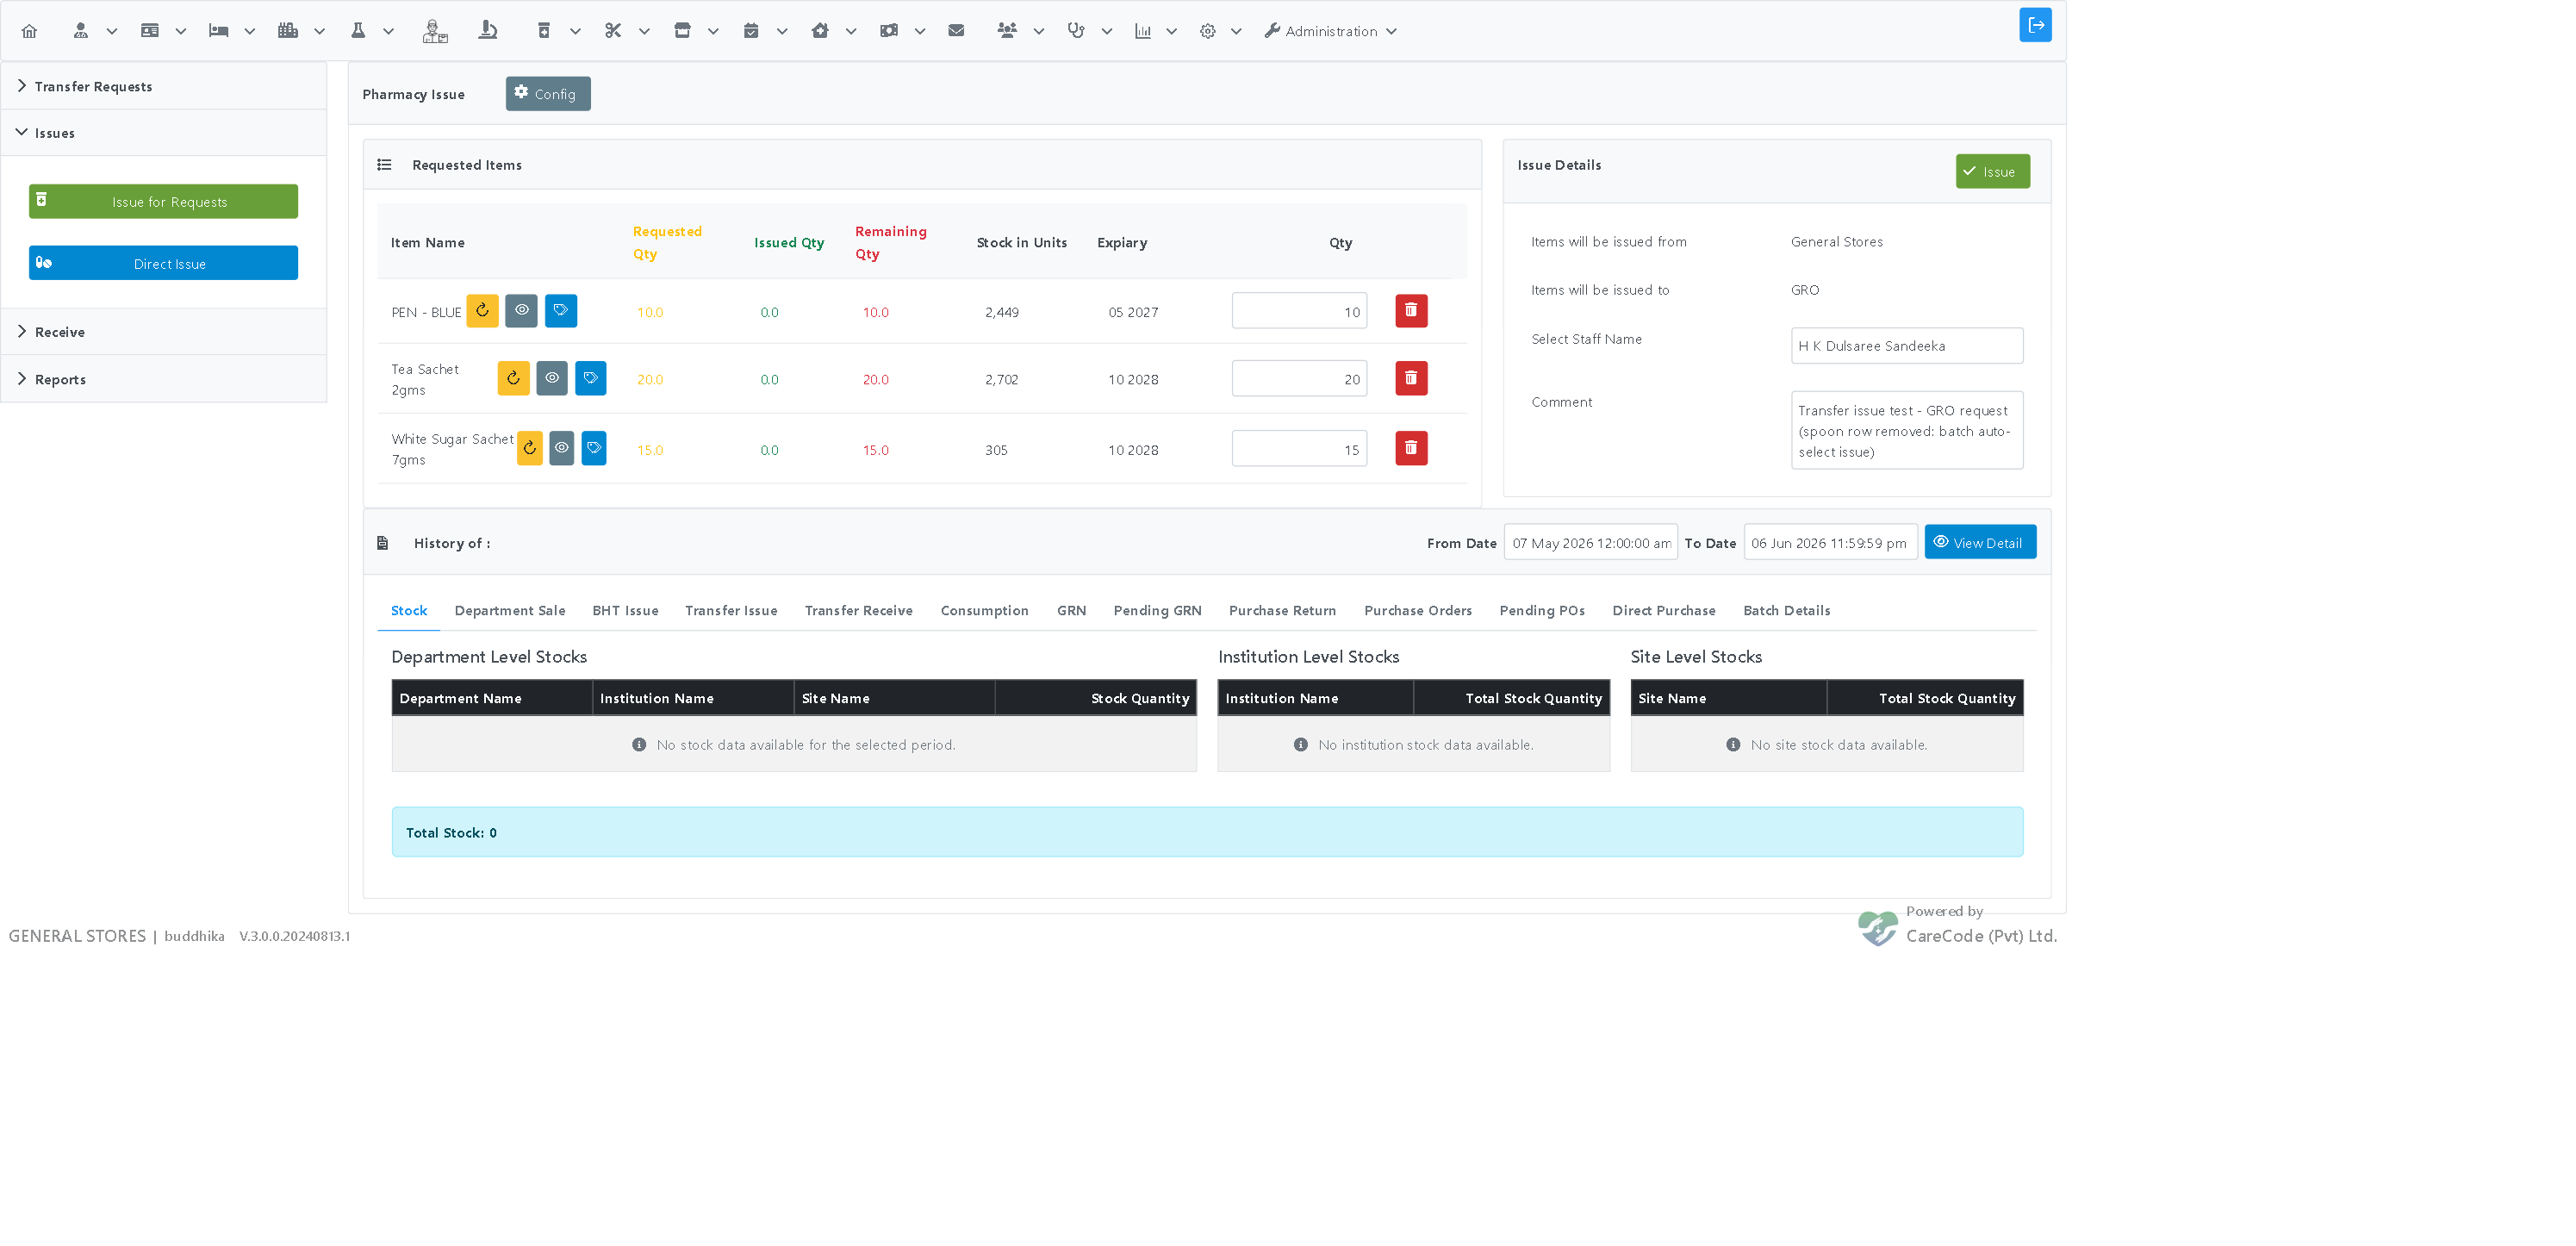
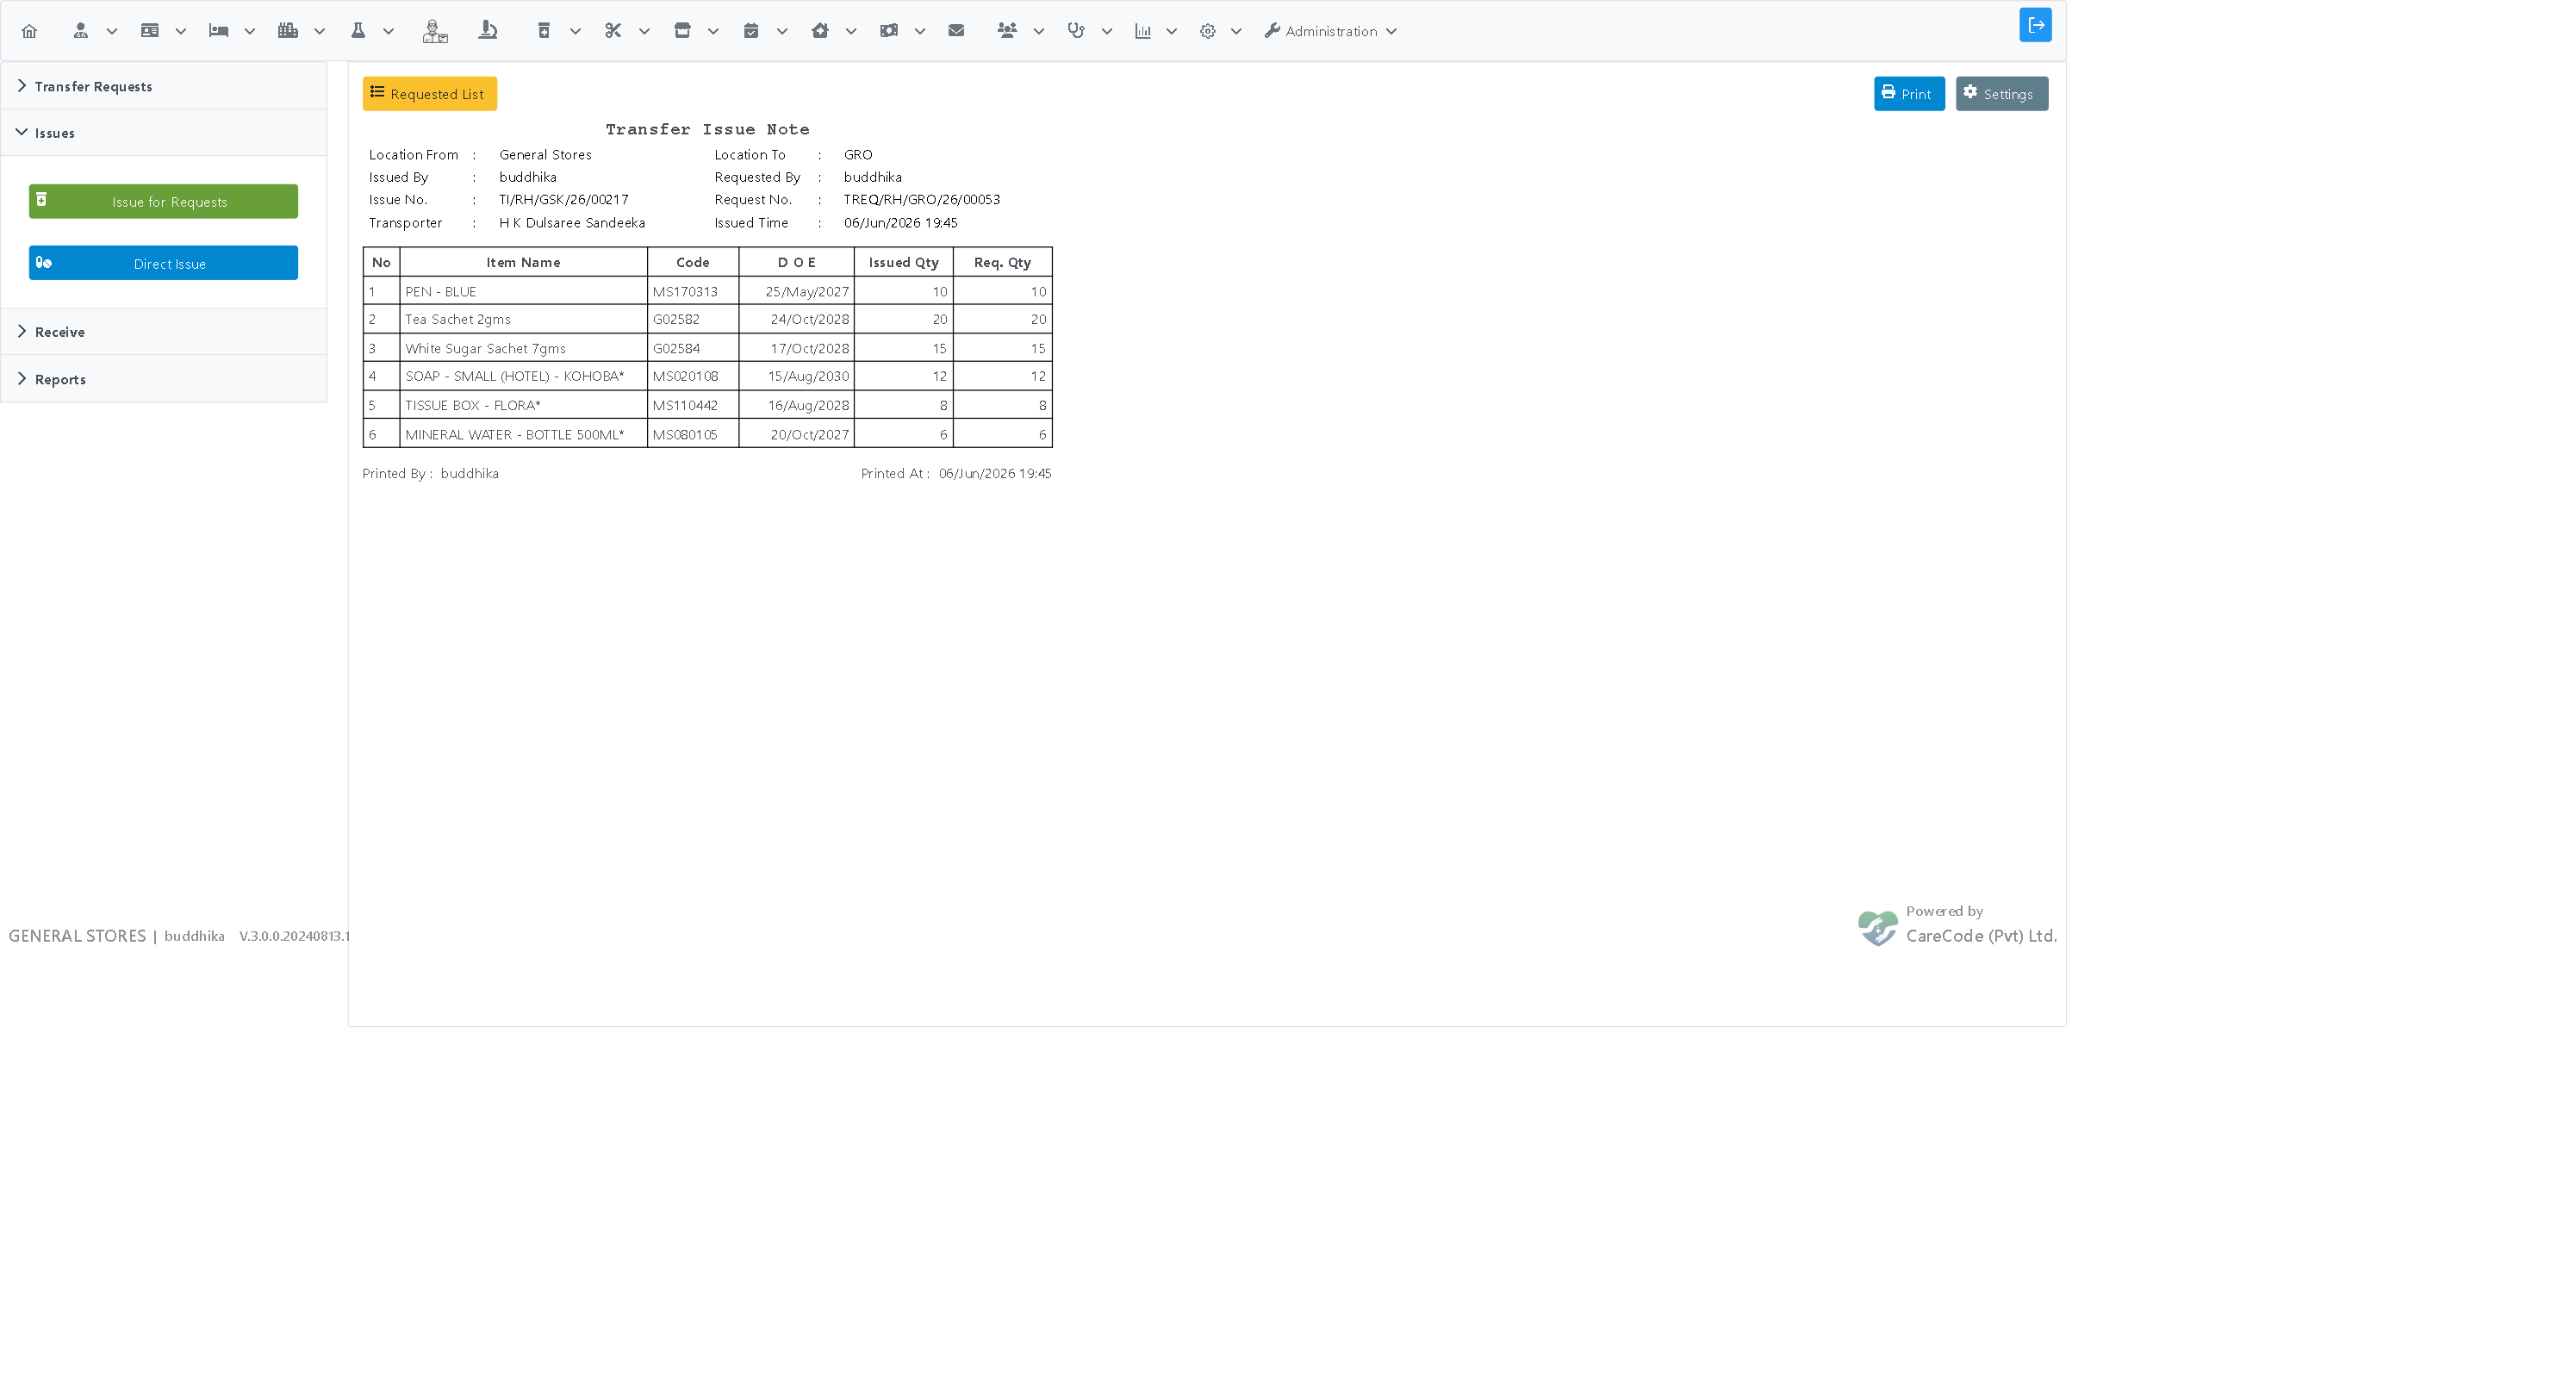
After issuing, a printable issue receipt is shown. The stock is now deducted from the supplying department and held against the selected staff member until it is received.
Performed while logged in to the requesting department (GRO). Log out and log back in, selecting the requesting department.
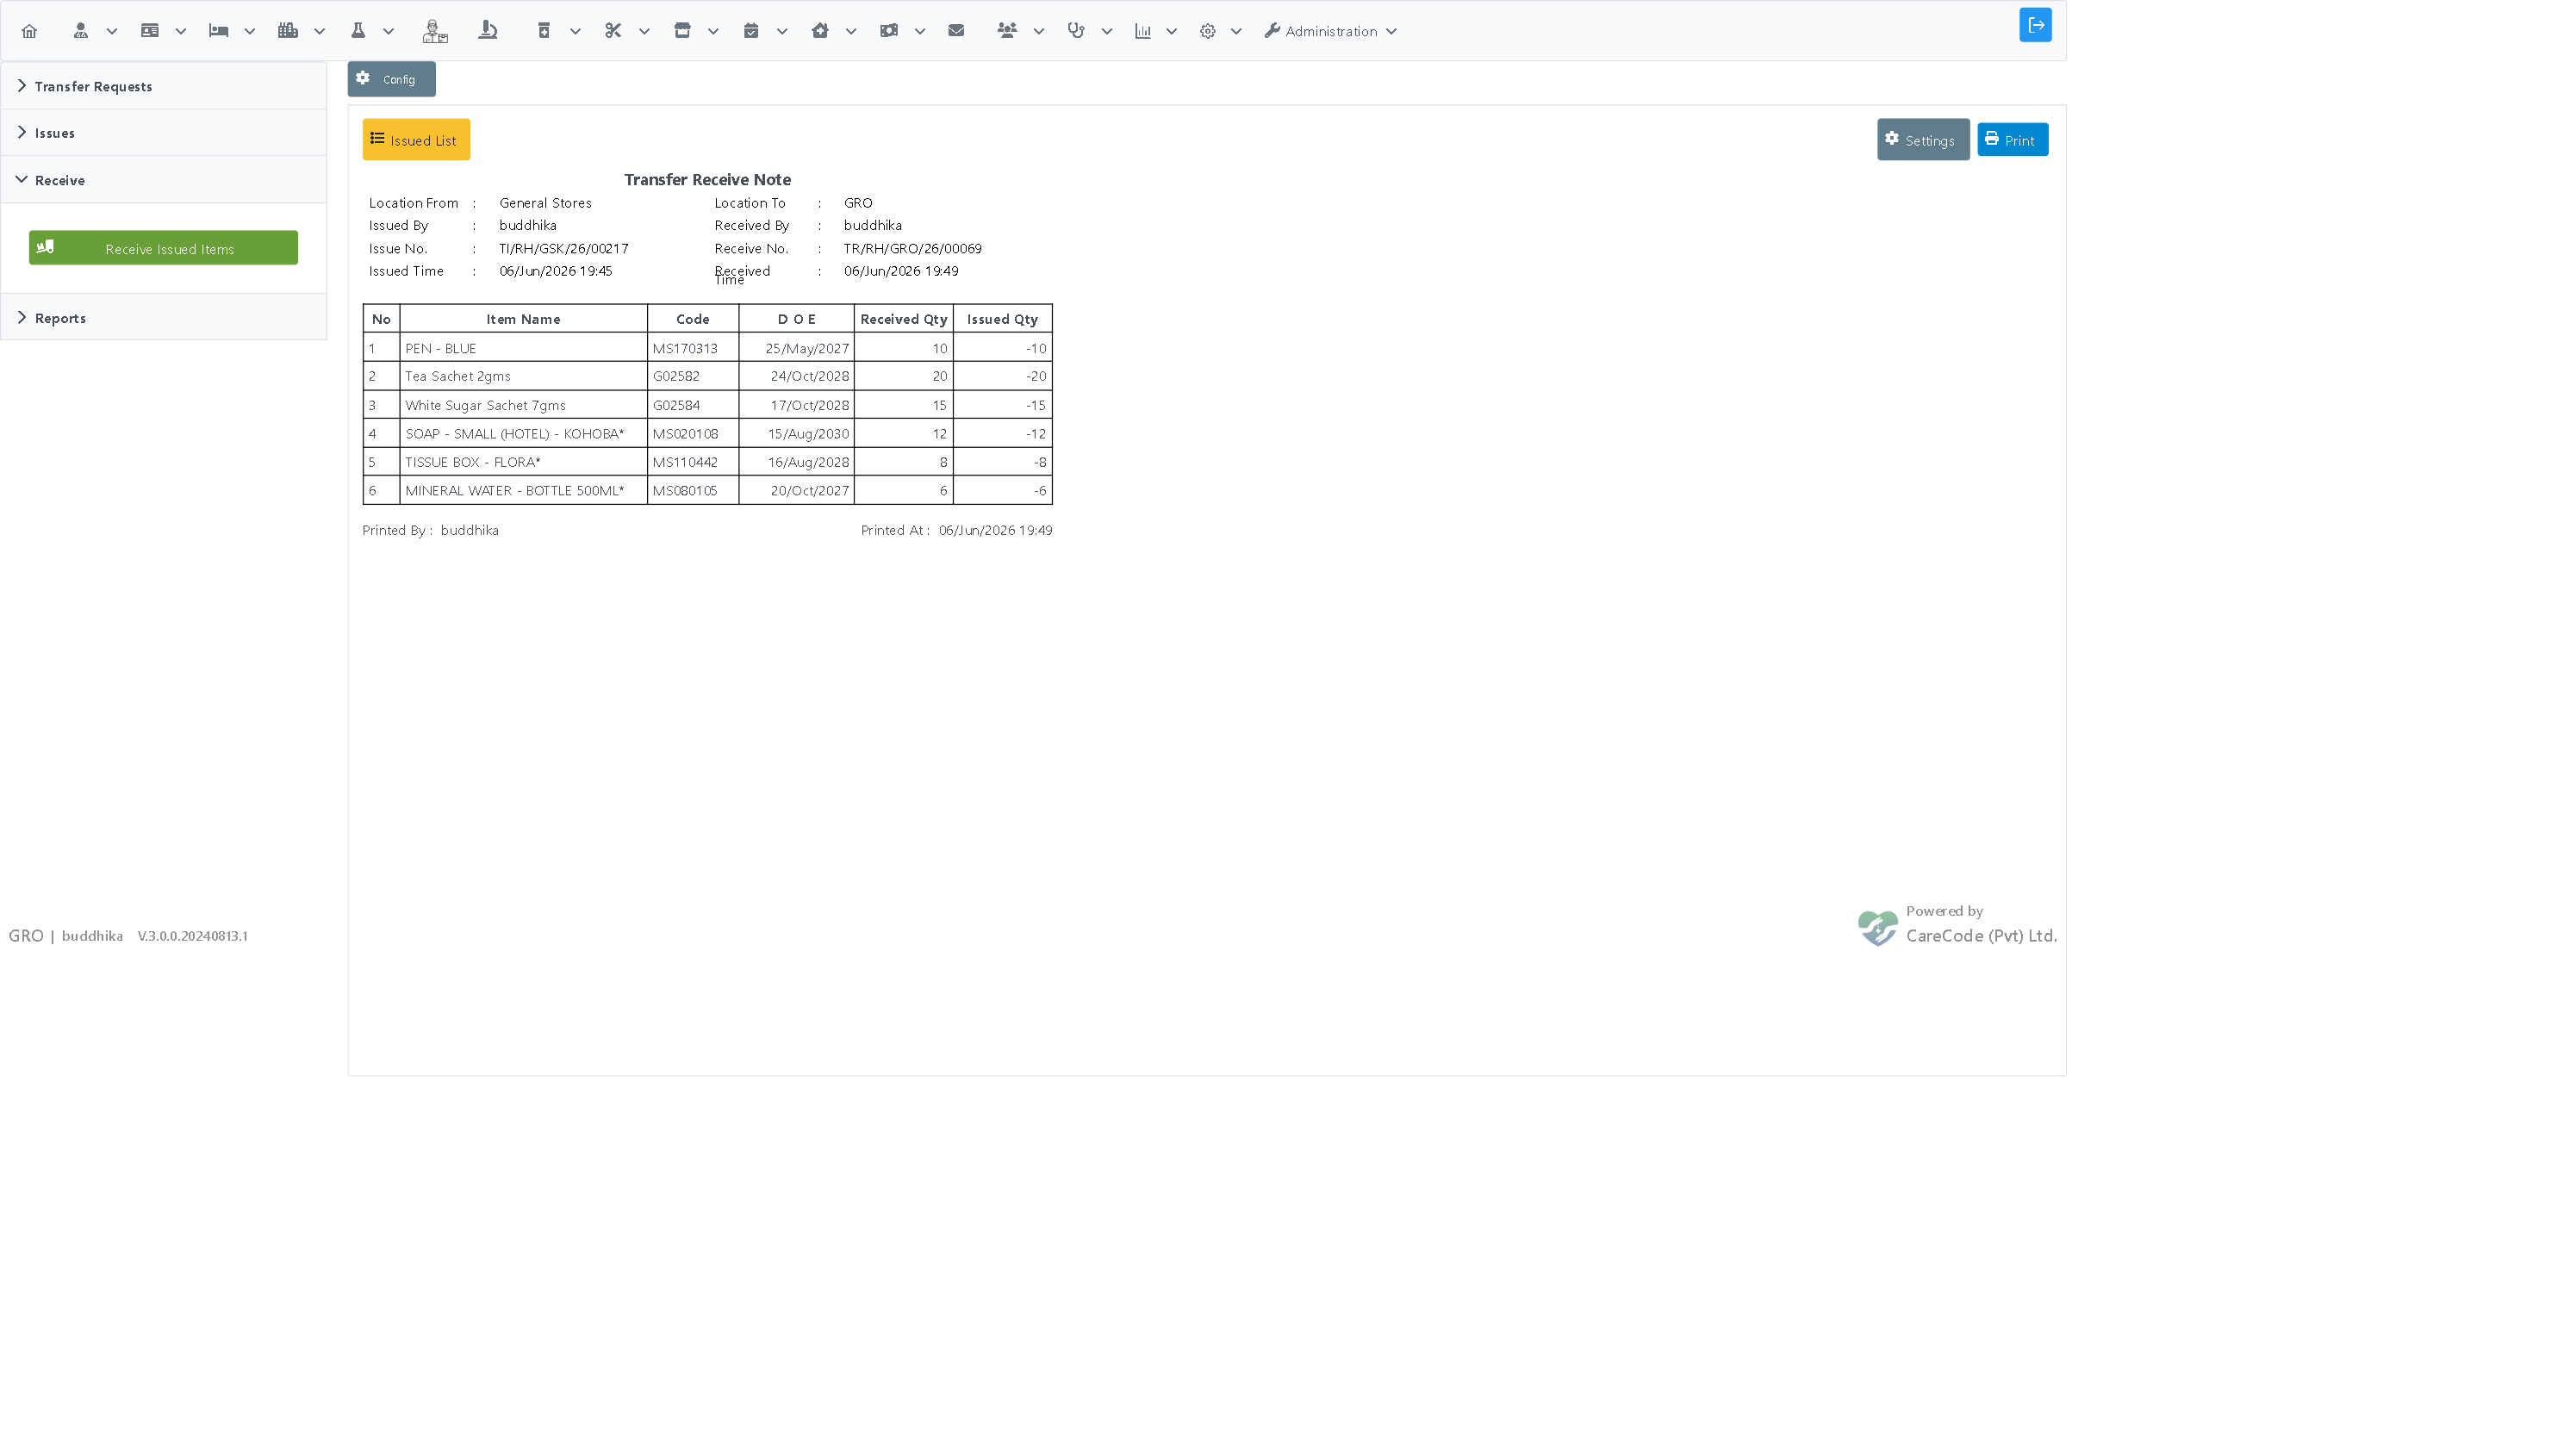
Go to Pharmacy > Disbursement > Receive tab > Receive Issued Items. Click Search to list issued transfers awaiting receipt. Find the issue (shown with the supplying department and the carrying staff member) and click Receive.
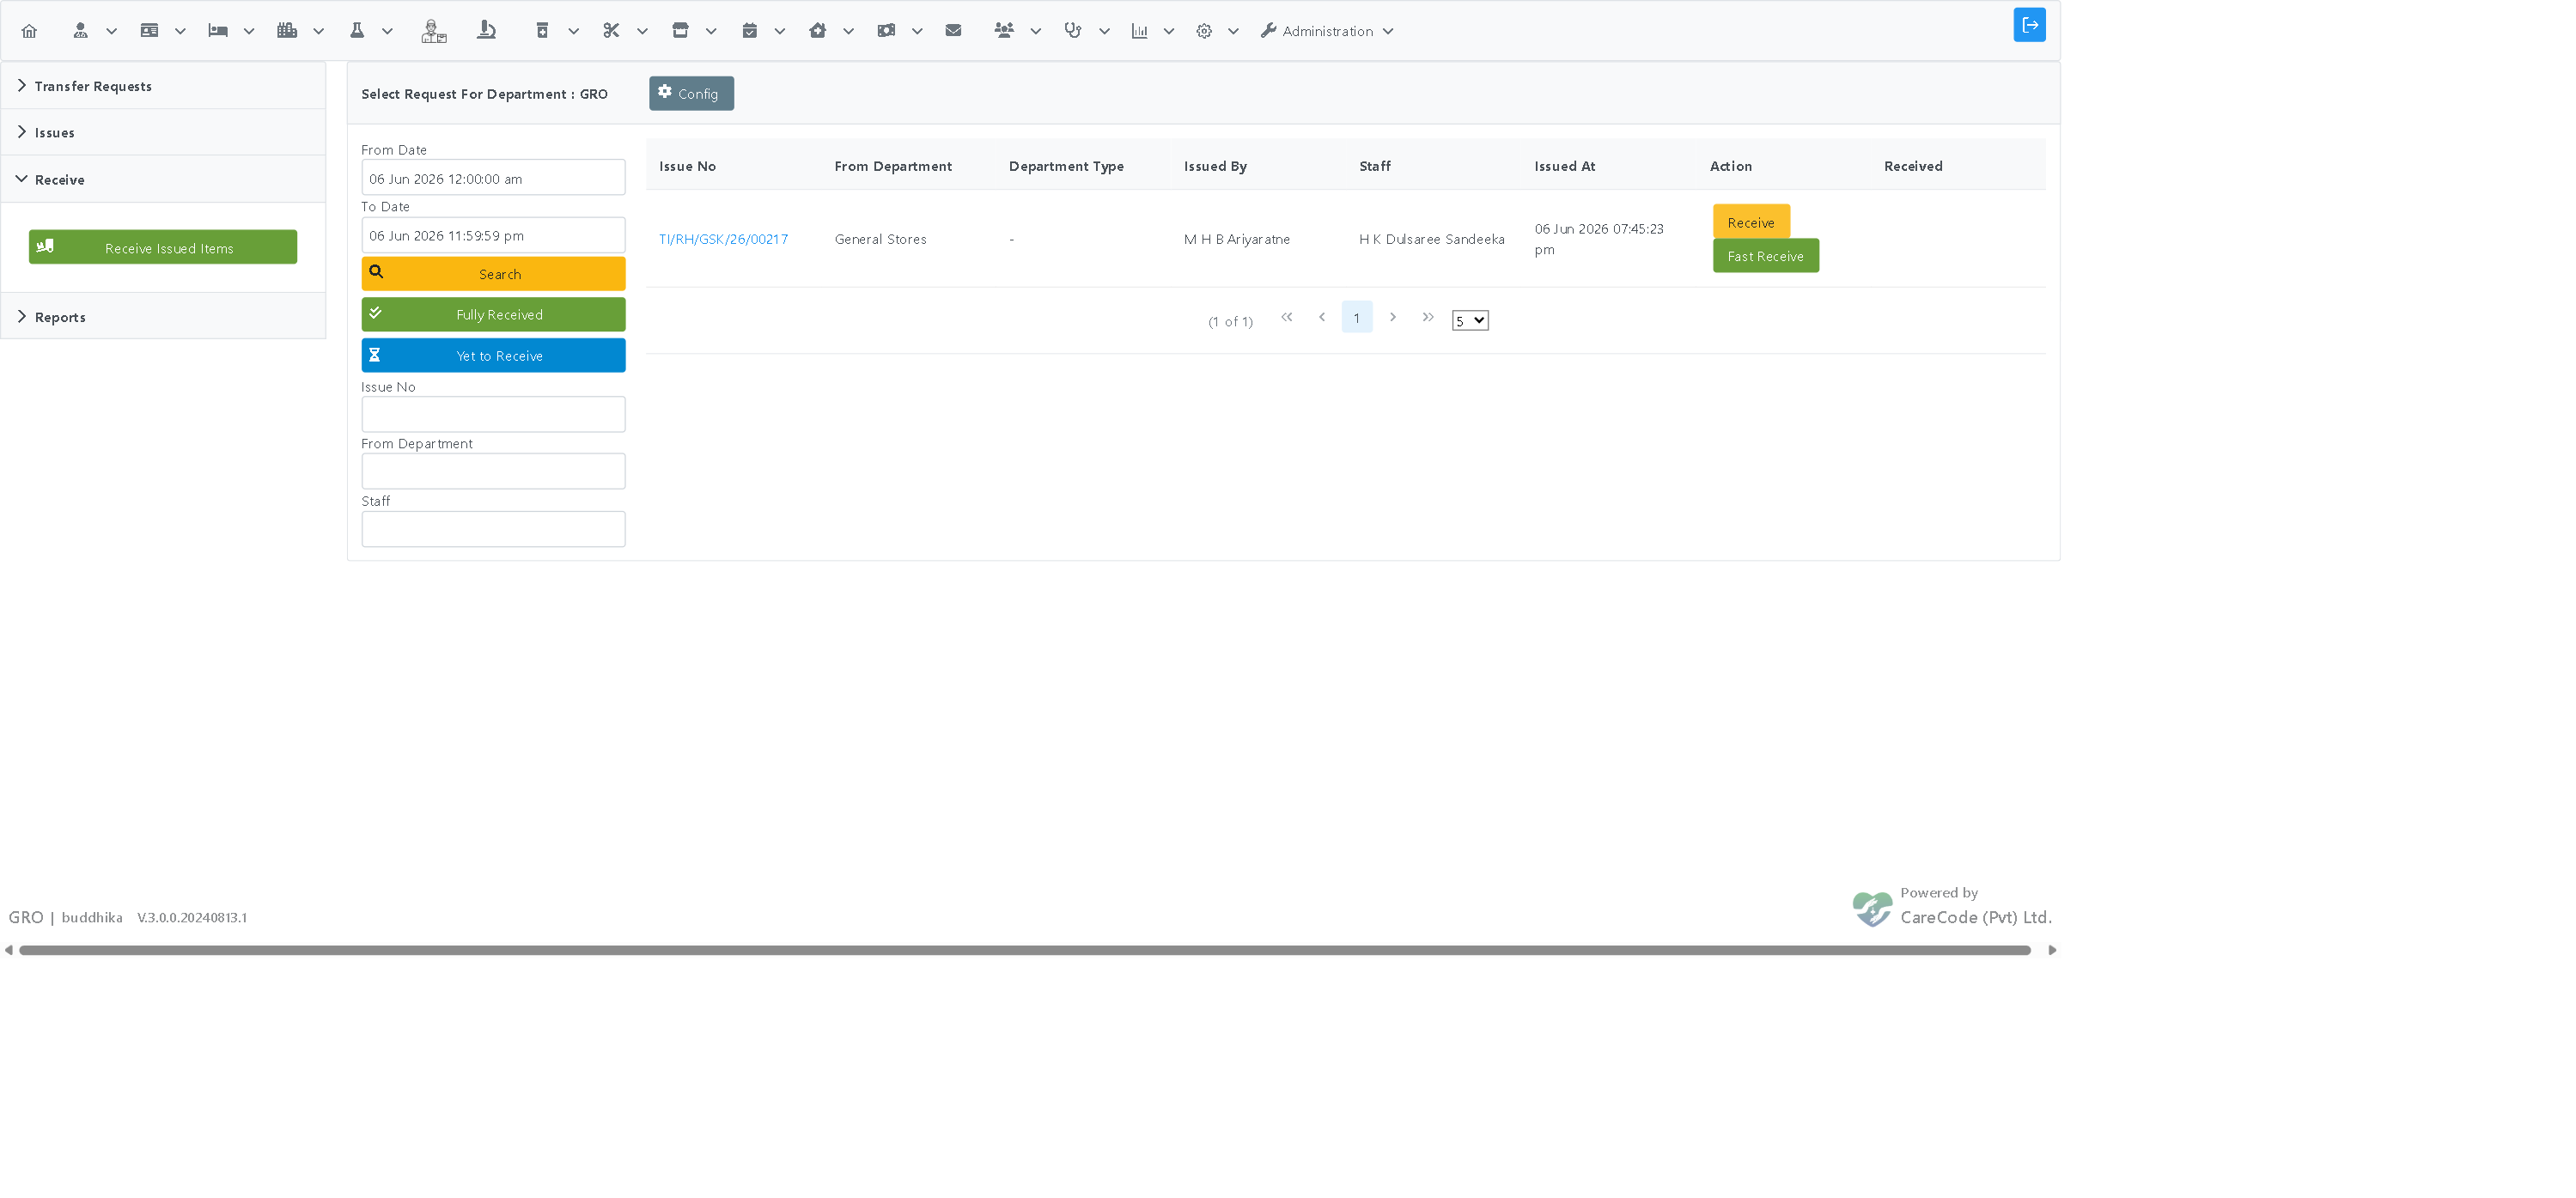
The receive page lists each issued item with its Issued Quantity and an editable Receiving Quantity (pre-filled to the issued amount). Adjust the receiving quantity only if you are receiving less than was issued.
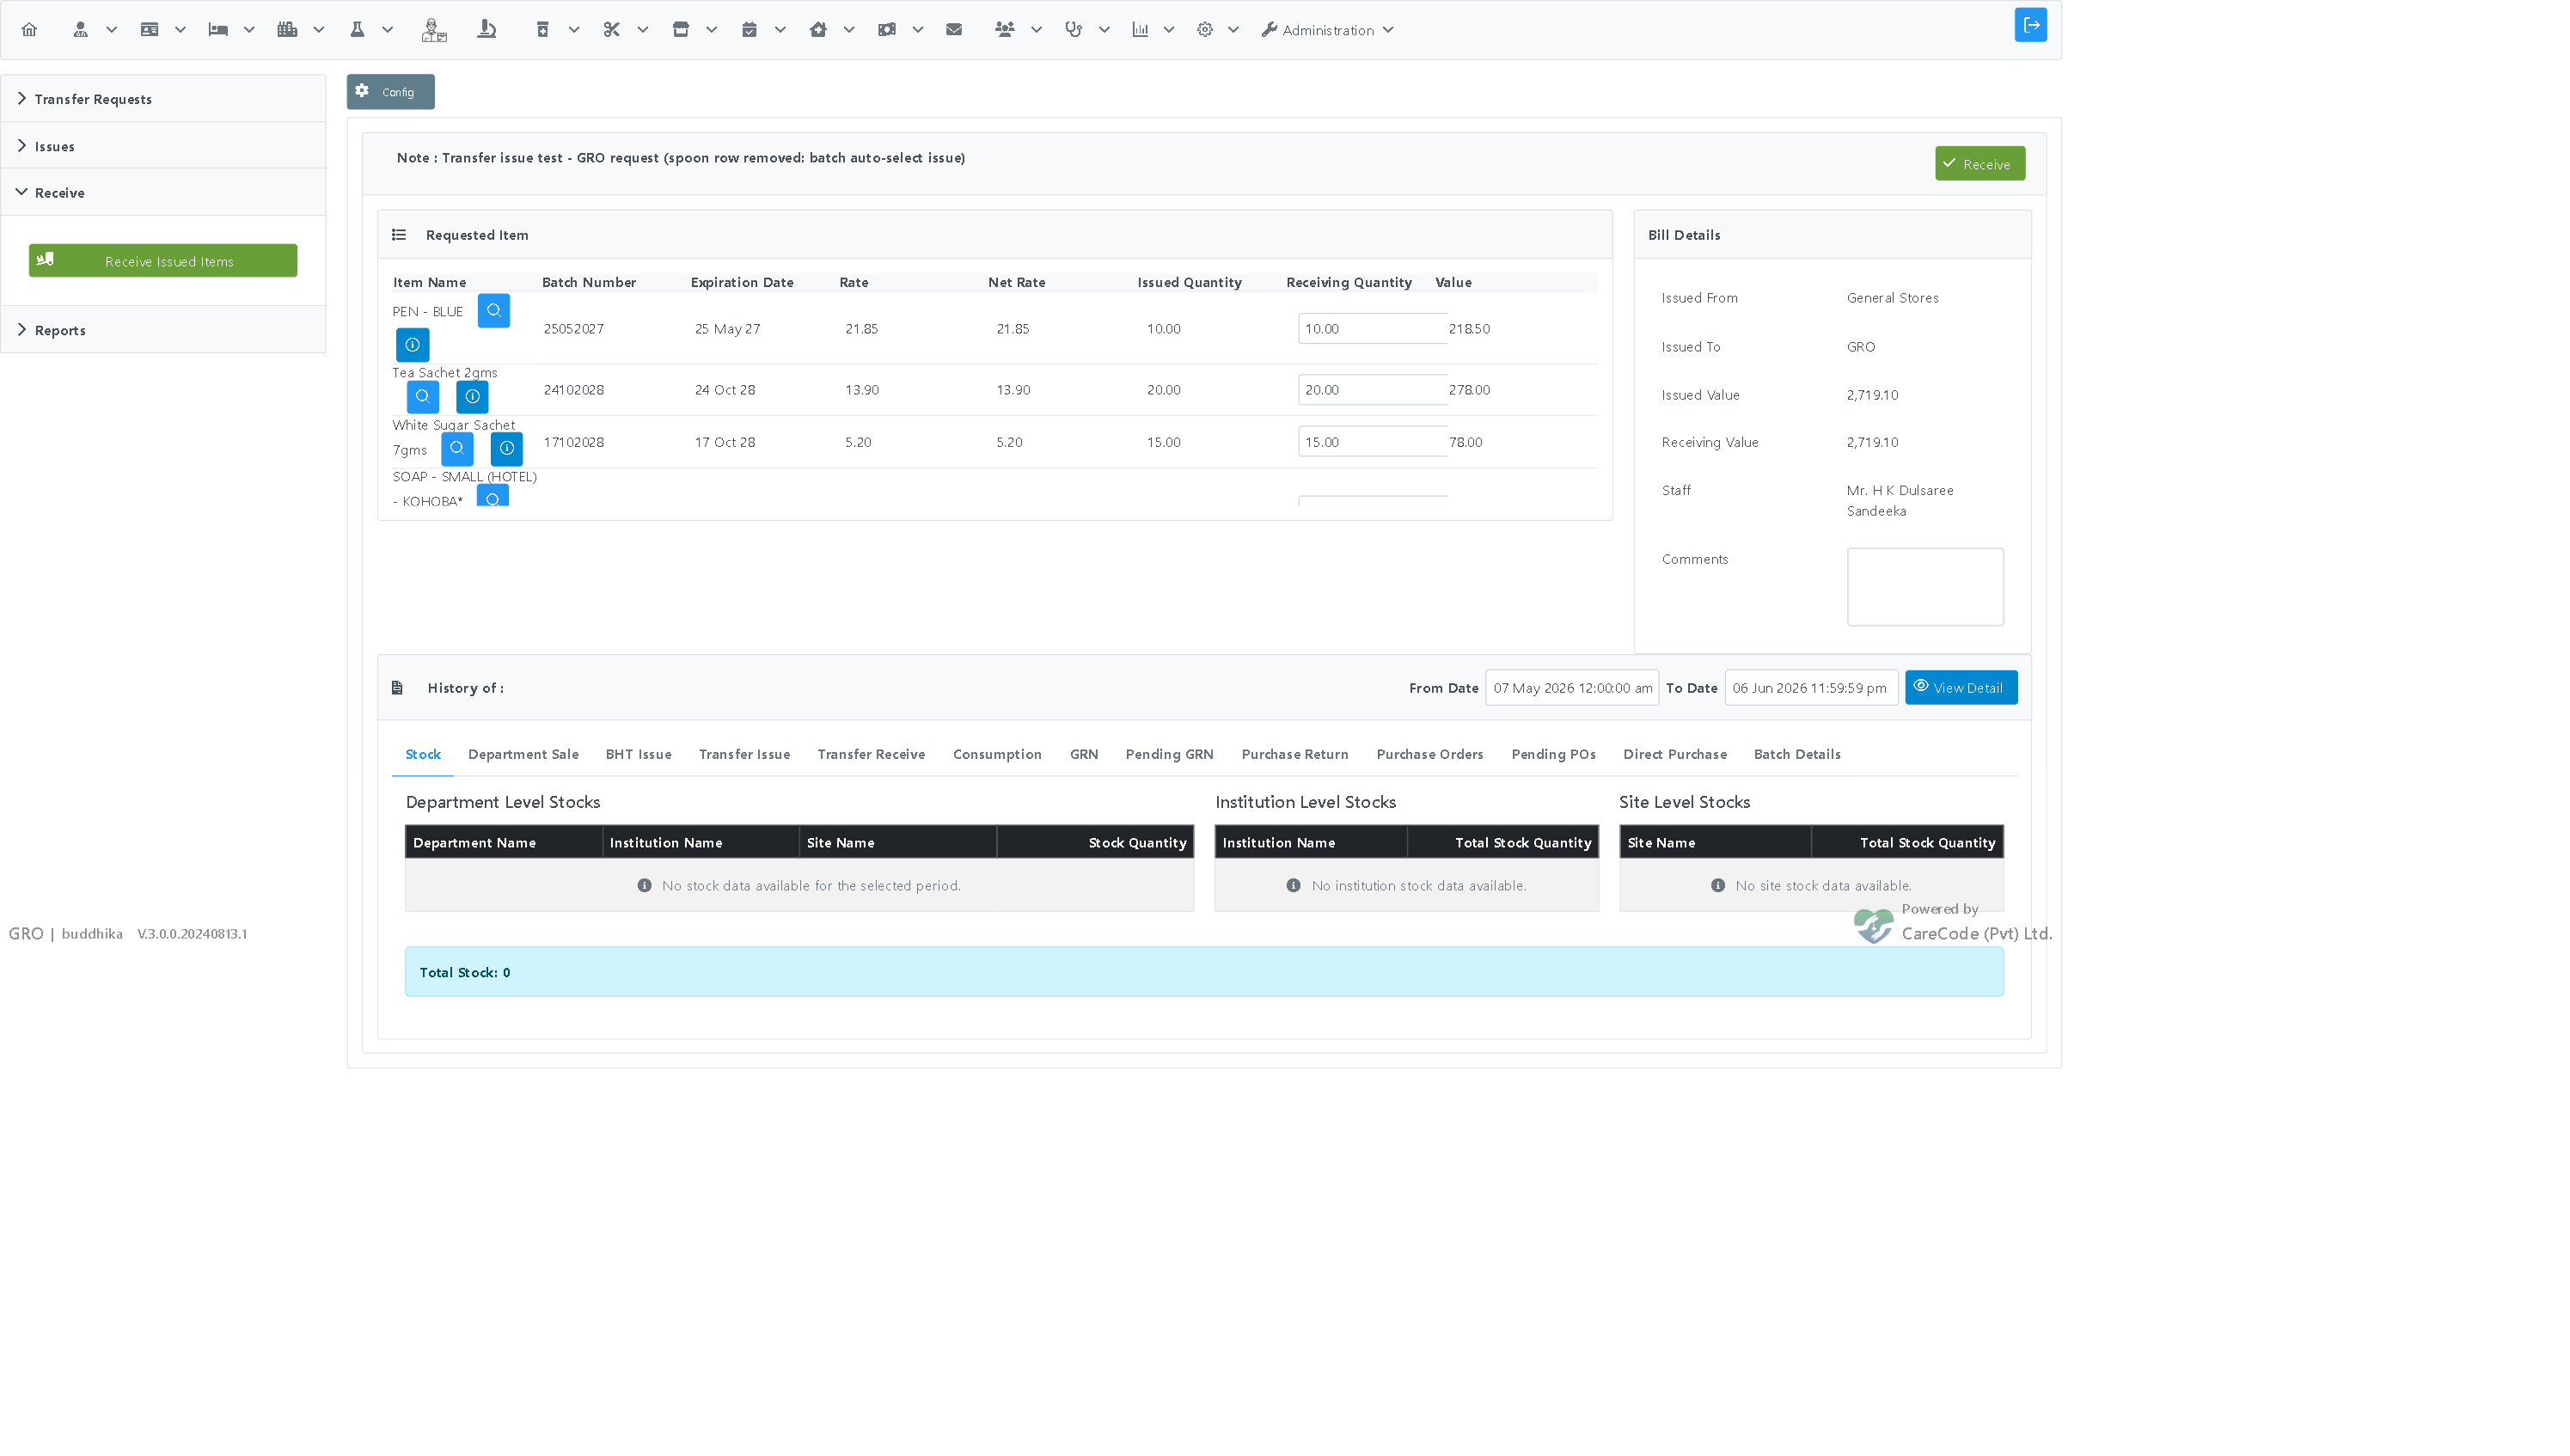
- Enter a Comment (required).
- Click Receive and confirm the prompt "Are you sure you want to receive this transfer?"
Note: The Receive button is protected against accidental double-clicks. Even if the button is clicked more than once, the transfer is only received once — stock is not duplicated.
After receiving, a printable receive receipt is shown. The stock is now added to the requesting department's inventory, and the original issue is marked as fully received.
| Stage | Supplying dept stock | Carrying staff stock | Requesting dept stock |
|---|---|---|---|
| After Issue | decreased by the issued quantity | increased by the issued quantity | unchanged |
| After Receive | unchanged | decreased to zero | increased by the received quantity |
This means stock is always accounted for — it moves from the supplying department, to the carrying staff member, and finally into the requesting department.
You do not need to issue the full requested quantity at once. The system tracks Remaining Qty across multiple issues:
- On the issue page, the Issued Qty column defaults to the full requested amount
- Change the quantity to issue only what is currently available
- After issuing, the Remaining Qty on future issues reflects what's still needed
- You can issue the remaining quantity later — the system pre-fills with the outstanding amount
Example — Partial Issue:
- Request: 30 units of Gauze
- First issue: 10 units → Remaining Qty: 20
- Second issue: 20 units (auto-filled) → Remaining Qty: 0
Example — Partial Receive:
- Issued: 15 units of A4 Paper
- You can receive less than was issued on the receive page
- Remaining items remain "in transit" and appear on the Goods in Transit report
Each partial issue creates a separate issue bill with its own bill number:
| Request | Issue 1 | Issue 2 |
|---|---|---|
| TREQ/RH/LBK/26/00082 (30 units) | TI/RH/GSK/26/00219 (10 units) | TI/RH/GSK/26/00220 (20 units) |
All partial issue bills are linked to the same original request, and the remaining quantity tracks correctly across all of them.
When the supplying department does not have enough stock to fulfill a request:
- The system detects the shortage when you click Issue
- The item with insufficient stock is removed from the bill
- No partial stock deduction occurs — the entire item is rejected
- An error message appears: "No Bill Items are added to Transfer" (if all items fail)
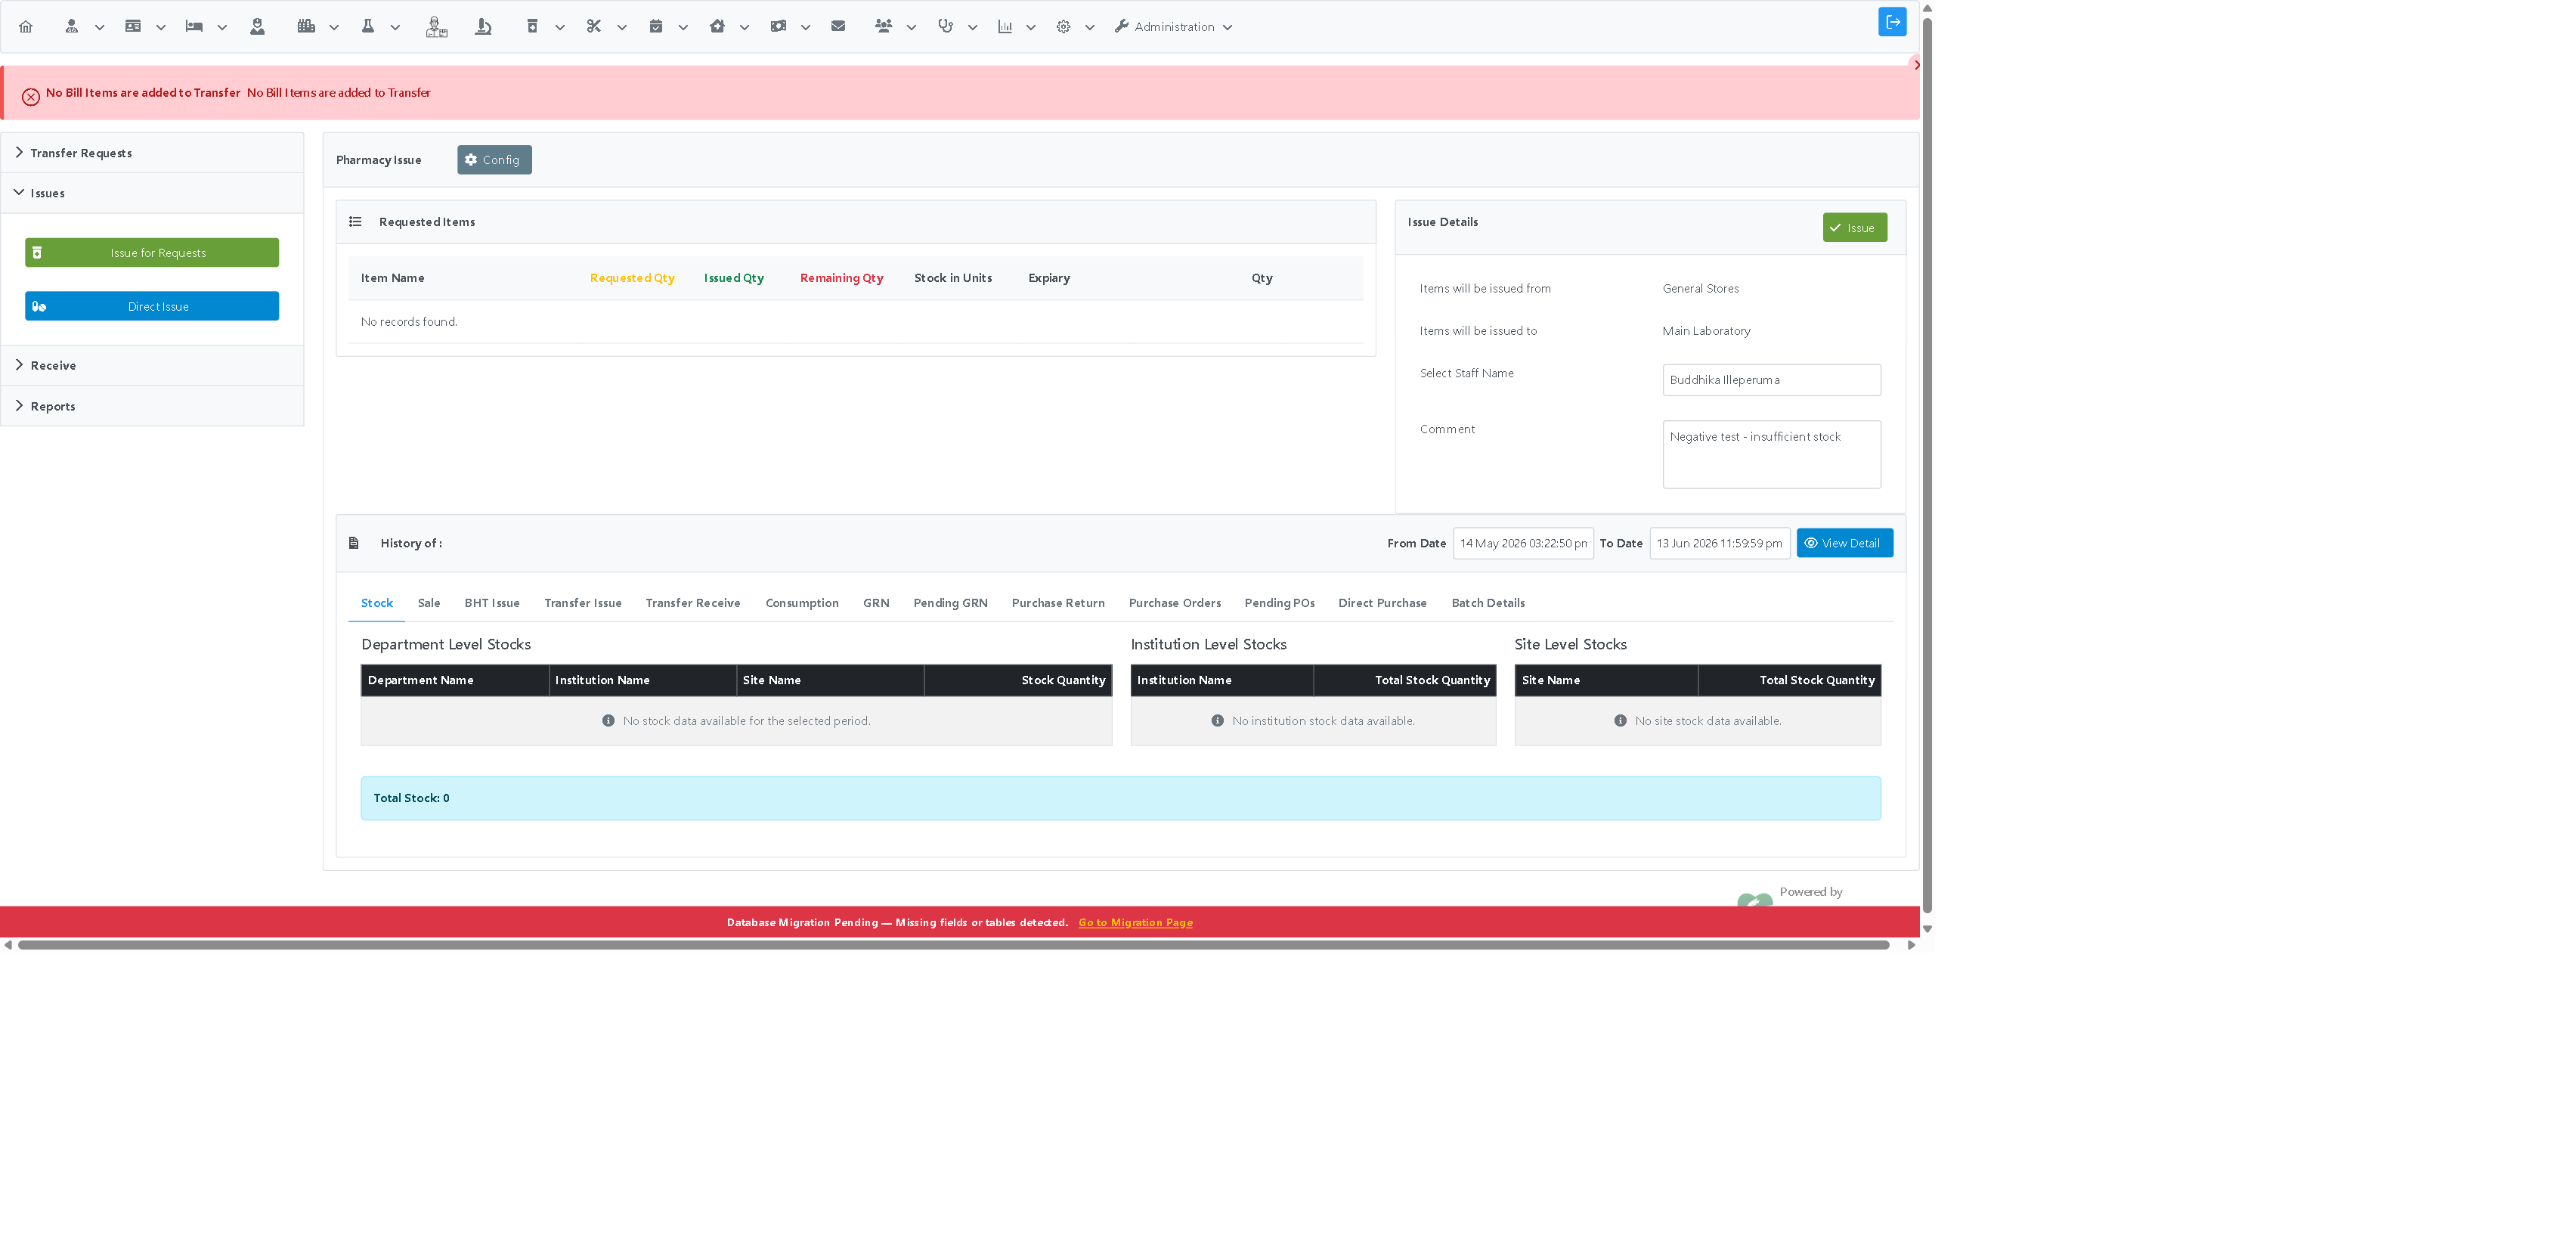
Important: The system does NOT partially issue available stock when one item has insufficient quantity. The failing item is rejected entirely. If you have multiple items and some pass while others fail, only the passing items are included in the issue.
If Stock Runs Out Between Issues:
- If you issued some items earlier and stock for remaining items has been consumed, the new issue will fail with the same behavior
- Add stock to the supplying department before attempting to issue again
Error Messages for Stock Issues:
| Message | Meaning |
|---|---|
| "[Item name] is not available in the stock" | The specific item has zero available stock |
| "No Bill Items are added to Transfer" | All items were rejected due to stock issues |
- A list is empty after opening it: Most transfer lists are filtered by date. Click Search (adjusting the date range if needed) to load records.
- An item cannot be requested: The requesting department can only request item types it is configured to support. Check the item-type information shown on the request form.
- An item has no batch or quantity on the issue page: If a row shows blank Stock/Expiry/Quantity even though stock exists, a batch was not auto-selected for that item. Remove that row to issue the rest, and report the item to your administrator.
- The comment field is required: Both the issue and receive screens require a comment before the bill can be settled.
- Switching departments: Use Logout and log back in to change the active department between stages.
- Goods in Transit Report — Track issued-but-not-yet-received items
- Stores Stock Transfers
- Theatre Stock Transfers
- Direct Issue to BHTs from Pharmacy
- Pharmacy Batch Management and Expiry Tracking