Repository navigation
Tails OS USB Operating System Setup Guide
Portable privacy workstation: live USB boot, Tor connectivity, optional encrypted Persistent Storage, and repeatable session checks
Part of the ULTIMATE CYBERSECURITY MASTER GUIDE · OPSEC Section


Documentation reviewed: 2026-09-29; boundary diagram and routing terminology updated: 2026-11-18 — hardware testing and complete link-resolution verification remain pending.
Prerequisites: Basic USB imaging and boot-menu skills; review the Linux command reference and OPSEC fundamentals. Acronyms are defined below; see also the repository glossary.
Build a portable privacy-focused operating system using Tails booted directly from a USB stick, with Tor Browser and optional encrypted Persistent Storage for selected files and settings.
Walk through hardware preparation, verified downloads, installation from Windows/Linux/macOS, startup options, Tor connection, selective persistence, validation, updates, backups, and recovery.
Produce a repeatable Tails setup whose boot behavior, Tor connection, retained files, and backup process have been checked — while keeping anonymity claims within what those checks can establish.
- Creating a portable privacy workstation without installing an OS on the computer's internal disk.
- Starting temporary sessions with minimal retained local activity.
- Keeping selected documents or settings in encrypted storage between sessions.
- Reviewing an existing Tails USB for operational mistakes and outdated procedures.
Important
Anonymity is a goal, not a guarantee. Tor, temporary sessions, and storage encryption address different risks. Tails does not prevent identification through accounts, document contents, compromised hardware, or sufficiently capable traffic analysis. [^warnings]
Note
Research and validation scope: Installation, network, persistence, upgrade, and recovery instructions were checked against official Tails documentation, including direct page retrieval. Some initial searches used the project's English documentation source strings. This guide has not been executed on the reader's hardware. Obtain current releases, signing keys, and changing compatibility details from the official pages. Recommendations and acceptance tests below are practical guidance, not a certification.
- 🧭 1. Architecture and Protection Boundaries
- 🧰 2. Equipment and Preparation
- 🔏 3. Download and Verify Tails
- 💾 4. Install Tails on USB
- ⚙️ 5. First Boot and Welcome Screen
- 🌐 6. Connect to Tor
- 🔐 7. Create and Configure Persistent Storage
- ✅ 8. Validate the Setup
- 🔄 9. Choose How Much to Retain
- 🎭 10. Daily Operation and Identity Separation
- 🛠️ 11. Maintenance, Recovery, and Troubleshooting
- 📋 12. Final Acceptance Checklist
- 📚 Official Sources and Verification Scope
- Related Repository Material
- Download the current stable Tails USB image (
.img) from the official installation page. - Verify the download using the official verification workflow.
- Write the image to a dedicated USB stick using the documented tool for your preparation OS.
- Boot that USB directly on a compatible computer.
- Review the Welcome Screen; keep default protections unless you have a specific reason to change them.
- Connect to the network, complete Tor Connection, and use Tor Browser.
- If you need saved files, create Persistent Storage and enable only the required features.
- Test session reset and persistence, keep Tails updated, and maintain an encrypted backup.
Terminology: Tails = The Amnesic Incognito Live System; OS = operating system; USB = Universal Serial Bus; RAM = random-access memory; UEFI = Unified Extensible Firmware Interface; VM = virtual machine; LUKS = Linux Unified Key Setup; MAC address = local network-interface identifier; ISP = Internet service provider.
Tails is the operating system you boot. This guide does not install Kicksecure, VirtualBox, or Whonix VMs. One USB can be enough for initial installation and use; additional sticks support backups and some upgrades. [^windows][^requirements]
| Component | Purpose | Important boundary |
|---|---|---|
| Physical computer | Executes Tails and provides keyboard, display, and networking | Firmware and hardware must still be trusted |
| Tails USB system area | Holds the bootable OS and supported system upgrades | This is not the encrypted Persistent Storage |
| Live session | Holds ordinary temporary session changes | Shutdown does not erase remote records or intentionally saved files |
| Tor and Tor Browser | Route supported browser traffic through Tor, reducing exposure of the source network address | Accounts, content, timing, and endpoint risks can still identify or correlate activity |
| Optional Persistent Storage | Encrypts selected retained data and settings | Encryption protects locked data; it is not a hidden volume |
| Unsafe Browser | Allows direct access for captive portals and trusted local pages | It bypasses Tor |
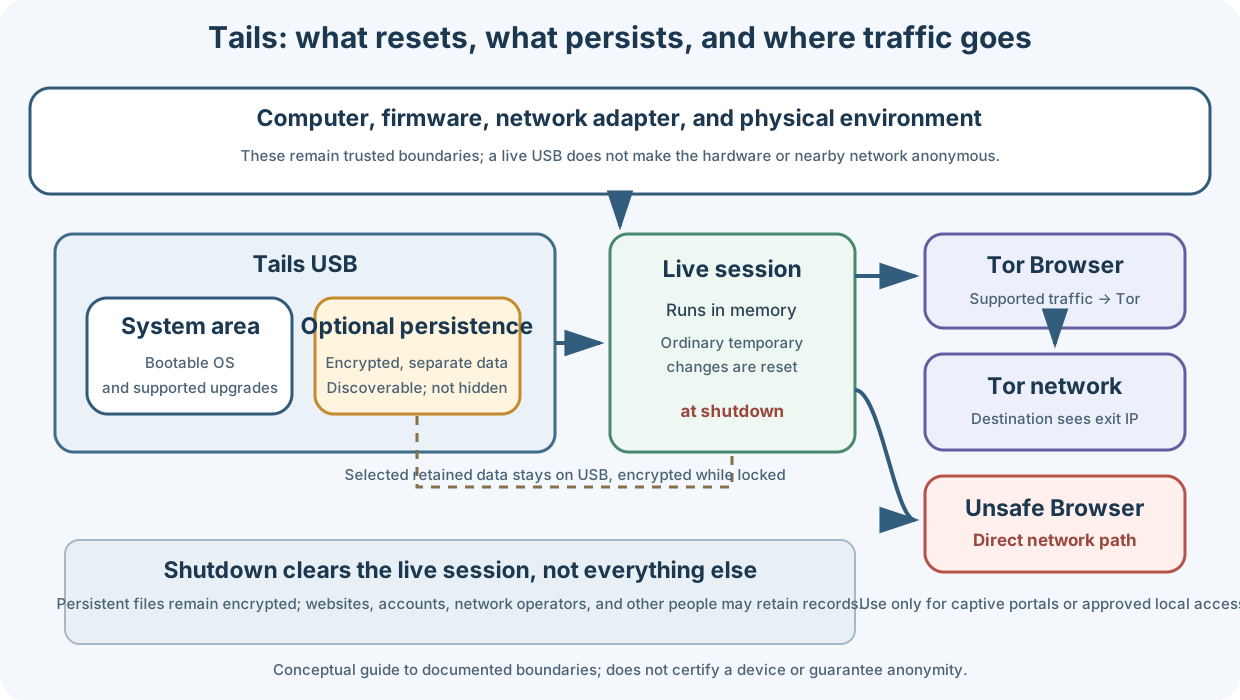
Conceptual view of the documented boundaries. Session reset does not erase Persistent Storage or records held by remote services.
Tails is not a promise that the whole USB is encrypted. Its optional Persistent Storage is a separate passphrase-protected encrypted partition. Its presence can be detected. Leaving it locked on one boot does not delete anything stored there. [^persistence]
Tails normally restricts application Internet access to Tor. There are documented exceptions: Unsafe Browser, and certain connection-establishment functions such as the clock check used by automatic Tor Connection. Avoid the inaccurate claim that every packet from the computer always travels through Tor. [^tor][^unsafe]
An infected installed Windows system is different from compromised firmware or a hostile USB device. Booting a separate OS avoids running the installed Windows session, but it does not make the physical machine inherently trustworthy. Use a trusted computer to create and operate the USB. [^warnings]
Official documentation calls for an x86-64 compatible processor, USB boot support, a USB stick of at least 8 GB, and 3 GB RAM for smooth operation. Hardware compatibility still varies. ARM devices, Apple Silicon Macs, and Raspberry Pi are outside this setup. [^requirements]
The following are my practical recommendations, not additional official minimums:
| Item | Suggested choice | Why |
|---|---|---|
| Computer | Compatible Intel/AMD PC with 8 GB RAM or more | Headroom for browser tabs and temporary files |
| Primary USB | Quality 32–64 GB USB 3.x stick | Room for saved files without excessive cost |
| Backup USB | Same actual capacity or larger | Holds a separately usable backup |
| Upgrade USB | Spare stick meeting the current minimum | Used for intermediary/manual upgrades |
| Network fallback | Supported Ethernet connection or adapter | Helps isolate Wi-Fi compatibility problems |
| Instructions | This guide on another device or paper | Available while the setup computer restarts |
Tails recommends multiple USB sticks when using Persistent Storage: a primary, a backup, and ideally an upgrade stick. Check current hardware issues before buying equipment. [^requirements]
- Back up the chosen target USB; installation erases it.
- Label sticks by role: PRIMARY, BACKUP, and UPGRADE.
- Record their capacity and model so they are distinguishable in imaging tools.
- Disconnect unrelated external disks while writing the image.
- Keep Windows recovery information available before making firmware changes; do not clear the TPM.
- Use a trusted OS to prepare the USB.
- Keep the target laptop plugged into power during installation and upgrades.
For this baseline, use a conventional USB stick. External SSDs and devices reported as fixed disks have a separate Tails procedure and may need its External Hard Disk boot option; do not assume the Kicksecure external-SSD instructions transfer unchanged. [^boot]
- Open the official installation selector.
- Select the OS you are using to create the USB.
- Download the current stable USB image, with the
.imgextension. - Save it on the preparation computer, not the USB you are about to overwrite.
- Complete the official download verification before flashing.
The USB image and ISO serve different workflows. Use the USB image here; do not rename an ISO to .img. This guide deliberately avoids fixing a release number that will become obsolete. [^windows][^verify]
On the Tails download page, use its file-selection verification control, select your downloaded image, and wait for a successful result. If it reports failure, download again and investigate; do not proceed with an image that failed verification. [^verify]
For a stronger verification workflow, follow Tails' expert instructions to authenticate the signing key and verify the matching signature. A valid signature from an unverified key is not sufficient. [^expert]
The generic detached-signature command below uses placeholders, not actual release filenames:
gpg --verify '/path/to/actual-tails-image.img.sig' '/path/to/actual-tails-image.img'Use the exact downloaded signature filename and current official signing-key instructions. A hash can detect a changed file; its trustworthiness still depends on where the expected value came from. Neither verification route repairs a compromised preparation computer.
Tip
Record the release you downloaded, the verification method, and the date. Never record your future Persistent Storage passphrase alongside this installation record.
Choose one installation method below. These are new-install procedures, not instructions for updating a USB containing important Persistent Storage.
Caution
Verify the target before writing. Imaging overwrites the selected drive, including any existing Tails Persistent Storage. Disconnect backup drives and confirm the target by model and capacity.
- Download Rufus through the official Tails Windows instructions and save it on the preparation computer.
- Open Rufus; follow the documented update-policy prompt.
- Insert the target USB and choose it under Device.
- Use Select to choose the verified Tails
.imgfile. - Recheck the target and start writing.
- Let the operation finish before closing Rufus. [^windows]
Do not add a Rufus persistence partition or customize the image layout. Tails manages its own Persistent Storage after startup. If Windows later cannot browse the drive normally, do not format it to make it appear in File Explorer.
- Open Disks; install your distribution's
gnome-disk-utilitypackage if needed. - Insert and select the target USB in the drive list.
- Open the drive menu and choose Restore Disk Image.
- Select the verified Tails
.img. - Choose Start Restoring, confirm the correct destination, and authenticate if required.
- After completion, use Disks' eject/power-off control. [^linux]
Use the whole-drive restore function. Copying the image into an existing filesystem does not create this installation.
- Install/open balenaEtcher using the Tails macOS instructions.
- Choose Flash from file and select the verified USB image.
- Use Select target to choose the correct USB.
- Flash it and let Etcher finish its validation.
- Close Etcher and eject the drive. If macOS calls it unreadable, eject rather than initialize it. [^mac]
Creating an image from macOS does not establish that the Mac can boot Tails. Apple Silicon is unsupported; Intel Mac support is model dependent. [^requirements]
My recommended checkpoint: the writer completed without errors, you know which physical stick was written, and its contents are expendable until your first successful boot. If verification or writing failed, fix that before investigating Tor or persistence.
On Windows, the documented path is Shift + Restart → Use a device → USB HDD or the matching USB entry. Alternatively, power on and use the manufacturer's one-time boot menu to select the Tails USB. On supported Intel Macs, use the Option startup selector. [^boot]
Choose the normal Tails boot entry first. Try Troubleshooting Mode for a suspected hardware problem; use device-specific documentation before changing firmware settings. Keep Secure Boot settings unchanged unless the actual error and current Tails instructions indicate otherwise. An exact firmware key or setting cannot be guaranteed across all models.
| Setting | Suggested baseline | Purpose |
|---|---|---|
| Language/keyboard | Set correctly | Avoid typing and passphrase-layout mistakes |
| Persistent Storage | Leave locked unless required | Choose whether retained data is available |
| Administration password | Leave unset for routine use | Enable only for a defined maintenance task |
| MAC address anonymization | Keep enabled initially | Reduces local hardware-identifier exposure |
| Offline Mode | Enable for entirely offline work | Avoid network activity during that session |
| Unsafe Browser | Disable when unnecessary | Reduces accidental direct browsing |
Configure these before clicking Start Tails. Welcome Screen options can themselves be saved through a persistence feature; inspect them again after unlocking stored settings. [^welcome]
The administration password permits privileged operations; it is not your Persistent Storage passphrase. Set it through Additional Settings → Administration Password on the Welcome Screen when needed. You cannot add it after starting the desktop; restart for a session that requires it. Do not enable administrative access merely to browse. [^admin]
MAC anonymization concerns the local network interface, not your public IP, account identity, or physical presence. If it causes a real connectivity problem, consult the official guidance before disabling it. [^mac-address]
Join Ethernet or Wi-Fi, then follow Tor Connection. Select automatic connection for ordinary use, or its option to hide Tor use from the local network when that matches your needs. The latter requires an appropriate custom bridge and may require manually correcting the clock. Decide before allowing direct Tor attempts. [^tor]
Automatic connection can try public relays, then default bridges, then request a custom bridge. It also uses a documented non-Tor clock-check connection. A bridge can help with blocking and visibility, but do not interpret it as a guarantee that Tor use is undetectable. [^tor]
If the network requires a hotel, airport, or similar sign-in page:
- Use the connection assistant's guidance or open Apps → Internet → Unsafe Browser.
- Visit an ordinary public page to trigger the portal.
- Complete the required network sign-in.
- Close Unsafe Browser after access is established.
- Finish Tor Connection and use Tor Browser for your intended browsing. [^unsafe]
If you disabled Unsafe Browser and now need it, save intentional work and restart with that option available.
Warning
Unsafe Browser does not use Tor. Sites it reaches can see the network's real public IP. Do not use it for anonymous accounts or private research. Portal credentials can also identify you to the network operator. [^unsafe]
After Tor Connection succeeds, open Tor Browser and visit Tor Check. A positive result verifies that browser connection. It does not verify hardware trust, document safety, every application, or identity separation.
If the browser reports a refusing proxy, confirm network and Tor connection status first. Do not turn off the firewall or replace Tor Browser to work around the error. [^browser]
- Start the Tails desktop from the primary USB.
- Open Apps → Tails → Persistent Storage.
- Begin the creation assistant.
- Enter and confirm a strong unique passphrase.
- Create the storage, then select which features should persist. [^create]
Tails recommends 5–7 randomly chosen words for the passphrase. An improvised quote or familiar sentence is not equivalent to random selection. Forgotten passphrases cannot be recovered by the project. [^create]
| Feature | What it keeps | Suggested initial choice |
|---|---|---|
| Persistent Folder | Documents deliberately saved there | Enable if retaining documents |
| Network Connections | Wi-Fi credentials/network settings | Optional; consider network-history sensitivity |
| Tor Bridge | Last successfully used bridge | Enable if consistently needed |
| Welcome Screen | Startup preferences | Optional; review restored settings |
| Tor Browser Bookmarks | Bookmarks | Optional; not general browser-history persistence |
| GnuPG / SSH Client | Relevant keys and configuration | Only for a defined workflow |
| Additional Software | Packages selected for automatic installation | Leave off initially |
| Dotfiles | Selected custom configuration files | Leave off unless you understand each change |
Other supported features are listed in the application. Persistence is selective: unlocking it does not make every directory, application setting, or browser state permanent. [^configure]
Open Files, select Persistent in its sidebar, and save retained documents there. On the next boot, enter the passphrase on the Welcome Screen and select Unlock Encryption before starting Tails. Enabled features become available. [^use]
A file saved to an ordinary temporary folder may disappear even when Persistent Storage is unlocked. Large temporary downloads consume RAM; select Persistent deliberately for large files you intend to retain. Current Tor Browser uses the file chooser for permitted file access; older instructions requiring special “Tor Browser” download folders are obsolete. [^browser]
Keep the initial system minimal. If a package is necessary:
- Boot with an administration password and unlock persistence.
- Enable Additional Software.
- Open Synaptic Package Manager, search for the package, mark it for installation, and apply.
- Select Install Every Time when offered if it should return on later boots. [^software]
Network software may need explicit Tor configuration; blocked connectivity is not permission to weaken Tails' firewall. Installing VPN or other network-control software can interfere with its protections. Use supported instructions instead of treating Tails as a general Debian installation. [^software]
These are practical acceptance tests, not a forensic or anonymity certification. Use harmless sample files throughout.
Open Apps → Tails → About Tails, record the version, and check for upgrades. Confirm you booted Tails itself rather than opening a desktop file in the installed OS. Test display, keyboard, network, and shutdown before saving important work.
- Create
session-test.txtin a normal temporary location, such as the Desktop. - Fully shut down.
- Boot Tails again.
- Confirm the file is absent.
If it survives, check whether the actual path was on external/persistent storage or redirected through custom persistence. File disappearance confirms this test case, not that every possible trace was erased.
- Unlock Persistent Storage and enable Persistent Folder.
- Create
persistence-test.txtin the Persistent folder. - Fully shut down and reboot.
- Unlock persistence and confirm the file opens correctly.
Then reboot without unlocking persistence. The retained file should not be available through the normal Persistent folder. Reboot and unlock once more; the original file should still exist. This demonstrates access behavior, not erasure or resistance to all attacks.
Confirm Tor Connection succeeds, then use Tor Check inside Tor Browser. In a separate Offline Mode session, fresh remote pages should fail to load. Cached content is not evidence of a working network. Do not use Unsafe Browser for the Tor test, and do not expect ordinary ping behavior to validate Tor.
For readers comfortable with Linux, these commands inspect devices and mounts without modifying them:
lsblk -o NAME,SIZE,MODEL,TRAN,FSTYPE,MOUNTPOINTS
findmnt
swapon --show
Identify the boot USB, any unlocked encrypted mapping, and unexpected internal or external writable mounts. Do not use broad logs or serial numbers in a public troubleshooting post. A partition listing does not authenticate the OS image or certify encryption implementation.
Try another trusted compatible computer if portability matters. Separately boot the backup created in Section 11, unlock its storage, and open a sample retained file. A copy that has never been opened is an unverified backup.
| Workflow | Startup choice | Data-handling result |
|---|---|---|
| Temporary session | No persistence, or leave it locked | Ordinary session changes are temporary |
| Selective saved work | Unlock persistence and enable needed features | Selected files/settings survive |
| Offline work | Enable Offline Mode; independently choose persistence | Network unavailable; storage choice still matters |
These are workflow choices, not three separate installed operating systems. Tails remains a live system when persistence is unlocked. Supported OS upgrades can also intentionally write to the system area, independently of your document-persistence choice. [^persistence][^upgrade]
For a first setup, my recommendation is to validate a temporary session before creating persistence. Then enable Persistent Folder only, test it, and add other features one at a time. This makes it easier to understand why a setting or file survives a reboot.
Keep a private inventory of retained categories, such as “research documents” and “bridge configuration.” Avoid recording passwords, identities, or account secrets in an unencrypted setup checklist.
A reboot does not retract uploaded documents, delete a website's records, remove backups, or erase data intentionally written to other disks. It also does not sanitize a physically compromised USB or computer. Leaving a saved feature disabled should not be treated as securely deleting its previously stored data.
Do not copy Whonix's Gateway-initialization or live-host maintenance steps into Tails. Tails manages its own Tor session and USB upgrade workflow; there is no separate Gateway VM to initialize.
- Use trusted hardware and insert the primary USB for booting.
- Select the Tails boot entry.
- Review startup settings and deliberately choose whether to unlock persistence.
- Connect through Tor when online work is required.
- Check upgrades before sensitive activity after a long break.
- Open only the documents and accounts needed for this session.
Use each session for one purpose. Restart between activities you do not want linked, and consider separate USB installations when their saved files or identities must remain apart. Tor does not make an existing personal or business account anonymous to its operator. Reusing recovery addresses, phone numbers, or identifying content can reconnect supposedly separate identities. [^warnings]
Prefer supported Tor Browser settings. Its Safer or Safest security levels trade some site functionality for reduced active content; inspect the current Security Level panel. Avoid adding arbitrary extensions or changing browser identity strings. A new browser identity cannot withdraw information you already disclosed. [^browser]
Before publishing a file, use Apps → Accessories → Metadata Cleaner on a copy, then inspect the result. It cannot reliably remove all metadata from every complex format, and it does not remove identifying content visible in a document. [^metadata]
For supported files, an optional command-line workflow is:
mat2 '/path/to/file.ext'The tool normally creates a separate file.cleaned.ext. Confirm that the cleaned copy is the one you share. Metadata cleanup is different from removing malicious document behavior; offline viewing and dedicated sanitization tools address different risks. [^metadata]
My recommended document checklist: verify the filename, visible text, embedded images, comments, revision history, and destination account before uploading. Never assume “opened in Tails” means “safe to publish.”
Save only the work you intend to retain. Close applications, eject any auxiliary writable drives, then use the system's shutdown command. Wait for power-off before removing the boot USB. Avoid sleep or hibernation as a substitute for ending a sensitive session, and do not leave an unlocked system unattended.
Connect to Tor and use the offered Tails Upgrader workflow. You can also open Apps → Tails → About Tails → Check for Upgrades. Complete the upgrade and restart; confirm the running version afterward. The supported upgrader verifies upgrade packages and is designed to preserve Persistent Storage. [^upgrade]
Back up important files first. Keep power stable and do not unplug the USB. A system-partition space error is not necessarily solved by deleting files from Persistent Storage because these are different storage areas.
Do not use apt full-upgrade, a Debian release conversion, or a new raw image flashed onto the primary stick as a replacement for Tails' supported OS upgrade procedure.
Tor Browser's independent automatic updater is intentionally disabled in Tails. Keep the browser current through supported Tails upgrades; do not override that policy or replace it with a separately downloaded browser. [^browser]
When the Upgrader requires a manual upgrade, prepare a separate up-to-date Tails USB and boot it. Attach the primary USB afterward. In Tails Cloner, choose the primary as the target and select Upgrade. Follow the official version-specific workflow. [^clone]
Caution
Upgrade and Install are different actions. Keep Clone the current Persistent Storage off during an OS-only upgrade. That option makes Upgrade unavailable and instead requires reinstalling, which erases the target. If asked to delete all target data during your intended upgrade, stop and recheck the selected operation. [^clone]
Shut down after completion, remove the intermediary stick, boot the primary, and test retained files. The supported manual upgrade preserves target persistence; a raw reflash does not. [^upgrade][^clone]
- Boot the primary Tails and unlock its Persistent Storage.
- Attach the blank backup USB.
- Open Apps → Tails → Tails Cloner.
- Select Clone the current Tails and enable Clone the current Persistent Storage.
- Verify that the target is the expendable backup USB.
- Choose Install, set/confirm the backup's storage passphrase, and approve erasing that backup target.
- Wait for completion. [^backup]
Power off and independently boot the backup. Unlock its storage and open sample files. Store it separately from the primary.
Boot/unlock the primary, connect the existing backup, and use Apps → System Tools → Back Up Persistent Storage. Maintain the backup's OS version separately using the supported upgrade procedure when necessary. [^backup]
My recommendation: close applications that are editing saved data before backup, and keep a dated offline copy when historical recovery matters. A synchronized backup can reflect accidental changes too; one current copy is not a complete version history.
If the OS no longer boots, official recovery options include a preserving manual upgrade, unlocking storage from another Tails, and working from a partition image with recovery tools. If Tails boots but persistence will not unlock, use the separate filesystem-error procedure. [^recover]
Do not format or reflash the original drive to make it readable. First identify whether you have a passphrase/layout mistake, OS boot failure, filesystem problem, or physically failing flash storage. For a drive with read errors or valuable unique data, preserve an image before repair attempts; work on a copy where possible.
Recovery commands can overwrite their destination, and no recovery workflow bypasses an unknown encryption passphrase. Follow the official recovery page for your exact condition rather than substituting a generic fsck or guessed device path.
| Symptom | First checks |
|---|---|
| USB does not appear in the boot menu | Confirm image writing succeeded; try another port and check the manufacturer's boot instructions |
| Windows starts instead | Select the USB explicitly through the one-time boot menu |
| Blank screen or graphics failure | Try Tails Troubleshooting Mode and consult current hardware/graphics issues |
| USB appears unreadable in Windows/macOS | Do not format or initialize it; test booting instead |
| Wi-Fi missing | Check airplane mode, supported hardware, and an Ethernet fallback |
| Wi-Fi connected but no Internet | Check for a captive portal before troubleshooting Tor |
| Tor Connection fails | Check network access, clock, selected bridge, and current connection guidance |
| Browser proxy error | Confirm Tor Connection completed; do not disable the firewall |
| Persistence passphrase rejected | Check keyboard layout and Caps Lock before considering filesystem damage |
| Saved file disappears | Check whether it was actually saved under Persistent and the feature was enabled |
| Persistent folder missing | Confirm storage was unlocked at startup and its folder feature is enabled |
| Software disappears on reboot | Check Additional Software registration and unlocked persistence |
| Downloads cause crashes | Check available RAM; large temporary files consume memory |
| Automatic upgrade fails | Follow the official manual-upgrade path; do not reflash the primary |
| Backup will not unlock | Verify the backup's own passphrase, keyboard layout, and health |
| Ordinary command cannot access the Internet | Check supported Tor configuration; generic network software is not automatically compatible |
These are starting points, not confirmed diagnoses. Change one variable at a time. Save the exact error, release, computer model, and USB model for support, but redact private identifiers and documents.
- Compatible x86-64 hardware and USB boot confirmed.
- Current Tails USB
.imgdownloaded through the official site. - Download verification completed successfully.
- Correct USB selected; unrelated drives protected from accidental overwrite.
- Tails boots directly and shuts down cleanly.
- Welcome Screen choices reviewed deliberately.
- MAC anonymization retained unless a documented need required otherwise.
- Tor Connection completes; Tor Browser reports Tor use.
- Unsafe Browser's direct-network behavior understood.
- Temporary test file disappears after full shutdown/reboot.
- If enabled, Persistent Storage unlocks and retained test files survive.
- Only necessary persistence features enabled.
- Difference between encrypted persistence and the unencrypted system area understood.
- Current release confirmed after upgrades.
- Bootable backup created and independently tested if retaining important data.
- Manual upgrade distinguished from destructive reinstall/reflash.
- Personal/business identities separated from intended anonymous activity.
- Hardware, account, metadata, and network-analysis limitations understood.
The table below is intentionally empty for an operator's actual hardware and Tails installation. Enter the version displayed on the running device and the real verification method/date. Write Not tested rather than implying Tor connectivity, persistent data recovery or verified backups. Keep the entire record private.
| Field | Your record |
|---|---|
| Installation date | |
| Tails version after update | |
| Download verification method/result | |
| Computer and USB model | |
| Enabled persistence features | |
| Temporary-file test result | |
| Persistent-file test result | |
| Tor connection test result | |
| Backup boot/file-open test date | |
| Known hardware limitations |
Keep this record private. Do not put passphrases, recovery keys, sensitive account names, or bridge secrets into it.
Official project instructions determine release-specific behavior. The table of contents, practical equipment headroom, acceptance tests, and operational checklists are editorial recommendations. Directly retrieved pages sometimes include hidden text for several installation paths; this guide separates fresh install, manual upgrade, and backup clone instead of combining those alternatives.
[^requirements]: Tails system requirements and USB recommendations. [^windows]: Install Tails from Windows. [^linux]: Install Tails from Linux. [^mac]: Install Tails from macOS. [^verify]: Download and verify the USB image; verification instructions were also checked in the official installation workflow and English source strings. [^expert]: Expert installation and signing-key verification; English source strings. [^boot]: Starting Tails on a PC and external hard disks. Boot instructions were also retrieved through the installation pages. [^welcome]: Welcome Screen. [^admin]: Administration password. [^mac-address]: MAC address anonymization; English documentation source. [^tor]: Connecting to Tor. [^unsafe]: Captive portals and Unsafe Browser. [^browser]: Tor Browser in Tails. [^persistence]: Persistent Storage overview and encryption. [^create]: Create Persistent Storage. [^configure]: Configure Persistent Storage. [^use]: Unlock and use Persistent Storage. [^software]: Additional Software. [^metadata]: Remove metadata. [^upgrade]: Upgrade Tails. [^clone]: Manual upgrade from another Tails. [^backup]: Back up Persistent Storage. [^recover]: Recover a nonbooting Tails USB and recover from filesystem errors. [^warnings]: Tails limitations and warnings.
Additional troubleshooting: known issues and graphics compatibility.
| Resource | Relationship |
|---|---|
| OPSEC section | Operational security concepts and section navigation. |
| Cybersecurity OPSEC Guide | Broader compartmentalization and research-workstation context. |
| Linux command reference | Command-line fundamentals. |
| Master guide | Broader cybersecurity reference. |
| Repository glossary | Additional technical terminology. |
Note
Tails-specific configuration takes precedence for this build. Generic VM, VPN, browser-extension, disk-encryption, and Linux-upgrade instructions elsewhere should not be applied blindly. Tails uses its own live-session, Tor, persistence, and upgrade design.
⬅️ Back to Master Index | 🔒 OPSEC Index | 🎯 Role Navigation | Legal Notice
📄 Source: OPSEC/tails-usb-setup-guide.md | ✏️ Suggest an edit | ⬅️ Back to Operations Security (OPSEC)