Repository navigation
WIRELESS and NETWORK SECURITY AUDIT PLAYBOOK
Version 1.1
Last Reviewed: November 2026
Broader assessment workflow: Staged client audit blueprint connects the scope and evidence rules below to OWASP web/API checks, M365 SCuBA, SBOM checks and findings/retesting where explicitly included in customer authorization.
Provide a complete, engagement-ready procedure for auditing an organization's wireless and network security posture - from pre-engagement paperwork through evidence collection to final reporting - so that nothing gets skipped under time pressure and every finding is defensible.
Structured as eight sequential sections covering pre-engagement authorization, wireless-specific testing, internal network testing, external perimeter testing, documentation standards, evidence/screenshot requirements, post-testing analysis, and a tool reference guide. Each section is a checklist-style procedure meant to be followed in order during a live engagement, not just read once.
Ensure every network/wireless penetration test produces (1) legally defensible evidence, obtained under signed authorization, (2) consistent, comparable results across engagements and testers, and (3) a report that a client can act on.
- Running an internal network penetration test
- Conducting a wireless security assessment (WPA2/WPA3, rogue AP detection, deauth testing)
- Performing external perimeter testing
- Onboarding a new tester who needs a standardized procedure to follow
- Preparing engagement documentation and reports for a client
- Pre-Engagement Checklist
- Wireless-Specific Testing Procedures
- Internal Network Testing Procedures
- External Perimeter Testing Procedures
- Documentation Standards During Testing
- Evidence Collection & Screenshot Requirements
- Post-Testing Analysis & Reporting
- Tool Reference Guide
For every active technique, confirm the exact assets, allowed methods, time window, rate or attempt limits, impact tolerance, emergency contact, and stop condition in the signed scope. A general authorization to assess the network does not automatically authorize credential collection, service disruption, persistence, or testing third-party systems. Use dedicated test accounts and synthetic data; stop if activity affects an out-of-scope user or service.
- Obtain signed authorization letter with specific scope
- Verify emergency contact information (client POC, technical lead)
- Confirm testing windows and blackout periods
- Document all MAC addresses and serial numbers of testing devices
- Ensure all tools are updated and functioning
- Verify the approved encrypted channel for evidence transfer and the client's data-handling rules
- Brief team on rules of engagement and legal boundaries
- Establish secure storage for collected evidence
- Configure timestamping on all devices
- Backup all tool configurations
- Signed Statement of Work (SOW)
- Rules of Engagement (ROE) document
- Authorization to Test letter on company letterhead
- NDA and liability waiver
- Emergency stop procedures documented
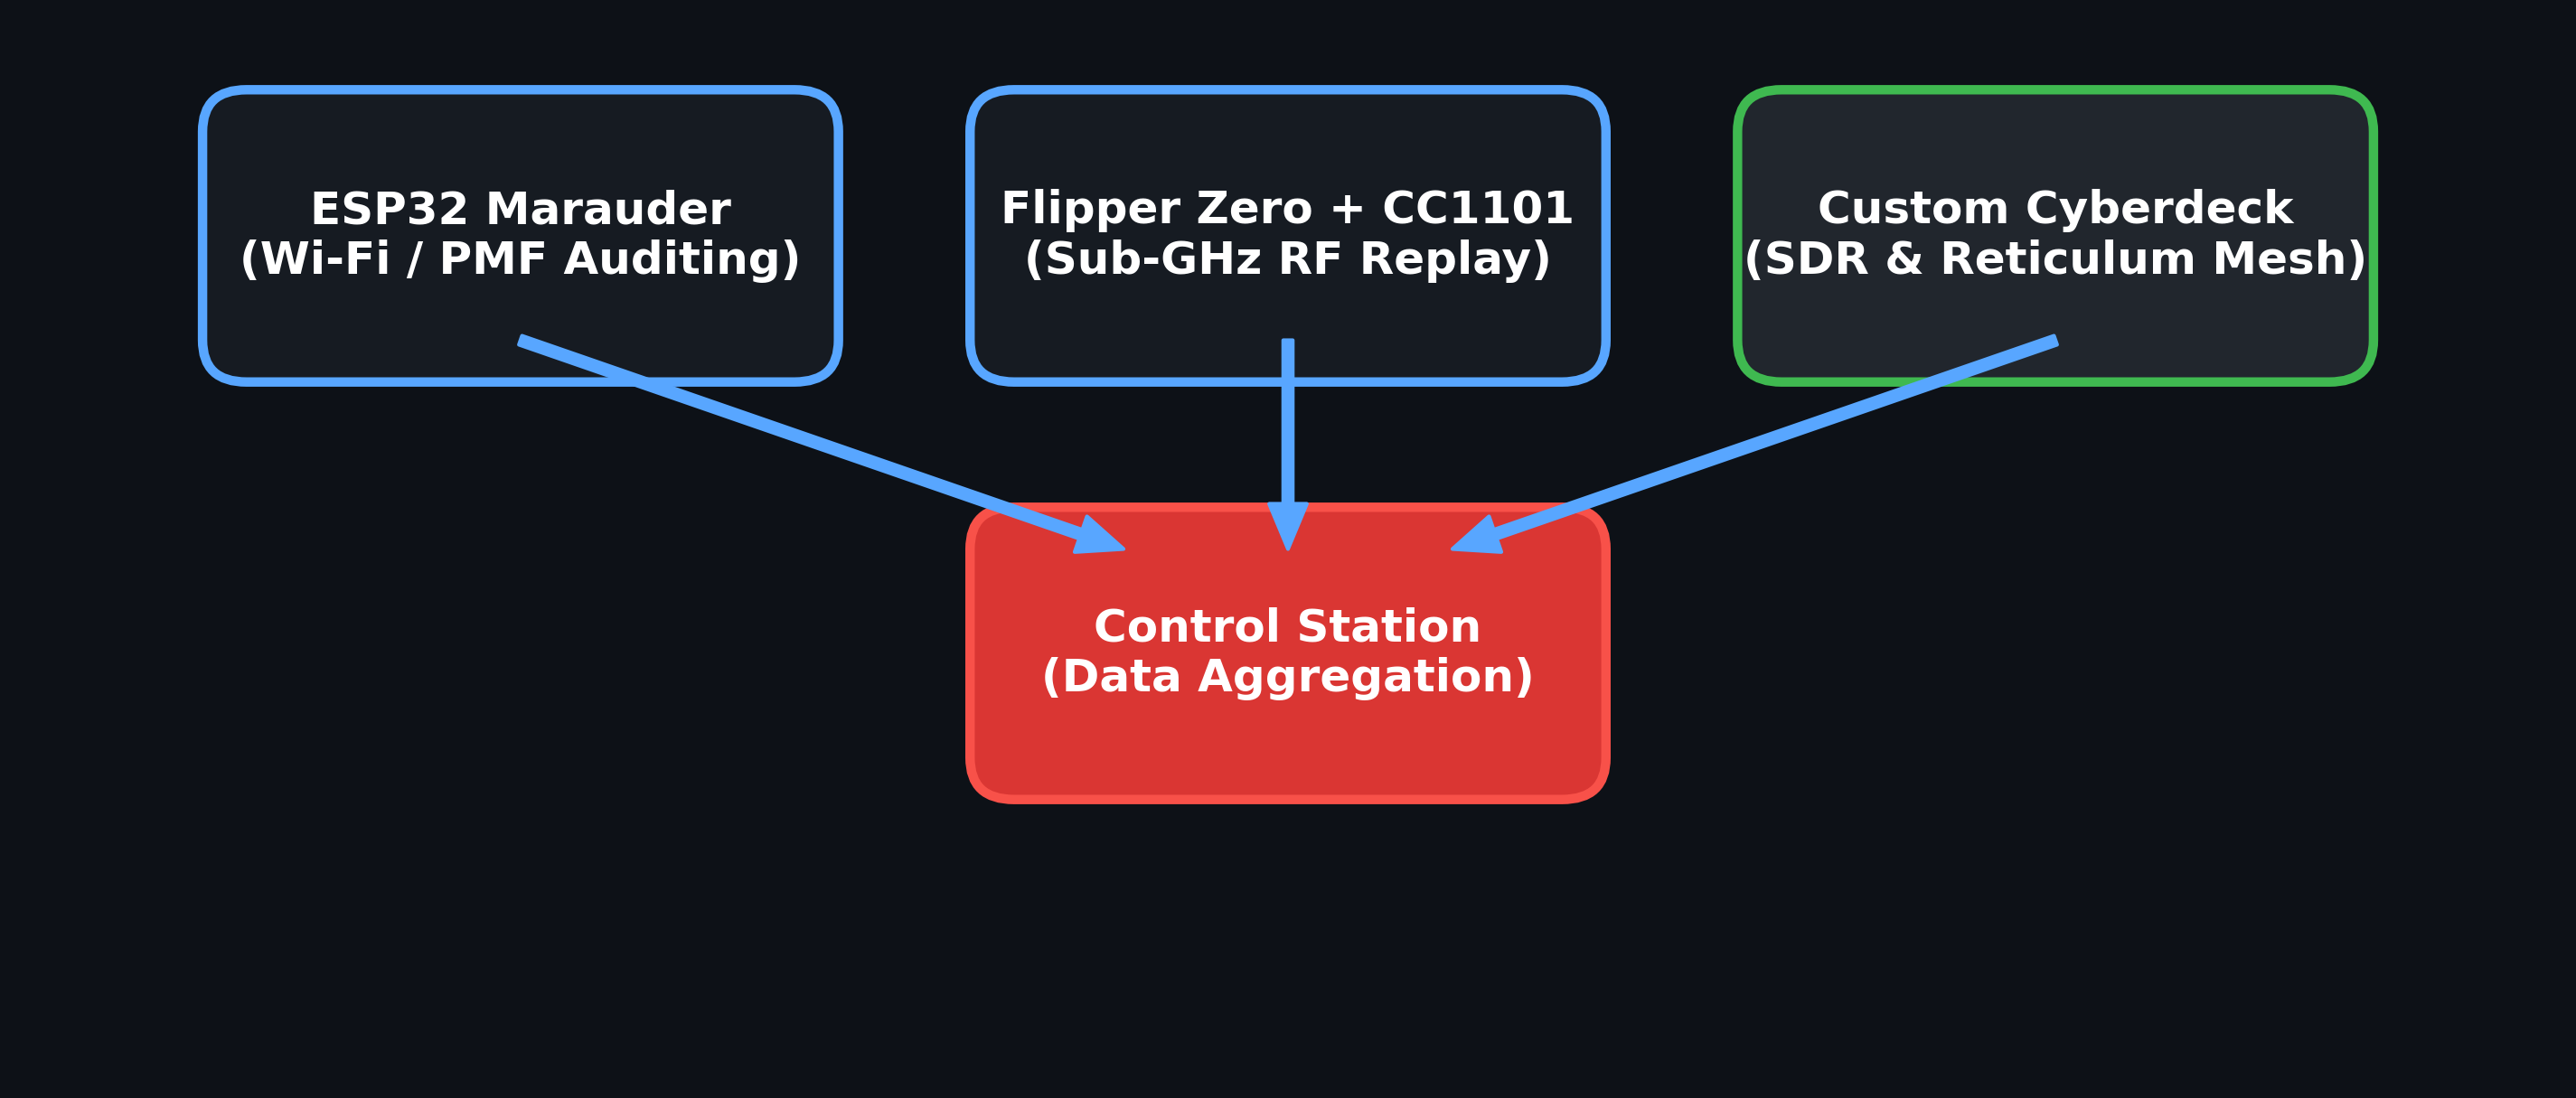
Illustrative wireless assessment workflow; execute only phases explicitly authorized in the engagement. Passive observation and active tests have different authorization and evidence-handling requirements.
For a focused GPS-tagged AP inventory before any separately authorized active testing, follow the Wardriving Field Workflow and select a tool in the Wardriving Index. The Kismet guide documents its lightweight wardrive overlay; Data Handling distinguishes private records from public WiGLE uploads.
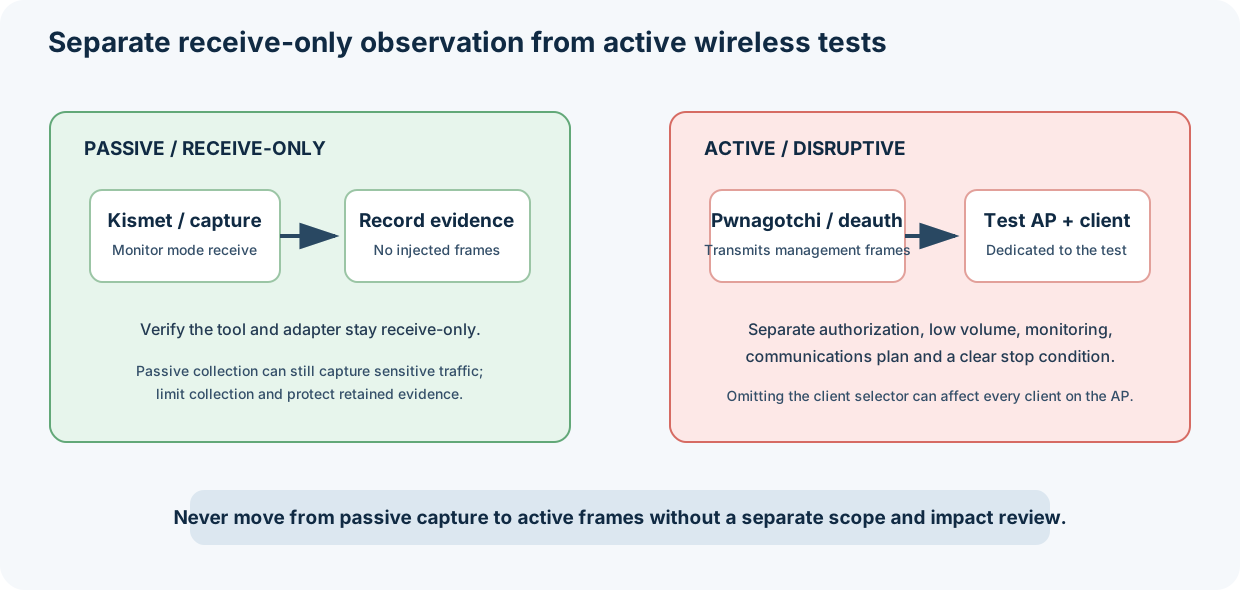
Pwnagotchi AUTO mode and deauthentication can transmit frames. Keep them outside receive-only observation; authorize active tests separately and isolate the test AP and client.
Objective: Identify wireless networks, access points, clients, and security configurations without actively engaging targets.
Receive-only tools: Kismet, Wireshark, or a monitor-mode capture tool configured without frame injection. Pwnagotchi AUTO mode is excluded from this passive phase; its behavior can include deauthentication when enabled (which upstream defaults enable), so treat it as active testing.
STEP 1: Environmental Survey
- Use Kismet or a monitor-mode capture configured for receive-only observation; verify that the adapter/tool is not transmitting test frames
- Position device in multiple physical locations throughout facility
- Duration: Minimum 2-4 hours per location
- Document:
- All SSIDs discovered (hidden and broadcast)
- BSSID (MAC addresses) of access points
- Channel utilization
- Signal strength measurements (RSSI)
- Encryption types (Open, WEP, WPA, WPA2, WPA3)
- Client devices and their associations
STEP 2: Passive Packet Capture
- Enable monitor mode on wireless interface:
# airmon-ng start wlan0 - Begin packet capture on all channels:
# airodump-ng wlan0mon - Alternate tool: Launch Kismet for comprehensive logging
- Capture duration: Minimum 4 hours for thorough analysis
- Save all .cap files with timestamps
STEP 3: Client Device Enumeration
- Identify all client devices connected to target networks
- Document MAC addresses and manufacturers
- Note client roaming behavior and preferred networks
- Capture probe requests to identify previously connected networks
- CSV export of all discovered networks
- Signal strength heatmap (if using multiple collection points)
- Timestamp logs of all activities
- Photographs of physical locations where testing occurred
Objective: Actively test wireless security controls, authentication mechanisms, and network access.
Tools: WiFi Pineapple, ESP32 Marauder, Kali Linux, Wireshark, or Pwnagotchi only when active behavior is explicitly approved
STEP 1: Rogue Access Point Testing (Evil Twin)
Using WiFi Pineapple:
- Use only a dedicated test AP and test client in an isolated environment; do not imitate a production SSID where real clients could connect.
- Do not harvest credentials. If portal behavior is in scope, use a clearly designated test portal and synthetic test account, and verify only whether the expected control blocks or permits that synthetic flow.
- Test client auto-association only with a dedicated test device and test SSID; do not enable karma against nearby or production clients.
- Document only the test-client outcome, time to connection, and control response. Do not collect or retain real credentials, session tokens, or unrelated device identifiers.
STEP 2: Deauthentication Testing
Using ESP32 Marauder or Kali:
- Purpose: In an isolated test, assess resilience or capture a test handshake. Deauthentication interrupts a client connection.
- Preconditions: Use an AP and client dedicated to the test, an explicitly approved time window, a named stop condition, and a rollback/communications plan. Do not target production clients unless the owner has approved the service impact.
- Select the test AP and one associated test client. The
-coption is essential: without it, aireplay-ng targets all clients on that AP. - Send the smallest approved test count (one in this example), then stop and verify the client reconnects:
# Replace placeholders with the isolated test AP/client and monitor interface. aireplay-ng --deauth 1 -a [AP_MAC] -c [TEST_CLIENT_MAC] wlan0mon - Capture only the test client's reconnection handshake.
- Document:
- Time to client reconnection
- Whether IDS/IPS detected the attack
- Success rate of handshake capture
- Any alerts generated
STEP 3: WPS Vulnerability Testing
Using Reaver/Bully on Kali:
- Scan for WPS-enabled access points:
# wash -i wlan0mon - Assess WPS only on an isolated access point that the engagement owner explicitly designated for this test. Do not use this workflow against production access points or clients.
- Before any active attempt, record the approved channel, maximum attempt count, maximum test duration, lockout/impact monitoring, emergency contact, and stop condition. Configure the selected tool to enforce those limits; stop immediately if the AP or a client behaves unexpectedly.
- Document whether WPS is enabled, the observed lockout behavior, the tool/version, approved limits, and the result. Test Pixie Dust only in the same isolated scope.
STEP 4: Captive Portal Bypass Testing
- Test DNS policy only with a controlled, non-sensitive marker and an approved destination.
- Test MAC filtering or VLAN isolation only on dedicated test equipment and ports; do not spoof production clients.
- Document the control result and approved test parameters. Avoid bypassing captive portals to access third-party or production services.
STEP 5: Wireless IDS/IPS Testing
- Generate various attack signatures
- Verify detection and response
- Test alert thresholds and tuning
- Document detection rates
Objective: Analyze captured data for security weaknesses.
Tools: Wireshark, Hashcat, Aircrack-ng
STEP 1: WPA/WPA2-PSK Handshake Analysis (Authorized Lab Captures Only)
This Aircrack-ng dictionary workflow applies to captured WPA/WPA2-PSK four-way handshakes. It is not a generic offline dictionary attack for WPA3-SAE. Assess WPA3-SAE using an authorized, controlled configuration review or test plan designed for that protocol; do not infer WPA3 password recoverability from a WPA2 capture.
- Verify handshake validity:
# aircrack-ng -J output captured.cap - Attempt dictionary attack (with pre-approved wordlist):
# aircrack-ng -w wordlist.txt captured.cap - For reporting: Document time to crack (if successful)
- Note: Never include actual passwords in reports
STEP 2: Traffic Analysis
- Open .cap files in Wireshark
- Filter for unencrypted traffic:
- HTTP credentials
- Clear-text protocols (FTP, Telnet)
- Sensitive data leakage
- Identify misconfigured devices
- Check for vendor default configurations
STEP 3: Client Security Analysis
- Analyze probe requests for security risks
- Identify devices using weak security protocols
- Document devices attempting to connect to suspicious SSIDs
Objective: Map internal network topology and identify active hosts.
Tools: Nmap, Netdiscover, Responder, Kali Linux tools
STEP 1: Host Discovery
- Perform network sweep:
# nmap -sn 192.168.1.0/24
# netdiscover -r 192.168.1.0/24
- Document all active hosts with IP and MAC addresses
- Identify network segmentation
- Create network diagram
STEP 2: Port Scanning
- Comprehensive port scan of discovered hosts:
# nmap -sS -sV -O -p- --script=default [target] - Quick scan for common ports:
# nmap -T4 -F [target] - Identify:
- Operating systems
- Running services and versions
- Open ports and their purposes
- Potential vulnerabilities
STEP 3: Service Enumeration
- SMB enumeration:
# enum4linux -a [target]
# smbclient -L //[target]
- SNMP enumeration:
# snmp-check [target] - DNS enumeration:
# dnsenum [domain]
# fierce --domain [domain]
STEP 4: Network Protocol Analysis
Using Wireshark:
- Capture internal network traffic
- Identify:
- Broadcast/multicast traffic
- LLMNR/NBT-NS poisoning opportunities
- Clear-text credentials
- Misconfigured VLANs
- Spanning tree topology
- Internal routing protocols
NSE vulnerability checks can probe services and may create load or trigger fragile behavior. Select targets and scripts individually from the written scope, agree on rate and timing limits, and prefer non-invasive checks first. Do not run broad script categories against production assets without explicit approval and a stop plan.
Objective: Identify security weaknesses in internal systems.
Tools: Nmap NSE scripts, Metasploit, OpenVAS (optional)
STEP 1: Automated Vulnerability Scanning
- Run Nmap vulnerability scripts:
# nmap --script vuln [target] - Check for common vulnerabilities:
- MS17-010 (EternalBlue)
- SMBv1 enabled
- Weak SSL/TLS configurations
- Default credentials
- Unpatched services
STEP 2: Web Application Identification
- Identify internal web applications
- Check for:
- Default admin panels
- Directory listings
- Version disclosure
- Common web vulnerabilities
STEP 3: Credential Exposure Testing
Using Responder only on an isolated, explicitly approved test segment:
- Responder can answer/poison name-resolution requests and capture challenge-response material; it is not a passive listener. Confirm the interface and VLAN are the dedicated test environment before starting it. Use a passive capture for observation-only work.
# responder -I eth0 -rdwv - Use dedicated test accounts and synthetic credentials only; do not capture or crack employee credentials.
- Validate the relevant name-resolution protections and alerting using the approved test scenario.
- Document the control result without including challenge-response material or secrets.
Objective: Test ability to escalate privileges and move laterally.
Tools: Metasploit, P4wnP1, various post-exploitation tools
STEP 1: Initial Access Testing
Using P4wnP1 only when physical testing is explicitly in scope:
- Use a dedicated test workstation and a benign, reversible marker payload that makes no network connections and changes no security settings.
- Do not harvest credentials, install persistence/backdoors, or interact with employee accounts or data.
- Document marker execution and defensive detection outcomes; coordinate with the client before testing user awareness.
STEP 2: Post-Exploitation Enumeration
After gaining initial access (authorized):
- Enumerate user privileges
- Check for unpatched software
- Identify sensitive data stores
- Map network shares and permissions
- Document findings
STEP 3: Lateral Movement Testing
- Test SMB relay attacks (if authorized)
- Attempt pass-the-hash attacks
- Test for Kerberoasting opportunities
- Verify network segmentation effectiveness
Objective: Gather information about external attack surface.
Tools: Nmap, Shodan, theHarvester, DNSrecon, Kali Linux
STEP 1: OSINT Gathering
- DNS enumeration:
# dnsenum [domain]
# dnsrecon -d [domain]
- Subdomain discovery:
# sublist3r -d [domain]
# amass enum -d [domain]
- Email harvesting:
# theHarvester -d [domain] -b all - Shodan/Censys queries for exposed services
STEP 2: External Network Mapping
- Identify public IP ranges
- Perform port scanning on external IPs:
# nmap -sS -sV -Pn -p- [external_IP] - Document:
- Exposed services
- SSL/TLS configurations
- Service banners and versions
- Potential entry points
Objective: Identify vulnerabilities in external-facing systems.
Tools: Nmap, SSLScan, Nikto, various web testing tools
STEP 1: Web Application Testing
- Directory/file brute forcing
- SSL/TLS configuration testing:
# sslscan [target]
# testssl.sh [target]
- Check for:
- Outdated software versions
- Known CVEs
- Security header misconfigurations
- Information disclosure
STEP 2: VPN/Remote Access Testing
- Identify VPN technologies in use
- Test for:
- Default credentials
- Known vulnerabilities
- Weak encryption
- Information leakage
STEP 3: Email Security Testing
- SPF/DKIM/DMARC verification
- Mail server security testing
- Open relay testing (authorized)
All testing activities must be documented in real-time with the following standards:
- All entries must include:
YYYY-MM-DD HH:MM:SS [Timezone] - Use synchronized time source (NTP)
- Document timezone in all logs
For each testing activity, document:
[TIMESTAMP] - Activity Initiated
Tool: [Tool name and version]
Target: [IP/Hostname/SSID]
Purpose: [What you're testing]
Command/Action: [Exact command or action taken]
Result: [Outcome]
Screenshot Reference: [Filename]
Notes: [Any relevant observations]
Example Entry:
2025-10-23 14:32:15 PST - Wireless Network Scan Initiated
Tool: Airodump-ng v1.7
Target: Corporate Network Vicinity (Building A)
Purpose: Identify all wireless networks and access points
Command: airodump-ng wlan0mon --output-format csv --write corp_scan_001
Result: Discovered 12 access points, 34 client devices
Screenshot: IMG_20251023_143215_airodump.png
Notes: Strong WPA2 encryption on all corporate APs, detected one rogue AP
Maintain strict chain of custody for all evidence:
- Evidence ID number (sequential)
- Date and time collected
- Collector name
- Evidence description
- Storage location
- Hash values (SHA-256) of all captured files
- Transfer records (if applicable)
- Store all evidence on encrypted drives
- Maintain backup copies
- Never modify original evidence files
- Use write-blocking where appropriate
Maintain a master testing log with sections:
Date: [YYYY-MM-DD]
Tester(s): [Names]
Testing Location: [Physical location]
Testing Phase: [Wireless/Internal/External/Other]
Weather Conditions: [If relevant for wireless testing]

Activities Summary:
[Bulleted list of major activities]

Findings Summary:
[Bulleted list of significant findings]

Issues Encountered:
[Any problems, anomalies, or deviations from plan]

Follow-up Required:
[Items needing additional testing or clarification]
- Timestamp visible (system clock or terminal timestamp)
- Tool name and version visible
- Command or action being performed visible
- Relevant output/results visible, with secrets redacted
- Minimum target information needed to support the finding
- Redact usernames, tokens, client identifiers, and other personal or sensitive data unless the client explicitly requires them in a protected evidence record.
[DATE]_[TIME]_[TOOL]_[TARGET]_[DESCRIPTION].png
Example: 20251023_1432_nmap_192.168.1.1_port_scan.png
For Each Vulnerability Found:
- Initial discovery screenshot
- Detailed information screenshot
- Proof of concept/exploitation screenshot (if applicable)
- Remediation verification screenshot (if retesting)
For Network Scans:
- Scan initiation (showing full command)
- Scan results overview
- Detailed results of interesting findings
- Scan completion with statistics
For Wireless Testing:
- Network discovery results
- Handshake capture confirmation
- Client connection attempts
- Deauthentication attack results
- Rogue AP connection logs
- Save full packet captures (.pcap/.cap format)
- Include only authorized network traffic
- Hash all capture files immediately after collection
- Document capture duration and statistics
- Filter and save separate files for specific findings
[DATE]_[TIME]_[INTERFACE]_[LOCATION]_[DESCRIPTION].pcap
- Start/end timestamps
- Interface used
- Capture filter applied (if any)
- Total packets captured
- File size
- SHA-256 hash
Tool Logs:
- All terminal output saved to log files
- Use script/screen logging:
# script testing_session_$(date +%Y%m%d_%H%M%S).log - Save tool-specific logs (Metasploit logs, Nmap XML output, etc.)
System Logs (if provided by client):
- IDS/IPS alerts during testing
- Firewall logs showing blocked/allowed connections
- Authentication logs
- System event logs
Custom Tool Logs:
- Pwnagotchi session logs and captured handshakes
- WiFi Pineapple logging database
- Responder captured hashes and logs
- Any custom script output
[CLIENT_NAME]_[ENGAGEMENT_DATE]/
├── 01_Planning/
│   ├── Authorization_Letter.pdf
│   ├── Scope_Document.pdf
│   └── Rules_of_Engagement.pdf
├── 02_Reconnaissance/
│   ├── OSINT/
│   ├── Network_Diagrams/
│   └── Findings_Summary.txt
├── 03_Wireless_Testing/
│   ├── Packet_Captures/
│   ├── Screenshots/
│   ├── Logs/
│   ├── Handshakes/
│   └── Wireless_Findings.txt
├── 04_Internal_Testing/
│   ├── Network_Scans/
│   ├── Screenshots/
│   ├── Logs/
│   ├── Vulnerability_Evidence/
│   └── Internal_Findings.txt
├── 05_External_Testing/
│   ├── Port_Scans/
│   ├── Screenshots/
│   ├── Logs/
│   └── External_Findings.txt
├── 06_Exploitation_POCs/
│   ├── Screenshots/
│   ├── Scripts_Used/
│   └── POC_Documentation.txt
├── 07_Raw_Evidence/
│   ├── evidence_manifest.csv
│   └── [All original evidence files with hashes]
└── 08_Final_Report/
    ├── Draft_Report.docx
    ├── Final_Report.pdf
    └── Executive_Summary.pdf
Evidence_ID, Filename, SHA256_Hash, Date_Collected, Collector, Description
For software and hardware vulnerabilities, use the client's required scoring policy; prefer CVSS v4.0 for new findings and include the vector string. Use CVSS v3.1 only when a client or reporting system requires it or for explicit comparison with legacy results. For control gaps that are not vulnerabilities, use a qualitative rating and explain the rationale rather than forcing a CVSS score. The following severity bands are a reporting aid:
- Requires immediate remediation
- Examples: Unauthenticated remote code execution, complete system compromise
- Requires urgent remediation (within 30 days)
- Examples: Authenticated RCE, critical data exposure, weak wireless encryption
- Requires remediation within 90 days
- Examples: Information disclosure, missing security controls, outdated software
- Requires remediation within 180 days
- Examples: Minor misconfigurations, informational findings
- No immediate risk but worth noting
- Best practice recommendations
For Each Finding:
Title: [Clear, concise title]
Risk Rating: [Critical/High/Medium/Low/Informational]
CVSS Version / Score / Vector: [If applicable; include the full vector string]

Description:
[Clear explanation of what was found]

Impact:
[Business and technical impact explanation]

Affected Assets:
[List all affected systems, networks, or devices]

Evidence:
[Reference to screenshots, logs, packet captures]
- Screenshot 1: [filename and description]
- Packet Capture: [filename and description]
- Log File: [filename and description]

Steps to Reproduce:
1. [Detailed steps]
2. [Including commands used]
3. [That allow client to verify]

Remediation Recommendations:
Short-term:
- [Immediate actions to mitigate risk]

Long-term:
- [Strategic improvements]

References:
[CVE numbers, vendor advisories, industry standards]
- Engagement overview
- Scope and methodology
- Key findings summary
- Overall risk posture assessment
- Strategic recommendations
- Organized by severity
- Each finding with full documentation as per template above
- Clear remediation guidance
- Tools used (with versions)
- Testing procedures followed
- Timeline of activities
- Detailed scan results
- Network diagrams
- Tool output samples (sanitized)
- Glossary of terms
- PwnDoc supports reusable findings, audit review, CVSS v3/v4, collaborative authoring and configurable DOCX report templates. It is a report-authoring option, not an automated substitute for evidence validation, severity review, client-specific remediation or secure storage of engagement data.
- Public Penetration Testing Reports provides publicly released examples for studying structure, scope statements, evidence presentation and executive summaries. Treat third-party report formats as examples, not reusable client data or permission to copy protected content.
Before delivery, review redactions, attachments, timestamps, scope and finding ownership; retain the final signed-off version and evidence manifest under the engagement retention policy.
Purpose: Automated WPA handshake capture using AI
Use Cases: Passive wireless reconnaissance, long-term monitoring
Key Commands: Configure via web UI, AUTO/MANU modes
Documentation: All captured handshakes saved to /root/handshakes/
Evidence: Session logs, captured .pcap files with handshakes
Purpose: Multi-functional wireless security testing platform
Use Cases: Combined wireless assessment tool
Key Features: Check device-specific capabilities and documentation
Purpose: Wireless auditing platform for authorized testing
Use Cases: Rogue AP testing, evil twin attacks, wireless MitM
Key Modules: PineAP, Recon, Logging
Access: Web interface at 172.16.42.1:1471
Evidence: Database exports, client connection logs, captured credentials
Purpose: Portable wireless attack/testing device
Use Cases: Deauth attacks, beacon flooding, probe sniffing
Key Commands: Access via serial or web interface
Evidence: Terminal logs of attacks, statistics
Purpose: HID attack platform and network implant
Use Cases: Physical penetration testing, USB attack simulation
Key Features: Rubber Ducky payloads, WiFi backdoor, Bluetooth attacks
Access: Web interface when deployed
Evidence: Payload execution logs, collected credentials, screenshots
- airmon-ng: Enable monitor mode
- airodump-ng: Capture wireless traffic
- aireplay-ng: Inject packets, deauth attacks
- aircrack-ng: WPA/WPA2 cracking
- Port scanning, service enumeration, OS detection
- NSE scripts for vulnerability detection
- Key flags:
-sS(SYN scan),-sV(version detection),-O(OS detection)
- Deep packet inspection and protocol analysis
- Filter syntax:
ip.addr,tcp.port,wlan.fc.type - Export options: PDFs of packet details, CSV summaries
- Exploitation framework
- Use only with explicit authorization
- Document all modules used
- Responder: LLMNR/NBT-NS poisoning
- enum4linux: SMB enumeration
- Nikto: Web server scanning
- Burp Suite: Web application testing
Maintain a tools manifest for each engagement:
| Tool Name | Version | Last Updated | Purpose |
|---|---|---|---|
| Kali Linux | Record installed release | Record verification date | Approved, isolated test platform |
| Nmap | Record installed version | Record verification date | Scope-limited network scanning |
| Wireshark | Record installed version | Record verification date | Authorized packet analysis |
| Additional approved tool (engagement-specific) | Record installed version | Record actual verification date | Describe authorized purpose |
Remember at all times:
- Only test systems explicitly authorized in writing
- Stop testing immediately if requested by client
- Protect all client data with encryption
- Never retain client data longer than necessary for reporting
- Report critical vulnerabilities immediately (out-of-band)
- Maintain professional insurance and certifications
- Follow industry standards (PTES, OWASP, OSSTMM)
- Document everything - if it's not documented, it didn't happen
If you cause a system outage or incident:
- Stop all testing immediately
- Contact client emergency contact
- Document exact circumstances of incident
- Preserve all evidence related to incident
- Assist in restoration efforts as requested
- Include incident in final report with full transparency
This playbook should be reviewed at least quarterly and updated to reflect:
- New tools and techniques
- Updated security standards
- Lessons learned from engagements
- Client feedback
- Industry best practices
Document Control:
- Version: 1.0
- Created: October 2025
- Next Review: February 2027
- Owner: Pacific Northwest Computers
For questions or suggestions, contact: [Your Contact Information]
- README.md - PlayBooks section index
- ../Mobile/mobile_pentest_sop.md - Mobile platform variant of this SOP (NetHunter as primary attack platform)
- ../Mobile/OnePlus_A6003/Nethunter_SOP.md - Per-module NetHunter field procedures
Section Index | Master Index | Legal Notice
📄 Source: PlayBooks/NetworkAuditPlayBook.md | ✏️ Suggest an edit | ⬅️ Back to Playbooks