Repository navigation
Whonix Kicksecure Encrypted Operating System Setup Guide
Portable privacy workstation: encrypted USB storage, isolated Whonix virtual machines, Tor connectivity, and optional live sessions
Part of the ULTIMATE CYBERSECURITY MASTER GUIDE · OPSEC Section


Installer source and related guidance reviewed: 2026-09-30 — hardware testing and complete external link-resolution verification remain pending.
Prerequisites: Basic Linux installation and disk-management skills; review the Linux command reference and OPSEC fundamentals. Acronyms are defined below; see also the repository glossary.
Build a privacy-focused operating system using Kicksecure installed directly on an encrypted external USB drive, with Whonix-Gateway and Whonix-Workstation running in VirtualBox.
Walk through trusted downloads, a two-drive installation, host maintenance, VM deployment, Tor connectivity, storage verification, optional live sessions, and ongoing maintenance. Distinguish the protection supplied by disk encryption, Tor routing, virtual-machine isolation, and temporary storage.
Produce a repeatable external-drive setup whose boot independence, storage placement, network routing, and chosen persistence mode have been checked — while keeping anonymity claims within what those checks can establish.
- Building a portable privacy workstation on a conventional Intel/AMD x86-64 PC.
- Keeping a research environment separate from an internal everyday operating system.
- Choosing between encrypted persistent work and disposable live sessions.
- Reviewing an existing Kicksecure/Whonix USB installation for configuration mistakes.
Important
Anonymity is a goal, not a guarantee. Encryption protects locked storage, Whonix routes Workstation traffic through Tor, and live mode limits retained changes. None makes compromised hardware trustworthy or prevents identification through accounts, documents, behavior, or traffic correlation.
Note
Research and validation scope: Based on official project documentation retrieved during preparation. Some full pages were unavailable and were checked through indexed official documentation instead. This procedure has not been executed on the reader's hardware. Obtain release numbers, signing-key fingerprints, and changing installer details from the linked official pages. Practical recommendations and acceptance checks are identified as such.
- 🧭 1. Architecture and Protection Boundaries
- 🧰 2. Equipment and Preparation
- 🔏 3. Download and Verify Kicksecure
- 💾 4. Create the Installer and Install to USB B
- 🔐 5. Verify Boot Independence and Encryption
- ⚙️ 6. Update Kicksecure and Install Whonix
- 🖥️ 7. Configure and Update the Two VMs
- ✅ 8. Validate the Setup
- 🔄 9. Choose Persistent or Live Use
- 🎭 10. Daily Operation and Identity Separation
- 🛠️ 11. Maintenance, Recovery, and Troubleshooting
- 📋 12. Final Acceptance Checklist
- 📚 Official Sources and Verification Scope
- Related Repository Material
- Prepare USB A as the verified Kicksecure installer.
- Install Kicksecure onto USB B, preferably an external SSD, with encryption enabled.
- Confirm USB B boots independently and stores its operating-system data on encrypted storage.
- Update the persistent Kicksecure host and run its official Whonix installer.
- Initialize and update Gateway and Workstation persistently; preserve their supplied network isolation.
- Check Tor connectivity, Gateway dependency, and VM storage placement.
- Use persistent mode to retain work, or validated host live mode for temporary sessions.
- Return to persistent maintenance regularly so updates and Tor state changes can be saved.
Terminology: OS = operating system; VM = virtual machine; SSD = solid-state drive; RAM = random-access memory; FDE = full-disk encryption; UEFI = Unified Extensible Firmware Interface; LUKS = Linux Unified Key Setup; NAT = network address translation. “Host” means Kicksecure on the physical PC; “guest” means a Whonix VM.
The official Whonix USB procedure supports installing Kicksecure on USB, booting it, and installing Whonix with the included Linux installer. This is a full operating-system installation to external storage, rather than simply copying a Whonix VM image to a bootable USB. [^1]
| Component | Purpose | What to do there |
|---|---|---|
| Physical computer | Runs firmware and Kicksecure | Use hardware you control and reasonably trust |
| External drive | Stores host, VM disks, and persistent data | Encrypt during installation |
| Kicksecure host | Runs networking and VirtualBox | Host maintenance and VM management |
| Whonix-Gateway | Connects to Tor and routes Workstation traffic | Tor configuration and maintenance |
| Whonix-Workstation | Runs applications behind the Gateway | Browsing and privacy-sensitive work |
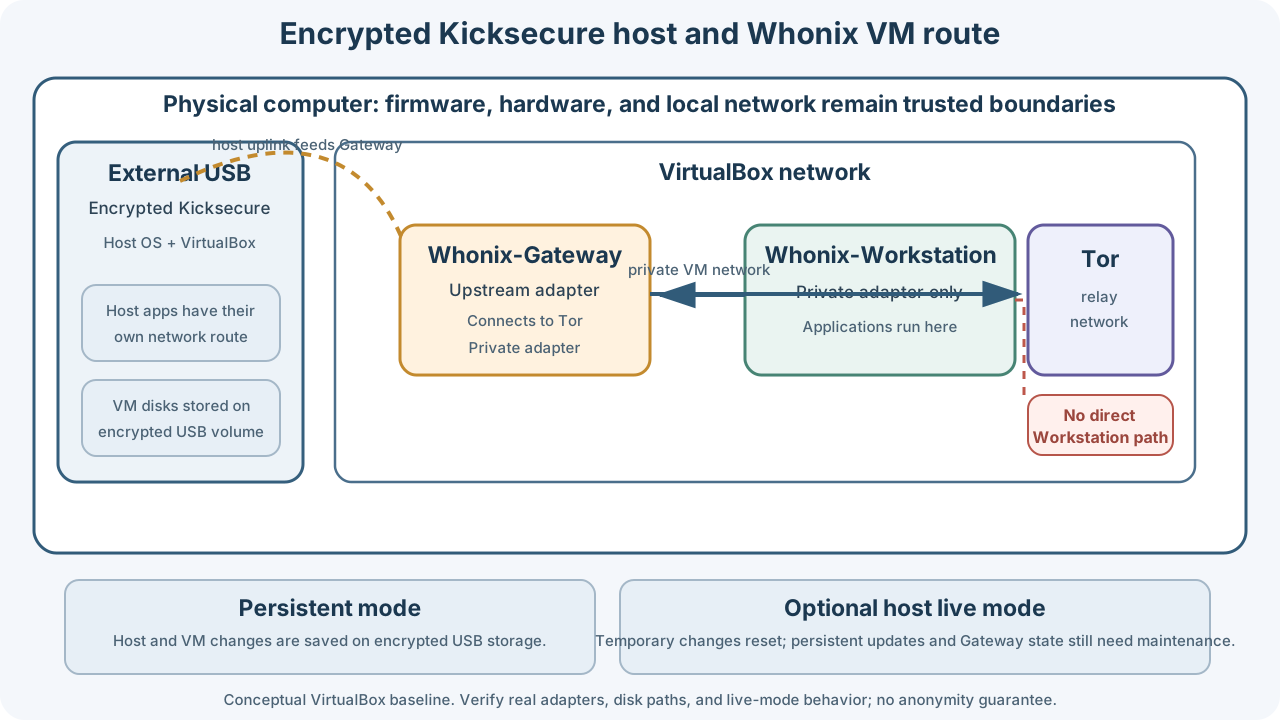
Conceptual VirtualBox baseline derived from the project documentation; it is not a tested installation. Confirm actual adapters and disk paths on the host.
Normal Workstation network traffic passes through the Gateway to Tor. The host has its own network access: installing Whonix does not automatically put every Kicksecure application behind the Gateway. Keep the host minimal and perform the intended private activity in Workstation. [^15][^16]
Tor does not erase the identity of an account you log into. A compromised host can observe or interfere with its VMs. A USB OS does not neutralize firmware malware or a physical keylogger. Local network operators may observe Tor use in the default configuration; bridges address connectivity/censorship needs without guaranteeing invisibility. [^12][^13]
These capacity choices are planning recommendations, not claimed project minimums or a particular product endorsement.
| Item | Suggested choice |
|---|---|
| Computer | Intel/AMD 64-bit PC with VT-x or AMD-V enabled |
| RAM | 16 GB preferred; 8 GB workable for a modest persistent setup |
| Installer USB, called USB A below | 16 GB or larger, provided the current ISO fits |
| Operating-system drive, called USB B | External SSD, 128 GB or larger; 256 GB gives more headroom |
| Connection | Reliable USB 3.x port and cable; avoid a loose hub |
| Spare storage | Separate encrypted backup destination if saving important data |
Whonix's official requirements list hardware virtualization and recommend an SSD and 8 GB RAM for performance. Live use benefits from additional memory because temporary writes consume RAM. Small conventional flash sticks can have very poor random-write performance under two VMs. [^4][^8]
This procedure does not cover ARM Chromebooks, Raspberry Pi, or Apple Silicon. Even an Intel Chromebook may need device-specific firmware work; do not assume a standard PC installation applies.
- Back up anything on USB A and USB B. Both will be overwritten at different stages.
- Record each drive's manufacturer, model, capacity, and serial number if available.
- Preferably disconnect internal storage while installing, if you can do so safely. This reduces wrong-disk and bootloader-placement mistakes.
- Disconnect other removable drives.
- Use a trusted existing computer to prepare the installer.
- Enable Intel VT-x/AMD-V in firmware if disabled. VT-d/IOMMU is a different setting.
- Keep the existing OS's recovery information available before firmware changes. Do not clear the TPM.
- Use the computer's one-time boot menu, ideally selecting a UEFI entry consistently.
Secure Boot behavior depends on the ISO, firmware, and VirtualBox module signing. Start with existing settings; if a signing error occurs, follow the official Secure Boot instructions. Do not treat disabling it as a universal first step. [^11]
- Open the official Kicksecure download page.
- Select the stable ISO for installation on compatible PC hardware. Do not select an OVA or QCOW2 VM image.
- Download the image and its corresponding signature or signed checksum files from the official download/verification flow.
- Obtain the current project signing key using the official signing-key page.
- Verify its full fingerprint against the project's published fingerprint, preferably through an independently obtained trusted copy as well.
- Follow the verification page matching your preparation OS.
Official instructions: Linux verification, Windows verification, and signing key. [^5][^6]
For a detached OpenPGP signature, the general verification form is below. Replace the placeholders with the actual downloaded paths; these are not literal filenames:
gpg --verify '/path/to/actual-image-signature.asc' '/path/to/actual-image.iso'Use the project's current method if its release uses a signed checksum manifest instead. A checksum alone detects corruption but is not proof of authenticity. A valid signature from an unverified key is also insufficient. Stop on a bad signature, unexpected fingerprint, or mismatched image. Do not bypass verification to make installation proceed. [^5][^6]
Using the image-writing application linked by the official ISO instructions, select the verified ISO, select USB A, and write/validate it. Copying the ISO into a normal folder does not create this installer. [^2]
- Boot USB A through the firmware's one-time boot menu.
- Connect USB B if not already connected.
- Start the Kicksecure installer; use its installation/maintenance session if prompted.
- Set the requested language and keyboard options.
- Select USB B as the installation target by model and capacity.
- Choose whole-disk installation on that target and enable Encrypt system.
- Set a strong, unique disk-unlock passphrase.
- Inspect the partition/action summary before pressing Install.
- Finish, shut down, remove USB A, and boot USB B. [^2]
Caution
Verify the target before erasing. USB A and USB B must be separate physical devices. The installer cannot install onto its own boot drive. Selecting the wrong target can erase your internal operating system. [^2]
My recommended review before committing: photograph the target selection for your own records, ensure all proposed partitions are on USB B, and ensure any EFI system partition/bootloader destination is on USB B. Do not publish photos containing serial numbers or private data. If the installer cannot make the boot destination clear, stop before writing and resolve that ambiguity.
Do not interpret “full disk encryption” as proof that every boot-related partition is encrypted. Firmware-readable boot components may remain outside encryption. This guide requires the OS data, home directories, VM images, and any disk-backed swap to be protected, while recognizing that disk encryption alone does not authenticate the entire boot chain.
Before installing VMs, establish that the external system is actually independent of the internal drive.
- Boot USB B without USB A.
- Confirm the expected disk-unlock prompt appears.
- If internal storage was disconnected, complete a successful boot before reconnecting it.
- With the machine powered off, reconnect internal storage if desired and recheck boot selection.
- On another trusted compatible PC, test USB B before relying on portability. Boot menus, Wi-Fi, graphics, and Secure Boot/module trust can differ.
These read-only Linux checks help inspect the result:
lsblk -o NAME,SIZE,MODEL,SERIAL,TRAN,FSTYPE,MOUNTPOINTS
findmnt /
findmnt /home
findmnt /boot/efi
swapon --show
In persistent mode, look for an encrypted container (crypto_LUKS) on the external drive with a decrypted mapping containing the OS filesystem. Trace the parent device; a /dev/mapper/... name alone does not establish which disk backs it. /home may share the root filesystem rather than being a separate mount. An absent /boot/efi mount is not by itself an error on every boot configuration.
Check swap placement too: a file inside the encrypted root has different protection from an unrelated plaintext swap partition. Avoid adding swap on internal storage. These checks are practical validation steps, not a forensic audit.
Current graphical releases use a distinction between ordinary activity and maintenance. If available, select PERSISTENT Mode | SYSMAINT Session for updates and installation. Use the ordinary USER Session for daily activity. Do not weaken privilege separation just because sudo is unavailable in a user session. GUI and CLI variants can differ. [^7]
On the Kicksecure host, connect Ethernet or Wi-Fi and use the System Maintenance Panel's update functions. Complete updates and reboot if requested. You must later update both VMs separately; a host update does not update their operating systems.
Open the host terminal and run the currently documented included command:
whonix-lxqt-installer-cliFor VirtualBox, the official installer handles downloads, integrity/authenticity checks, and VM import, and attempts to start the VMs. Kicksecure includes the installer, so its documented route does not require downloading an arbitrary script and piping it to a shell. Follow prompts about maintenance privileges, intended VM user, and reboots. The KVM option has a different implementation and does not provide this complete import workflow. [^1][^3][^20]
Keep downloads, VM disks, snapshots, and configuration under the encrypted external installation. If asked which user should own/run the VMs, choose the intended ordinary user, not an account you plan to use only for maintenance. After any requested reboot, open VirtualBox in that ordinary user's session and confirm both machines are registered.
If the command is missing, update Kicksecure and recheck the linked installer page. If automated setup fails, use its official manual VirtualBox fallback and verified Whonix images. Do not disable signature checks, use random third-party appliances, or blindly rename an old xfce command to match a new release. [^3]
Whonix is a Gateway/Workstation pair. The current build documentation names the LXQt flavors whonix-gateway-lxqt and whonix-workstation-lxqt; CLI flavors are whonix-gateway-cli and whonix-workstation-cli. These are build flavors, not values accepted by the installer's --guest option. Imported VM display names come from the appliance; libvirt domain names come from its XML. Do not infer either from a lowercase build flavor. [^21]
The shared dist-installer-cli selects the product and interface separately. On a host where it is installed, the explicit VirtualBox selection is:
dist-installer-cli --guest=whonix --interface=lxqt --hypervisor=virtualboxThis selects the Whonix LXQt appliance containing both VMs by default. Do not replace --guest=whonix with --guest=whonix-gateway-lxqt. --import-only=gateway or --import-only=workstation is an intentional partial VirtualBox import, not the normal complete setup. [^20]
Kicksecure is a separate product: --guest=kicksecure --interface=lxqt --hypervisor=virtualbox selects a Kicksecure guest VM. It does not install Kicksecure onto USB B, encrypt the host, or supply the Whonix pair. The official Kicksecure VirtualBox wrapper is kicksecure-lxqt-installer-cli. Keep the physical-host ISO installation in Sections 3–5 distinct from these guest installers. [^22]
Verification baseline: This comparison uses Kicksecure/usability-misc commit 9b076dc91983728385f0b194e3fc825d269142ec, inspected on 2026-09-30. Packaged and downloaded standalone installers can differ from upstream; record the version actually used. [^20]
| Selection | Stable version source | Image selection | Import behavior in inspected source |
|---|---|---|---|
--hypervisor=virtualbox |
Template:VersionNew |
/ova/, ending in Intel_AMD64.ova
|
Imports the appliance through VBoxManage |
--hypervisor=kvm |
Template:Version_KVM |
/libvirt/, ending in Intel_AMD64.qcow2.libvirt.xz
|
KVM import remains a placeholder |
The inspected KVM branch has download and verification code, but import_kvm() reports that import is unavailable and exits with status 0. A successful exit therefore does not establish that libvirt networks or VMs were created. Selecting KVM also does not mean a VirtualBox OVA can be imported into libvirt unchanged. [^20]
For KVM, use the project-hosted Whonix KVM installation procedure, including its platform-specific signature verification, archive extraction, VM XML definitions, networking, and disk placement. The KVM pages are contributor maintained with community support. Use the XML supplied for that release: the current import section uses qemu:///session and the image-placement section uses ~/.local/share/images. Older examples elsewhere on the page still use qemu:///system and /var/lib/libvirt/images; these are different scopes and paths. Match the actual XML and connection rather than combining examples. Confirm both domains and their Gateway-only routing before booting; define separate libvirt networks only if the release's configuration requires them. [^23][^24]
This guide's remaining VirtualBox menus, adapter checks, snapshot paths, and startup instructions describe the VirtualBox baseline. For KVM, apply the same encryption and Gateway-only routing requirements using the official libvirt instructions. Store the actual QCOW2 files and any other persistent VM state on USB B's encrypted filesystem and confirm XML paths do not depend on an internal disk. A separate Kicksecure KVM guest follows Kicksecure's KVM documentation, rather than the Whonix pair procedure. [^23][^24]
Reported symptom: A KVM selection failed with Invalid guest version: contains unexpected characters. while the VirtualBox selection worked. This report establishes the observed symptom; the original response body and installed script version were not supplied, so its exact cause has not been reproduced.
In the inspected source, automatic detection fetches the selected raw wiki template, takes its first line, removes text from the first < onward, and rejects an empty result or characters other than digits and periods. A separate check rejects values longer than 12 characters. The error is a version-response validation failure before image download/import, not evidence that VT-x/AMD-V or libvirt is broken. The different template sources explain how VirtualBox detection can work while KVM detection fails. HTML/error responses, template markup, whitespace, or an empty first line are possible causes; none is confirmed for the reported run. [^20]
-
Record the complete invocation, installer version printed at startup, and exact error. Check the installed command's
--helpand update through the supported host maintenance route. -
Inspect the Version Detection: API host URL from the informational log. For default clearnet Whonix KVM selection, a read-only diagnostic request is:
curl --tlsv1.3 --proto '=https' --max-time 30 --dump-header whonix-kvm-version.headers --output whonix-kvm-version.body --url 'https://www.whonix.org/w/index.php?title=Template:Version_KVM&stable=0&action=raw'
Inspect the status/headers and first body line locally. If using a proxy/onion route, diagnose the route and URL actually logged; this clearnet example does not reproduce it. Never execute the returned body. Redact private paths, proxy details, and other sensitive log content before sharing.
-
Confirm the available release on the official KVM page. Do not copy a VirtualBox release number into the KVM path merely because its lookup succeeds.
-
Prefer the official manual KVM installation flow when automated detection fails. The source supports
--guest-version, which skips automatic lookup, but use an explicit value only after confirming that exact platform-specific release and its signed artifacts. It cannot implement the missing KVM import. Do not strip arbitrary characters until a response happens to pass, patch out validation, or bypass image signature/hash checks. [^20][^23]
Keep the headers/body and version details with any upstream bug report. A later successful template fetch would not prove what the earlier failing run received.
Use the official imported appliances and retain their network configuration. Workstation's path must remain the private VM network connected to Gateway. Do not add a NAT/bridged adapter to Workstation, attach a USB network device to it, or put it directly on the LAN to fix a connection problem. The two VMs' internal network names must match. [^14][^15]
Review these isolation choices while the VMs are powered off:
- Keep shared clipboard and drag-and-drop disabled unless deliberately needed.
- Leave shared folders unconfigured for the initial build.
- Avoid USB passthrough, webcam, and other unnecessary device access.
- Start with supplied CPU/RAM settings; adjust RAM only after checking host headroom.
- Do not expose VirtualBox remote-display services.
Reducing host/guest integration limits unnecessary paths between compartments. It does not remove the need to trust the hypervisor and host. [^17]
- Keep the host and both VMs persistent for first setup.
- Start Gateway first and complete its setup prompts.
- In Gateway, use Anon Connection Wizard if connection configuration is needed.
- Use direct Tor connectivity where appropriate, or configure supported bridges when the network requires them.
- Wait for successful Tor bootstrapping before starting private activity.
- Start Workstation and finish its setup.
The first persistent Gateway boot allows Tor to save its entry-guard state. A persistent guest inside a live host still cannot permanently save changes to a VM image residing in the host's temporary overlay. [^8][^9]
Bridge configuration belongs in Gateway, through the documented wizard. Obtain bridges through the official process linked from Whonix; never rely on a random person's proxy instructions. Bridges are not an automatic anonymity upgrade for an unrestricted connection. [^10]
Use each system's maintenance/update interface:
| System | Update separately |
|---|---|
| Kicksecure host | Host OS, VirtualBox, supporting packages |
| Whonix-Gateway | Gateway OS and Tor-related packages |
| Whonix-Workstation | Workstation OS and applications; check Tor Browser updates too |
Where present, use each VM's persistent SYSMAINT boot entry and Maintenance Panel, then return to ordinary USER mode. Keep Gateway available when Workstation needs its network. Reboot as requested, and repeat connectivity checks afterward. [^7][^18]
For the LXQt VMs with user-sysmaint-split, update one guest at a time:
- Boot Whonix-Gateway into PERSISTENT Mode | SYSMAINT Session.
- Install Gateway updates using its System Maintenance Panel.
- Reboot Gateway into PERSISTENT Mode | USER Session.
- Leave Gateway running and wait for Tor connectivity.
- Boot Whonix-Workstation into PERSISTENT Mode | SYSMAINT Session.
- Install Workstation updates using its System Maintenance Panel. Its update traffic still passes through the running Gateway; do not shut Gateway down.
- Reboot Workstation into PERSISTENT Mode | USER Session.
- Repeat connectivity checks. Normal use: both Gateway and Workstation run in USER sessions, with Gateway started first. [^7][^15][^18]
Note
USER mode deliberately restricts administration. Update attempts that report denied root access or permission denied for sudo/pkexec are expected in USER sessions. Reboot the affected VM into its own persistent SYSMAINT session for maintenance, then return to USER. Host sysmaint privileges do not carry into guest VMs: each guest has its own accounts and session permissions, regardless of the host session used to launch VirtualBox. [^7]
These are acceptance checks I recommend before relying on the installation. Passing them confirms specific behavior; it does not prove complete anonymity.
Run the graphical system check, or the following in a terminal, in Gateway and Workstation separately:
systemcheckRead and resolve network, time, update, and configuration warnings. Check Gateway first when Workstation cannot connect. Do not use ordinary ICMP ping as your sole Tor connectivity test. [^18]
Inside Workstation's Tor Browser, open Tor Check. Confirm it reports Tor use. This tests that browser connection, not every application or the host. Do not perform the test in the host browser and assume it describes Workstation.
After cleanly stopping any transfers, shut down Gateway while leaving Workstation running. Try a fresh, uncached web request in Workstation; it should fail. Restart Gateway and confirm connectivity returns. If new network requests succeed without Gateway, stop and inspect VM adapters and passthrough devices before using the setup.
In VirtualBox, inspect each VM's disk and snapshot paths. Confirm they reside on the encrypted USB B filesystem. Check that shared folders do not point at an internal disk. Shut everything down and reboot USB B once more to confirm the VMs remain present.
Create a harmless test file in Workstation while the host and Workstation are persistent. Shut down and reboot; it should remain. This establishes your baseline before testing live mode below.
| Host | Workstation | Intended behavior and limitation |
|---|---|---|
| Persistent | Persistent | Saves files, changes, and updates on encrypted storage |
| Persistent | Live | Discards Workstation live-overlay changes; host logs/swap may still retain evidence |
| Live | Persistent or live | Host-overlay changes, including VM-disk changes within it, are temporary; separately mounted writable media remain exceptions |
For a first build, I recommend completing and validating the encrypted persistent installation first. Enable live use only after understanding its update, memory, and storage consequences. Whonix distinguishes host live mode from guest live mode; guest-only live mode does not make the host amnesic. [^9][^12]
After updating and cleanly shutting down the prepared installation:
- Boot USB B and select Kicksecure's LIVE Mode / USER entry; wording may differ.
- Start the already-installed Whonix pair from the ordinary user session.
- Work without mounting persistent internal disks, extra writable volumes, or shared host paths outside the overlay.
- Fully shut down Workstation, Gateway, then the host when finished.
Kicksecure provides live boot through grub-live. Changes to the covered filesystem are held in volatile storage; deliberately accessed writable storage is a separate case. Monitor available memory and avoid large downloads or VM snapshots during disposable sessions. [^8]
In host live mode, create a harmless marker in your host home directory and another in Workstation's home. Fully shut down and boot live again. Both newly created markers should be absent, while baseline files created in persistent mode remain. If either marker survives, inspect where it was stored and which layer was actually live.
Also inspect swapon --show and mounted filesystems. Disk-backed swap or writable mounts require investigation before claiming a nonpersistent session. The absence of two marker files is a useful functionality check, not proof of zero forensic traces or resistance to hostile software.
Warning
Updates installed only during host live mode disappear with the overlay.
Periodically boot the host and both VMs persistently, apply updates, allow Gateway to retain legitimate Tor state changes, and shut down cleanly before returning to live use. Do not routinely delete Tor state or restore a never-initialized Gateway snapshot. Entry-guard persistence is a security feature. [^8][^9]
Live mode also does not erase data previously saved in persistent mode, sanitize backups, or remove records retained by websites or network operators.
- Boot USB B on trusted hardware and unlock it.
- Deliberately select persistent or live mode.
- Connect the host to the network.
- Start Gateway, then Workstation.
- Review relevant checks and use Tor Browser inside Workstation.
Keep anonymous activity separate from personal and business activity. Signing into your usual email, business accounts, browser sync, or existing social profiles identifies that session to those services even if Tor still hides your home IP. Do not reuse identifying usernames, recovery addresses, phone numbers, or document metadata across identities.
Use Tor Browser's supported security settings instead of installing extra extensions or applying arbitrary fingerprinting tweaks. Do not assume a new circuit or browser “New Identity” can undo information already submitted. [^12][^13]
Keep downloaded documents inside Workstation when viewing them. If a document does not need network access, disconnect the VM's virtual network cable before opening it. Reconnection can still allow malicious software to communicate later; offline viewing is not a malware cure. Export only intentionally, review metadata, and treat transferred files as potentially identifying. [^17]
Do not add a VPN as an assumed requirement. A VPN changes who you trust and how traffic is routed; it is not a universal anonymity improvement. Resolve a specific need before changing the documented Tor design. [^19]
Close applications and shut down Workstation, then Gateway, then Kicksecure. Avoid VirtualBox “Save machine state” when you intend to end a sensitive session: saved state can retain memory on disk. Avoid suspend/hibernate for this workflow. Wait for power-off and drive activity to stop before unplugging USB B. Store it securely.
My practical recommendation is to check for updates before use after a long break, and to schedule regular persistent maintenance if most sessions are live. Follow release-upgrade instructions when a major version changes; do not substitute a generic Debian distribution upgrade.
Maintain an offline record of the installation date, chosen releases, verification result, last successful update, and last successful boot/live-mode test. Never record the disk passphrase in plaintext on the same drive.
- Back up only data you intend to retain, to encrypted storage.
- Power off VMs before copying their disk/configuration files; active copies may be inconsistent.
- Whole-drive backup images contain your stored identities and history, so protect them as sensitive data.
- A VM snapshot on USB B is not protection against losing USB B.
- Restoring old images also restores old software and Tor state; update and validate before resuming activity.
- If compromise is suspected, reinstall from newly verified media and restore necessary documents cautiously. Do not restore an entire suspect system as your clean baseline.
| Symptom | Next step |
|---|---|
| USB B fails to boot | Confirm firmware boot choice, UEFI consistency, and that boot files were installed on USB B |
| Works only when internal disk is present | Suspect internal-disk bootloader dependence; resolve before calling the drive portable |
| Disk passphrase fails | Check keyboard layout and Caps Lock; do not reformat to “fix” it |
| Host Wi-Fi missing | Try supported Ethernet; investigate hardware/firmware support on the host |
| VT-x/AMD-V error | Enable CPU virtualization in firmware and fully restart |
| VirtualBox kernel/module error | Check updates, kernel/module compatibility, reboot requirement, and Secure Boot trust using official instructions |
| Installer missing or failing | Update host, consult current Linux installer page, then use its verified manual fallback |
Invalid guest version: contains unexpected characters. |
Inspect the selected platform's version response; see version diagnostics. Do not treat this as a virtualization hardware failure |
| KVM installer exits successfully but no domains appear | The inspected KVM import is a placeholder; follow official libvirt installation |
| VMs absent in ordinary user session | Check which account imported them and where their files are; do not use unrestricted permissions as a shortcut |
| Gateway cannot bootstrap Tor | Check host connectivity and clock; inspect systemcheck and use supported bridges if needed |
| Gateway works, Workstation does not | Check matching private network and imported settings; do not give Workstation direct NAT |
sudo or updates denied |
Check whether you booted USER instead of SYSMAINT mode |
| Updates disappear | Check whether the host or guest was live during maintenance |
| Live session freezes during downloads | Check RAM usage/overlay growth; use smaller sessions or more memory |
| Files unexpectedly survive live reboot | Check actual boot mode, mounts, shared folders, and file location |
| Severe slowness | Check drive/cable, RAM pressure, USB speed, and free space |
The table is a diagnostic starting point, not a promise of a particular root cause. Preserve the exact error and consult Whonix troubleshooting or the matching Kicksecure page rather than making unrelated networking or security changes. [^11][^18]
- Compatible hardware and CPU virtualization confirmed.
- Kicksecure image signature checked against the expected signing key.
- USB A and USB B were correctly distinguished.
- USB B boots independently and prompts for disk unlock.
- OS data and VM disks reside on encrypted external storage.
- Boot files and VM paths do not depend on internal storage.
- Kicksecure host, Gateway, Workstation, and Tor Browser updated.
- Gateway initialized persistently before live use.
- Workstation retains only its intended private network path.
- Unnecessary host/guest sharing and devices disabled.
- Gateway and Workstation checks reviewed.
- Tor Browser reports Tor connectivity.
- Fresh Workstation network requests fail when Gateway is stopped.
- If using live mode, marker-file and writable-storage checks completed.
- Persistent maintenance and encrypted backup plan understood.
- Personal/business identities kept separate from intended anonymous activity.
The linked project pages are the authority for changing release details. Capacity choices, installation safeguards, acceptance tests, and operating checklists above are practical recommendations built around that documented architecture.
[^1]: Whonix USB installation
[^2]: Kicksecure ISO and installation and USB installation
[^3]: Whonix Linux installer for VirtualBox
[^4]: Whonix system requirements
[^5]: Kicksecure Linux image verification and Windows verification
[^6]: Kicksecure signing key and download security
[^7]: Whonix system maintenance user and Kicksecure root commands
[^8]: Kicksecure live mode and Whonix live mode
[^9]: Whonix persistence versus live mode and Tor entry guards
[^10]: Anon Connection Wizard, bridges, and Tor configuration
[^11]: Kicksecure Secure Boot
[^12]: Whonix and Tor limitations
[^13]: Network, browser, and website fingerprints
[^14]: Whonix multiple Gateways: internal-network configuration
[^15]: Whonix technical introduction
[^16]: Whonix stream isolation
[^17]: Whonix system hardening checklist and file transfer
[^18]: Whonix troubleshooting and common commands
[^19]: Whonix versus VPNs
[^20]: Installer source pinned to the inspected commit: get_version(), get_download_links(), import_virtualbox(), import_kvm(), option validation, and main(); current upstream source. Upstream source inspection does not establish the version installed on a particular host.
[^21]: Whonix VM build documentation: flavor selection.
[^22]: Kicksecure Linux installer for VirtualBox.
[^23]: Whonix KVM installation and verification. Follow the current release's XML, disk paths, and libvirt connection instructions.
[^24]: Kicksecure KVM installation.
| Resource | Relationship |
|---|---|
| OPSEC section | Operational security concepts and section navigation. |
| Cybersecurity OPSEC Guide | Broader compartmentalization and research-workstation context. |
| Linux command reference | Command-line fundamentals. |
| Master guide | Broader cybersecurity reference. |
| Repository glossary | Additional technical terminology. |
Note
Whonix-specific configuration takes precedence for this build. General VM advice elsewhere in the repository must not be applied blindly: Workstation must retain its Gateway-only network path, a VPN is not mandatory, and arbitrary browser extensions or fingerprint changes are not part of this procedure.
⬅️ Back to Master Index | 🔒 OPSEC Index | 🎯 Role Navigation | Legal Notice
📄 Source: OPSEC/whonix-kicksecure-usb-guide.md | ✏️ Suggest an edit | ⬅️ Back to Operations Security (OPSEC)