pts away talk setup

The Away Talks Setup page allows you specify how the report will be created. To be able to access this setup page, you must select Away Talks from the list of report types on the Report Type tab. All the settings are saved when you dismiss the window by pressing the OK button.
To learn more about the features of this property page, glance down the table below or highlight the control you are interested in by clicking on the screenshot above.
Start Date
Press on the arrow to choose the start date for the report. You can also click on the separate parts of the date in the edit box and use the arrow keys to adjust the date. This option is disabled if the Display All Entries option is checked.
End Date
Press on the arrow to choose the end date for the report. You can also click on the separate parts of the date in the edit box and use the arrow keys to adjust the date. This option is disabled if the Display All Entries option is checked.
Display All Entries
Check this option if you want to create a report with all entries included. When checked, the date options (described above) get disabled.
Show horizontal grid lines
Check this option if you want to have horizontal grid lines on the report. This option is disabled if your are generating away talk slips.
Show vertical grid lines
Check this option if you want to have vertical grid lines on the report. This option is disabled if your are generating away talk slips.
Generate away talk slips
Check this option if you want to generate away talk slips instead of a list. You should set your page setup to landscape orientation. Each page can display up to 4 away talk slips. Cut-lines are provided for your assistance. Here is a sample away talk slip:
 Clicking the Memo button displays this window. Use this window to select which additional information you would like include on the away talk slip and in which order you would like them presented. Ideally, you should select no more than 5 items due to the limited space available on the slips. The features behave like ones on the Summary Information options window so you might want to review that help topic if you require more information. Clicking the Memo button displays this window. Use this window to select which additional information you would like include on the away talk slip and in which order you would like them presented. Ideally, you should select no more than 5 items due to the limited space available on the slips. The features behave like ones on the Summary Information options window so you might want to review that help topic if you require more information. |
|---|
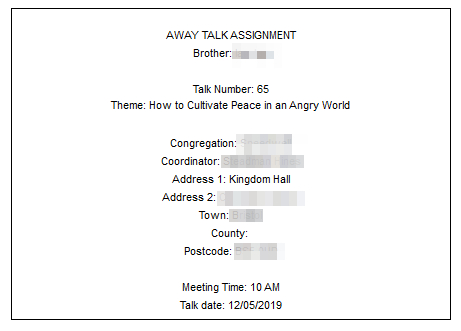 Here is a sample away talk slip. I have blurred out the personal information for privacy reasons but it gives you an idea of what these away talk slips look like. The text labels used on these slips can be customized as detailed below. Please choose a sensible font size, say 10 point, because you have a limited area to work in. These away talk slips can be exported to Microsoft Word where further customization can be made. Here is a sample away talk slip. I have blurred out the personal information for privacy reasons but it gives you an idea of what these away talk slips look like. The text labels used on these slips can be customized as detailed below. Please choose a sensible font size, say 10 point, because you have a limited area to work in. These away talk slips can be exported to Microsoft Word where further customization can be made. |
Show talk numbers in parentheses
Check this option if you want to display talk numbers in parentheses after the talk theme, instead of separately in their own column on the report. This setting is disabled when Generate away talk slips is set.
Highlight tentative
Set this option if you want to highlight any tentative away talk assignments in a different colour. This option is not available when you are generating away talk slips.
Text Colour
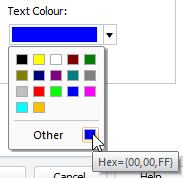 Use the drop-down list to select which colour you would like tentative away talk assignments to be highlighted in. This setting is disabled if the Highlight tentative option is not set or the Generate away talk slips option is on. Use the drop-down list to select which colour you would like tentative away talk assignments to be highlighted in. This setting is disabled if the Highlight tentative option is not set or the Generate away talk slips option is on. |
|---|
Personal Settings Away Talk Slips can be personalised to meet your needs. All of the labels can be changed. Use this drop-down list to select the label you want to modify. Once selected, the current value gets shown in the edit box:  You can then edit the text. The settings get saved when you click OK to create the away slips or choose the Report Type property page. You can then edit the text. The settings get saved when you click OK to create the away slips or choose the Report Type property page. |
|---|