pts tutorial2 module3
(Starts from the new "TextChunk" script)
| The following commands are used in this module: EOL PARAGRAPH TEXT |
|---|
As you may have realised after learning about the need for EOL, you can bundle more than one TEXT command into the script before the EOL and they will all be rendered on the same physical line. Let's try it, eh?
- Click Insert Text and set "Hello" (no quotes and no comma for now) as the item, then click Insert.
- Do the same again, using "World!" as the text.
- Finally insert an end of line (EOL) as before, and you should see your efforts rendered.
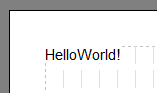 Now are you happy? As long as you haven't accidentally clicked in the box to the right and changed where the solid bar was, you should now see your masterpiece rendered on the left. If you have followed the instructions carefully, you should be a touch mystified... your text came out as HelloWorld!, no spaces, right? Correct. The reason is, the parser does not try and guess where you want spaces; if you want spaces, you must put them in explicitly yourself. Now are you happy? As long as you haven't accidentally clicked in the box to the right and changed where the solid bar was, you should now see your masterpiece rendered on the left. If you have followed the instructions carefully, you should be a touch mystified... your text came out as HelloWorld!, no spaces, right? Correct. The reason is, the parser does not try and guess where you want spaces; if you want spaces, you must put them in explicitly yourself. |
|---|
- For practice, exit the script editor by clicking Cancel Changes and do not save the script (you want to abandon changes).
- Then start a new script called "TextChunk" (no quotes) again, since the last one was not saved.
- This time, when you type in the first piece of text, type "Hello " (no quotes, but note the space at the end).
- Then do "World!" as before, no spaces.
We have now put a space after Hello, so it should not come out crunched up.
- Go ahead and insert the EOL, and check it's working.
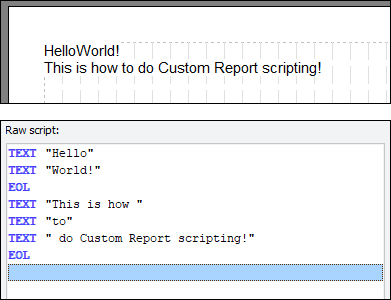 Fine so far? Have a go at inserting a bunch of new bits of text, followed by an EOL for each physical line you want, and familiarise yourself with how this works. When you're done, you can either save or discard your script; the choice is yours. Either way exit the editor and start a new script called "Paragraph" (no quotes), so that we start with a blank script. Fine so far? Have a go at inserting a bunch of new bits of text, followed by an EOL for each physical line you want, and familiarise yourself with how this works. When you're done, you can either save or discard your script; the choice is yours. Either way exit the editor and start a new script called "Paragraph" (no quotes), so that we start with a blank script. |
|---|
(Starts from the new "Paragraph" script)
You might be wondering what happens if the text chunks, when put together, spill over the edge of the paper. Let's try it.
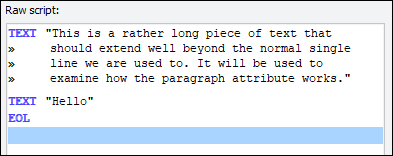 In this new blank script, enter the following in a TEXT command (cut and paste from here into the raw script pane if you know how, it's easier): "This is a rather long piece of text that should extend well beyond the normal single line we are used to. It will be used to examine how the paragraph attribute works." (no quotes). Now enter another TEXT command, say "Hello". Finally, enter an EOL. In this new blank script, enter the following in a TEXT command (cut and paste from here into the raw script pane if you know how, it's easier): "This is a rather long piece of text that should extend well beyond the normal single line we are used to. It will be used to examine how the paragraph attribute works." (no quotes). Now enter another TEXT command, say "Hello". Finally, enter an EOL. |
|---|
You should see just one physical line, and it just goes off the edge of the page preview. The Hello is bundled right up alongside it - but you expected that, since we did not issue an EOL between the two TEXT commands.

Since it shows the text going off the edge of the page on-screen, that is what it will do in the proper report and on the printer. Not very useful, is it? You could, of course, break it down manually into chunks and issue EOLs after each one to split it over lines, but that is largely down to trial and error where to split the lines, and it's quite tedious.
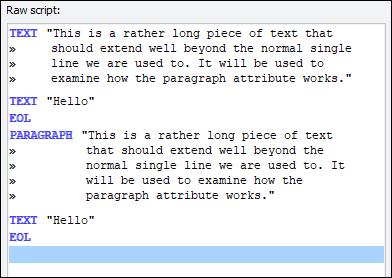 Now try the following: Repeat exactly the same pair of TEXT commands and EOL, but this time on the first TEXT command only, use the paragraph option before clicking Insert. Leave it set as Single line for the second TEXT command. Now try the following: Repeat exactly the same pair of TEXT commands and EOL, but this time on the first TEXT command only, use the paragraph option before clicking Insert. Leave it set as Single line for the second TEXT command. |
|---|
Now how does it look?

You should notice three things:
- First, the text automatically wrapped onto the next line at the correct place(don't be fooled by the grid lines - it breaks so that the last word doesn't extend beyond the paper margin, but that's not necessarily where the last grid line is).
- Second, the Hello now appears on a new line automatically.
- Third, the TEXT command is actually a PARAGRAPH command. The PARAGRAPH command is actually a special form of the TEXT command which automatically wraps long lines of text as necessary. Because it is a paragraph, it is implicit that it is a complete TEXT command and is thus automatically followed by an EOL.
| Now, please either: Click Cancel Changes Click Save Script followed by Close Script Then when you are ready start a new script called "Dates" (no quotes). When you are back with the editor open and waiting, read on. |
|---|
| Previous Module | Next Module |
|---|