pts tutorial2 module13
(Starts a new "Banners" script)
| The following commands are used in this module: BANNER BLANK EOL HIGHLIGHT | LINESPACING SEPARATOR TAB TEXT |
|---|
Ever used a highlighter pen to mark a word on a page? They are very handy for attracting the eye to that word.
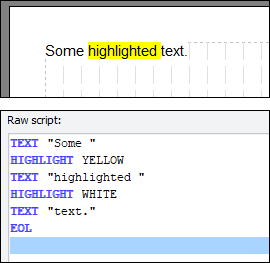 We can do that too. Start a new script called "Banners" (no quotes) and we'll show you how.
- Insert a TEXT command using "Some " (no quotes).
- Insert a font change, but instead of changing the entry in the Colour box, change it in the Highlight box - to Yellow.
- Leave everything else the same.
- Click Insert.
- Insert another TEXT command using "highlighted " (no quotes, but note the space in this one and the previous one).
- Insert another HIGHLIGHT command, putting it back to White, the colour of the page (the page is always assumed to be White).
- Insert a third TEXT command using "text." (no quotes).
- Insert the EOL.
Observe your masterpiece. Cool, huh?
Notice that the yellow highlight also highlighted the space after "highlighted"? This is correct - a HIGHLIGHT colours the background of all text in the following TEXT commands until further notice. Thus, if you don't want this odd effect, you would arrange for the space to go on the TEXT command following the HIGHLIGHT WHITE command instead.
- Repeat the exact same set of commands above to produce a second identical line.
Notice that there is no gap between the highlighted portions from one line to the next. This is single line spacing. If you want to increase the spacing between lines (just like on a typewriter), you can click Line Spacing. This inserts a LINESPACING command in the script. This is something else which is remembered until you explicitly switch it back. The line spacing change affects the very next EOL encountered. Thus, it must go before an EOL command (but technically, doesn't have to be before TEXT commands - but it's good practice to show intention by putting it in front of any TEXT commands you want on the next line to have that spacing).
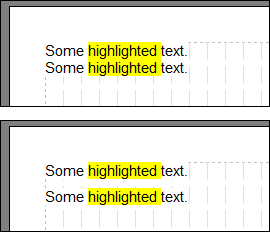 Let's do this. The reason will become apparent very shortly. Move to the very top of your script and insert a 1.5 LINESPACING command. Notice that now, there is a gap between highlights? HIGHLIGHT only colours the background of text and spaces; it doesn't fill in the gaps. So what if we wanted to have a nice title block, all shaded in a colour, no gaps? We could certainly put in tons of spaces to get the highlight to stretch across the page, but it wouldn't fill those line spacing gaps. I'll bet you a pound to a penny one of you has already gotten brave and tried BANNER at this point. If you have, well done. But don't charge too far ahead, you'll get yourself in a pickle {:v). Let's do this. The reason will become apparent very shortly. Move to the very top of your script and insert a 1.5 LINESPACING command. Notice that now, there is a gap between highlights? HIGHLIGHT only colours the background of text and spaces; it doesn't fill in the gaps. So what if we wanted to have a nice title block, all shaded in a colour, no gaps? We could certainly put in tons of spaces to get the highlight to stretch across the page, but it wouldn't fill those line spacing gaps. I'll bet you a pound to a penny one of you has already gotten brave and tried BANNER at this point. If you have, well done. But don't charge too far ahead, you'll get yourself in a pickle {:v). |
|---|
Try it now:
- After the LINESPACING command but before your first TEXT command in your script, insert a BANNER command (font change), choosing Light Red.
- While you're at it (you can do this either in the same font change or as a separate one, no difference), change (line) alignment to Centre so our "Some highlighted text." appears in the middle. This should also be inserted before the first TEXT command.

Impressed? BANNER not only fills the entire line behind anything not covered by text or spaces, but it also fills the gaps between lines, giving a nice, solid background. Notice that it does not colour behind the text - that's HIGHLIGHT's domain, and there's no crossover.
- HIGHLIGHT for text and spaces.
- BANNER for gaps.
Let's complete the picture since it probably still looks a bit odd.
- Insert a Blank Line (value 1) before the first text but after the BANNER. We'll let you figure out how to do that - you should be getting an expert by now!
- Insert another (value 1) right at the end of your script (yes, after both EOLs - BLANK does not require an EOL, it's implicit that you want a whole blank line).
- Go back to the beginning of your text (after the first BLANK, for example) and insert a font change to change the normal text colour to White.
- At the same time, set the highlight to Light Red (same as the banner).
Now it probably looks a bit funny:
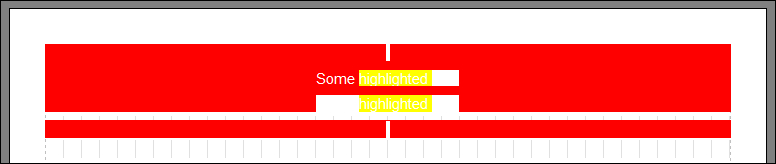
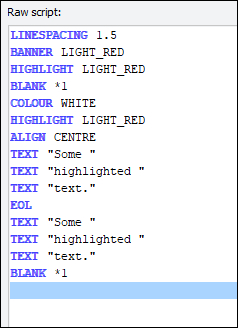 There are several final tweaks that we need to make for this to look nice. We are also going to do our first deletions from the script: Insert a HIGHLIGHT (Light Red) just after the first BANNER command. Highlight the first line that says HIGHLIGHT YELLOW (by left-clicking on it once) and then press <Delete>. The line should be removed from the script and the script shuffled up to absorb it. Delete the remaining HIGHLIGHT lines from there onwards (but leave the HIGHLIGHT LIGHT_RED you just inserted). Highlight the last EOL (by left-clicking on it once) and then press <Delete>. The line should be removed from the script and the script shuffled up to absorb it. If you have followed these steps correctly your script should look like the example on the right. There are several final tweaks that we need to make for this to look nice. We are also going to do our first deletions from the script: Insert a HIGHLIGHT (Light Red) just after the first BANNER command. Highlight the first line that says HIGHLIGHT YELLOW (by left-clicking on it once) and then press <Delete>. The line should be removed from the script and the script shuffled up to absorb it. Delete the remaining HIGHLIGHT lines from there onwards (but leave the HIGHLIGHT LIGHT_RED you just inserted). Highlight the last EOL (by left-clicking on it once) and then press <Delete>. The line should be removed from the script and the script shuffled up to absorb it. If you have followed these steps correctly your script should look like the example on the right. |
|---|
What you should now be left with is a nice red banner with white writing on it:
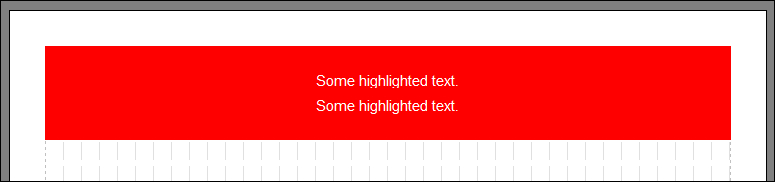
Blocks of colour are one way to make a section nice and clear, but there is another very common way: a separator. As a quick demonstration here...
- Move the insert point to the end of your script (next blank line in the box).
- Insert a font change to change text colour back to Black, banner and highlight colour back to White.
- Insert a Separator, value 100%, your choice of style.

Simple, huh? For reference, separators don't need an EOL either. They always sit on a line of their own, and always have the same gap above and below them - thus, they are also unaffected by line spacing.
| Now, please: Click Save Script click Close Script Then when you are ready continue with module 14. |
|---|
| Previous Module | Next Module |
|---|